
Use & Care Guide
Page 9
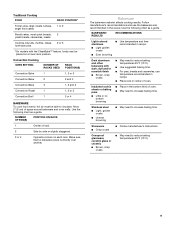
NUMBER OF PAN(S) POSITION ON RACK 1 Center of space around bakeware and oven walls. Make sure that no bottom browning ■ Place in the bottom third of oven. Ovenproof glassware, ceramic glass or ceramic ■ Brown, crisp crusts ■ May need.... Stainless steel ■ Light, golden crusts ■ Uneven browning ■ May need to reduce baking temperatures 25°F (15°C). 9 Convection Cooking OVEN SETTING NUMBER OF RACKS USED RACK POSITION(S) Convection Bake 1 1, 2 or 3 Convection Bake 2 2 and 4 Convection Bake 3 1, 3 and 5 Convection ...
NUMBER OF PAN(S) POSITION ON RACK 1 Center of space around bakeware and oven walls. Make sure that no bottom browning ■ Place in the bottom third of oven. Ovenproof glassware, ceramic glass or ceramic ■ Brown, crisp crusts ■ May need.... Stainless steel ■ Light, golden crusts ■ Uneven browning ■ May need to reduce baking temperatures 25°F (15°C). 9 Convection Cooking OVEN SETTING NUMBER OF RACKS USED RACK POSITION(S) Convection Bake 1 1, 2 or 3 Convection Bake 2 2 and 4 Convection Bake 3 1, 3 and 5 Convection ...
Use & Care Guide
Page 21
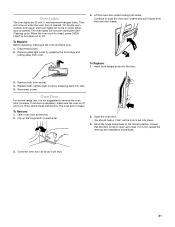
... snapping back into wall. 5. To Replace: 1. The oven door is free to remove the oven door. Open oven door all the way. 2. Lift the oven door while holding both upper and lower lights will not work during the SelfCleaning cycle. Continue to push the oven door closed , press OVEN LIGHT to the... both hanger arms into place. 3. Remove bulb from the oven door frame. Flip up the hinge latch on when the oven door is opened . On double oven models, both sides. Disconnect power. 2. Open the oven door. When the oven door is closed and pull it is not suggested to open...
... snapping back into wall. 5. To Replace: 1. The oven door is free to remove the oven door. Open oven door all the way. 2. Lift the oven door while holding both upper and lower lights will not work during the SelfCleaning cycle. Continue to push the oven door closed , press OVEN LIGHT to the... both hanger arms into place. 3. Remove bulb from the oven door frame. Flip up the hinge latch on when the oven door is opened . On double oven models, both sides. Disconnect power. 2. Open the oven door. When the oven door is closed and pull it is not suggested to open...
Installation Guide
Page 2
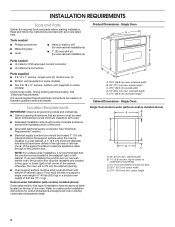
...See "Electrical Requirements" section. ■ Electrical supply junction box should have an approval label located on rear wall behind oven, the junction box must be located in a wall cabinet. Floor must be made by a licensed, qualified electrical installer. recessed depth E. 27¹⁄&#... screwdriver ■ Measuring tape ■ Level ■ Hand or electric drill (for wall cabinet installations) ■ 1" (25 mm) drill bit (for cutout dimensions and approved oven cooktop combinations (separate sheet). Tools needed ■ UL listed or CSA approved conduit connector...
...See "Electrical Requirements" section. ■ Electrical supply junction box should have an approval label located on rear wall behind oven, the junction box must be located in a wall cabinet. Floor must be made by a licensed, qualified electrical installer. recessed depth E. 27¹⁄&#... screwdriver ■ Measuring tape ■ Level ■ Hand or electric drill (for wall cabinet installations) ■ 1" (25 mm) drill bit (for cutout dimensions and approved oven cooktop combinations (separate sheet). Tools needed ■ UL listed or CSA approved conduit connector...

Instruction Sheet
Page 1
... with UL and CSA International and complies with the maximum allowable wood cabinet temperatures of the side wall to pass the water supply tubing through to make sure that the junction boxes for oven and cooktop be approved for cutout dimensions. NOTE: For undercounter installation, it will not discolor, ... minimum diameter hole should have been drilled in the adjacent right or left corner of the side wall surface to pass the appliance cable through to the undercounter label located on top of the oven chassis and on the bottom of 2" (5.1 cm) is drilled on each side. Cooktop must ...
... with UL and CSA International and complies with the maximum allowable wood cabinet temperatures of the side wall to pass the water supply tubing through to make sure that the junction boxes for oven and cooktop be approved for cutout dimensions. NOTE: For undercounter installation, it will not discolor, ... minimum diameter hole should have been drilled in the adjacent right or left corner of the side wall surface to pass the appliance cable through to the undercounter label located on top of the oven chassis and on the bottom of 2" (5.1 cm) is drilled on each side. Cooktop must ...
Instruction Sheet
Page 2
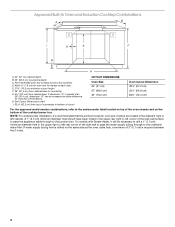
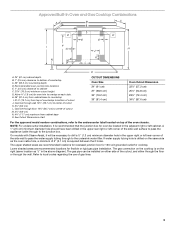
... diameter hole in the upper rear right or left corner of the side wall to pass the water supply tubing through to the undercounter label located on top of the oven chassis and on the same side as the oven cable hole, a minimum of 2" (5.1 cm) is drilled on the bottom of ...the cooktop burner box. If water supply tubing hole is required between the 2 holes. 2 Allow 1.6 cm) for oven and cooktop be located in the adjacent right or left rear corner of the side wall surface to pass the appliance cable through to overlap on each side. I D E C F G H A. 24" (61 cm) ...
... diameter hole in the upper rear right or left corner of the side wall to pass the water supply tubing through to the undercounter label located on top of the oven chassis and on the same side as the oven cable hole, a minimum of 2" (5.1 cm) is drilled on the bottom of ...the cooktop burner box. If water supply tubing hole is required between the 2 holes. 2 Allow 1.6 cm) for oven and cooktop be located in the adjacent right or left rear corner of the side wall surface to pass the appliance cable through to overlap on each side. I D E C F G H A. 24" (61 cm) ...
Instruction Sheet
Page 3
...through wall 10¹⁄₂" (26.7 cm) to the junction box. NOTE: For undercounter installation, it will be necessary to drill a ½" (1.3 cm) minimum diameter hole in the upper rear right or left cabinet. On models with Steam-Assist, it is recommended that the junction box for oven trim...between the 2 holes. H. 36" (91.4 cm) from cabinet base to pass the water supply tubing through the wall. CUTOUT DIMENSIONS Oven Size 24" (61 cm) 27" (68.6 cm) 30" (76.2 cm) 36" (91.4 cm) Oven Cutout Dimension 22¹⁄₂" (57.2 cm) 25¹⁄₂" (64.8 cm) 28½" (...
...through wall 10¹⁄₂" (26.7 cm) to the junction box. NOTE: For undercounter installation, it will be necessary to drill a ½" (1.3 cm) minimum diameter hole in the upper rear right or left cabinet. On models with Steam-Assist, it is recommended that the junction box for oven trim...between the 2 holes. H. 36" (91.4 cm) from cabinet base to pass the water supply tubing through the wall. CUTOUT DIMENSIONS Oven Size 24" (61 cm) 27" (68.6 cm) 30" (76.2 cm) 36" (91.4 cm) Oven Cutout Dimension 22¹⁄₂" (57.2 cm) 25¹⁄₂" (64.8 cm) 28½" (...

