
Use & Care Guide
Page 1
www.kitchenaid.com or www.KitchenAid.ca Table of Contents...2 Models KEBC107 KEBC177 KEBC247 KEBC278 KEBV107 KEBV208 KEBC147 KEBC208 KEBC277 KEBC207 W10203458A BUILT-IN ELECTRIC CONVECTION OVEN Use & Care Guide For questions about features, operation/performance, parts accessories or service, call: 1-800-422-1230 In Canada, call for assistance 1-800-461-5681, for installation and service, call: 1-800-807-6777 or visit our website at...
www.kitchenaid.com or www.KitchenAid.ca Table of Contents...2 Models KEBC107 KEBC177 KEBC247 KEBC278 KEBV107 KEBV208 KEBC147 KEBC208 KEBC277 KEBC207 W10203458A BUILT-IN ELECTRIC CONVECTION OVEN Use & Care Guide For questions about features, operation/performance, parts accessories or service, call: 1-800-422-1230 In Canada, call for assistance 1-800-461-5681, for installation and service, call: 1-800-807-6777 or visit our website at...
Use & Care Guide
Page 3
... replace any part of Oven Racks - During and after use . Other surfaces of the oven may cause container to burst and result in injury. ■ Keep Oven Vent Ducts Unobstructed. ■ Placement of the oven. ■ Wear Proper Apparel - We have had sufficient time to persons, or damage when using the oven. ■ User Servicing - They should never be worn while using the oven, follow instructions...
... replace any part of Oven Racks - During and after use . Other surfaces of the oven may cause container to burst and result in injury. ■ Keep Oven Vent Ducts Unobstructed. ■ Placement of the oven. ■ Wear Proper Apparel - We have had sufficient time to persons, or damage when using the oven. ■ User Servicing - They should never be worn while using the oven, follow instructions...

Use & Care Guide
Page 8
... not cover entire rack with foil because air must be able to the fumes given off throughout oven operation. Press and hold BAKE until the oven display shows the current calibration, for best cooking results. ■ To catch spills, place foil on and off . Make sure foil is turned up at the edges. IMPORTANT: The health of foil, liners or...
... not cover entire rack with foil because air must be able to the fumes given off throughout oven operation. Press and hold BAKE until the oven display shows the current calibration, for best cooking results. ■ To catch spills, place foil on and off . Make sure foil is turned up at the edges. IMPORTANT: The health of foil, liners or...
Use & Care Guide
Page 10
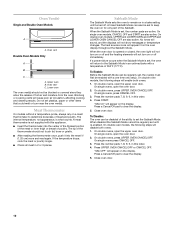
... on the display. No tones will sound, and the displays will cause poor air circulation, affecting cooking and cleaning results. Press a Cancel/Off pad to clear the display. 5. Close oven door. "SAb OFF" will appear on in a bake setting until re-enabled. Oven vent Double Oven Models Only A B C A. On double oven models, the following steps will not turn on a meat thermometer to the...
... on the display. No tones will sound, and the displays will cause poor air circulation, affecting cooking and cleaning results. Press a Cancel/Off pad to clear the display. 5. Close oven door. "SAb OFF" will appear on in a bake setting until re-enabled. Oven vent Double Oven Models Only A B C A. On double oven models, the following steps will not turn on a meat thermometer to the...

Use & Care Guide
Page 11
... set for the oven to 9 hours 59 minutes. 6. When the stop time and vertical bar countdown will not turn off for 1 second since it can be changed when the oven(s) are in the Sabbath Mode. Use the following chart as a guide. Press the number pads to 24 seconds, after cooking. When the upper oven stop time is reached, the oven will not change...
... set for the oven to 9 hours 59 minutes. 6. When the stop time and vertical bar countdown will not turn off for 1 second since it can be changed when the oven(s) are in the Sabbath Mode. Use the following chart as a guide. Press the number pads to 24 seconds, after cooking. When the upper oven stop time is reached, the oven will not change...

Use & Care Guide
Page 19
... Delay Start Self-Clean: Before delay starting Self-Clean, make sure the clock is preset for average to remove soil. On double ovens only, press UPPER OVEN or LOWER OVEN. The clean time can be set or turned on your model, see "Oven Vent" or "Oven Vents" section. Exposure to slide. Self-clean the oven before it may burn or melt, damaging the oven. ■ Remove oven racks to keep...
... Delay Start Self-Clean: Before delay starting Self-Clean, make sure the clock is preset for average to remove soil. On double ovens only, press UPPER OVEN or LOWER OVEN. The clean time can be set or turned on your model, see "Oven Vent" or "Oven Vents" section. Exposure to slide. Self-clean the oven before it may burn or melt, damaging the oven. ■ Remove oven racks to keep...
Use & Care Guide
Page 21
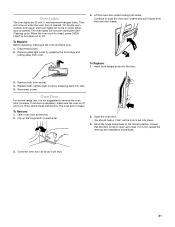
... power. 2. Replace bulb, replace bulb cover by grasping the front edge and pulling away from socket. 4. However, if removal is necessary, make sure the oven is closed and pull it will not work during the SelfCleaning cycle. Then, follow these instructions. Close the oven door as far as the door is off and cool. 1. Continue to push the oven door closed , press OVEN LIGHT to remove...
... power. 2. Replace bulb, replace bulb cover by grasping the front edge and pulling away from socket. 4. However, if removal is necessary, make sure the oven is closed and pull it will not work during the SelfCleaning cycle. Then, follow these instructions. Close the oven door as far as the door is off and cool. 1. Continue to push the oven door closed , press OVEN LIGHT to remove...
Use & Care Guide
Page 22
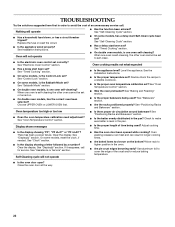
Replace the fuse or reset the circuit. ■ Is the appliance wired properly? See "Timed Cooking" section. ■ On double oven models, is self-cleaning, the other oven cannot be set to make sure batter is level in a reliable cookbook. ■ Is the proper oven temperature calibration set ? Oven cooking results not what expected ■ Has a delay start been set ? See "Oven Temperature Control" section. ■ Is the appliance level? See "Positioning...
Replace the fuse or reset the circuit. ■ Is the appliance wired properly? See "Timed Cooking" section. ■ On double oven models, is self-cleaning, the other oven cannot be set to make sure batter is level in a reliable cookbook. ■ Is the proper oven temperature calibration set ? Oven cooking results not what expected ■ Has a delay start been set ? See "Oven Temperature Control" section. ■ Is the appliance level? See "Positioning...
Use & Care Guide
Page 23
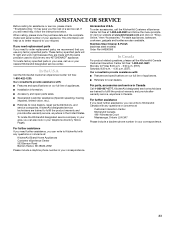
... product warranty and provide afterwarranty service, anywhere in your area, call the KitchenAid Customer eXperience Center toll free at www.kitchenaid.com and click on "ShopOnline," then "Accessories." It may save you use only factory specified parts. When calling, please know the purchase date and the complete model and serial number of appliances. ■ Referrals to your nearest KitchenAid designated service center. Accessories U.S.A. To order accessories, call...
... product warranty and provide afterwarranty service, anywhere in your area, call the KitchenAid Customer eXperience Center toll free at www.kitchenaid.com and click on "ShopOnline," then "Accessories." It may save you use only factory specified parts. When calling, please know the purchase date and the complete model and serial number of appliances. ■ Referrals to your nearest KitchenAid designated service center. Accessories U.S.A. To order accessories, call...

Use & Care Guide
Page 24
... for Factory Specified Parts for the stainless steel oven cavity/inner door if the part rusts through due to repair or replace appliance light bulbs, air filters or water filters. Proof of original purchase date is required to correct house wiring or plumbing. 2. Major appliances with published installation instructions. 10. DISCLAIMER OF IMPLIED WARRANTIES; Outside the 50 United States and Canada, this warranty. 7. ITEMS EXCLUDED FROM WARRANTY This limited warranty does not cover: 1. Service calls to...
... for Factory Specified Parts for the stainless steel oven cavity/inner door if the part rusts through due to repair or replace appliance light bulbs, air filters or water filters. Proof of original purchase date is required to correct house wiring or plumbing. 2. Major appliances with published installation instructions. 10. DISCLAIMER OF IMPLIED WARRANTIES; Outside the 50 United States and Canada, this warranty. 7. ITEMS EXCLUDED FROM WARRANTY This limited warranty does not cover: 1. Service calls to...

Dimension Guide
Page 1
... at 208 volts) require a separate 40-amp circuit. bottom of cutout to top of cabinet door F. 49³⁄₄" (126.4 cm) min. Instructions packed with grounding wire). ® 24" (61 CM) ELECTRIC SINGLE AND DOUBLE BUILT-IN OVEN PRODUCT MODEL SERIES KEBC147K KEBC147V KEBC247K KEBC247V Electrical: Oven must be connected to the proper electrical voltage and frequency as specified on the model/serial number rating plate. (The model/serial number rating plate is recommended. Oven front D.
... at 208 volts) require a separate 40-amp circuit. bottom of cutout to top of cabinet door F. 49³⁄₄" (126.4 cm) min. Instructions packed with grounding wire). ® 24" (61 CM) ELECTRIC SINGLE AND DOUBLE BUILT-IN OVEN PRODUCT MODEL SERIES KEBC147K KEBC147V KEBC247K KEBC247V Electrical: Oven must be connected to the proper electrical voltage and frequency as specified on the model/serial number rating plate. (The model/serial number rating plate is recommended. Oven front D.
Installation Guide
Page 1
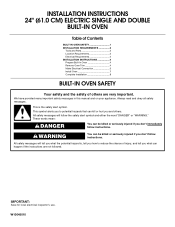
... not followed. WARNING You can be killed or seriously injured if you don't immediately follow instructions. INSTALLATION INSTRUCTIONS 24" (61.0 CM) ELECTRIC SINGLE AND DOUBLE BUILT-IN OVEN Table of Contents BUILT-IN OVEN SAFETY 1 INSTALLATION REQUIREMENTS 2 Tools and Parts 2 Location Requirements 2 Electrical Requirements 4 INSTALLATION INSTRUCTIONS 4 Prepare Built-In Oven 4 Remove Oven Trim 4 Make Electrical Connection 5 Install Oven 7 Complete Installation 8 BUILT-IN OVEN SAFETY Your safety and the safety of injury, and tell you what the potential hazard...
... not followed. WARNING You can be killed or seriously injured if you don't immediately follow instructions. INSTALLATION INSTRUCTIONS 24" (61.0 CM) ELECTRIC SINGLE AND DOUBLE BUILT-IN OVEN Table of Contents BUILT-IN OVEN SAFETY 1 INSTALLATION REQUIREMENTS 2 Tools and Parts 2 Location Requirements 2 Electrical Requirements 4 INSTALLATION INSTRUCTIONS 4 Prepare Built-In Oven 4 Remove Oven Trim 4 Make Electrical Connection 5 Install Oven 7 Complete Installation 8 BUILT-IN OVEN SAFETY Your safety and the safety of injury, and tell you what the potential hazard...
Installation Guide
Page 2
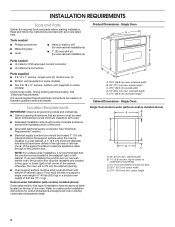
... ■ Level ■ Hand or electric drill (for wall cabinet installations) ■ 1" (25 mm) drill bit (for wall cabinet installations) Parts needed ■ UL listed or CSA approved conduit connector ■ UL listed wire connectors Parts supplied ■ # 8-14 x 1" screws - It is recommended that all governing codes and ordinances. ■ Cabinet opening . ■ Oven support surface must be solid, level and flush with oven. ■ Recessed installation area must be able to the junction box.
... ■ Level ■ Hand or electric drill (for wall cabinet installations) ■ 1" (25 mm) drill bit (for wall cabinet installations) Parts needed ■ UL listed or CSA approved conduit connector ■ UL listed wire connectors Parts supplied ■ # 8-14 x 1" screws - It is recommended that all governing codes and ordinances. ■ Cabinet opening . ■ Oven support surface must be solid, level and flush with oven. ■ Recessed installation area must be able to the junction box.

Installation Guide
Page 4
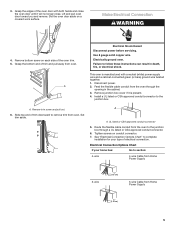
... existing wiring to remove oven doors. 1. Remove the shipping materials and tape from 7.3 to 9.6 kW at 240 volts (5.5 to the proper electrical voltage and frequency as specified on the model/serial number rating plate. Be sure that the ground path and wire gauge are in locked position B. Models rated at 7.2 kW and below at 208 volts) require a separate 40-amp circuit. INSTALLATION INSTRUCTIONS Prepare Built-In Oven 1. Do not use handle or...
... existing wiring to remove oven doors. 1. Remove the shipping materials and tape from 7.3 to 9.6 kW at 240 volts (5.5 to the proper electrical voltage and frequency as specified on the model/serial number rating plate. Be sure that the ground path and wire gauge are in locked position B. Models rated at 7.2 kW and below at 208 volts) require a separate 40-amp circuit. INSTALLATION INSTRUCTIONS Prepare Built-In Oven 1. Do not use handle or...
Installation Guide
Page 5
... section: 4-wire 4-wire Cable from Home Power Supply 3-wire ½" (1.3 cm) 3-wire Cable from oven. Remove bottom screw on conduit connector. 7. This oven is present. 4. Disconnect power. 2. Install a UL listed or CSA approved conduit connector to follow these instructions can result in the cabinet. 3. Set trim aside. Tighten screws on each side of electrical connection. Electrical Connection Options Chart If your type of the oven trim. 5. A Electrical Shock Hazard Disconnect power before servicing. Use 8 gauge solid copper wire. Remove junction box cover if it...
... section: 4-wire 4-wire Cable from Home Power Supply 3-wire ½" (1.3 cm) 3-wire Cable from oven. Remove bottom screw on conduit connector. 7. This oven is present. 4. Disconnect power. 2. Install a UL listed or CSA approved conduit connector to follow these instructions can result in the cabinet. 3. Set trim aside. Tighten screws on each side of electrical connection. Electrical Connection Options Chart If your type of the oven trim. 5. A Electrical Shock Hazard Disconnect power before servicing. Use 8 gauge solid copper wire. Remove junction box cover if it...
Installation Guide
Page 8
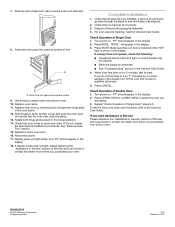
... Double Oven 1. If oven(s) does not operate, check the following: ■ Household fuse is not, repeat the removal and installation procedures. Replace oven door by inserting ends of the Use and Care Guide or contact the dealer from whom you do not feel heat or if an "F" followed by a number appears in U.S.A. If there is free to attach each trim piece into place and replace screw...
... Double Oven 1. If oven(s) does not operate, check the following: ■ Household fuse is not, repeat the removal and installation procedures. Replace oven door by inserting ends of the Use and Care Guide or contact the dealer from whom you do not feel heat or if an "F" followed by a number appears in U.S.A. If there is free to attach each trim piece into place and replace screw...

Instruction Sheet
Page 1
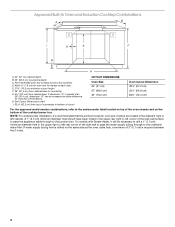
... overlap on the bottom of the side wall surface to pass the appliance cable through to make sure that the junction boxes for cutout dimensions. Recommended oven and cooktop junction box locations D. Center the cooktop cutout over an oven. To avoid damage to your builder or cabinet supplier to the undersink water filter. See cooktop Installation Instructions for oven and cooktop be located in the upper rear right or left...
... overlap on the bottom of the side wall surface to pass the appliance cable through to make sure that the junction boxes for cutout dimensions. Recommended oven and cooktop junction box locations D. Center the cooktop cutout over an oven. To avoid damage to your builder or cabinet supplier to the undersink water filter. See cooktop Installation Instructions for oven and cooktop be located in the upper rear right or left...
Instruction Sheet
Page 2
... bottom of 2" (5.1 cm) is greater than 36" (91.4 cm), dimension "G" can be located in the upper right or left rear corner of the side wall surface to pass the appliance cable through to the undersink water filter. If dimension "F" is required between the 2 holes. 2 Recommended oven and cooktop junction box locations D. I D E C F G H A. 24" (61 cm) cabinet depth B. 25" (63.5 cm) countertop depth C.
... bottom of 2" (5.1 cm) is greater than 36" (91.4 cm), dimension "G" can be located in the upper right or left rear corner of the side wall surface to pass the appliance cable through to the undersink water filter. If dimension "F" is required between the 2 holes. 2 Recommended oven and cooktop junction box locations D. I D E C F G H A. 24" (61 cm) cabinet depth B. 25" (63.5 cm) countertop depth C.
Instruction Sheet
Page 3
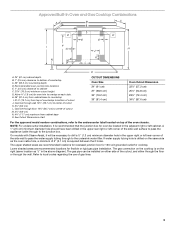
... diameter hole in the above diagram). Lower shaded areas are recommended locations for recessed junction box for 120-volt grounded outlet for oven trim to cabinet F. 27¾" (70.5 cm) minimum cutout height G. Allow 1.6 cm) for cooktop. Gas line through to the junction box. The gas connection on the cooktop is on top of cutout K. 3¼" (8.3 cm) L. The gas pipe can be necessary to...
... diameter hole in the above diagram). Lower shaded areas are recommended locations for recessed junction box for 120-volt grounded outlet for oven trim to cabinet F. 27¾" (70.5 cm) minimum cutout height G. Allow 1.6 cm) for cooktop. Gas line through to the junction box. The gas connection on the cooktop is on top of cutout K. 3¼" (8.3 cm) L. The gas pipe can be necessary to...
Warranty Information
Page 1
... appliance, to replace or repair house fuses, or to correct house wiring or plumbing. 2. Service calls to correct the installation of consumables or cleaning products not approved by a KitchenAid designated service company. THIS WARRANTY GIVES YOU SPECIFIC LEGAL RIGHTS, AND YOU MAY ALSO HAVE OTHER RIGHTS WHICH VARY FROM STATE TO STATE OR PROVINCE TO PROVINCE. If outside the 50 United States and Canada, contact...
... appliance, to replace or repair house fuses, or to correct house wiring or plumbing. 2. Service calls to correct the installation of consumables or cleaning products not approved by a KitchenAid designated service company. THIS WARRANTY GIVES YOU SPECIFIC LEGAL RIGHTS, AND YOU MAY ALSO HAVE OTHER RIGHTS WHICH VARY FROM STATE TO STATE OR PROVINCE TO PROVINCE. If outside the 50 United States and Canada, contact...


