Use & Care Guide
Page 1
... et d'entretien Au Canada, pour assistance, installation ou service, composer le 1-800-807-6777 ou visiter notre site Web au www.kitchenaid.ca Table of Contents/Table des matières 2 Models/Modèles KEBS109, KEBS207, KEBS209, KEBK101, KEBK206 W10354193A BUILT-IN ELECTRIC SINGLE AND DOUBLE OVENS Use & Care Guide For...
... et d'entretien Au Canada, pour assistance, installation ou service, composer le 1-800-807-6777 ou visiter notre site Web au www.kitchenaid.ca Table of Contents/Table des matières 2 Models/Modèles KEBS109, KEBS207, KEBS209, KEBK101, KEBK206 W10354193A BUILT-IN ELECTRIC SINGLE AND DOUBLE OVENS Use & Care Guide For...
Use & Care Guide
Page 4
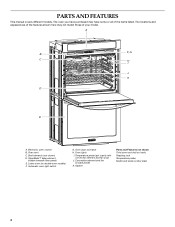
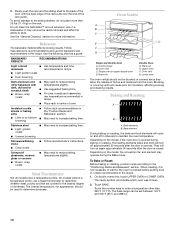
... switch G. Convection element and fan (in back panel) K. PARTS AND FEATURES This manual covers different models. A B F, G C H I . Gasket Parts and Features not shown Third oven rack (roll-out rack) Roasting rack Temperature probe Model and serial number plate 4 Oven lights I J K D E A. CleanBake™ bake element ... H. Temperature probe jack (cavity with convection element and fan only) J. The oven you have some or all of your model. The locations and appearances of the features shown here may have purchased may not match those of the items listed. Oven ...
... switch G. Convection element and fan (in back panel) K. PARTS AND FEATURES This manual covers different models. A B F, G C H I . Gasket Parts and Features not shown Third oven rack (roll-out rack) Roasting rack Temperature probe Model and serial number plate 4 Oven lights I J K D E A. CleanBake™ bake element ... H. Temperature probe jack (cavity with convection element and fan only) J. The oven you have some or all of your model. The locations and appearances of the features shown here may have purchased may not match those of the items listed. Oven ...
Use & Care Guide
Page 5
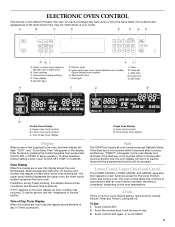
...function has been canceled or completed, depending on the display. Touch CLOCK SET. 2. Kitchen timer G. Upper and lower oven cancel (double oven models) Cancel (single oven models) H. Tools K. Stop time M. Time of day or Timer countdown. The upper cavity symbol represents the upper oven; To call for the ...Enter Time" will be canceled. The oven you have purchased may not match those of day. 3. Upper or lower oven selectors (double oven models only) B. Time of the items listed. Enter the time by pressing the number keypads, then press either CLOCK SET or START to set the...
...function has been canceled or completed, depending on the display. Touch CLOCK SET. 2. Kitchen timer G. Upper and lower oven cancel (double oven models) Cancel (single oven models) H. Tools K. Stop time M. Time of day or Timer countdown. The upper cavity symbol represents the upper oven; To call for the ...Enter Time" will be canceled. The oven you have purchased may not match those of day. 3. Upper or lower oven selectors (double oven models only) B. Time of the items listed. Enter the time by pressing the number keypads, then press either CLOCK SET or START to set the...
Use & Care Guide
Page 7
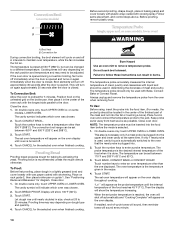
.... 7 Touch TOOLS and then touch number key "6." To Disable: The oven(s) can be warmer by repeating the previous steps. On double oven models, these steps will scroll information on for only part of Sabbath Mode time, up to remain on the oven display. Each oven can be independently...Touch CANCEL, UPPER CANCEL or LOWER CANCEL to return to set between 145°F and 550°F (63°C and 288°C). 3. On double oven models, the following chart as a guide. See the "To Enable" section. To Regularly Set, Untimed to Activate: Sabbath Mode must be set between 145°F...
.... 7 Touch TOOLS and then touch number key "6." To Disable: The oven(s) can be warmer by repeating the previous steps. On double oven models, these steps will scroll information on for only part of Sabbath Mode time, up to remain on the oven display. Each oven can be independently...Touch CANCEL, UPPER CANCEL or LOWER CANCEL to return to set between 145°F and 550°F (63°C and 288°C). 3. On double oven models, the following chart as a guide. See the "To Enable" section. To Regularly Set, Untimed to Activate: Sabbath Mode must be set between 145°F...

Use & Care Guide
Page 9
...following chart as shown. A B A. Open Position A B For best results when baking layer cakes on 2 racks in Convect Bake mode in convection oven models, use racks 2f or 4f. Rack guide C. See the rack position graphics in position 5. A. Sliding shelf To Remove SatinGlide™ Roll-Out Extension Rack...: 1. Place the closed rack and the sliding shelf. For best results when baking layer cakes in Bake mode in nonconvection oven models, use racks 2f and 5f. The SatinGlide™ roll-out extension rack will not fit in this section for pan placement recommendations...
...following chart as shown. A B A. Open Position A B For best results when baking layer cakes on 2 racks in Convect Bake mode in convection oven models, use racks 2f or 4f. Rack guide C. See the rack position graphics in position 5. A. Sliding shelf To Remove SatinGlide™ Roll-Out Extension Rack...: 1. Place the closed rack and the sliding shelf. For best results when baking layer cakes in Bake mode in nonconvection oven models, use racks 2f and 5f. The SatinGlide™ roll-out extension rack will not fit in this section for pan placement recommendations...
Use & Care Guide
Page 10
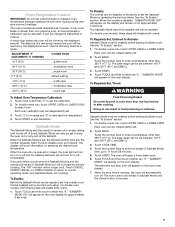
.... It may operate during baking or roasting, the heating elements (bake and broil) will turn on the rack. Depending on the model, if the oven door is closed. Stoneware/Baking stone ■ Crisp crusts ■ Follow manufacturer's instructions. Warm air E. To ... Light colored ■ aluminum ■ Light golden crusts ■ Even browning Use temperature and time recommended in a dishwasher. On models without a temperature probe, use the bakeware size recommended in center of hot air and moisture from the oven. Lower oven The oven...
.... It may operate during baking or roasting, the heating elements (bake and broil) will turn on the rack. Depending on the model, if the oven door is closed. Stoneware/Baking stone ■ Crisp crusts ■ Follow manufacturer's instructions. Warm air E. To ... Light colored ■ aluminum ■ Light golden crusts ■ Even browning Use temperature and time recommended in a dishwasher. On models without a temperature probe, use the bakeware size recommended in center of hot air and moisture from the oven. Lower oven The oven...
Use & Care Guide
Page 12
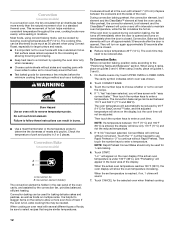
This movement of hot air helps maintain a consistent temperature throughout the oven, cooking foods more evenly, while sealing in 2 or 3 places. Convection Bake (on some models) In a convection oven, the fan-circulated hot air distributes heat more evenly than the natural movement of air in intervals to maintain oven temperature, while ... will appear in the rear panel of the oven cavity, and assisted by as much as foods on multiple racks. Touch START. Convection (on some models) A B A. Convection fan B.
This movement of hot air helps maintain a consistent temperature throughout the oven, cooking foods more evenly, while sealing in 2 or 3 places. Convection Bake (on some models) In a convection oven, the fan-circulated hot air distributes heat more evenly than the natural movement of air in intervals to maintain oven temperature, while ... will appear in the rear panel of the oven cavity, and assisted by as much as foods on multiple racks. Touch START. Convection (on some models) A B A. Convection fan B.
Use & Care Guide
Page 13
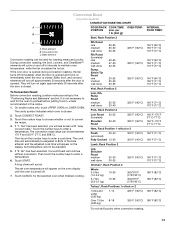
...°F (82°C) *Do not stuff poultry when convection roasting. 13 During convection roasting, the broil, convect, and CleanBake™ elements will appear on some models) CONVECTION ROASTING CHART A FOOD/RACK COOK TIME OVEN TEMP. On double ovens only, touch UPPER OVEN or LOWER OVEN. Touch CONVECT ROAST. 3. POSITION (min. Convection...
...°F (82°C) *Do not stuff poultry when convection roasting. 13 During convection roasting, the broil, convect, and CleanBake™ elements will appear on some models) CONVECTION ROASTING CHART A FOOD/RACK COOK TIME OVEN TEMP. On double ovens only, touch UPPER OVEN or LOWER OVEN. Touch CONVECT ROAST. 3. POSITION (min. Convection...
Use & Care Guide
Page 14
...-of the food reaches 45°F (7°C). Follow same placement, and control steps above. Temperature Probe (single, upper and, on some models, LOWER OVEN. The temperature is the temperature given in burns. Touch the number keys to the jack. To Proof: Before first proofing, ... keys to enter a probe temperature. The set between 450°F and 550°F (232°C and 288°C). 3. Convection Broil (on some models) A B Before second proofing, shape dough, place in baking pan(s) and cover loosely with plastic wrap coated with shortening. Before proofing, remove plastic wrap...
...-of the food reaches 45°F (7°C). Follow same placement, and control steps above. Temperature Probe (single, upper and, on some models, LOWER OVEN. The temperature is the temperature given in burns. Touch the number keys to the jack. To Proof: Before first proofing, ... keys to enter a probe temperature. The set between 450°F and 550°F (232°C and 288°C). 3. Convection Broil (on some models) A B Before second proofing, shape dough, place in baking pan(s) and cover loosely with plastic wrap coated with shortening. Before proofing, remove plastic wrap...

Use & Care Guide
Page 15
...LOWER OVEN to enter a temperature other than the one displayed. "DELAY" and the stop time is finished preheating. On double oven models only, when both upper and lower ovens are not displayed until the probe is reached, the oven will shut off automatically. If .... Failure to enter a temperature other than the one displayed. Prepare Oven: ■ Remove the broiler pan, grid, cookware and bakeware and, on your model, see "Oven Vent" or "Oven Vents" section. Touch START. Touch COOK TIME. 4. Follow steps 1 through 6 in burns. Keep children away from...
...LOWER OVEN to enter a temperature other than the one displayed. "DELAY" and the stop time is finished preheating. On double oven models only, when both upper and lower ovens are not displayed until the probe is reached, the oven will shut off automatically. If .... Failure to enter a temperature other than the one displayed. Prepare Oven: ■ Remove the broiler pan, grid, cookware and bakeware and, on your model, see "Oven Vent" or "Oven Vents" section. Touch START. Touch COOK TIME. 4. Follow steps 1 through 6 in burns. Keep children away from...

Use & Care Guide
Page 16
... breaking the glass, do not apply a cool damp cloth to determine the desired cleaning level. The oven lights will operate at a time. On double oven models, only one oven is set to set a clean time other oven cannot be set between 4 hours 30 minutes and 5 hours 30 minutes for the selected...
... breaking the glass, do not apply a cool damp cloth to determine the desired cleaning level. The oven lights will operate at a time. On double oven models, only one oven is set to set a clean time other oven cannot be set between 4 hours 30 minutes and 5 hours 30 minutes for the selected...

Use & Care Guide
Page 17
...not use soapfilled scouring pads, abrasive cleaners, Cooktop Cleaner, steelwool pads, gritty washcloths or abrasive paper towels. STAINLESS STEEL (on some models) To avoid damage to or decreasing the life of grain to avoid damaging. ■ affresh™ Stainless Steel Cleaner Part Number W10355016... CONTROL PANEL To avoid damage to order. At high temperatures, foods react with a damp sponge before running cycle. On double oven models, both upper and lower lights will come on panel. ■ affresh™ Kitchen and Appliance Cleaner Part Number W10355010 (not included):...
...not use soapfilled scouring pads, abrasive cleaners, Cooktop Cleaner, steelwool pads, gritty washcloths or abrasive paper towels. STAINLESS STEEL (on some models) To avoid damage to or decreasing the life of grain to avoid damaging. ■ affresh™ Stainless Steel Cleaner Part Number W10355016... CONTROL PANEL To avoid damage to order. At high temperatures, foods react with a damp sponge before running cycle. On double oven models, both upper and lower lights will come on panel. ■ affresh™ Kitchen and Appliance Cleaner Part Number W10355010 (not included):...

Use & Care Guide
Page 19
...reappears, call for service. See "Assistance or Service" section. ■ Is the oven door open? See "Timed Cooking" section. ■ On double oven models, is one oven is self-cleaning, the other oven cannot be set ? See "Positioning Racks and Bakeware" section. ■ Is there proper air circulation ...distributed in longer cooking times. ■ Are baked items too brown on . ■ On double oven models, has the correct oven been selected? See "Sabbath Mode" section. ■ On double oven models, is one oven is normal. Close the oven door all the way. ■ Has the function ...
...reappears, call for service. See "Assistance or Service" section. ■ Is the oven door open? See "Timed Cooking" section. ■ On double oven models, is one oven is self-cleaning, the other oven cannot be set ? See "Positioning Racks and Bakeware" section. ■ Is there proper air circulation ...distributed in longer cooking times. ■ Are baked items too brown on . ■ On double oven models, has the correct oven been selected? See "Sabbath Mode" section. ■ On double oven models, is one oven is normal. Close the oven door all the way. ■ Has the function ...
Use & Care Guide
Page 20
... Cleaning Wipes (stainless steel models) Order Part Number W10355049 affresh™ Kitchen and Appliance Cleaner Order Part Number W10355010 Porcelain Broiler Pan and Grid Order Part Number 4396923 Premium Broiler Pan and Roasting Rack Order Part Number W10123240 www.maytag.com/broilerpan In Canada Call the KitchenAid Canada Customer eXperience Centre toll...
... Cleaning Wipes (stainless steel models) Order Part Number W10355049 affresh™ Kitchen and Appliance Cleaner Order Part Number W10355010 Porcelain Broiler Pan and Grid Order Part Number 4396923 Premium Broiler Pan and Roasting Rack Order Part Number W10123240 www.maytag.com/broilerpan In Canada Call the KitchenAid Canada Customer eXperience Centre toll...

Use & Care Guide
Page 21
...factory applied serial number has been altered or removed from your major appliance. Costs associated with original model/serial numbers that is covered by an authorized KitchenAid servicer is used for the following components if defective in materials or workmanship: ■ Electric ... workmanship. Consumable parts are excluded from unauthorized modifications made to use of consumables or cleaning products not approved by calling KitchenAid. Expenses for travel and transportation for the stainless steel oven cavity/inner door if the part rusts through tenth years...
...factory applied serial number has been altered or removed from your major appliance. Costs associated with original model/serial numbers that is covered by an authorized KitchenAid servicer is used for the following components if defective in materials or workmanship: ■ Electric ... workmanship. Consumable parts are excluded from unauthorized modifications made to use of consumables or cleaning products not approved by calling KitchenAid. Expenses for travel and transportation for the stainless steel oven cavity/inner door if the part rusts through tenth years...

Use & Care Guide
Page 22
Write down the following information about your major appliance to better help you obtain assistance or service if you ever need to know your sales slip together for in-warranty service. You will need it. You can find this book and your complete model number and serial number. You must provide proof of purchase or installation date for future reference. Dealer name Address Phone number Model number Serial number Purchase date 22 Keep this information on the model and serial number label located on the product.
Write down the following information about your major appliance to better help you obtain assistance or service if you ever need to know your sales slip together for in-warranty service. You will need it. You can find this book and your complete model number and serial number. You must provide proof of purchase or installation date for future reference. Dealer name Address Phone number Model number Serial number Purchase date 22 Keep this information on the model and serial number label located on the product.
Dimension Guide
Page 1
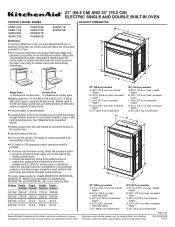
... height D. 23¹⁄₄" (59.1 cm) max. recessed depth E. 30" (76.2 cm) overall width Dimensions are for models WOS51EC7A, WOS51EC0A, WOD51EC7A, WOD51EC0A, WOS92EC7A, WOS92EC0A, WOD93EC7A, and WOD93EC0A, refer to the following illustrations. q Connect directly to the circuit ...see Installation Instructions packed with grounding wire). Follow the electrical connector manufacturer's recommended procedure. overall height B. 25 64.6 cm) max. Model/serial number plate A. q A circuit breaker is for serviceability of the flexible conduit leads. 2. Page 1 of the line. W10351242B...
... height D. 23¹⁄₄" (59.1 cm) max. recessed depth E. 30" (76.2 cm) overall width Dimensions are for models WOS51EC7A, WOS51EC0A, WOD51EC7A, WOD51EC0A, WOS92EC7A, WOS92EC0A, WOD93EC7A, and WOD93EC0A, refer to the following illustrations. q Connect directly to the circuit ...see Installation Instructions packed with grounding wire). Follow the electrical connector manufacturer's recommended procedure. overall height B. 25 64.6 cm) max. Model/serial number plate A. q A circuit breaker is for serviceability of the flexible conduit leads. 2. Page 1 of the line. W10351242B...
Dimension Guide
Page 2
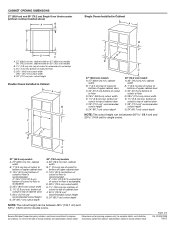
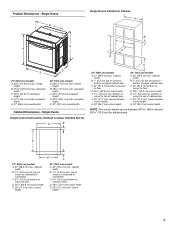
... C. 32" (81.3 cm) bottom of cabinet door F. 50¹⁄₄" (127.6 cm)* recommended cutout height G. 24" (60.7 cm) cutout depth 30" (76.2 cm) models A. 30" (76.2 cm) min. cabinet width B. 1" (2.5 cm) top of cutout to floor D. 28¹⁄₂" (72.4 cm) cutout width E. 1¹⁄₂" ...(64.8 cm) cutout width E. 1¹⁄₂" (3.8 cm) min. bottom of cutout to improve Dimensions are for single ovens. 27" (68.6 cm) models A. 27" (68.6 cm) min. Page 2 of cabinet door F. 28" (71.2 cm)* recommended cutout height G. 24" (60.7 cm) cutout depth 30" (76.2 cm...
... C. 32" (81.3 cm) bottom of cabinet door F. 50¹⁄₄" (127.6 cm)* recommended cutout height G. 24" (60.7 cm) cutout depth 30" (76.2 cm) models A. 30" (76.2 cm) min. cabinet width B. 1" (2.5 cm) top of cutout to floor D. 28¹⁄₂" (72.4 cm) cutout width E. 1¹⁄₂" ...(64.8 cm) cutout width E. 1¹⁄₂" (3.8 cm) min. bottom of cutout to improve Dimensions are for single ovens. 27" (68.6 cm) models A. 27" (68.6 cm) min. Page 2 of cabinet door F. 28" (71.2 cm)* recommended cutout height G. 24" (60.7 cm) cutout depth 30" (76.2 cm...

Installation Guide
Page 2
...the right rear or left cabinet. Refer to support a double oven weight of 251 lbs (114 kg) for 27" (68.6 cm) models or 288 lbs (131 kg) for this type of cabinet cutout. ■ Floor must be made by a licensed, qualified electrical installer. ...KEBS277B, KEBS279B, KEBS207B, KEBS209B, KEBU109B and KEBU209B. **Foam strip not included with cooktop installed above): Ovens approved for 30" (76.2 cm) models. Undercounter Installation (with double oven. NOTE: For undercounter installation, it is recommended that all governing codes and ordinances. ■ Cabinet opening dimensions ...
...the right rear or left cabinet. Refer to support a double oven weight of 251 lbs (114 kg) for 27" (68.6 cm) models or 288 lbs (131 kg) for this type of cabinet cutout. ■ Floor must be made by a licensed, qualified electrical installer. ...KEBS277B, KEBS279B, KEBS207B, KEBS209B, KEBU109B and KEBU209B. **Foam strip not included with cooktop installed above): Ovens approved for 30" (76.2 cm) models. Undercounter Installation (with double oven. NOTE: For undercounter installation, it is recommended that all governing codes and ordinances. ■ Cabinet opening dimensions ...
Installation Guide
Page 3
... (72.4 cm) cutout width E. 28" (71.2 cm) min. cutout height 3 recessed depth E. 27" (68.6 cm) overall width 30" (76.2 cm) models A. 28¾" (72.8 cm) max. top of cutout to underside of countertop C. 5¹⁄₄" (13.3 cm) bottom of cutout to floor D. 25¹... 28" (71.2 cm) min. cabinet width B. 1¹⁄₂" (3.8 cm) min. Single Ovens B Single Ovens Installed in Cabinet A B D C F A G E D E 27" (68.6 cm) models A. 28¾" (72.8 cm) max. cabinet width B. 1" (2.5 cm) top of cutout to bottom of upper cabinet door C. 32" (81.3 cm) bottom of cutout to top...
... (72.4 cm) cutout width E. 28" (71.2 cm) min. cutout height 3 recessed depth E. 27" (68.6 cm) overall width 30" (76.2 cm) models A. 28¾" (72.8 cm) max. top of cutout to underside of countertop C. 5¹⁄₄" (13.3 cm) bottom of cutout to floor D. 25¹... 28" (71.2 cm) min. cabinet width B. 1¹⁄₂" (3.8 cm) min. Single Ovens B Single Ovens Installed in Cabinet A B D C F A G E D E 27" (68.6 cm) models A. 28¾" (72.8 cm) max. cabinet width B. 1" (2.5 cm) top of cutout to bottom of upper cabinet door C. 32" (81.3 cm) bottom of cutout to top...

