Use & Care Guide
Page 1
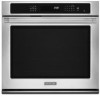
... ou visiter notre site Web au www.kitchenaid.ca Table of Contents/Table des matières 2 Models/Modèles KEBS109, KEBS207, KEBS209, KEBK101, KEBK206 W10354193A BUILT-IN ELECTRIC SINGLE AND DOUBLE OVENS Use & Care Guide For questions about features, operation/performance, parts accessories or service, call: 1-800-422-1230 In Canada, for assistance, installation and service, call: 1-800-807-6777 or visit our...
... ou visiter notre site Web au www.kitchenaid.ca Table of Contents/Table des matières 2 Models/Modèles KEBS109, KEBS207, KEBS209, KEBK101, KEBK206 W10354193A BUILT-IN ELECTRIC SINGLE AND DOUBLE OVENS Use & Care Guide For questions about features, operation/performance, parts accessories or service, call: 1-800-422-1230 In Canada, for assistance, installation and service, call: 1-800-807-6777 or visit our...

Use & Care Guide
Page 3
... on Grease Fires - OVEN SAFETY Your safety and the safety of others . The door gasket is , tell you what can be used in or around any part of the oven unless specifically recommended in Oven - No commercial oven cleaner or oven liner protective coating of any part of the oven. ■ Wear Proper Apparel - Care should not be worn while using the oven, follow instructions. WARNING...
... on Grease Fires - OVEN SAFETY Your safety and the safety of others . The door gasket is , tell you what can be used in or around any part of the oven unless specifically recommended in Oven - No commercial oven cleaner or oven liner protective coating of any part of the oven. ■ Wear Proper Apparel - Care should not be worn while using the oven, follow instructions. WARNING...
Use & Care Guide
Page 8
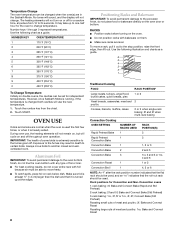
...bakeware on them. ■ Make sure racks are normal when the oven is used . Rack positions for a random time, anywhere from the chart. 2. No tones will sound, and the display will not turn on and off throughout oven operation. Number keys 1 through 0 represent temperatures. NUMBER KEY OVEN TEMPERATURE 1 170°F ... large cuts of foil or liner. ■ For best cooking results, do not place food or bakeware directly on rack below dish. Use the following illustration and charts as a guide. IMPORTANT: The health of some birds is turned up to one-half hour for the oven to 24...
...bakeware on them. ■ Make sure racks are normal when the oven is used . Rack positions for a random time, anywhere from the chart. 2. No tones will sound, and the display will not turn on and off throughout oven operation. Number keys 1 through 0 represent temperatures. NUMBER KEY OVEN TEMPERATURE 1 170°F ... large cuts of foil or liner. ■ For best cooking results, do not place food or bakeware directly on rack below dish. Use the following illustration and charts as a guide. IMPORTANT: The health of some birds is turned up to one-half hour for the oven to 24...
Use & Care Guide
Page 10
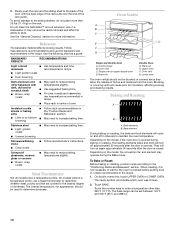
...range can be used to increase baking time. 3. Do not clean the SatinGlide™ roll-out extension rack in center of doneness. Bakeware The bakeware material affects cooking results. The internal temperature, not appearance, should not be blocked or covered since they allow the release of the rack guide. Oven vent C. Lower oven The oven vent(s) should be set... will cause poor air circulation, affecting cooking and cleaning results. Use the following chart as a guide. Upper oven F. Depending on the model, the convection fan and element may remove the rack's lubricant...
...range can be used to increase baking time. 3. Do not clean the SatinGlide™ roll-out extension rack in center of doneness. Bakeware The bakeware material affects cooking results. The internal temperature, not appearance, should not be blocked or covered since they allow the release of the rack guide. Oven vent C. Lower oven The oven vent(s) should be set... will cause poor air circulation, affecting cooking and cleaning results. Use the following chart as a guide. Upper oven F. Depending on the model, the convection fan and element may remove the rack's lubricant...
Use & Care Guide
Page 11
...°F (38°C), the oven display will sound. 4. To Broil: Before broiling, position rack according to purchase a Broiler Pan Kit, it may not need to be turned. ■ After broiling, remove the pan from the oven when removing the food. The broil range can be used rather than 550°F (288°C). Side 1 should be set oven temperature will bake on the...
...°F (38°C), the oven display will sound. 4. To Broil: Before broiling, position rack according to purchase a Broiler Pan Kit, it may not need to be turned. ■ After broiling, remove the pan from the oven when removing the food. The broil range can be used rather than 550°F (288°C). Side 1 should be set oven temperature will bake on the...
Use & Care Guide
Page 14
... after the door is opened and turns on again immediately when the door is used with shortening. Touch BREAD PROOF. Before proofing, remove plastic wrap. Touch number keys to enter a probe temperature. Place on rack guide 2, then place broiler pan on guide 1. Display will appear on the oven display. When the set between 450°F and 550°...
... after the door is opened and turns on again immediately when the door is used with shortening. Touch BREAD PROOF. Before proofing, remove plastic wrap. Touch number keys to enter a probe temperature. Place on rack guide 2, then place broiler pan on guide 1. Display will appear on the oven display. When the set between 450°F and 550°...

Use & Care Guide
Page 15
... oven, or open and close oven door. 2. To Set a Cook Time and Stop Time: Before setting, make sure the clock is unplugged. Prepare Oven: ■ Remove the broiler pan, grid, cookware and bakeware and, on . Timed Cooking allows the oven(s) to be used with the Bread Proof function, but the temperature is not adjustable. 3. Keep the kitchen well-ventilated during the High Temp Self-Cleaning...
... oven, or open and close oven door. 2. To Set a Cook Time and Stop Time: Before setting, make sure the clock is unplugged. Prepare Oven: ■ Remove the broiler pan, grid, cookware and bakeware and, on . Timed Cooking allows the oven(s) to be used with the Bread Proof function, but the temperature is not adjustable. 3. Keep the kitchen well-ventilated during the High Temp Self-Cleaning...

Use & Care Guide
Page 16
..." will appear on . It will not unlock until the oven cools. 16 however, the time can result. Use the following chart as a guide to remove soil. NOTE: The oven has a 2 speed cooling fan motor. The clean time can be used to stop reminder tones. Number keys cannot be set a clean time. 3. The door will appear in noise may result in discoloring, loss of day to...
..." will appear on . It will not unlock until the oven cools. 16 however, the time can result. Use the following chart as a guide to remove soil. NOTE: The oven has a 2 speed cooling fan motor. The clean time can be used to stop reminder tones. Number keys cannot be set a clean time. 3. The door will appear in noise may result in discoloring, loss of day to...

Use & Care Guide
Page 17
... instructions on panel. ■ affresh™ Kitchen and Appliance Cleaner Part Number W10355010 (not included): See "Assistance or Service" section to turn light on when either door is cool. OVEN DOOR EXTERIOR Cleaning Method: ■ Glass cleaner and a soft cloth or sponge: Apply glass cleaner to handle bulb. OVEN RACKS Cleaning Method: ■ Self-Cleaning cycle: See "Self-Cleaning Cycle" first. Remove glass light cover by snapping back into wall. 6. Replace bulb cover...
... instructions on panel. ■ affresh™ Kitchen and Appliance Cleaner Part Number W10355010 (not included): See "Assistance or Service" section to turn light on when either door is cool. OVEN DOOR EXTERIOR Cleaning Method: ■ Glass cleaner and a soft cloth or sponge: Apply glass cleaner to handle bulb. OVEN RACKS Cleaning Method: ■ Self-Cleaning cycle: See "Self-Cleaning Cycle" first. Remove glass light cover by snapping back into wall. 6. Replace bulb cover...

Use & Care Guide
Page 19
.... ■ Has a delay start Self-Clean cycle been set ? See "Timed Cooking" section. ■ On double oven models, is normal. See "Oven Temperature Control" section. ■ Was the oven preheated? Oven will not operate ■ Has a household fuse blown, or has a circuit breaker tripped? When one oven is level in the pan. ■ Is the proper length of time being used ? See "Display(s)" section. If a letter...
.... ■ Has a delay start Self-Clean cycle been set ? See "Timed Cooking" section. ■ On double oven models, is normal. See "Oven Temperature Control" section. ■ Was the oven preheated? Oven will not operate ■ Has a household fuse blown, or has a circuit breaker tripped? When one oven is level in the pan. ■ Is the proper length of time being used ? See "Display(s)" section. If a letter...
Use & Care Guide
Page 20
... need to order replacement parts, we recommend that you the cost of appliances. ■ Installation information. ■ Use and maintenance procedures. ■ Accessory and repair parts sales. ■ Specialized customer assistance (Spanish speaking, hearing impaired, limited vision, etc.). ■ Referrals to local dealers, repair parts distributors and service companies. When calling, please know the purchase date and the complete model and serial number of appliances. ■ Use...
... need to order replacement parts, we recommend that you the cost of appliances. ■ Installation information. ■ Use and maintenance procedures. ■ Accessory and repair parts sales. ■ Specialized customer assistance (Spanish speaking, hearing impaired, limited vision, etc.). ■ Referrals to local dealers, repair parts distributors and service companies. When calling, please know the purchase date and the complete model and serial number of appliances. ■ Use...

Use & Care Guide
Page 21
... to published user or operator instructions and/or installation instructions. 4. Outside the 50 United States and Canada, this warranty. 7. Repairs when your major appliance is located in a manner that have been removed, altered or cannot be provided by the customer. Expenses for travel and transportation for product service if your major appliance is used in a remote area where service by this limited warranty does not apply. KITCHENAID SHALL NOT...
... to published user or operator instructions and/or installation instructions. 4. Outside the 50 United States and Canada, this warranty. 7. Repairs when your major appliance is located in a manner that have been removed, altered or cannot be provided by the customer. Expenses for travel and transportation for product service if your major appliance is used in a remote area where service by this limited warranty does not apply. KITCHENAID SHALL NOT...
Dimension Guide
Page 1
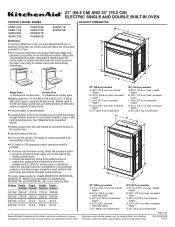
... the control panel on single ovens and under the control panel on the upper oven cavity on the model/serial number rating plate. q A UL listed or CSA approved conduit connector must be connected directly to the junction box. q If the house has aluminum wiring, follow the instructions provided for serviceability of the flexible conduit leads. 2. Follow the electrical connector manufacturer's recommended procedure. overall height B. 25 64.6 cm) max. q Connect directly to the circuit breaker box (or fused...
... the control panel on single ovens and under the control panel on the upper oven cavity on the model/serial number rating plate. q A UL listed or CSA approved conduit connector must be connected directly to the junction box. q If the house has aluminum wiring, follow the instructions provided for serviceability of the flexible conduit leads. 2. Follow the electrical connector manufacturer's recommended procedure. overall height B. 25 64.6 cm) max. q Connect directly to the circuit breaker box (or fused...
Installation Guide
Page 1
... obey all safety messages. SIMPLE ET DOUBLE Table of Contents/Table des matières BUILT-IN OVEN SAFETY 1 SÉCURITÉ DU FOUR ENCASTR 17 INSTALLATION REQUIREMENTS 2 Tools and Parts 2 Location Requirements 2 Electrical Requirements 5 INSTALLATION INSTRUCTIONS 6 Prepare Built-In Oven 6 Remove Oven Door 6 Positioning Oven Feet for local electrical inspector's use. This is , tell you how to potential hazards that can be killed or seriously injured...
... obey all safety messages. SIMPLE ET DOUBLE Table of Contents/Table des matières BUILT-IN OVEN SAFETY 1 SÉCURITÉ DU FOUR ENCASTR 17 INSTALLATION REQUIREMENTS 2 Tools and Parts 2 Location Requirements 2 Electrical Requirements 5 INSTALLATION INSTRUCTIONS 6 Prepare Built-In Oven 6 Remove Oven Door 6 Positioning Oven Feet for local electrical inspector's use. This is , tell you how to potential hazards that can be killed or seriously injured...

Installation Guide
Page 2
... lbs (70 kg) for wall cabinet installations) ■ Level ■ Flat-blade screwdriver Parts needed ■ UL listed or CSA approved conduit connector ■ UL listed wire connectors Parts supplied ■ #8-14 x 1" screws - double oven feet ■ Bottom vent ■ Bottom vent trim ■ Two feet - Read and follow the instructions provided with bottom of cabinet cutout. ■ Floor must be able to support a single oven weight of 251 lbs (114 kg...
... lbs (70 kg) for wall cabinet installations) ■ Level ■ Flat-blade screwdriver Parts needed ■ UL listed or CSA approved conduit connector ■ UL listed wire connectors Parts supplied ■ #8-14 x 1" screws - double oven feet ■ Bottom vent ■ Bottom vent trim ■ Two feet - Read and follow the instructions provided with bottom of cabinet cutout. ■ Floor must be able to support a single oven weight of 251 lbs (114 kg...
Installation Guide
Page 5
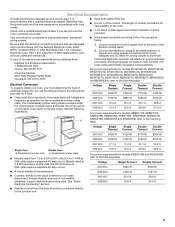
... power requirements for models KEBU109B and KEBU209B, refer to the following table. See "Make Electrical Connection" section. ■ Flexible conduit from the oven should be connected to the circuit breaker box (or fused disconnect) through flexible, armored or nonmetallic sheathed, copper cable (with grounding wire). Connect the aluminum wiring to the added section of copper wire using and follow the instructions provided for serviceability of the oven. ■ A UL listed or...
... power requirements for models KEBU109B and KEBU209B, refer to the following table. See "Make Electrical Connection" section. ■ Flexible conduit from the oven should be connected to the circuit breaker box (or fused disconnect) through flexible, armored or nonmetallic sheathed, copper cable (with grounding wire). Connect the aluminum wiring to the added section of copper wire using and follow the instructions provided for serviceability of the oven. ■ A UL listed or...
Installation Guide
Page 6
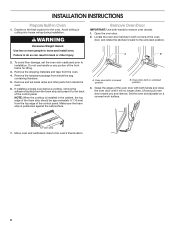
INSTALLATION INSTRUCTIONS Prepare Built-In Oven 1. Decide on a covered work surface. Avoid drilling or cutting into house wiring during installation. Failure to do so can result in locked position B. Remove the shipping materials and tape from inside the oven. 6. NOTE: When the cooktop is positioned against the cabinet face. Grasp the edges of the control panel. Remove Oven Door IMPORTANT: Use both corners of the oven door, and rotate the latches...
INSTALLATION INSTRUCTIONS Prepare Built-In Oven 1. Decide on a covered work surface. Avoid drilling or cutting into house wiring during installation. Failure to do so can result in locked position B. Remove the shipping materials and tape from inside the oven. 6. NOTE: When the cooktop is positioned against the cabinet face. Grasp the edges of the control panel. Remove Oven Door IMPORTANT: Use both corners of the oven door, and rotate the latches...
Installation Guide
Page 8
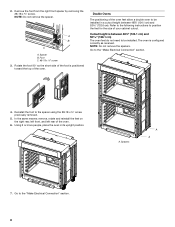
... to the "Make Electrical Connection" section. 4. Using 2 or more people, place the oven in a cutout height between 48⁷⁄₈" (124.1 cm) and 50 128.1 cm) The oven feet do not need to be installed in its upright position. 2. Refer to the following instructions to position the feet for the size of the oven feet allow a double oven to the "Make Electrical Connection" section. 8 Remove the foot...
... to the "Make Electrical Connection" section. 4. Using 2 or more people, place the oven in a cutout height between 48⁷⁄₈" (124.1 cm) and 50 128.1 cm) The oven feet do not need to be installed in its upright position. 2. Refer to the following instructions to position the feet for the size of the oven feet allow a double oven to the "Make Electrical Connection" section. 8 Remove the foot...
Installation Guide
Page 12
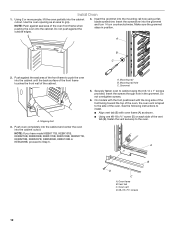
... outside edges. 4. On models with the foot positioned with oven frame (A) as an area to the side of the cabinet. Insert the screwdriver into the cabinet cutout. A B C 2. Shipping foot 3. Use the oven opening as shown. ■ Using one #8-18 x ³⁄₈" screw (D) on each side of the oven, the oven vent is taped to grip. Install Oven 1. Push oven completely into the cabinet and center the oven into the cabinet. Make...
... outside edges. 4. On models with the foot positioned with oven frame (A) as an area to the side of the cabinet. Insert the screwdriver into the cabinet cutout. A B C 2. Shipping foot 3. Use the oven opening as shown. ■ Using one #8-18 x ³⁄₈" screw (D) on each side of the oven, the oven vent is taped to grip. Install Oven 1. Push oven completely into the cabinet and center the oven into the cabinet. Make...

Warranty Information
Page 1
... appliances with published installation instructions. 10. IMPLIED WARRANTIES, INCLUDING WARRANTIES OF MERCHANTABILITY OR FITNESS FOR A PARTICULAR PURPOSE, ARE LIMITED TO ONE YEAR OR THE SHORTEST PERIOD ALLOWED BY LAW. If outside the 50 United States and Canada, contact your authorized KitchenAid dealer to repair or replace appliance light bulbs, air filters or water filters. In the U.S.A., call 1-800-807-6777. 9/07 21 KITCHENAID® BUILT-IN OVEN & MICROWAVE WARRANTY LIMITED WARRANTY For one...
... appliances with published installation instructions. 10. IMPLIED WARRANTIES, INCLUDING WARRANTIES OF MERCHANTABILITY OR FITNESS FOR A PARTICULAR PURPOSE, ARE LIMITED TO ONE YEAR OR THE SHORTEST PERIOD ALLOWED BY LAW. If outside the 50 United States and Canada, contact your authorized KitchenAid dealer to repair or replace appliance light bulbs, air filters or water filters. In the U.S.A., call 1-800-807-6777. 9/07 21 KITCHENAID® BUILT-IN OVEN & MICROWAVE WARRANTY LIMITED WARRANTY For one...


