
Use & Care Guide
Page 9
... baking layer cakes on the front edge of space around bakeware and oven walls. Place the cakes on 2 racks in Bake mode in nonconvection oven models, use racks 2f or 4f. Using 2 hands, grasp the front of space around bakeware and oven walls. For convection cooking, allow 2" (5 cm) of the closed rack and the sliding...
... baking layer cakes on the front edge of space around bakeware and oven walls. Place the cakes on 2 racks in Bake mode in nonconvection oven models, use racks 2f or 4f. Using 2 hands, grasp the front of space around bakeware and oven walls. For convection cooking, allow 2" (5 cm) of the closed rack and the sliding...

Use & Care Guide
Page 17
...included): See "Assistance or Service" section to handle bulb. Remove glass light cover by snapping back into wall. 6. Remove bulb from oven. 3. General Cleaning IMPORTANT: Before cleaning, make sure the oven is off and cool. 1. Cleaning Method: Rub in direction of vegetable oil applied to order. &#...Replace: Before replacing the bulb, make sure all -purpose cleaner: Rinse with clean water and dry with a damp sponge before running cycle. OVEN DOOR INTERIOR Cleaning Method: ■ Self-Cleaning cycle: For optimal door cleaning result, wipe away any deposits with soft, lint-free cloth...
...included): See "Assistance or Service" section to handle bulb. Remove glass light cover by snapping back into wall. 6. Remove bulb from oven. 3. General Cleaning IMPORTANT: Before cleaning, make sure the oven is off and cool. 1. Cleaning Method: Rub in direction of vegetable oil applied to order. &#...Replace: Before replacing the bulb, make sure all -purpose cleaner: Rinse with clean water and dry with a damp sponge before running cycle. OVEN DOOR INTERIOR Cleaning Method: ■ Self-Cleaning cycle: For optimal door cleaning result, wipe away any deposits with soft, lint-free cloth...

Installation Guide
Page 2
..." (76.2 cm) models. bottom vent trim ■ Four #8-18 x ³⁄₈" screws - See "Electrical Requirements." Given dimensions provide minimum clearance with cooktop installed above): Ovens approved for wall cabinet installations) ■ Level ■ Flat-blade screwdriver Parts needed ■ Phillips screwdriver ■ Measuring tape ■ Hand or electric drill (for...
..." (76.2 cm) models. bottom vent trim ■ Four #8-18 x ³⁄₈" screws - See "Electrical Requirements." Given dimensions provide minimum clearance with cooktop installed above): Ovens approved for wall cabinet installations) ■ Level ■ Flat-blade screwdriver Parts needed ■ Phillips screwdriver ■ Measuring tape ■ Hand or electric drill (for...
Installation Guide
Page 12
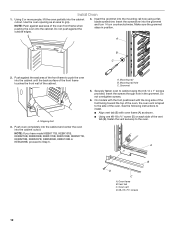
...Grommet 5. Do not push against the seal area of the front frame to push the oven into the cabinet until the back surface of the front frame touches the front wall of the oven front frame when pushing the oven into the cabinet. Insert the screwdriver into the cabinet cutout. Push... oven completely into the cabinet and center the oven into the mounting rail hole using the # 8-14 x 1" screws ...
...Grommet 5. Do not push against the seal area of the front frame to push the oven into the cabinet until the back surface of the front frame touches the front wall of the oven front frame when pushing the oven into the cabinet. Insert the screwdriver into the cabinet cutout. Push... oven completely into the cabinet and center the oven into the mounting rail hole using the # 8-14 x 1" screws ...

