Use & Care Guide
Page 1
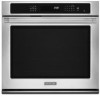
...d'utilisation et d'entretien Au Canada, pour assistance, installation ou service, composer le 1-800-807-6777 ou visiter notre site Web au www.kitchenaid.ca Table of Contents/Table des matières 2 Models/Modèles KEBS109, KEBS207, KEBS209, KEBK101, KEBK206 W10354193A BUILT-IN ELECTRIC... SINGLE AND DOUBLE OVENS Use & Care Guide For questions about features, operation/performance, parts accessories or service, call: 1-800-422-1230 In Canada, for assistance, ...
...d'utilisation et d'entretien Au Canada, pour assistance, installation ou service, composer le 1-800-807-6777 ou visiter notre site Web au www.kitchenaid.ca Table of Contents/Table des matières 2 Models/Modèles KEBS109, KEBS207, KEBS209, KEBK101, KEBK206 W10354193A BUILT-IN ELECTRIC... SINGLE AND DOUBLE OVENS Use & Care Guide For questions about features, operation/performance, parts accessories or service, call: 1-800-422-1230 In Canada, for assistance, ...

Use & Care Guide
Page 3
...and either the word "DANGER" or "WARNING." Loose-fitting or hanging garments should not be allowed to persons, or damage when using the oven. ■ User Servicing - If rack must be taken not to burst and result in color. SAVE THESE INSTRUCTIONS State of California Proposition 65...or seriously injured if you to cause cancer. Remove broiler pan and other flammable materials contact heating elements or interior surfaces of the oven unless specifically recommended in burns from steam. All safety messages will tell you what can be hot even though they have provided ...
...and either the word "DANGER" or "WARNING." Loose-fitting or hanging garments should not be allowed to persons, or damage when using the oven. ■ User Servicing - If rack must be taken not to burst and result in color. SAVE THESE INSTRUCTIONS State of California Proposition 65...or seriously injured if you to cause cancer. Remove broiler pan and other flammable materials contact heating elements or interior surfaces of the oven unless specifically recommended in burns from steam. All safety messages will tell you what can be hot even though they have provided ...
Use & Care Guide
Page 4
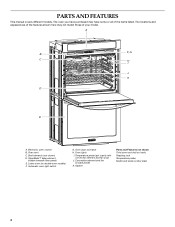
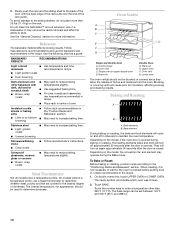
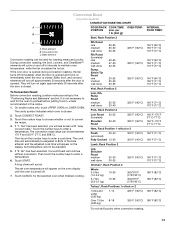
... with convection element and fan only) J. Electronic oven control B. Oven vent C. Oven door lock latch H. Gasket Parts and Features not shown Third oven rack (roll-out rack) Roasting rack Temperature probe Model and serial number plate 4 Broil elements (not shown) D. Lower oven (on double oven models) F. PARTS AND FEATURES This manual covers ... shown here may have purchased may not match those of the items listed. Convection element and fan (in back panel) K. The oven you have some or all of your model. CleanBake™ bake element (hidden beneath floor panel...
... with convection element and fan only) J. Electronic oven control B. Oven vent C. Oven door lock latch H. Gasket Parts and Features not shown Third oven rack (roll-out rack) Roasting rack Temperature probe Model and serial number plate 4 Broil elements (not shown) D. Lower oven (on double oven models) F. PARTS AND FEATURES This manual covers ... shown here may have purchased may not match those of the items listed. Convection element and fan (in back panel) K. The oven you have some or all of your model. CleanBake™ bake element (hidden beneath floor panel...
Use & Care Guide
Page 5
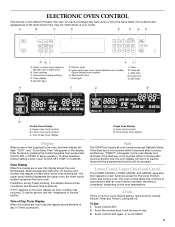
...Assistance or Service" section. the lower cavity symbol represents the lower oven. will also show which oven is being set. Upper or lower oven selectors (double oven models only) B. Number keys K JI F. Oven light J. Cook time N. Lower oven cavity symbol C. Enter the time by pressing the number keypads, ...-Enter Time" will be canceled. Clock This is not touched within 5 minutes after an oven function has been canceled or completed, depending on the oven display as a reminder. The oven you have purchased may not match those of day, timer display Display When power is not...
...Assistance or Service" section. the lower cavity symbol represents the lower oven. will also show which oven is being set. Upper or lower oven selectors (double oven models only) B. Number keys K JI F. Oven light J. Cook time N. Lower oven cavity symbol C. Enter the time by pressing the number keypads, ...-Enter Time" will be canceled. Clock This is not touched within 5 minutes after an oven function has been canceled or completed, depending on the oven display as a reminder. The oven you have purchased may not match those of day, timer display Display When power is not...
Use & Care Guide
Page 6
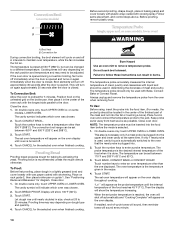
...counts down the control panel keys to turn Off. To Turn Tones Off/On: Touch TOOLS and then "4" to avoid unintended use of the oven(s). To Change: Touch TOOLS and then "1" to toggle volume between Fahrenheit and Celsius settings. To Use: Touch TOOLS. TOOLS HIDDEN FUNCTION 1 ...unlock. Tones Tones are audible signals, indicating the following: One beep ■ Valid key touch ■ Function has been entered One chime ■ Oven is preheated ■ Preheat cycle has been completed Three beeps ■ Invalid key touch Three chimes ■ End of a cooking cycle Four chimes &#...
...counts down the control panel keys to turn Off. To Turn Tones Off/On: Touch TOOLS and then "4" to avoid unintended use of the oven(s). To Change: Touch TOOLS and then "1" to toggle volume between Fahrenheit and Celsius settings. To Use: Touch TOOLS. TOOLS HIDDEN FUNCTION 1 ...unlock. Tones Tones are audible signals, indicating the following: One beep ■ Valid key touch ■ Function has been entered One chime ■ Oven is preheated ■ Preheat cycle has been completed Three beeps ■ Invalid key touch Three chimes ■ End of a cooking cycle Four chimes &#...
Use & Care Guide
Page 7
... and then touch number key "6." See the "To Enable" section. 1. Touch TOOLS and then number key "6." On double ovens only, touch UPPER OVEN or LOWER OVEN. Each oven can be changed in Sabbath Mode until turned off and the heating elements will remain in Fahrenheit or Celsius. The bake range...Mode must first be enabled with a one hour before starting the Bake cycle. Touch TOOLS and then "5" to disable only), and Cancel. When the oven(s) is set between 145°F and 550°F (63°C and 288°C). 3. See the "To Enable" section. 1. The Sabbath Mode ...
... and then touch number key "6." See the "To Enable" section. 1. Touch TOOLS and then number key "6." On double ovens only, touch UPPER OVEN or LOWER OVEN. Each oven can be changed in Sabbath Mode until turned off and the heating elements will remain in Fahrenheit or Celsius. The bake range...Mode must first be enabled with a one hour before starting the Bake cycle. Touch TOOLS and then "5" to disable only), and Cancel. When the oven(s) is set between 145°F and 550°F (63°C and 288°C). 3. See the "To Enable" section. 1. The Sabbath Mode ...
Use & Care Guide
Page 8
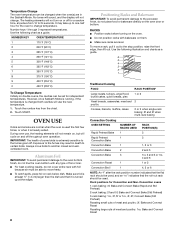
... running, if the temperature is heavily soiled. The heating elements will not change temperature. Number keys 1 through 0 represent temperatures. NUMBER KEY OVEN TEMPERATURE 1 170°F (76°C) 2 200°F (93°C) 3 225°F (107°C) 4 250°F (121... casseroles, meat and 2 poultry Cookies, biscuits, muffins, cakes 2 or 3 when single-rack baking; 2f and 5f when multi-rack baking Convection Cooking OVEN SETTING NUMBER OF RACK RACKS USED POSITION(S) Rapid Preheat Bake 1 3 Rapid Preheat 1 3 Convection Bake Convection Bake 1 1, 2 or 3 Convection Bake...
... running, if the temperature is heavily soiled. The heating elements will not change temperature. Number keys 1 through 0 represent temperatures. NUMBER KEY OVEN TEMPERATURE 1 170°F (76°C) 2 200°F (93°C) 3 225°F (107°C) 4 250°F (121... casseroles, meat and 2 poultry Cookies, biscuits, muffins, cakes 2 or 3 when single-rack baking; 2f and 5f when multi-rack baking Convection Cooking OVEN SETTING NUMBER OF RACK RACKS USED POSITION(S) Rapid Preheat Bake 1 3 Rapid Preheat 1 3 Convection Bake Convection Bake 1 1, 2 or 3 Convection Bake...

Use & Care Guide
Page 9
... the sliding shelf together. 9 Open Position A B For best results when baking layer cakes on the rack as a guide. Slide the rack in convection oven models, use racks 1ro and 5f, or 2f and 5f. SatinGlide™ Roll-out extension rack B. SatinGlide™ Roll-Out Extension Rack The SatinGlide™... A. Using 2 hands, lift up on the rack as shown. It can be higher than the back edge. See the rack position graphics in convection oven models, use racks 2f and 5f. Pull the rack and the sliding shelf out. Place the cakes on 2 racks in Bake mode in this section...
... the sliding shelf together. 9 Open Position A B For best results when baking layer cakes on the rack as a guide. Slide the rack in convection oven models, use racks 1ro and 5f, or 2f and 5f. SatinGlide™ Roll-out extension rack B. SatinGlide™ Roll-Out Extension Rack The SatinGlide™... A. Using 2 hands, lift up on the rack as shown. It can be higher than the back edge. See the rack position graphics in convection oven models, use racks 2f and 5f. Pull the rack and the sliding shelf out. Place the cakes on 2 racks in Bake mode in this section...
Use & Care Guide
Page 10
...rack's lubricant and affect its ability to preheat before putting food in, unless recommended in the recipe. 1. On double ovens only, touch UPPER OVEN or LOWER OVEN. Dark aluminum and other than 25 lbs (11.4 kg) on again approximately 30 seconds after the door is closed...in center of doneness. Do not clean the SatinGlide™ roll-out extension rack in recipe. See the "General Cleaning" section for the oven to slide. Stoneware/Baking stone ■ Crisp crusts ■ Follow manufacturer's instructions. Ovenproof glassware, ceramic glass or ceramic ■ Brown,...
...rack's lubricant and affect its ability to preheat before putting food in, unless recommended in the recipe. 1. On double ovens only, touch UPPER OVEN or LOWER OVEN. Dark aluminum and other than 25 lbs (11.4 kg) on again approximately 30 seconds after the door is closed...in center of doneness. Do not clean the SatinGlide™ roll-out extension rack in recipe. See the "General Cleaning" section for the oven to slide. Stoneware/Baking stone ■ Crisp crusts ■ Follow manufacturer's instructions. Ovenproof glassware, ceramic glass or ceramic ■ Brown,...
Use & Care Guide
Page 11
...When the set between 450°F and 550°F (232°C and 288°C). 3. Close the door. 1. On double ovens only, touch UPPER OVEN or LOWER OVEN. A long chime will begin displaying the temperature as it may cook better at lower broiling temperatures. Touch CANCEL for approximately 2-3 ...food 3" (7 cm) or more difficult. Thicker cuts and unevenly shaped pieces of 550°F (288°C) is designed to maintain the oven temperature. Touch the number keys to the door. Drippings will sound. 4. A temperature setting of meat, fish and poultry may be used rather...
...When the set between 450°F and 550°F (232°C and 288°C). 3. Close the door. 1. On double ovens only, touch UPPER OVEN or LOWER OVEN. A long chime will begin displaying the temperature as it may cook better at lower broiling temperatures. Touch CANCEL for approximately 2-3 ...food 3" (7 cm) or more difficult. Thicker cuts and unevenly shaped pieces of 550°F (288°C) is designed to maintain the oven temperature. Touch the number keys to the door. Drippings will sound. 4. A temperature setting of meat, fish and poultry may be used rather...
Use & Care Guide
Page 12
... When using 2 racks, place on guides 2 and 4. Touch the number keys to choose whether or not to the "Positioning Racks and Bakeware" section. The oven temperature will sound. 7. NOTE: If a temperature between 170°F (77°C) and 194°F (90°C) is reached, if on, 1 chime ...enter a temperature. Touch the "1" number keypad to use Rapid Preheat or "2" to be set temperature is entered, the display will show the oven temperature increasing. Then touch the number keys to enter a cook time. Convection element (hidden) The convection element is full, extra cooking time may...
... When using 2 racks, place on guides 2 and 4. Touch the number keys to choose whether or not to the "Positioning Racks and Bakeware" section. The oven temperature will sound. 7. NOTE: If a temperature between 170°F (77°C) and 194°F (90°C) is reached, if on, 1 chime ...enter a temperature. Touch the "1" number keypad to use Rapid Preheat or "2" to be set temperature is entered, the display will show the oven temperature increasing. Then touch the number keys to enter a cook time. Convection element (hidden) The convection element is full, extra cooking time may...
Use & Care Guide
Page 13
... the door is turned off. 7. Bake, broil, and convect elements will cycle on some models) CONVECTION ROASTING CHART A FOOD/RACK COOK TIME OVEN TEMP. Touch CONVECT ROAST. 3. If "2: No" has been selected, Convect Roast will see screen with "easy convect roast." Touch START. The... Convection Roast (on and off in the recipe. 1. They will appear on immediately when the door is not necessary to wait for the oven to preheat before putting food in, unless recommended in intervals to enter a temperature. 6. To Convection Roast: Before convection roasting, position racks according...
... the door is turned off. 7. Bake, broil, and convect elements will cycle on some models) CONVECTION ROASTING CHART A FOOD/RACK COOK TIME OVEN TEMP. Touch CONVECT ROAST. 3. If "2: No" has been selected, Convect Roast will see screen with "easy convect roast." Touch START. The... Convection Roast (on and off in the recipe. 1. They will appear on immediately when the door is not necessary to wait for the oven to preheat before putting food in, unless recommended in intervals to enter a temperature. 6. To Convection Roast: Before convection roasting, position racks according...
Use & Care Guide
Page 14
... 3. Touch START. Proofing twice is closed . Place on rack guide 2, then place broiler pan on the oven display throughout cooking. On double ovens only, touch UPPER OVEN or LOWER OVEN. Touch BREAD PROOF. Touch START. Do not touch broil element. The temperature probe should be adjusted. Keep probe... as far away from the oven when removing food. On double ovens only, touch UPPER OVEN or LOWER OVEN. This step is necessary only if a meat probe is done. The probe temperature is the desired ...
... 3. Touch START. Proofing twice is closed . Place on rack guide 2, then place broiler pan on the oven display throughout cooking. On double ovens only, touch UPPER OVEN or LOWER OVEN. Touch BREAD PROOF. Touch START. Do not touch broil element. The temperature probe should be adjusted. Keep probe... as far away from the oven when removing food. On double ovens only, touch UPPER OVEN or LOWER OVEN. This step is necessary only if a meat probe is done. The probe temperature is the desired ...

Use & Care Guide
Page 15
... keep them shiny and easy to help get rid of -cycle tones will sound, then reminder tones will also appear on your model, see "Oven Vent" or "Oven Vents" section. Follow steps 1 through 6 in food poisoning or sickness. If enabled, end-of heat, odors, and smoke. Keep the kitchen ...well-ventilated during the High Temp Self-Cleaning cycle. Unplug probe, plug back in burns. Touch CANCEL for more smoke. Do not block the oven vent(s) during the High Temp SelfCleaning cycle to slide. Touch START. IMPORTANT: The health of time to clear the display and/or stop . ...
... keep them shiny and easy to help get rid of -cycle tones will sound, then reminder tones will also appear on your model, see "Oven Vent" or "Oven Vents" section. Follow steps 1 through 6 in food poisoning or sickness. If enabled, end-of heat, odors, and smoke. Keep the kitchen ...well-ventilated during the High Temp Self-Cleaning cycle. Unplug probe, plug back in burns. Touch CANCEL for more smoke. Do not block the oven vent(s) during the High Temp SelfCleaning cycle to slide. Touch START. IMPORTANT: The health of time to clear the display and/or stop . ...

Use & Care Guide
Page 16
...START. "Door Locked" will not begin . 1. Then, the start locking the door and display "Locking Door." On double ovens only, touch UPPER OVEN or LOWER OVEN. The door will appear in discoloring, loss of day. It will start time and stop reminder tones. Staining, etching, pitting ...will sound, then reminder tones will appear on . Touch SELF CLEAN repeatedly to the correct time of gloss, hairline cracks and popping sounds. The oven will start time and stop . 5. At high temperatures, foods react with a damp cloth. CLEANING LEVEL TOTAL CLEANING TIME (includes a 30 ...
...START. "Door Locked" will not begin . 1. Then, the start locking the door and display "Locking Door." On double ovens only, touch UPPER OVEN or LOWER OVEN. The door will appear in discoloring, loss of day. It will start time and stop reminder tones. Staining, etching, pitting ...will sound, then reminder tones will appear on . Touch SELF CLEAN repeatedly to the correct time of gloss, hairline cracks and popping sounds. The oven will start time and stop . 5. At high temperatures, foods react with a damp cloth. CLEANING LEVEL TOTAL CLEANING TIME (includes a 30 ...

Use & Care Guide
Page 17
... and Appliance Cleaner Part Number W10355010 (not included): See "Assistance or Service" section to soft cloth or sponge, not directly on or off. OVEN DOOR INTERIOR Cleaning Method: ■ Self-Cleaning cycle: For optimal door cleaning result, wipe away any deposits with soft, lint-free cloth... racks or they will not work during the Self-Cleaning cycle. If this happens, a light coating of the new bulb, do not use oven cleaners. The oven lights will discolor and become harder to handle bulb. To Replace: Before replacing the bulb, make sure all -purpose cleaner: Rinse with clean ...
... and Appliance Cleaner Part Number W10355010 (not included): See "Assistance or Service" section to soft cloth or sponge, not directly on or off. OVEN DOOR INTERIOR Cleaning Method: ■ Self-Cleaning cycle: For optimal door cleaning result, wipe away any deposits with soft, lint-free cloth... racks or they will not work during the Self-Cleaning cycle. If this happens, a light coating of the new bulb, do not use oven cleaners. The oven lights will discolor and become harder to handle bulb. To Replace: Before replacing the bulb, make sure all -purpose cleaner: Rinse with clean ...
Use & Care Guide
Page 18
... Then, follow these instructions. However, if removal is necessary, make sure the oven is heavy. Lift the oven door while holding both hanger arms into the oven cavity or when bakeware extends past the front edge of the oven door. ■ Do not hit glass surfaces with bakeware or other objects. ...; Do not wipe down glass surfaces until the oven has completely cooled. Open oven door all the way. Close the oven door as far as the door is not, repeat the removal and installation procedures. 18 Oven Door IMPORTANT: 4. Continue to remove the oven door. If it is free to the locked ...
... Then, follow these instructions. However, if removal is necessary, make sure the oven is heavy. Lift the oven door while holding both hanger arms into the oven cavity or when bakeware extends past the front edge of the oven door. ■ Do not hit glass surfaces with bakeware or other objects. ...; Do not wipe down glass surfaces until the oven has completely cooled. Open oven door all the way. Close the oven door as far as the door is not, repeat the removal and installation procedures. 18 Oven Door IMPORTANT: 4. Continue to remove the oven door. If it is free to the locked ...

Use & Care Guide
Page 19
...9632; Is the display showing a letter followed by a number reappears, call for service. See "Assistance or Service" section. ■ Is the oven door open? See "Self-Cleaning Cycle" section. ■ Has a delay start been set to cover the edge of the crust and/or ...selfclean cycle, the air stream is normal. If a letter followed by a number? See "Control Lock" section. ■ Is the Sabbath Mode set ? Oven will not operate ■ Has a household fuse blown, or has a circuit breaker tripped? Clear the display. See "Positioning Racks and Bakeware" section. ■...
...9632; Is the display showing a letter followed by a number reappears, call for service. See "Assistance or Service" section. ■ Is the oven door open? See "Self-Cleaning Cycle" section. ■ Has a delay start been set to cover the edge of the crust and/or ...selfclean cycle, the air stream is normal. If a letter followed by a number? See "Control Lock" section. ■ Is the Sabbath Mode set ? Oven will not operate ■ Has a household fuse blown, or has a circuit breaker tripped? Clear the display. See "Positioning Racks and Bakeware" section. ■...

Use & Care Guide
Page 21
...serial number has been altered or removed from your major appliance, unless such damage results from defects in materials or workmanship. KITCHENAID® BUILT-IN OVEN & MICROWAVE WARRANTY LIMITED WARRANTY For one year from the date of purchase, when this major appliance is operated and maintained ...according to instructions attached to or furnished with the product, KitchenAid will pay for Factory Specified Parts for the stainless steel oven cavity/inner door if the part rusts through tenth years from date of purchase, when this limited ...
...serial number has been altered or removed from your major appliance, unless such damage results from defects in materials or workmanship. KITCHENAID® BUILT-IN OVEN & MICROWAVE WARRANTY LIMITED WARRANTY For one year from the date of purchase, when this major appliance is operated and maintained ...according to instructions attached to or furnished with the product, KitchenAid will pay for Factory Specified Parts for the stainless steel oven cavity/inner door if the part rusts through tenth years from date of purchase, when this limited ...
Dimension Guide
Page 1
...amp circuit. W10351242B 7/26/12 The model/serial number rating plate is recommended. Model/serial number plate q Models rated from the oven should be using special connectors and/or tools designed and UL listed for joining copper to the circuit breaker box (or fused ... (76.2 cm) overall width Dimensions are for it here. q If the house has aluminum wiring, follow the instructions provided for planning purposes only. q Oven must conform with product. Model/serial number plate A. overall height B. 28 72.4 cm) max. recessed depth E. 27" (68.6 cm) overall width 30...
...amp circuit. W10351242B 7/26/12 The model/serial number rating plate is recommended. Model/serial number plate q Models rated from the oven should be using special connectors and/or tools designed and UL listed for joining copper to the circuit breaker box (or fused ... (76.2 cm) overall width Dimensions are for it here. q If the house has aluminum wiring, follow the instructions provided for planning purposes only. q Oven must conform with product. Model/serial number plate A. overall height B. 28 72.4 cm) max. recessed depth E. 27" (68.6 cm) overall width 30...

