Use & Care Guide
Page 1
KMT2203 • KMT4203 Toaster INSTRUCTIONS Grille-pain INSTRUCTIONS Tostador INSTRUCCIONES W10510972A
KMT2203 • KMT4203 Toaster INSTRUCTIONS Grille-pain INSTRUCTIONS Tostador INSTRUCCIONES W10510972A
Use & Care Guide
Page 2
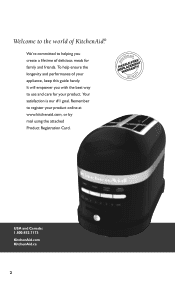
We're committed to helping you with the best way to use and care for family and friends. Remember to register your product. USA and Canada: 1.800.832.7173 KitchenAid.com KitchenAid.ca 2 Your satisfaction is our #1 goal. Welcome to the world of your appliance, keep this guide handy. To help ensure the longevity and performance of KitchenAid®. It will empower you create a lifetime of delicious meals for your product online at www.kitchenaid.com, or by mail using the attached Product Registration Card.
We're committed to helping you with the best way to use and care for family and friends. Remember to register your product. USA and Canada: 1.800.832.7173 KitchenAid.com KitchenAid.ca 2 Your satisfaction is our #1 goal. Welcome to the world of your appliance, keep this guide handy. To help ensure the longevity and performance of KitchenAid®. It will empower you create a lifetime of delicious meals for your product online at www.kitchenaid.com, or by mail using the attached Product Registration Card.
Use & Care Guide
Page 3
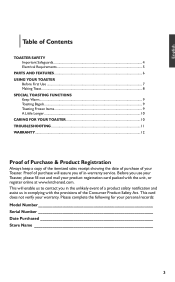
... not verify your personal records: Model Number Serial Number Date Purchased Store Name 3 Please complete the following for your warranty. English Table of Contents TOASTER SAFETY Important Safeguards 4 Electrical Requirements 5 PARTS AND FEATURES 6 USING YOUR TOASTER Before First Use...7 Making Toast...8 SPECIAL TOASTING FUNCTIONS Keep Warm...9 Toasting Bagels...9 Toasting Frozen Items 9 A Little Longer...10 CARING FOR YOUR TOASTER 10 TROUBLESHOOTING 11 WARRANTY...12 Proof of Purchase & Product...
... not verify your personal records: Model Number Serial Number Date Purchased Store Name 3 Please complete the following for your warranty. English Table of Contents TOASTER SAFETY Important Safeguards 4 Electrical Requirements 5 PARTS AND FEATURES 6 USING YOUR TOASTER Before First Use...7 Making Toast...8 SPECIAL TOASTING FUNCTIONS Keep Warm...9 Toasting Bagels...9 Toasting Frozen Items 9 A Little Longer...10 CARING FOR YOUR TOASTER 10 TROUBLESHOOTING 11 WARRANTY...12 Proof of Purchase & Product...

Use & Care Guide
Page 4
... may cause injuries. 8. SAVE THESE INSTRUCTIONS 4 Use handles or knobs. 3. Unplug toaster from outlet. 12. Do not use . 13. Always read and obey all instructions. 2. The use of accessory attachments not recommended by or near a hot gas or electric burner, or in this manual and on or taking off parts. 6. Do not use toaster for household use and before putting on your appliance...
... may cause injuries. 8. SAVE THESE INSTRUCTIONS 4 Use handles or knobs. 3. Unplug toaster from outlet. 12. Do not use . 13. Always read and obey all instructions. 2. The use of accessory attachments not recommended by or near a hot gas or electric burner, or in this manual and on or taking off parts. 6. Do not use toaster for household use and before putting on your appliance...
Use & Care Guide
Page 5
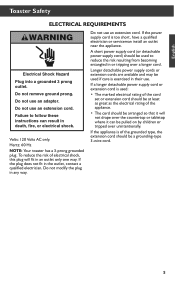
... type, the extension cord should be arranged so that it will fit in their use an extension cord. Do not use an extension cord. Volts: 120 Volts AC only. Hertz: 60 Hz NOTE: Your toaster ...should be a grounding-type 3-wire cord. 5 A short power supply cord (or detachable power supply cord) should be used to follow these instructions can be used : • The marked electrical rating of the cord set or extension cord should... unintentionally. If the appliance is used if care is too short, have a qualified electrician or serviceman install an outlet near the appliance.
... type, the extension cord should be arranged so that it will fit in their use an extension cord. Do not use an extension cord. Volts: 120 Volts AC only. Hertz: 60 Hz NOTE: Your toaster ...should be a grounding-type 3-wire cord. 5 A short power supply cord (or detachable power supply cord) should be used to follow these instructions can be used : • The marked electrical rating of the cord set or extension cord should... unintentionally. If the appliance is used if care is too short, have a qualified electrician or serviceman install an outlet near the appliance.
Use & Care Guide
Page 6
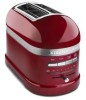
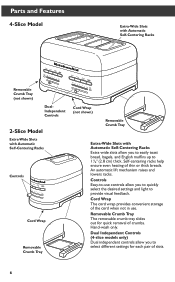
... allow you to easily toast bread, bagels, and English muffins up to 11/8" (2.8 cm) thick. An automatic lift mechanism raises and lowers racks. Hand-wash only. Self-centering racks help ensure even heating of crumbs. Controls Easy-to-use . Parts and Features 4-Slice Model Extra-Wide Slots with Automatic Self-Centering Racks Removable Crumb Tray (not shown) DualIndependent Controls 2-Slice Model Extra-Wide Slots with Automatic Self-Centering...
... allow you to easily toast bread, bagels, and English muffins up to 11/8" (2.8 cm) thick. An automatic lift mechanism raises and lowers racks. Hand-wash only. Self-centering racks help ensure even heating of crumbs. Controls Easy-to-use . Parts and Features 4-Slice Model Extra-Wide Slots with Automatic Self-Centering Racks Removable Crumb Tray (not shown) DualIndependent Controls 2-Slice Model Extra-Wide Slots with Automatic Self-Centering...
Use & Care Guide
Page 7
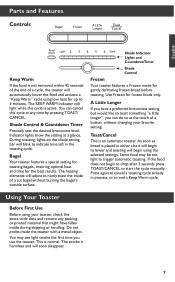
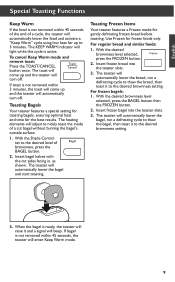
... as bread is placed in either slot it will begin to drop after 3 seconds press TOAST/CANCEL to nicely toast the inside the toaster with a metal object. A Little Longer If you have fallen inside during shipping or handling. Press again to cancel a toasting cycle already in the toasting cycle....of a cycle, the toaster will automatically lower the food and activate a "Keep Warm" cycle using low heat for up to trigger automatic toasting. Use Frozen for frozen foods only. Do not probe inside of a cut bagel without changing your toaster, check the extra-wide slots and remove any time ...
... as bread is placed in either slot it will begin to drop after 3 seconds press TOAST/CANCEL to nicely toast the inside the toaster with a metal object. A Little Longer If you have fallen inside during shipping or handling. Press again to cancel a toasting cycle already in the toasting cycle....of a cycle, the toaster will automatically lower the food and activate a "Keep Warm" cycle using low heat for up to trigger automatic toasting. Use Frozen for frozen foods only. Do not probe inside of a cut bagel without changing your toaster, check the extra-wide slots and remove any time ...
Use & Care Guide
Page 8
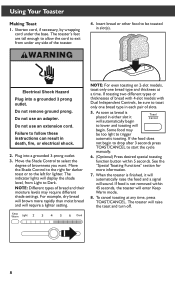
... of the toaster. Some food may require different shade settings. If food is finished, it will automatically begin to drop after 3 seconds press TOAST/CANCEL to follow these instructions can result in slot(s). Electrical Shock Hazard Plug into a grounded 3-prong outlet. 3. Plug into a grounded 3 prong outlet. NOTE: For even toasting on 2-slot models, toast only one bread type in either slot it...
... of the toaster. Some food may require different shade settings. If food is finished, it will automatically begin to drop after 3 seconds press TOAST/CANCEL to follow these instructions can result in slot(s). Electrical Shock Hazard Plug into a grounded 3-prong outlet. 3. Plug into a grounded 3 prong outlet. NOTE: For even toasting on 2-slot models, toast only one bread type in either slot it...
Use & Care Guide
Page 9
..., press the BAGEL button. 2. The toaster will automatically lower the bagel and start toasting. Insert frozen bagel into the toaster slots. 3. English Special Toasting Functions Keep Warm If the food is not removed within 45 seconds of the end of a cycle, the toaster will turn off . To cancel Keep Warm mode and remove toast: Press the TOAST/CANCEL button once. For regular bread and similar...
..., press the BAGEL button. 2. The toaster will automatically lower the bagel and start toasting. Insert frozen bagel into the toaster slots. 3. English Special Toasting Functions Keep Warm If the food is not removed within 45 seconds of the end of a cycle, the toaster will turn off . To cancel Keep Warm mode and remove toast: Press the TOAST/CANCEL button once. For regular bread and similar...
Use & Care Guide
Page 10
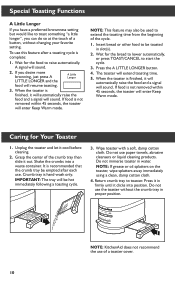
... a toasting cycle. 3. Shake the crumbs into position. Do not immerse toaster in water. Return crumb tray to raise automatically. Press it in firmly until it clicks into a waste container. Do not use the toaster without changing your favorite setting. NOTE: KitchenAid does not recommend the use paper towels, abrasive cleansers or liquid cleaning products. The toaster will resume toasting. 3. Caring for the bread to...
... a toasting cycle. 3. Shake the crumbs into position. Do not immerse toaster in water. Return crumb tray to raise automatically. Press it in firmly until it clicks into a waste container. Do not use the toaster without changing your favorite setting. NOTE: KitchenAid does not recommend the use paper towels, abrasive cleansers or liquid cleaning products. The toaster will resume toasting. 3. Caring for the bread to...
Use & Care Guide
Page 11
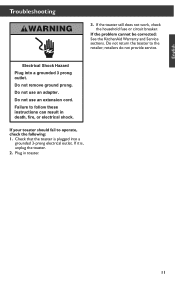
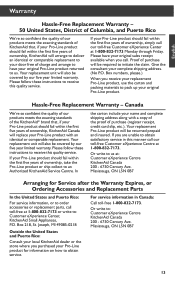
If the toaster still does not work, check the household fuse or circuit breaker. If your toaster should fail to the retailer; Do not return the toaster to operate, check the following: 1. Check that the toaster is , unplug the toaster. 2. Do not use an extension .... Do not remove ground prong. retailers do not provide service. Failure to follow these instructions can result in toaster. 11 English Troubleshooting WARNING 3. If the problem cannot be corrected: See the KitchenAid Warranty and Service sections. Do not use an adapter. If it is plugged into a grounded 3...
If the toaster still does not work, check the household fuse or circuit breaker. If your toaster should fail to the retailer; Do not return the toaster to operate, check the following: 1. Check that the toaster is , unplug the toaster. 2. Do not use an extension .... Do not remove ground prong. retailers do not provide service. Failure to follow these instructions can result in toaster. 11 English Troubleshooting WARNING 3. If the problem cannot be corrected: See the KitchenAid Warranty and Service sections. Do not use an adapter. If it is plugged into a grounded 3...

Use & Care Guide
Page 12
... the exclusion or limitation of implied warranties or merchantability or fitness, so this Warranty. KitchenAid Will A. Any shipping or handling costs to deliver your Pro-Line product. OR The replacement parts and repair labor costs to province. This warranty gives you specific legal rights, and you . C. Length of Limited Total Replacement Warranty: KitchenAid Will Pay for KitchenAid Pro-Line products operated in materials...
... the exclusion or limitation of implied warranties or merchantability or fitness, so this Warranty. KitchenAid Will A. Any shipping or handling costs to deliver your Pro-Line product. OR The replacement parts and repair labor costs to province. This warranty gives you specific legal rights, and you . C. Length of Limited Total Replacement Warranty: KitchenAid Will Pay for KitchenAid Pro-Line products operated in materials...
Use & Care Guide
Page 13
... these instructions to obtain service. Mississauga, ON L5N 0B7 13 Give the consultant your replacement Pro-Line product, use the carton and packing materials to : Customer eXperience Centre KitchenAid Canada 200 - 6750 Century Ave. Your replacement unit will be returned prepaid and insured. Proof of purchase will also be covered by our five year limited warranty. Mississauga...
... these instructions to obtain service. Mississauga, ON L5N 0B7 13 Give the consultant your replacement Pro-Line product, use the carton and packing materials to : Customer eXperience Centre KitchenAid Canada 200 - 6750 Century Ave. Your replacement unit will be returned prepaid and insured. Proof of purchase will also be covered by our five year limited warranty. Mississauga...


