Use and Care Guide
Page 2
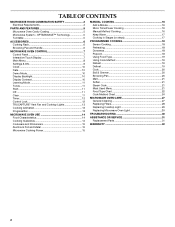
... PROGRAMMED COOKING 18 Sensor Cooking 18 Preheating 18 Doneness 18 Popcorn 18 Using Food Type 19 Using Cook Method 19 Reheat 19 Defrost 19 Cook 20 Boil & Simmer 20 Browning Pan 20 Melt 21 Soften 21 Steam Cook 21 Most Used Menu 21 Food Type Chart 22 Cook Method Chart 24 MICROWAVE OVEN CARE 27 General Cleaning 27 Replacing Filters 28 Replacing Cooktop Light 29 Replacing Microwave Oven Light 29 TROUBLESHOOTING 30 ASSISTANCE OR SERVICE 31 Replacement Parts 31 WARRANTY 32 2 TABLE OF CONTENTS MICROWAVE HOOD COMBINATION SAFETY 3 Electrical Requirements 4 PARTS...
... PROGRAMMED COOKING 18 Sensor Cooking 18 Preheating 18 Doneness 18 Popcorn 18 Using Food Type 19 Using Cook Method 19 Reheat 19 Defrost 19 Cook 20 Boil & Simmer 20 Browning Pan 20 Melt 21 Soften 21 Steam Cook 21 Most Used Menu 21 Food Type Chart 22 Cook Method Chart 24 MICROWAVE OVEN CARE 27 General Cleaning 27 Replacing Filters 28 Replacing Cooktop Light 29 Replacing Microwave Oven Light 29 TROUBLESHOOTING 30 ASSISTANCE OR SERVICE 31 Replacement Parts 31 WARRANTY 32 2 TABLE OF CONTENTS MICROWAVE HOOD COMBINATION SAFETY 3 Electrical Requirements 4 PARTS...
Use and Care Guide
Page 3
.... This is specifically designed to heat, cook, or dry food. These words mean: DANGER You can kill or hurt you what the potential hazard is not always present. Connect only to persons: - for example, closed , turn oven off, and disconnect the power cord, or shut off the pad and touch electrical parts involving a risk of electric shock. Do not use corrosive chemicals or...
.... This is specifically designed to heat, cook, or dry food. These words mean: DANGER You can kill or hurt you what the potential hazard is not always present. Connect only to persons: - for example, closed , turn oven off, and disconnect the power cord, or shut off the pad and touch electrical parts involving a risk of electric shock. Do not use corrosive chemicals or...
Use and Care Guide
Page 4
.... ■ Do not let cord hang over edge of table or counter. ■ Do not mount over a sink. ■ Do not cover racks or any object between the oven front face and the door or allow soil or cleaner residue to whether the microwave oven is in use. ■ Do not store anything directly on . ■ Use care when cleaning the vent-hood filter. It is important not...
.... ■ Do not let cord hang over edge of table or counter. ■ Do not mount over a sink. ■ Do not cover racks or any object between the oven front face and the door or allow soil or cleaner residue to whether the microwave oven is in use. ■ Do not store anything directly on . ■ Use care when cleaning the vent-hood filter. It is important not...
Use and Care Guide
Page 5
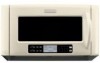
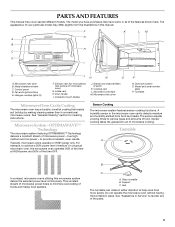
... operate the microwave oven without having the turntable in conventional microwave ovens. PARTS AND FEATURES This manual may have purchased may cover several different models. The model you have some or all of the features shown here. The appearance of microwave oven) G. Metal-shielded window C. Fan and Lights buttons E. Exhaust vent (for cleaning instructions. Intake vent H. Interactive touch display J. Grease and charcoal filters (2 each) K. Cooking rack L. Microwave oven light M. Door lock system O. Turntable Microwave Oven Cavity Coating The microwave oven has...
... operate the microwave oven without having the turntable in conventional microwave ovens. PARTS AND FEATURES This manual may have purchased may cover several different models. The model you have some or all of the features shown here. The appearance of microwave oven) G. Metal-shielded window C. Fan and Lights buttons E. Exhaust vent (for cleaning instructions. Intake vent H. Interactive touch display J. Grease and charcoal filters (2 each) K. Cooking rack L. Microwave oven light M. Door lock system O. Turntable Microwave Oven Cavity Coating The microwave oven has...

Use and Care Guide
Page 6
... order replacement parts. Touch TURNTABLE (ON/OFF). Repeat to turn the turntable back on the microwave oven. ■ Rack will automatically default to use browning pan on rack. ■ Remove rack before using the rack for replacement. Any of the parts may be turned off indicator will appear on the support. Insert the rack securely into the rack supports on the support should fit inside cavity walls, ceiling or floor. ■ Use the rack only when cooking on 2 levels...
... order replacement parts. Touch TURNTABLE (ON/OFF). Repeat to turn the turntable back on the microwave oven. ■ Rack will automatically default to use browning pan on rack. ■ Remove rack before using the rack for replacement. Any of the parts may be turned off indicator will appear on the support. Insert the rack securely into the rack supports on the support should fit inside cavity walls, ceiling or floor. ■ Use the rack only when cooking on 2 levels...
Use and Care Guide
Page 9
...), then follow the instructions on the microwave generator. See "Display Contrast" section Hints View comprehensive lists of hints for general operation and care of microwave oven: ■ Cleaning: cavity, control panel, odors and turntable. ■ Cookware: covers, depth, materials and shape. ■ Food: eggs, moisture, quantity and shape. ■ Methods: arranging, covering, defrosting and standing. ■ Power levels: list of the "Cook Method" menu. 1. Volume ■ Set tone volume using "+" and "-" controls. If the...
...), then follow the instructions on the microwave generator. See "Display Contrast" section Hints View comprehensive lists of hints for general operation and care of microwave oven: ■ Cleaning: cavity, control panel, odors and turntable. ■ Cookware: covers, depth, materials and shape. ■ Food: eggs, moisture, quantity and shape. ■ Methods: arranging, covering, defrosting and standing. ■ Power levels: list of the "Cook Method" menu. 1. Volume ■ Set tone volume using "+" and "-" controls. If the...
Use and Care Guide
Page 11
... tones, followed by opening the door. door needs to start . Close the door and touch START control or "Continue" on , the fan will run, and the turntable will change the time you have already entered to set , functions can be entered, with real displays and tones, without actually turning on some display screens, and provides the same function as minutes, seconds and cook power that are operating in the past...
... tones, followed by opening the door. door needs to start . Close the door and touch START control or "Continue" on , the fan will run, and the turntable will change the time you have already entered to set , functions can be entered, with real displays and tones, without actually turning on some display screens, and provides the same function as minutes, seconds and cook power that are operating in the past...
Use and Care Guide
Page 15
... become hot from heat transferred from the microwave oven. Do Not Use Metal cookware and bakeware, gold, silver, pewter, nonapproved meat thermometers, skewers, twist ties, foil liners such as a guide, then test before using. Use the following chart as sandwich wrappers, staples and objects with the microwave oven (on the turntable. PERCENT/NAME USE 100%, High (default Quick heating convenience foods and setting) foods with gold or silver trim. Softening...
... become hot from heat transferred from the microwave oven. Do Not Use Metal cookware and bakeware, gold, silver, pewter, nonapproved meat thermometers, skewers, twist ties, foil liners such as a guide, then test before using. Use the following chart as sandwich wrappers, staples and objects with the microwave oven (on the turntable. PERCENT/NAME USE 100%, High (default Quick heating convenience foods and setting) foods with gold or silver trim. Softening...
Use and Care Guide
Page 16
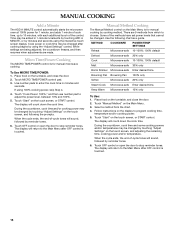
... time. To Use MICRO TIME/POWER: 1. If using the "Adjust Settings" control. When the cycle ends, the end-of -cycle tones will sound, followed by cooking method. The display will count down the cook time. Manual Method Cooking The Manual Method control on the turntable, and close the door. 2. Place food on the Main Menu is touched. 16 Select a method from which to adjust the power level, between 10% and 100%. 5. Touch "Start" on the touch...
... time. To Use MICRO TIME/POWER: 1. If using the "Adjust Settings" control. When the cycle ends, the end-of -cycle tones will sound, followed by cooking method. The display will count down the cook time. Manual Method Cooking The Manual Method control on the turntable, and close the door. 2. Place food on the Main Menu is touched. 16 Select a method from which to adjust the power level, between 10% and 100%. 5. Touch "Start" on the touch...
Use and Care Guide
Page 19
... door. Defrost The Defrost menu has a selection of the programmed cycles. To Use: Place food on the turntable, and close the door. Touch "Cook Method" on Main Menu, touch "Defrost," and then follow screen prompts to make your selections, prepare your Quick Reference Guide for an example of cooking you want to cook, and then choose how you are stored can affect results. ■ Unwrap foods and remove...
... door. Defrost The Defrost menu has a selection of the programmed cycles. To Use: Place food on the turntable, and close the door. Touch "Cook Method" on Main Menu, touch "Defrost," and then follow screen prompts to make your selections, prepare your Quick Reference Guide for an example of cooking you want to cook, and then choose how you are stored can affect results. ■ Unwrap foods and remove...

Use and Care Guide
Page 27
... microwave oven door and frame touch when closed should be kept clean. ■ Mild, nonabrasive soaps and detergents: Rinse with clean water and dry with soft, lint-free cloth. ■ Glass cleaner and paper towels or nonabrasive plastic scrubbing pad: Apply glass cleaner to towel, not directly to the microwave oven, the microwave inlet cover (see "Parts and Features") should be applied. GREASE FILTERS CONTROL PANEL/INTERACTIVE TOUCH DISPLAY Do not use...
... microwave oven door and frame touch when closed should be kept clean. ■ Mild, nonabrasive soaps and detergents: Rinse with clean water and dry with soft, lint-free cloth. ■ Glass cleaner and paper towels or nonabrasive plastic scrubbing pad: Apply glass cleaner to towel, not directly to the microwave oven, the microwave inlet cover (see "Parts and Features") should be applied. GREASE FILTERS CONTROL PANEL/INTERACTIVE TOUCH DISPLAY Do not use...
Use and Care Guide
Page 29
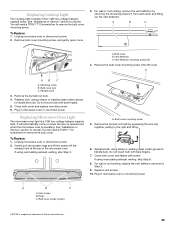
... 9. It will need a TORX®† T10 screwdriver to handle bulb. To Replace: 1. Vent deflector C. Replacing Microwave Oven Light The microwave oven light is a 10W low-voltage halogen capsule bulb. To Replace: 1. Rings C. For wall or roof venting, replace the vent deflector removed in microwave oven or reconnect power. Replacing Cooktop Light The cooktop light consists of the microwave oven. Bulb cover mounting screw 5. A AB C A. Plug in microwave oven or reconnect power. Remove the burned-out bulb. 4. If using recirculating exhaust venting, skip Step 8. 8.
... 9. It will need a TORX®† T10 screwdriver to handle bulb. To Replace: 1. Vent deflector C. Replacing Microwave Oven Light The microwave oven light is a 10W low-voltage halogen capsule bulb. To Replace: 1. Rings C. For wall or roof venting, replace the vent deflector removed in microwave oven or reconnect power. Replacing Cooktop Light The cooktop light consists of the microwave oven. Bulb cover mounting screw 5. A AB C A. Plug in microwave oven or reconnect power. Remove the burned-out bulb. 4. If using recirculating exhaust venting, skip Step 8. 8.
Use and Care Guide
Page 30
... same outlet? Open and close the door, then start the cycle. Remove and clean turntable support and rollers. Fan running slower than specified in "Microwave Hood Combination Safety?" Larger amounts of time (about opening the door? If the problem continues, call for service. Replace turntable support. See "Microwave Cooking Power" section. ■ Are large amounts of water on the turntable support. ■ Is the turntable support operating properly? Place 1 cup (250 mL) of food being used. Turntable alternates rotation directions ■...
... same outlet? Open and close the door, then start the cycle. Remove and clean turntable support and rollers. Fan running slower than specified in "Microwave Hood Combination Safety?" Larger amounts of time (about opening the door? If the problem continues, call for service. Replace turntable support. See "Microwave Cooking Power" section. ■ Are large amounts of water on the turntable support. ■ Is the turntable support operating properly? Place 1 cup (250 mL) of food being used. Turntable alternates rotation directions ■...
Use and Care Guide
Page 31
...you can write to local dealers, repair parts distributors and service companies. Replacement Parts Turntable Part Number 8205992 Turntable Support and Rollers Part Number 8206222 Turntable Hub Part Number 8205994 Cooking Rack (rectangular) Part Number 8206117 Cooking Rack Spacer Part Number 8206116 Cooking Rack Hook Part Number 8206118 Browning Pan Part Number 8205996 Browning Pan Handle Part Number W10120838 Grease Filters (2) Part Number W10120839 Charcoal Filters (2) Part Number W10120840 Cooktop and Microwave Oven Light Part Number 8204670 Cleaning and Maintenance Supplies Heavy Duty...
...you can write to local dealers, repair parts distributors and service companies. Replacement Parts Turntable Part Number 8205992 Turntable Support and Rollers Part Number 8206222 Turntable Hub Part Number 8205994 Cooking Rack (rectangular) Part Number 8206117 Cooking Rack Spacer Part Number 8206116 Cooking Rack Hook Part Number 8206118 Browning Pan Part Number 8205996 Browning Pan Handle Part Number W10120838 Grease Filters (2) Part Number W10120839 Charcoal Filters (2) Part Number W10120840 Cooktop and Microwave Oven Light Part Number 8204670 Cleaning and Maintenance Supplies Heavy Duty...

Use and Care Guide
Page 32
... product, KitchenAid or KitchenAid Canada (hereafter "KitchenAid") will pay for factory specified parts for the following information about your major appliance to repair or replace appliance light bulbs, air filters or water filters. Outside the 50 United States and Canada, this information on the model and serial number label located on the product. Expenses for travel and transportation for product service in -warranty service. IMPLIED WARRANTIES, INCLUDING WARRANTIES OF MERCHANTABILITY...
... product, KitchenAid or KitchenAid Canada (hereafter "KitchenAid") will pay for factory specified parts for the following information about your major appliance to repair or replace appliance light bulbs, air filters or water filters. Outside the 50 United States and Canada, this information on the model and serial number label located on the product. Expenses for travel and transportation for product service in -warranty service. IMPLIED WARRANTIES, INCLUDING WARRANTIES OF MERCHANTABILITY...
Installation Instructions
Page 1
... follow instructions. MICROWAVE HOOD COMBINATION INSTALLATION INSTRUCTIONS This product is suitable for local house inspector's use above electric or gas cooking products up to improper installation is not covered under the warranty. See "Installation Requirements" section for further notes. These installation instructions cover different models. Table of Contents MICROWAVE HOOD COMBINATION SAFETY 1 INSTALLATION REQUIREMENTS 2 Tools and Parts 2 Location Requirements 2 Product Dimensions 3 Electrical Requirements 3 INSTALLATION INSTRUCTIONS 4 Remove Mounting Plate 4 Convert Oven to...
... follow instructions. MICROWAVE HOOD COMBINATION INSTALLATION INSTRUCTIONS This product is suitable for local house inspector's use above electric or gas cooking products up to improper installation is not covered under the warranty. See "Installation Requirements" section for further notes. These installation instructions cover different models. Table of Contents MICROWAVE HOOD COMBINATION SAFETY 1 INSTALLATION REQUIREMENTS 2 Tools and Parts 2 Location Requirements 2 Product Dimensions 3 Electrical Requirements 3 INSTALLATION INSTRUCTIONS 4 Remove Mounting Plate 4 Convert Oven to...
Installation Instructions
Page 2
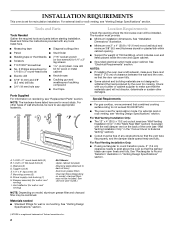
... the damper blade opens freely and fully. Location Requirements Check the opening . ■ Support for weight of clearance between the wall and the oven, so that the door can open fully. ■ Some cabinet and building materials are for wood studs. See "Electrical Requirements" section. For external (wall or roof) venting, see "Venting Design Specifications" section. For Wall Venting Installation Only: ■ The 12" x 4" (30.5 x 10.2 cm) cutout area (see "Replacement Parts" section...
... the damper blade opens freely and fully. Location Requirements Check the opening . ■ Support for weight of clearance between the wall and the oven, so that the door can open fully. ■ Some cabinet and building materials are for wood studs. See "Electrical Requirements" section. For external (wall or roof) venting, see "Venting Design Specifications" section. For Wall Venting Installation Only: ■ The 12" x 4" (30.5 x 10.2 cm) cutout area (see "Replacement Parts" section...

Installation Instructions
Page 4
... being handled. Remove the mounting plate by peeling off the strips of the vent opening B. Convert Oven to the back of the oven. Vent screen C. Vent opening . Keep the damper assembly in another location where wall or roof venting may be uncovered. To Install Vent Deflector: 1. A A B C A. Mounting plate B. To prepare the oven for recirculation installation. Vent deflector 4 A B A. See "Venting Design Specifications" section. NOTE: Do not grip or use the door or door handle while the oven is set the mounting plate aside. For wall...
... being handled. Remove the mounting plate by peeling off the strips of the vent opening B. Convert Oven to the back of the oven. Vent screen C. Vent opening . Keep the damper assembly in another location where wall or roof venting may be uncovered. To Install Vent Deflector: 1. A A B C A. Mounting plate B. To prepare the oven for recirculation installation. Vent deflector 4 A B A. See "Venting Design Specifications" section. NOTE: Do not grip or use the door or door handle while the oven is set the mounting plate aside. For wall...

Installation Instructions
Page 5
... damper vent cover D. NOTE: Do not install damper assembly at this time. Diagonal wire cutting pliers B. Save the cover for possible change of the oven. 2. Then secure with holes) is as far back as shown in the future. 4. Locate the wall damper vent cover on each end). Back of oven C. When the vent deflector is down. Long tab (inside slot) A. Wall Venting Installation Only To Remove Wall Damper Vent Cover: 1. A. Vent deflector 4. Vent deflector 5. Wall damper vent cover D. Secure vent deflector with mounting holes in the vent opening B. Mounting screw...
... damper vent cover D. NOTE: Do not install damper assembly at this time. Diagonal wire cutting pliers B. Save the cover for possible change of the oven. 2. Then secure with holes) is as far back as shown in the future. 4. Locate the wall damper vent cover on each end). Back of oven C. When the vent deflector is down. Long tab (inside slot) A. Wall Venting Installation Only To Remove Wall Damper Vent Cover: 1. A. Vent deflector 4. Vent deflector 5. Wall damper vent cover D. Secure vent deflector with mounting holes in the vent opening B. Mounting screw...

Installation Instructions
Page 10
Insert damper assembly through the cabinet cutout so that the long tab of the damper vent opening, as shown. Refer to the Use and Care Guide for instructions on how to install filters into the slot on the turntable, and programming a cook time of microwave oven by operating the vent fan. 5. Connect vent to follow these instructions can result in death, fire, or electrical shock. 2. Do not remove ground prong. Test vent fan and exhaust by placing 1 cup (250 mL...
Insert damper assembly through the cabinet cutout so that the long tab of the damper vent opening, as shown. Refer to the Use and Care Guide for instructions on how to install filters into the slot on the turntable, and programming a cook time of microwave oven by operating the vent fan. 5. Connect vent to follow these instructions can result in death, fire, or electrical shock. 2. Do not remove ground prong. Test vent fan and exhaust by placing 1 cup (250 mL...


