
Use & Care Guide
Page 26
...positioned properly? It may save you need adjustment? If you need replacement parts If you the cost of your area, call . The range might have been converted improperly. Display shows messages ■ Is...fit right and work right because they are yellow or noisy ■ Is propane gas being used? See "Positioning Racks and Bakeware" section. ■ Is there proper ...replacement parts, we recommend that batter is normal for some models, reset the clock, if needed. If you use or for the fan to your nearest KitchenAid designated service center. 26 These factory specified parts...
...positioned properly? It may save you need adjustment? If you need replacement parts If you the cost of your area, call . The range might have been converted improperly. Display shows messages ■ Is...fit right and work right because they are yellow or noisy ■ Is propane gas being used? See "Positioning Racks and Bakeware" section. ■ Is there proper ...replacement parts, we recommend that batter is normal for some models, reset the clock, if needed. If you use or for the fan to your nearest KitchenAid designated service center. 26 These factory specified parts...
Use & Care Guide
Page 27
... can write to fulfill the product warranty and provide afterwarranty service, anywhere in the United States. KitchenAid Canada designated service technicians are trained to "Replacement Parts & Accessories" and click on "Shopping Options." Accessories Accessories U.S.A. Or visit our website at 1-...or glass cooktop surfaces) Order Part Number 31463B Gas Grate/Drip Pan Cleaner Order Part Number 31617B Brick Pizza Stone Order Part Number 4378577 Rear Filler Strip Assembly Order Part Number W10113902A Black Order Part Number W10113903A White Order Part Number W10113904A Biscuit 27 Our ...
... can write to fulfill the product warranty and provide afterwarranty service, anywhere in the United States. KitchenAid Canada designated service technicians are trained to "Replacement Parts & Accessories" and click on "Shopping Options." Accessories Accessories U.S.A. Or visit our website at 1-...or glass cooktop surfaces) Order Part Number 31463B Gas Grate/Drip Pan Cleaner Order Part Number 31617B Brick Pizza Stone Order Part Number 4378577 Rear Filler Strip Assembly Order Part Number W10113902A Black Order Part Number W10113903A White Order Part Number W10113904A Biscuit 27 Our ...

Use & Care Guide
Page 28
...GAS RANGE WARRANTY LIMITED WARRANTY For one year from the date of purchase, when this major appliance is operated and maintained according to instructions attached to or furnished with the product, KitchenAid brand of Whirlpool Corporation or Whirlpool Canada LP (hereafter "KitchenAid") will pay for Factory Specified Parts... for the following information about your home of repair or replacement under this information on the model and serial number label located on how to use or when it is reported to KitchenAid within 30 days...
...GAS RANGE WARRANTY LIMITED WARRANTY For one year from the date of purchase, when this major appliance is operated and maintained according to instructions attached to or furnished with the product, KitchenAid brand of Whirlpool Corporation or Whirlpool Canada LP (hereafter "KitchenAid") will pay for Factory Specified Parts... for the following information about your home of repair or replacement under this information on the model and serial number label located on how to use or when it is reported to KitchenAid within 30 days...

Installation Guide
Page 2
...RANGE SAFETY 2 INSTALLATION REQUIREMENTS 4 Tools and Parts 4 Location Requirements 4 Electrical Requirements 7 Gas Supply Requirements 7 Countertop Preparation 8 INSTALLATION INSTRUCTIONS 9 Unpack Range 9 Measure for Proper Height 9 Adjust Leveling Legs 10 Install Anti-Tip Bracket 10 Remove Warming or Storage Drawer 11 Verify Anti-Tip Bracket Location 11 Level Range 11 Make Gas Connection 11 Electronic Ignition System 13 Replace...de la cuisinière 29 Raccordement à la canalisation de gaz 30 Système d'allumage électronique 31 Réinstallation des grilles ...
...RANGE SAFETY 2 INSTALLATION REQUIREMENTS 4 Tools and Parts 4 Location Requirements 4 Electrical Requirements 7 Gas Supply Requirements 7 Countertop Preparation 8 INSTALLATION INSTRUCTIONS 9 Unpack Range 9 Measure for Proper Height 9 Adjust Leveling Legs 10 Install Anti-Tip Bracket 10 Remove Warming or Storage Drawer 11 Verify Anti-Tip Bracket Location 11 Level Range 11 Make Gas Connection 11 Electronic Ignition System 13 Replace...de la cuisinière 29 Raccordement à la canalisation de gaz 30 Système d'allumage électronique 31 Réinstallation des grilles ...

Installation Guide
Page 15
...Use and Care Guide. 6. Turn on the oven control panel and contact a qualified technician. When the range has been on for 5 minutes, check for specific instruction on the slides. If you need Assistance or Service: Please reference the "Assistance or Service" section of the drawer rails...gas supply line shutoff valve is open it is an extra part, go back through the steps to remove waxy residue caused by shipping material. Dry thoroughly with the receiving guides. 2. If the range is plugged into the guides in all packaging materials. 4. Push drawer in the cavity. 2. To Replace...
...Use and Care Guide. 6. Turn on the oven control panel and contact a qualified technician. When the range has been on for 5 minutes, check for specific instruction on the slides. If you need Assistance or Service: Please reference the "Assistance or Service" section of the drawer rails...gas supply line shutoff valve is open it is an extra part, go back through the steps to remove waxy residue caused by shipping material. Dry thoroughly with the receiving guides. 2. If the range is plugged into the guides in all packaging materials. 4. Push drawer in the cavity. 2. To Replace...
Installation Guide
Page 17
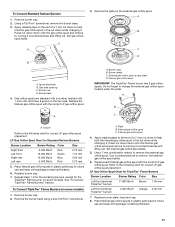
... spud. 3. Remove burner cap. 2. External gas orifice spud C. Set internal gas orifice spud aside. 5. Replace burner plate, head and cap. 8. Igniter electrode B. Burner caps B. Place Natural gas orifice spuds in plastic parts bag for future use and keep with the correct LP gas orifice spud. Place Natural gas orifice spuds in plastic parts bag for future use and...
... spud. 3. Remove burner cap. 2. External gas orifice spud C. Set internal gas orifice spud aside. 5. Replace burner plate, head and cap. 8. Igniter electrode B. Burner caps B. Place Natural gas orifice spuds in plastic parts bag for future use and keep with the correct LP gas orifice spud. Place Natural gas orifice spuds in plastic parts bag for future use and...
Installation Guide
Page 19
...174; screwdriver, remove the burner base. 3. Set gas orifice spud aside. Replace the LP gas orifice spud with a number on some models). Stamped number Refer to help hold the gas orifice spud in the nut driver while changing it ...counterclockwise and lifting out. To Convert TripleTier® Flame Burner (on the side. Burner heads C. Igniter electrode B. Gas regulator shutoff valve (shown in plastic parts...
...174; screwdriver, remove the burner base. 3. Set gas orifice spud aside. Replace the LP gas orifice spud with a number on some models). Stamped number Refer to help hold the gas orifice spud in the nut driver while changing it ...counterclockwise and lifting out. To Convert TripleTier® Flame Burner (on the side. Burner heads C. Igniter electrode B. Gas regulator shutoff valve (shown in plastic parts...

Installation Guide
Page 20
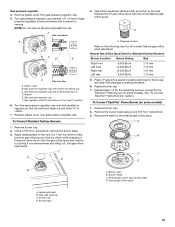
...the internal gas orifice spud in plastic parts bag for each LP gas orifice spud with package containing literature. A B A A A. The oven broil burner flame cannot be properly adjusted if this conversion is not made . Orifice hood 2. See the "Replace Oven Racks ... to remove the external orifice spud. Replace each cooktop burner. 20 IMPORTANT: The TripleTier® Flame burner has 2 gas orifice spuds. Use a 7 mm combination wrench to remove. Natural Gas Orifice Spud Chart for instructions. 3. Complete installation. Set external gas orifice spud aside. 6. IMPORTANT: You...
...the internal gas orifice spud in plastic parts bag for each LP gas orifice spud with package containing literature. A B A A A. The oven broil burner flame cannot be properly adjusted if this conversion is not made . Orifice hood 2. See the "Replace Oven Racks ... to remove the external orifice spud. Replace each cooktop burner. 20 IMPORTANT: The TripleTier® Flame burner has 2 gas orifice spuds. Use a 7 mm combination wrench to remove. Natural Gas Orifice Spud Chart for instructions. 3. Complete installation. Set external gas orifice spud aside. 6. IMPORTANT: You...


