User Guide
Page 4
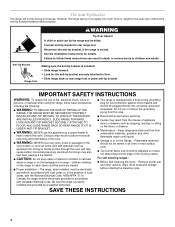
..., with local codes or, in an oven or near surface units. TO CHECK IF THE DEVICES ARE INSTALLED PROPERLY, SLIDE RANGE FORWARD, LOOK FOR ANTI-TIP BRACKET SECURELY ATTACHED TO FLOOR, AND SLIDE RANGE BACK SO REAR RANGE FOOT IS UNDER ANTI-TIP BRACKET. s WARNING: NEVER cover any slots, holes or passages in accordance with materials...
..., with local codes or, in an oven or near surface units. TO CHECK IF THE DEVICES ARE INSTALLED PROPERLY, SLIDE RANGE FORWARD, LOOK FOR ANTI-TIP BRACKET SECURELY ATTACHED TO FLOOR, AND SLIDE RANGE BACK SO REAR RANGE FOOT IS UNDER ANTI-TIP BRACKET. s WARNING: NEVER cover any slots, holes or passages in accordance with materials...
User Guide
Page 28
...STATE OR PROVINCE TO PROVINCE. KITCHENAID® GAS RANGE WARRANTY LIMITED WARRANTY For one year from the date of purchase, when this major appliance is operated and maintained according to instructions attached to or furnished with the product, KitchenAid brand of Whirlpool Corporation or ...dents, chips or other than normal, single-family household use your major appliance, to replace or repair house fuses, or to KitchenAid within 30 days from warranty coverage. 3. This major appliance is reported to correct house wiring or plumbing. 2. The removal and reinstallation of ...
...STATE OR PROVINCE TO PROVINCE. KITCHENAID® GAS RANGE WARRANTY LIMITED WARRANTY For one year from the date of purchase, when this major appliance is operated and maintained according to instructions attached to or furnished with the product, KitchenAid brand of Whirlpool Corporation or ...dents, chips or other than normal, single-family household use your major appliance, to replace or repair house fuses, or to KitchenAid within 30 days from warranty coverage. 3. This major appliance is reported to correct house wiring or plumbing. 2. The removal and reinstallation of ...
Installation Instructions
Page 11
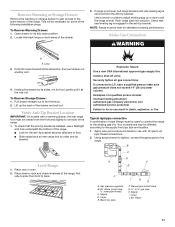
... with LP gas to floor. ■ Slide range back so rear range foot is ...range. ■ Look for some of the following installation steps. Gas pressure regulator B. 90° elbow (must be viewed from the anti-tip bracket. Level Range...range foot must be necessary for the anti-tip bracket securely attached to all gas connections. Your connections may be different, according to the range. Locate the black loops on rack and check levelness of the range...range is not level, pull range forward until the range is removed from the front and slightly to the lower section of the range...
... with LP gas to floor. ■ Slide range back so rear range foot is ...range. ■ Look for some of the following installation steps. Gas pressure regulator B. 90° elbow (must be viewed from the anti-tip bracket. Level Range...range foot must be necessary for the anti-tip bracket securely attached to all gas connections. Your connections may be different, according to the range. Locate the black loops on rack and check levelness of the range...range is not level, pull range forward until the range is removed from the front and slightly to the lower section of the range...
Installation Instructions
Page 12
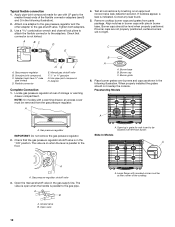
... over left front burner. When properly installed the grates should be located over burners and caps as shown in burner base. Slide-In Models A ON A A. Gas pressure regulator shutoff valve 3. The valve is open when the handle is indicated. Check that the...positioned, surface burners will not light. Use pipe-joint compound. Adapter Complete Connection 1. Gas pressure regulator B. The valve is on an approved noncorrosive leak-detection solution. Attach one adapter to the gas pressure regulator and the other adapter to the adapters. Burner cap C. Check that ...
... over left front burner. When properly installed the grates should be located over burners and caps as shown in burner base. Slide-In Models A ON A A. Gas pressure regulator shutoff valve 3. The valve is open when the handle is indicated. Check that the...positioned, surface burners will not light. Use pipe-joint compound. Adapter Complete Connection 1. Gas pressure regulator B. The valve is on an approved noncorrosive leak-detection solution. Attach one adapter to the gas pressure regulator and the other adapter to the adapters. Burner cap C. Check that ...