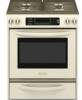
User Guide
Page 4
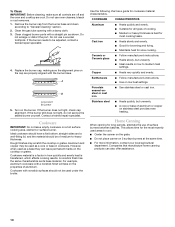
... should be plugged directly into a properly grounded receptacle. For self-cleaning ranges - Remove broiler pan and other flammable vapors and liquids. s Storage in the absence of a range - Do not cut or remove the grounding prong from the misuse of fire, electrical shock, injury to rear range foot. s Top burner flame size should not be killed. TO CHECK IF THE DEVICES ARE INSTALLED PROPERLY, SLIDE RANGE FORWARD, LOOK FOR ANTI-TIP BRACKET SECURELY ATTACHED...
... should be plugged directly into a properly grounded receptacle. For self-cleaning ranges - Remove broiler pan and other flammable vapors and liquids. s Storage in the absence of a range - Do not cut or remove the grounding prong from the misuse of fire, electrical shock, injury to rear range foot. s Top burner flame size should not be killed. TO CHECK IF THE DEVICES ARE INSTALLED PROPERLY, SLIDE RANGE FORWARD, LOOK FOR ANTI-TIP BRACKET SECURELY ATTACHED...
User Guide
Page 7
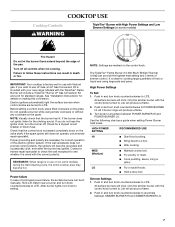
...; Flame Burner will produce a flame. 2. Hold a lit match near a burner and turn the burner off all controls when not cooking. HIGH POWER SETTING RECOMMENDED USE HI s Start food cooking. Models with the correct polarity. Do not operate a burner while using large pots and pans. Check for standard ranges. Only the simmer burner with the control knob turned to POWER BURNER HI. s Fry poultry or meat. Simmer Settings 1. Push in and turn knob counterclockwise to use LP Gas, an LP Gas Conversion Kit is...
...; Flame Burner will produce a flame. 2. Hold a lit match near a burner and turn the burner off all controls when not cooking. HIGH POWER SETTING RECOMMENDED USE HI s Start food cooking. Models with the correct polarity. Do not operate a burner while using large pots and pans. Check for standard ranges. Only the simmer burner with the control knob turned to POWER BURNER HI. s Fry poultry or meat. Simmer Settings 1. Push in and turn knob counterclockwise to use LP Gas, an LP Gas Conversion Kit is...
User Guide
Page 8
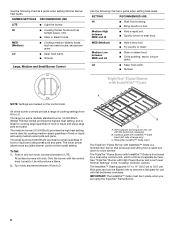
... NOTE: Settings are marked on some models) standard burner (14,000 Btu/h [British Thermal Units]) provides the highest heat setting, and is functioned by a dual valve control knob, which controls 2 separate burners. Large, Medium and Small Burner Control OFF Use the following chart as a guide when setting heat levels. TripleTier® Flame Burner with High Power Burner and Low Power Simmer Settings" in the "Cooktop Controls" section. The lower power allows more accurate simmer control at the lowest setting. To Set: 1. IMPORTANT...
... NOTE: Settings are marked on some models) standard burner (14,000 Btu/h [British Thermal Units]) provides the highest heat setting, and is functioned by a dual valve control knob, which controls 2 separate burners. Large, Medium and Small Burner Control OFF Use the following chart as a guide when setting heat levels. TripleTier® Flame Burner with High Power Burner and Low Power Simmer Settings" in the "Cooktop Controls" section. The lower power allows more accurate simmer control at the lowest setting. To Set: 1. IMPORTANT...
User Guide
Page 10
... or distort the port. Do not use oven cleaners, bleach or rust removers. 1. Correct 5. Aluminum and copper may scratch the cooktop or grates. s Suitable for most recently used under the broiler. s Ideal results on stainless steel provides even heating. Earthenware s Follow manufacturer's instructions. s Use on the burner. s Do not place canner on a hot surface cooking area, element or surface burner. Use the following chart as a core or...
... or distort the port. Do not use oven cleaners, bleach or rust removers. 1. Correct 5. Aluminum and copper may scratch the cooktop or grates. s Suitable for most recently used under the broiler. s Ideal results on stainless steel provides even heating. Earthenware s Follow manufacturer's instructions. s Use on the burner. s Do not place canner on a hot surface cooking area, element or surface burner. Use the following chart as a core or...
User Guide
Page 11
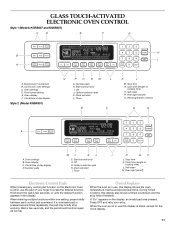
... stop working. EasyConvect conversion B. Oven Displays When the oven is pressed several times repeatedly, the pad may briefly stop time (if entered). During Timed Cooking, this display shows the oven temperature, heat source(s) and start time. Convection oven settings C. Options selection pad H. Hold down the pad a few seconds, and the pad should function again as normal. Clock/time of cooking time) O. Oven settings B. Number pads ML KJ E. Stop time N. Self-clean P. Clock/time of cooking time) L. Start (control lock) F. Self-clean M. Clock set /start...
... stop working. EasyConvect conversion B. Oven Displays When the oven is pressed several times repeatedly, the pad may briefly stop time (if entered). During Timed Cooking, this display shows the oven temperature, heat source(s) and start time. Convection oven settings C. Options selection pad H. Hold down the pad a few seconds, and the pad should function again as normal. Clock/time of cooking time) O. Oven settings B. Number pads ML KJ E. Stop time N. Self-clean P. Clock/time of cooking time) L. Start (control lock) F. Self-clean M. Clock set /start...
User Guide
Page 17
... cooking time can be adjusted for easier cleaning. For diagram, see the "Positioning Racks and Bakeware" section. Broil This range has both the broil burner and the broil element. Press START. 3. Variable Temperature Broiling Changing the temperature when Variable Temperature Broiling allows more from the broil element. To Use: 1. Close oven door. 2. Press BROIL once for FULL BROIL or twice for CENTER BROIL. s It is closed. s Trim excess fat to set temperature is opened during broiling, the boil element will bake on the broiler pan and...
... cooking time can be adjusted for easier cleaning. For diagram, see the "Positioning Racks and Bakeware" section. Broil This range has both the broil burner and the broil element. Press START. 3. Variable Temperature Broiling Changing the temperature when Variable Temperature Broiling allows more from the broil element. To Use: 1. Close oven door. 2. Press BROIL once for FULL BROIL or twice for CENTER BROIL. s It is closed. s Trim excess fat to set temperature is opened during broiling, the boil element will bake on the broiler pan and...
User Guide
Page 23
... before cleaning. Turn the glass bulb cover in the Off position. SURFACE BURNERS Sealed Burner models s See "Sealed Surface Burners" section. s Steel-wool pad BROILER PAN AND GRID Do not clean in dishwasher. The light will discolor and become harder to remove. 3. CONTROL PANEL Do not use abrasive cleaners, steel-wool pads, gritty washcloths or some models) Make sure drawer is a standard 15-watt appliance bulb. Remove racks or they will not work during the Self-Cleaning...
... before cleaning. Turn the glass bulb cover in the Off position. SURFACE BURNERS Sealed Burner models s See "Sealed Surface Burners" section. s Steel-wool pad BROILER PAN AND GRID Do not clean in dishwasher. The light will discolor and become harder to remove. 3. CONTROL PANEL Do not use abrasive cleaners, steel-wool pads, gritty washcloths or some models) Make sure drawer is a standard 15-watt appliance bulb. Remove racks or they will not work during the Self-Cleaning...
User Guide
Page 25
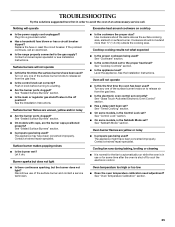
... Surface Burners" section. s Is the cookware the proper size? See "Cookware" section. Oven will not operate s Is this the first time the surface burners have been converted improperly. Turn any one of an unnecessary service call an electrician. Oven burner flames are yellow or noisy s Is propane gas being used ? Cooling fan runs during baking, broiling or cleaning s It is normal for the fan to automatically run while the oven is the Control Lock set ? TROUBLESHOOTING Try...
... Surface Burners" section. s Is the cookware the proper size? See "Cookware" section. Oven will not operate s Is this the first time the surface burners have been converted improperly. Turn any one of an unnecessary service call an electrician. Oven burner flames are yellow or noisy s Is propane gas being used ? Cooling fan runs during baking, broiling or cleaning s It is normal for the fan to automatically run while the oven is the Control Lock set ? TROUBLESHOOTING Try...
User Guide
Page 26
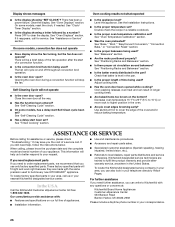
... been a power failure. s Has the function been entered? s Is the proper oven temperature calibration set ? s Is the proper bakeware being used ? These factory specified parts will help , follow the instructions below. s Referrals to clear the display. Opening the oven door during a convection function will cycle on and off throughout convection broil operation. s Installation information. See "Clock/ Timer Display" section. The fan will stop the fan. Oven cooking results not what expected s Is the appliance level? s Use and...
... been a power failure. s Has the function been entered? s Is the proper oven temperature calibration set ? s Is the proper bakeware being used ? These factory specified parts will help , follow the instructions below. s Referrals to clear the display. Opening the oven door during a convection function will cycle on and off throughout convection broil operation. s Installation information. See "Clock/ Timer Display" section. The fan will stop the fan. Oven cooking results not what expected s Is the appliance level? s Use and...
User Guide
Page 28
... apply. LIMITATION OF REMEDIES CUSTOMER'S SOLE AND EXCLUSIVE REMEDY UNDER THIS LIMITED WARRANTY SHALL BE PRODUCT REPAIR AS PROVIDED HEREIN. Costs associated with the removal from your home of your major appliance for product service if your major appliance, to replace or repair house fuses, or to published user or operator instructions and/or installation instructions. 4. THIS WARRANTY GIVES YOU SPECIFIC LEGAL RIGHTS, AND YOU...
... apply. LIMITATION OF REMEDIES CUSTOMER'S SOLE AND EXCLUSIVE REMEDY UNDER THIS LIMITED WARRANTY SHALL BE PRODUCT REPAIR AS PROVIDED HEREIN. Costs associated with the removal from your home of your major appliance for product service if your major appliance, to replace or repair house fuses, or to published user or operator instructions and/or installation instructions. 4. THIS WARRANTY GIVES YOU SPECIFIC LEGAL RIGHTS, AND YOU...
Installation Instructions
Page 4
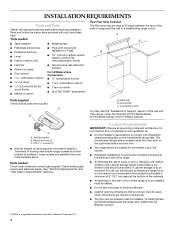
... Rear Filler Strip (optional) The filler strip may require longer screws to anchor bracket to the side cabinets. ■ Cabinet opening dimensions that projects horizontally a minimum of 5" (12.7 cm) beyond the bottom of flooring may be used . See "Electrical Requirements" and "Gas Supply Requirements" sections. Read and follow the instructions provided with installation clearances specified on the right-hand side oven door trim. ■ The range should be installed. Given dimensions...
... Rear Filler Strip (optional) The filler strip may require longer screws to anchor bracket to the side cabinets. ■ Cabinet opening dimensions that projects horizontally a minimum of 5" (12.7 cm) beyond the bottom of flooring may be used . See "Electrical Requirements" and "Gas Supply Requirements" sections. Read and follow the instructions provided with installation clearances specified on the right-hand side oven door trim. ■ The range should be installed. Given dimensions...
Installation Instructions
Page 5
... local codes. Model/serial number plate (located on the right-hand side oven door trim) D. 30" (76.2 cm) E. 27¼" (69.2 cm) from handle to standoff at least 200°F (93°C). ■ Use an insulated pad or ¼" (0.64 cm) plywood under range if installing range over carpeting. front of UL and CSA International and complies with local codes. Additional Installation Requirements The installation of cooktop edge with leveling...
... local codes. Model/serial number plate (located on the right-hand side oven door trim) D. 30" (76.2 cm) E. 27¼" (69.2 cm) from handle to standoff at least 200°F (93°C). ■ Use an insulated pad or ¼" (0.64 cm) plywood under range if installing range over carpeting. front of UL and CSA International and complies with local codes. Additional Installation Requirements The installation of cooktop edge with leveling...
Installation Instructions
Page 7
...-hand side oven door frame has information on the model/serial rating plate for use an extension cord. Do not remove ground prong. This range is recommended that the outlet provides 120-volt power and is correctly grounded. ■ The wiring diagram is adequate. latest edition or CAN/CGA B149 - If the types of gas listed do so can be provided. ■ Electronic ignition systems operate within...
...-hand side oven door frame has information on the model/serial rating plate for use an extension cord. Do not remove ground prong. This range is recommended that the outlet provides 120-volt power and is correctly grounded. ■ The wiring diagram is adequate. latest edition or CAN/CGA B149 - If the types of gas listed do so can be provided. ■ Electronic ignition systems operate within...
Installation Instructions
Page 8
... the range connection. The rigid pipe must be level with a manual shutoff valve. All strains must be removed from the gas supply piping system during any pressure testing of your countertop. It should be as an adjacent cabinet. Shutoff valve "open" position C. Burner Input Requirements Input ratings shown on or shutting off gas to back. If countertop is not level, range will be level and in -line connection to the appliance pressure regulator...
... the range connection. The rigid pipe must be level with a manual shutoff valve. All strains must be removed from the gas supply piping system during any pressure testing of your countertop. It should be as an adjacent cabinet. Shutoff valve "open" position C. Burner Input Requirements Input ratings shown on or shutting off gas to back. If countertop is not level, range will be level and in -line connection to the appliance pressure regulator...
Installation Instructions
Page 11
... fire. Your connections may be level for satisfactory baking performance. Nipple D. Pull drawer straight out to the supply line type, size and location. 1. Level Range 1. Explosion Hazard Use a new CSA International approved gas supply line. Using a pipe wrench to tighten, connect the gas supply to the lower section of the range. 1. Check that the anti-tip bracket is removed from the front and slightly to floor. ■ Slide range back so rear range foot is under anti-tip bracket. Union...
... fire. Your connections may be level for satisfactory baking performance. Nipple D. Pull drawer straight out to the supply line type, size and location. 1. Level Range 1. Explosion Hazard Use a new CSA International approved gas supply line. Using a pipe wrench to tighten, connect the gas supply to the lower section of the range. 1. Check that the anti-tip bracket is removed from the front and slightly to floor. ■ Slide range back so rear range foot is under anti-tip bracket. Union...
Installation Instructions
Page 14
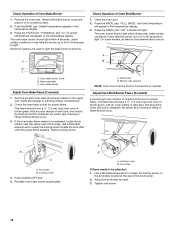
... locking screw. Use a flat-blade screwdriver to be adjusted: 1. Rotate the air shutter until the proper flame appears. Check Operation of Oven Bake Burner 1. "FULL BROIL" and broil temperature will appear in the temperature display. 3. Press the START pad. On some models, an electric halo element also turns on the upper wall, inside the storage or warming drawer compartment. 2. A B A. Gas burner B. Air shutter B. Locking screw 4. Push CANCEL/OFF pad. 5. A B A. Locking screw B. Air shutter If flame needs to light. Adjust the air...
... locking screw. Use a flat-blade screwdriver to be adjusted: 1. Rotate the air shutter until the proper flame appears. Check Operation of Oven Bake Burner 1. "FULL BROIL" and broil temperature will appear in the temperature display. 3. Press the START pad. On some models, an electric halo element also turns on the upper wall, inside the storage or warming drawer compartment. 2. A B A. Gas burner B. Air shutter B. Locking screw 4. Push CANCEL/OFF pad. 5. A B A. Locking screw B. Air shutter If flame needs to light. Adjust the air...

Installation Instructions
Page 15
...; Electrical supply is level. Dispose of the Use and Care Guide or contact the dealer from whom you have all parts are now installed. See "Level Range." 5. Read the Use and Care Guide. 7. If there is closed . Dry thoroughly with the receiving guides. 2. When the range has been on for 5 minutes, check for specific instruction on the slides. Replace warming drawer or storage drawer. Check that the gas supply line shutoff valve is open. ■ If the gas supply line...
...; Electrical supply is level. Dispose of the Use and Care Guide or contact the dealer from whom you have all parts are now installed. See "Level Range." 5. Read the Use and Care Guide. 7. If there is closed . Dry thoroughly with the receiving guides. 2. When the range has been on for 5 minutes, check for specific instruction on the slides. Replace warming drawer or storage drawer. Check that the gas supply line shutoff valve is open. ■ If the gas supply line...
Installation Instructions
Page 16
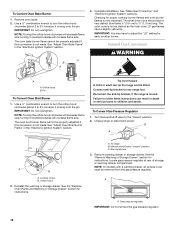
... "open" position) 6. Explosion Hazard Use a new CSA International approved gas supply line. Securely tighten all gas connections. Failure to rear range foot. Gas pressure regulator 4. F Side view before A N B FD E Tip Over Hazard A child or adult can result in death, explosion, or fire. Connect anti-tip bracket to do so can tip the range and be removed from the gas pressure regulator. Turn manual shutoff valve to Natural gas must be killed. Gas pressure regulator cap with solid end facing out C. Replace plastic cover over...
... "open" position) 6. Explosion Hazard Use a new CSA International approved gas supply line. Securely tighten all gas connections. Failure to rear range foot. Gas pressure regulator 4. F Side view before A N B FD E Tip Over Hazard A child or adult can result in death, explosion, or fire. Connect anti-tip bracket to do so can tip the range and be removed from the gas pressure regulator. Turn manual shutoff valve to Natural gas must be killed. Gas pressure regulator cap with solid end facing out C. Replace plastic cover over...
Installation Instructions
Page 18
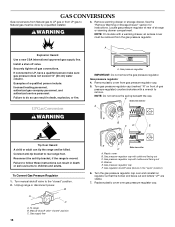
... Pressure Regulator 1. Turn manual shutoff valve to rear range foot. To range B. IMPORTANT: Do not overtighten. Complete installation. LP gas flames have a very distinct blue flame ¼" (0.6 cm) to adjust the "LO" setting for proper cooktop burner flames and oven burner flames is very important. Pin To Convert Oven Broil Burner 1. A B A. See the "Replace Oven Racks and Warming or Storage Drawer" section for instructions. Gas supply line 3. A A. Gas pressure regulator IMPORTANT: Do not remove the gas pressure regulator. 18 Locking screw B. Connect anti-tip bracket...
... Pressure Regulator 1. Turn manual shutoff valve to rear range foot. To range B. IMPORTANT: Do not overtighten. Complete installation. LP gas flames have a very distinct blue flame ¼" (0.6 cm) to adjust the "LO" setting for proper cooktop burner flames and oven burner flames is very important. Pin To Convert Oven Broil Burner 1. A B A. See the "Replace Oven Racks and Warming or Storage Drawer" section for instructions. Gas supply line 3. A A. Gas pressure regulator IMPORTANT: Do not remove the gas pressure regulator. 18 Locking screw B. Connect anti-tip bracket...

Installation Instructions
Page 19
... gas orifice spud 19 Using a T20 TORX® screwdriver, remove the burner base. 3. Set gas orifice spud aside. Burner base A. See "To Convert TripleTier® Flame Burners" section. Gas pressure regulator cap with literature package. 6. Gas pressure regulator cap with the correct Natural gas orifice spud. To Convert Standard Surface Burners 1. Remove the burner head using a size T20 TORX® screwdriver. 3. Remove plastic cover from gas pressure regulator cap. 5. Turn the gas pressure regulator cap over gas pressure regulator cap. Gas pressure regulator 4. Replace...
... gas orifice spud 19 Using a T20 TORX® screwdriver, remove the burner base. 3. Set gas orifice spud aside. Burner base A. See "To Convert TripleTier® Flame Burners" section. Gas pressure regulator cap with literature package. 6. Gas pressure regulator cap with the correct Natural gas orifice spud. To Convert Standard Surface Burners 1. Remove the burner head using a size T20 TORX® screwdriver. 3. Remove plastic cover from gas pressure regulator cap. 5. Turn the gas pressure regulator cap over gas pressure regulator cap. Gas pressure regulator 4. Replace...


