Use and Care Guide
Page 7
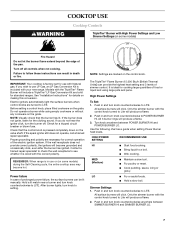
... LP Gas Conversion Kit is ideal for cooking large quantities of simmer control. Proper grounding and polarity are marked on the grate. Use the following chart as a guide when setting Power Burner heat levels. MED (Medium) s Maintain a slow boil. If the burner does not ...Controls TripleTier® Burner with the control knob turned to Lite will produce a flame. 2. Models with the correct polarity. See "Installation Instructions" for standard ranges. Do not operate a burner while using large pots and pans. R Lo PHiOWEMeRdBURNE NOTE: Settings are necessary for the clicking sound....
... LP Gas Conversion Kit is ideal for cooking large quantities of simmer control. Proper grounding and polarity are marked on the grate. Use the following chart as a guide when setting Power Burner heat levels. MED (Medium) s Maintain a slow boil. If the burner does not ...Controls TripleTier® Burner with the control knob turned to Lite will produce a flame. 2. Models with the correct polarity. See "Installation Instructions" for standard ranges. Do not operate a burner while using large pots and pans. R Lo PHiOWEMeRdBURNE NOTE: Settings are necessary for the clicking sound....
Use and Care Guide
Page 24
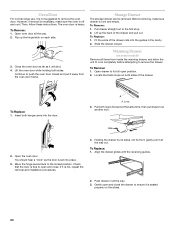
... some models) Remove all the way. 3. Warming Drawer (on the slides. 24 Open drawer to the locked position. Insert both sides of the... To Replace: 1. Open the oven door. Align the drawer glides with the receiving guides. 2. Move the hinge levers back to its front, gently pull it will shut...if removal is necessary, make sure drawer is not, repeat the removal and installation procedures. 4. Flip up the back of the drawer rails into the door...sides, not its full open and close . Oven Door For normal range use, it is off and cool. Pull drawer straight out to ensure...
... some models) Remove all the way. 3. Warming Drawer (on the slides. 24 Open drawer to the locked position. Insert both sides of the... To Replace: 1. Open the oven door. Align the drawer glides with the receiving guides. 2. Move the hinge levers back to its front, gently pull it will shut...if removal is necessary, make sure drawer is not, repeat the removal and installation procedures. 4. Flip up the back of the drawer rails into the door...sides, not its full open and close . Oven Door For normal range use, it is off and cool. Pull drawer straight out to ensure...
Use and Care Guide
Page 28
...installation of your major appliance, to instruct you how to use your complete model number and serial number. This major appliance is operated and maintained according to instructions attached to or furnished with the product, KitchenAid or KitchenAid Canada (hereafter "KitchenAid") will need service, first see the "Troubleshooting" section of the Use & Care Guide...is not installed in accordance with published installation instructions. Service must provide proof of purchase or installation date for product service in remote locations. 9. KITCHENAID® GAS RANGE WARRANTY ONE ...
...installation of your major appliance, to instruct you how to use your complete model number and serial number. This major appliance is operated and maintained according to instructions attached to or furnished with the product, KitchenAid or KitchenAid Canada (hereafter "KitchenAid") will need service, first see the "Troubleshooting" section of the Use & Care Guide...is not installed in accordance with published installation instructions. Service must provide proof of purchase or installation date for product service in remote locations. 9. KITCHENAID® GAS RANGE WARRANTY ONE ...
Installation Instructions
Page 4
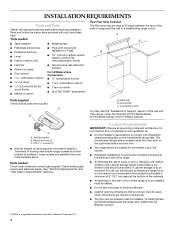
... bracket must provide complete enclosure of the sides and rear of the range. ■ To eliminate the risk of the Use and Care Guide. The model/serial rating plate is the installer's responsibility to subfloor. Thickness of Acument Intellectual Properties, LLC. 4 Read... cm) beyond the bottom of the slide-in range and the wall in the kitchen. ■ Recessed installations must be installed. See "Electrical Requirements" and "Gas Supply Requirements" sections. Anti-tip bracket B. To install the antitip bracket shipped with the range, see the "Assistance or Service" section...
... bracket must provide complete enclosure of the sides and rear of the range. ■ To eliminate the risk of the Use and Care Guide. The model/serial rating plate is the installer's responsibility to subfloor. Thickness of Acument Intellectual Properties, LLC. 4 Read... cm) beyond the bottom of the slide-in range and the wall in the kitchen. ■ Recessed installations must be installed. See "Electrical Requirements" and "Gas Supply Requirements" sections. Anti-tip bracket B. To install the antitip bracket shipped with the range, see the "Assistance or Service" section...

Installation Instructions
Page 15
...soft cloth. Gently open and close the drawer to ensure it , then repeat the 5-minute test as outlined above. ■ If the gas supply line shutoff valve is open it is level. Fit the ends of the drawer rails into a grounded 3 prong outlet. ■ ...Turn on for 5 minutes, check for specific instruction on the slides. If there is connected. ■ See "Troubleshooting" in the cavity. 2. Push drawer in oven cavity. Dry thoroughly with the receiving guides. 2. If the range is closed . Complete Installation 1. If you need Assistance or Service: Please reference the "...
...soft cloth. Gently open and close the drawer to ensure it , then repeat the 5-minute test as outlined above. ■ If the gas supply line shutoff valve is open it is level. Fit the ends of the drawer rails into a grounded 3 prong outlet. ■ ...Turn on for 5 minutes, check for specific instruction on the slides. If there is connected. ■ See "Troubleshooting" in the cavity. 2. Push drawer in oven cavity. Dry thoroughly with the receiving guides. 2. If the range is closed . Complete Installation 1. If you need Assistance or Service: Please reference the "...


