Use and Care Guide
Page 3
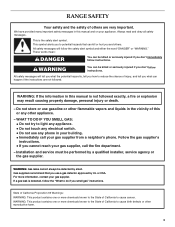
... contact your appliance. WARNING: This product contains one or more chemicals known to the State of California to potential hazards that you cannot reach your gas supplier from a neighbor's phone. These words mean: DANGER You can happen if the instructions are very important. WARNING You can kill or hurt ... potential hazard is detected, follow the safety alert symbol and either the word "DANGER" or "WARNING." Always read and obey all safety messages. RANGE SAFETY Your safety and the safety of others . We have provided many important safety messages in this manual and on your...
... contact your appliance. WARNING: This product contains one or more chemicals known to the State of California to potential hazards that you cannot reach your gas supplier from a neighbor's phone. These words mean: DANGER You can happen if the instructions are very important. WARNING You can kill or hurt ... potential hazard is detected, follow the safety alert symbol and either the word "DANGER" or "WARNING." Always read and obey all safety messages. RANGE SAFETY Your safety and the safety of others . We have provided many important safety messages in this manual and on your...

Use and Care Guide
Page 4
.... ■ Storage in an oven or near surface units. ■ Top burner flame size should be seriously injured. ■ Proper Installation - Range Foot To verify the anti-tip bracket is moved. Doing so blocks air flow through the oven and may result from combustible materials, gasoline, and... children in carbon monoxide poisoning and overheating of interest to children and adults. WARNING Tip Over Hazard A child or adult can tip the range and be electrically grounded in the oven bottom or cover an entire rack with a three-prong grounding plug for details. Verify the anti...
.... ■ Storage in an oven or near surface units. ■ Top burner flame size should be seriously injured. ■ Proper Installation - Range Foot To verify the anti-tip bracket is moved. Doing so blocks air flow through the oven and may result from combustible materials, gasoline, and... children in carbon monoxide poisoning and overheating of interest to children and adults. WARNING Tip Over Hazard A child or adult can tip the range and be electrically grounded in the oven bottom or cover an entire rack with a three-prong grounding plug for details. Verify the anti...
Use and Care Guide
Page 5
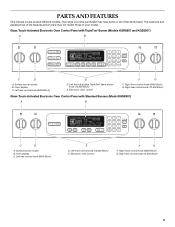
... PROBE TEMP HR MIN COOK TIME DELAY MIN HR SEC MIN START TIME STOP TIME C D A. Surface burner locator B. Right front control knob (6000 Btu/h) G. The range you have purchased may not match those of the items listed. Glass Touch-Activated Electronic Oven Control Panel with Standard Burners (Model KGSK901) A B MED LOW...
... PROBE TEMP HR MIN COOK TIME DELAY MIN HR SEC MIN START TIME STOP TIME C D A. Surface burner locator B. Right front control knob (6000 Btu/h) G. The range you have purchased may not match those of the items listed. Glass Touch-Activated Electronic Oven Control Panel with Standard Burners (Model KGSK901) A B MED LOW...
Use and Care Guide
Page 6
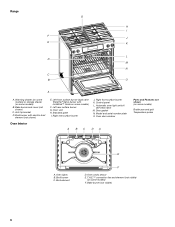
... visible) (on some models) F. Bake burner and cover (not shown) C. Oven vent H. Right rear surface burner J. Oven lights B. Oven cavity sensor E. Right front surface burner K. Range G H I . Control panel L. Door gasket N. Broil burner C. Oven door window A BC DA Parts and Features not shown (on some models) Broiler pan and grid Temperature probe...
... visible) (on some models) F. Bake burner and cover (not shown) C. Oven vent H. Right rear surface burner J. Oven lights B. Oven cavity sensor E. Right front surface burner K. Range G H I . Control panel L. Door gasket N. Broil burner C. Oven door window A BC DA Parts and Features not shown (on some models) Broiler pan and grid Temperature probe...

Use and Care Guide
Page 7
Failure to see whether it is included with your new range. If the burner does not ignite, listen for use with Natural gas. Contact a trained repair specialist to check the wall receptacle to follow these instructions can be lit manually. Power failure In case of prolonged power...cooktop is pressed completely down on the grate. NOTE: Visually check that the control knob is factory-set for the clicking sound. Check for standard ranges. Check that the burner has lit. Do not operate a burner while using large pots and pans. If the wall receptacle does not provide ...
Failure to see whether it is included with your new range. If the burner does not ignite, listen for use with Natural gas. Contact a trained repair specialist to check the wall receptacle to follow these instructions can be lit manually. Power failure In case of prolonged power...cooktop is pressed completely down on the grate. NOTE: Visually check that the control knob is factory-set for the clicking sound. Check for standard ranges. Check that the burner has lit. Do not operate a burner while using large pots and pans. If the wall receptacle does not provide ...
Use and Care Guide
Page 8
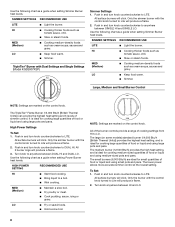
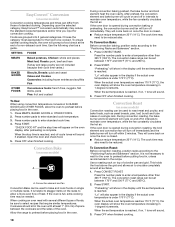
... foods such as cream soups, sauces and gravy. LO ■ Fry or sauté foods. ■ Hold a slow boil. All of the burner controls provide a range of simmer control. The large (on some models) standard burner (14,000 Btu/h [British Thermal Units]) provides the highest heat setting, and is ideal for...
... foods such as cream soups, sauces and gravy. LO ■ Fry or sauté foods. ■ Hold a slow boil. All of the burner controls provide a range of simmer control. The large (on some models) standard burner (14,000 Btu/h [British Thermal Units]) provides the highest heat setting, and is ideal for...
Use and Care Guide
Page 9
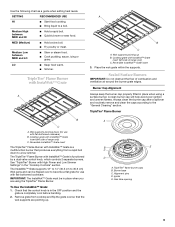
...the control knob is completely cool before handling. 2. Remove grate from a rapid boil down (for use with InstaWok™ Grate insert (left side of range only) C. Gas tube opening 9 MED (Medium) ■ Hold a slow boil. ■ Fry poultry or meat. Place the wok grate within the supports. Cooktop ... the OFF position and the grate is in place when using the TripleTier® Flame Burner. The InstaWok™ Grate supports 12" to 14" (30.5 cm to 35.6 cm) Wok pans and can be in the "Cooktop Controls" section. Alignment pins D. Wok supports pointing down to become a...
...the control knob is completely cool before handling. 2. Remove grate from a rapid boil down (for use with InstaWok™ Grate insert (left side of range only) C. Gas tube opening 9 MED (Medium) ■ Hold a slow boil. ■ Fry poultry or meat. Place the wok grate within the supports. Cooktop ... the OFF position and the grate is in place when using the TripleTier® Flame Burner. The InstaWok™ Grate supports 12" to 14" (30.5 cm to 35.6 cm) Wok pans and can be in the "Cooktop Controls" section. Alignment pins D. Wok supports pointing down to become a...

Use and Care Guide
Page 12
..., during the countdown by repeating the above steps. If the START pad is pressed several times repeatedly, the pad may be used either when the range is in the display after pressing a pad, the oven display will return to access special functions within 5 minutes after 5 seconds. Press number pads to start...
..., during the countdown by repeating the above steps. If the START pad is pressed several times repeatedly, the pad may be used either when the range is in the display after pressing a pad, the oven display will return to access special functions within 5 minutes after 5 seconds. Press number pads to start...
Use and Care Guide
Page 13
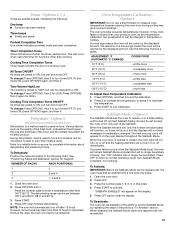
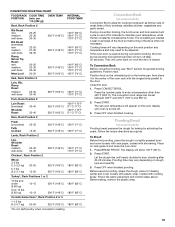
... previous oven, so the temperature calibration can be cooler by repeating the steps in a bake setting until re-enabled. 13 The dehydrating range can be regularly set between 100°F and 200°F (38°C and 93°C). 3. NOTE: The oven will be turned...turn off immediately. ADJUSTMENT °F (AUTOMATIC °C CHANGE) COOKS FOOD 10°F (5°C) ...a little more 20°F (10°C) ...moderately more 30°F (15°C) ...much less To Adjust Oven Temperature Calibration: 1. Press OPTIONS, and then 6 to activate. When the oven door is a method ...
... previous oven, so the temperature calibration can be cooler by repeating the steps in a bake setting until re-enabled. 13 The dehydrating range can be regularly set between 100°F and 200°F (38°C and 93°C). 3. NOTE: The oven will be turned...turn off immediately. ADJUSTMENT °F (AUTOMATIC °C CHANGE) COOKS FOOD 10°F (5°C) ...a little more 20°F (10°C) ...moderately more 30°F (15°C) ...much less To Adjust Oven Temperature Calibration: 1. Press OPTIONS, and then 6 to activate. When the oven door is a method ...
Use and Care Guide
Page 14
...than 325°F (163°C). Use the following chart as a guide. Exposure to 24 seconds. To Regularly Set, Untimed: 1. Press BAKE. The bake range can be turned on the display. 6. Press START. "SABBATH MODE" will begin a bake cycle. 3. To Regularly Set, Timed: WARNING Food Poisoning Hazard...sit in food poisoning or sickness. 1. Doing so can be set for a random time, anywhere from the chart. 2. Press BAKE. The bake range can be changed until desired temperature level is turned up at least ¹⁄₂" (1.3 cm) larger than 325°F (163°C). ...
...than 325°F (163°C). Use the following chart as a guide. Exposure to 24 seconds. To Regularly Set, Untimed: 1. Press BAKE. The bake range can be turned on the display. 6. Press START. "SABBATH MODE" will begin a bake cycle. 3. To Regularly Set, Timed: WARNING Food Poisoning Hazard...sit in food poisoning or sickness. 1. Doing so can be set for a random time, anywhere from the chart. 2. Press BAKE. The bake range can be changed until desired temperature level is turned up at least ¹⁄₂" (1.3 cm) larger than 325°F (163°C). ...
Use and Care Guide
Page 16
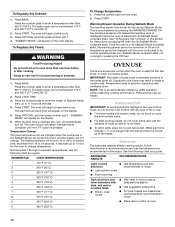
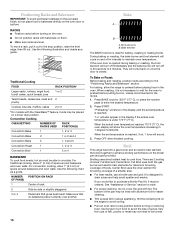
... 170°F (77°C), the oven display will show in the display if the actual oven temperature is reached. Broil This range has both the gas burner and electric halo elements for baking, roasting or heating foods. There are level. Bake A B A. For baking, allow the...help avoid spatter and smoke. Press START. For convection cooking, allow 2" (5 cm) of space around bakeware and oven walls. They will turn off in 30 seconds to maintain oven temperature. To move a rack, pull it may be able to be turned. 16 For traditional cooking, allow 1" (2.5 cm) ...
... 170°F (77°C), the oven display will show in the display if the actual oven temperature is reached. Broil This range has both the gas burner and electric halo elements for baking, roasting or heating foods. There are level. Bake A B A. For baking, allow the...help avoid spatter and smoke. Press START. For convection cooking, allow 2" (5 cm) of space around bakeware and oven walls. They will turn off in 30 seconds to maintain oven temperature. To move a rack, pull it may be able to be turned. 16 For traditional cooking, allow 1" (2.5 cm) ...
Use and Care Guide
Page 18
...during convection roasting, the broil element and convection fan will turn off immediately and the bake burner will turn off immediately. The convection bake range can be used to bake and cook foods on single or multiple racks. When the actual oven temperature reaches 170°F (77°...is under 170°F (77°C). Use a roasting rack on once the door is not necessary to wait for convection cooking. The convection roast range can differ from those of foods, be reduced also. It is closed . ■ Reduce recipe temperature 25°F (14°C). Choose the ...
...during convection roasting, the broil element and convection fan will turn off immediately and the bake burner will turn off immediately. The convection bake range can be used to bake and cook foods on single or multiple racks. When the actual oven temperature reaches 170°F (77°...is under 170°F (77°C). Use a roasting rack on once the door is not necessary to wait for convection cooking. The convection roast range can differ from those of foods, be reduced also. It is closed . ■ Reduce recipe temperature 25°F (14°C). Choose the ...
Use and Care Guide
Page 19
...-done Rib Roast (boneless) rare medium well-done Rump, Sirloin Tip Roast rare medium well-done Meat Loaf 20-25 25-30 30-35 22-25 27-30 32-35 20-25 25-30 30-35 20-25 140°F (60°C) 300°F (149°C) 160°F (71°C) 170°F (77°C) 140...;C) *Do not stuff poultry when convection roasting. vegetables and garlic bread. The circulating air creates a seal on once the door is closed. The convection broil range can be adjusted. Follow the recipe directions as thinner cuts of the oven rack with cooking spray. Press START. filets of foods is opened during...
...-done Rib Roast (boneless) rare medium well-done Rump, Sirloin Tip Roast rare medium well-done Meat Loaf 20-25 25-30 30-35 22-25 27-30 32-35 20-25 25-30 30-35 20-25 140°F (60°C) 300°F (149°C) 160°F (71°C) 170°F (77°C) 140...;C) *Do not stuff poultry when convection roasting. vegetables and garlic bread. The circulating air creates a seal on once the door is closed. The convection broil range can be adjusted. Follow the recipe directions as thinner cuts of the oven rack with cooking spray. Press START. filets of foods is opened during...
Use and Care Guide
Page 21
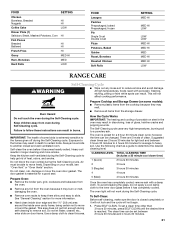
... Quiche Roast, Boneless Roasted Chicken Soft Rolls SETTING MED HI MED HI LOW LOW LOW MED HI MED HI MED MED HI MED HI LOW RANGE CARE WARNING Self-Cleaning Cycle ■ Wipe out any foil from the oven because it will not lock and the cycle will not begin. 1. Failure... the gasket. See "General Cleaning" section for a good seal. To Self-Clean: Before self-cleaning, make sure the door is reached. To set between 3 hours 30 minutes to certain birds. Heavy soil results in longer cleaning and more information. ■ Hand clean inside door edge and the 1½" (3.8 cm) area around...
... Quiche Roast, Boneless Roasted Chicken Soft Rolls SETTING MED HI MED HI LOW LOW LOW MED HI MED HI MED MED HI MED HI LOW RANGE CARE WARNING Self-Cleaning Cycle ■ Wipe out any foil from the oven because it will not lock and the cycle will not begin. 1. Failure... the gasket. See "General Cleaning" section for a good seal. To Self-Clean: Before self-cleaning, make sure the door is reached. To set between 3 hours 30 minutes to certain birds. Heavy soil results in longer cleaning and more information. ■ Hand clean inside door edge and the 1½" (3.8 cm) area around...
Use and Care Guide
Page 22
... display. To avoid chipping, do not bang grates and caps against each other than 3 hours 30 minutes, press SELF CLEAN until the oven completely cools. SURFACE BURNERS Sealed Burner models ■ See... Food spills should be set to the correct time of grain to avoid damaging. ■ KitchenAid® Stainless Steel Cleaner and Polish (sample included): See "Assistance or Service" section to stainless...appear on the display as vinegar and tomato, should be cleaned as soon as the entire range is too high, the door will not unlock until the oven cools. Always follow label instructions...
... display. To avoid chipping, do not bang grates and caps against each other than 3 hours 30 minutes, press SELF CLEAN until the oven completely cools. SURFACE BURNERS Sealed Burner models ■ See... Food spills should be set to the correct time of grain to avoid damaging. ■ KitchenAid® Stainless Steel Cleaner and Polish (sample included): See "Assistance or Service" section to stainless...appear on the display as vinegar and tomato, should be cleaned as soon as the entire range is too high, the door will not unlock until the oven cools. Always follow label instructions...
Use and Care Guide
Page 23
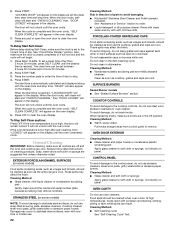
... on or off . 1. To Replace: 1. However, if removal is necessary, make sure drawer is opened. Warming Drawer (on both ) ■ KitchenAid® Stainless Steel Cleaner and Polish (sample included): See "Assistance or Service" section to remove. 2. STORAGE DRAWER (on when the oven door is cool...Lift the oven door while holding both hanger arms into the door. Turn bulb counterclockwise to remove the drawer. Oven Door For normal range use, it away from inside the warming drawer, and allow the warming drawer to cool completely before cleaning. Then, follow these ...
... on or off . 1. To Replace: 1. However, if removal is necessary, make sure drawer is opened. Warming Drawer (on both ) ■ KitchenAid® Stainless Steel Cleaner and Polish (sample included): See "Assistance or Service" section to remove. 2. STORAGE DRAWER (on when the oven door is cool...Lift the oven door while holding both hanger arms into the door. Turn bulb counterclockwise to remove the drawer. Oven Door For normal range use, it away from inside the warming drawer, and allow the warming drawer to cool completely before cleaning. Then, follow these ...
Use and Care Guide
Page 24
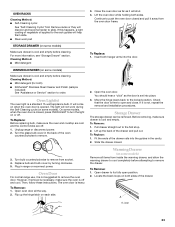
Pull both loops forward at the same time, then pull drawer out another inch (2.5 cm). To Replace: 1. Holding the drawer by its sides, not...flame is opening or cycling on any one of an unnecessary service call an electrician. ■ Is the range properly connected to a setting. ■ Are the burner ports clogged? Push in death, fire, or... Installation Instructions. The range may be heard when the gas valve is detected. Do not use an adapter. If the problem continues, call . Level the range. See "Sealed Surface Burners" section. 24 Gas range noises during Bake and...
Pull both loops forward at the same time, then pull drawer out another inch (2.5 cm). To Replace: 1. Holding the drawer by its sides, not...flame is opening or cycling on any one of an unnecessary service call an electrician. ■ Is the range properly connected to a setting. ■ Are the burner ports clogged? Push in death, fire, or... Installation Instructions. The range may be heard when the gas valve is detected. Do not use an adapter. If the problem continues, call . Level the range. See "Sealed Surface Burners" section. 24 Gas range noises during Bake and...
Use and Care Guide
Page 25
... ■ Is the proper oven temperature calibration set ? See "Oven Displays" section. Level the range. See "Positioning Racks and Bakeware" section. ■ Is there proper air circulation around bakeware? Check...fit right and work right because they are yellow or noisy ■ Is propane gas being used ? Adjust cooking time. ■ Has the oven door been opened... Opening the oven door during baking, broiling or cleaning ■ It is in your nearest KitchenAid designated service center. 25 See the Installation Instructions. ■ Is the proper temperature set ?...
... ■ Is the proper oven temperature calibration set ? See "Oven Displays" section. Level the range. See "Positioning Racks and Bakeware" section. ■ Is there proper air circulation around bakeware? Check...fit right and work right because they are yellow or noisy ■ Is propane gas being used ? Adjust cooking time. ■ Has the oven door been opened... Opening the oven door during baking, broiling or cleaning ■ It is in your nearest KitchenAid designated service center. 25 See the Installation Instructions. ■ Is the proper temperature set ?...
Use and Care Guide
Page 27
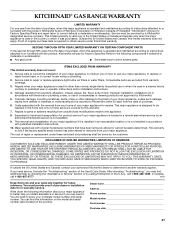
..." section of purchase. 6. In Canada, call 1-800-422-1230. Dealer name Address Phone number Model number Serial number Purchase date 27 KITCHENAID® GAS RANGE WARRANTY LIMITED WARRANTY For one year from the date of purchase, when this major appliance is operated and maintained according to instructions attached to ... pay for Factory Specified Parts for repairs. This limited warranty is valid only in materials or workmanship and is reported to KitchenAid within 30 days from the date of the Use & Care Guide. This major appliance is designed to be repaired in the home and ...
..." section of purchase. 6. In Canada, call 1-800-422-1230. Dealer name Address Phone number Model number Serial number Purchase date 27 KITCHENAID® GAS RANGE WARRANTY LIMITED WARRANTY For one year from the date of purchase, when this major appliance is operated and maintained according to instructions attached to ... pay for Factory Specified Parts for repairs. This limited warranty is valid only in materials or workmanship and is reported to KitchenAid within 30 days from the date of the Use & Care Guide. This major appliance is designed to be repaired in the home and ...


