Use & Care Guide
Page 5
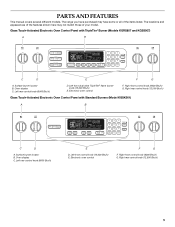
...MIN START TIME STOP TIME C D E F G A. Oven display C. Surface burner locator B. Left rear control knob (6000 Btu/h) E D. PARTS AND FEATURES This manual covers several different models. Glass Touch-Activated Electronic Oven Control Panel with Standard Burners (Model KGSK901) A B MED LOW HI ON...F. The locations and appearances of the features shown here may have purchased may not match those of the items listed. Right rear control knob (12,500 Btu/h) 5 The range you have some or all of your model. Oven display C. Electronic oven control F. Right front control knob...
...MIN START TIME STOP TIME C D E F G A. Oven display C. Surface burner locator B. Left rear control knob (6000 Btu/h) E D. PARTS AND FEATURES This manual covers several different models. Glass Touch-Activated Electronic Oven Control Panel with Standard Burners (Model KGSK901) A B MED LOW HI ON...F. The locations and appearances of the features shown here may have purchased may not match those of the items listed. Right rear control knob (12,500 Btu/h) 5 The range you have some or all of your model. Oven display C. Electronic oven control F. Right front control knob...

Installation Guide
Page 4
... or Service" section of the cabinets. ■ All openings in a freestanding range cutout. A B A. Anti-tip bracket B. Thickness of Saturn Fasteners, Inc. 4 Tools needed Check local codes and consult gas supplier. Parts needed ■ Tape measure ■ Masking tape Rear Filler Strip (optional) The...comply with installation clearances specified on the right-hand side oven door trim. ■ The range should be installed. To install the antitip bracket shipped with any tools listed here. Countertop C. Longer screws are shown must be located for wood floors) ■ Marker...
... or Service" section of the cabinets. ■ All openings in a freestanding range cutout. A B A. Anti-tip bracket B. Thickness of Saturn Fasteners, Inc. 4 Tools needed Check local codes and consult gas supplier. Parts needed ■ Tape measure ■ Masking tape Rear Filler Strip (optional) The...comply with installation clearances specified on the right-hand side oven door trim. ■ The range should be installed. To install the antitip bracket shipped with any tools listed here. Countertop C. Longer screws are shown must be located for wood floors) ■ Marker...

Installation Guide
Page 5
... screwed all the way in a mobile home, it conforms to the standards listed above. In Canada, the installation of cooktop edge with local codes. See "Electrical Requirements" section. ■ Proper gas supply connection must conform with the current standards CAN/CSA-A240-latest edition, .../serial number plate (located on models KGRS807XSP and KGSS907XSP) from handle to underside of this range is not applicable, use the Standard for Mobile Home Construction and Safety, Title 24, HUD Part 280). A. 30 77.6 cm) B. 35⁵⁄₈" (90.5 cm) height to standoff at least...
... screwed all the way in a mobile home, it conforms to the standards listed above. In Canada, the installation of cooktop edge with local codes. See "Electrical Requirements" section. ■ Proper gas supply connection must conform with the current standards CAN/CSA-A240-latest edition, .../serial number plate (located on models KGRS807XSP and KGSS907XSP) from handle to underside of this range is not applicable, use the Standard for Mobile Home Construction and Safety, Title 24, HUD Part 280). A. 30 77.6 cm) B. 35⁵⁄₈" (90.5 cm) height to standoff at least...


