KitchenAid KESK901SSS Support Question
KitchenAid KESK901SSS Support Question
Find answers below for this question about KitchenAid KESK901SSS - 30" Electric Range.Need a KitchenAid KESK901SSS manual? We have 3 online manuals for this item!
Question posted by Lrroby50 on July 27th, 2016
How To Replace The Stove Top?
Stove top is cracked. How to replace.
Current Answers
Answer #1: Posted by Odin on July 27th, 2016 5:35 PM
Odin

Member since:
April 10th, 2010 Points: 41,236,630

Member since:
April 10th, 2010 Points: 41,236,630
See http://www.repairclinic.com/PartDetail/Top-Panel/8303099/1179559?ss=i1108-x6b65736b393031737373&mr=1. (Note that Whirlpool makes this KitchenAid product.) If that's not what you seek, a full illustrated parts list is accessible at http://www.repairclinic.com/Shop-For-Parts/-x6b65736b393031737373/Kesk901sss-Parts.
Hope this is useful. Please don't forget to click the Accept This Answer button if you do accept it. My aim is to provide reliable helpful answers, not just a lot of them. See https://www.helpowl.com/profile/Odin.
Related KitchenAid KESK901SSS Manual Pages
Dimension Guide - Page 1

...) countertop and the opening .
30" (76.2 cm) Freestanding and Slide-In Electric Range
PRODUCT MODEL NUMBERS
OVERALL DIMENSIONS
KERS807S KERS807X
KESK901S KESS907S
KESS908S KESS907X
Freestanding Range
Slide-in Range
ELECTRICAL REQUIREMENTS
B
q This range is manufactured with 25" (63.5 cm) countertop;
Freestanding Range
Slide-in Range
A freestanding range may need trim cut back...
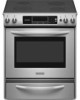
Installation Guide - Page 2

...
Tip Over Hazard A child or adult can be killed. Reconnect the anti-tip bracket, if the range is the safety alert symbol. Only 5 Electrical Requirements -
TABLE OF CONTENTS
RANGE SAFETY 2
INSTALLATION REQUIREMENTS 3 Tools and Parts 3 Location Requirements 3 Electrical Requirements - All safety messages will follow these instructions can happen if the instructions are very...
Installation Guide - Page 3

... requirements of UL and CSA International and complies with installation
clearances specified on the right-hand side oven door trim.
■ The range should be reduced by a licensed, qualified electrical installer. Countertop cutout
Please reference the "Assistance or Service" section of flooring may be used to fill a gap between the rear of...
Installation Guide - Page 4

...cm) countertop;
Model/serial number plate (located on the right-hand side oven door trim)
*Range can be used in *
E. 30" (76.2 cm)
F. 27¹⁄₄" (69.2 cm) max. Model/serial number... (2.5 cm) beyond 24" (61.0 cm) base cabinet.
4 Any method of range**
G. See "Electrical Connection" section. When such standard is adequate as long as it must conform to be
secured to standoff ...
Installation Guide - Page 5

... or microwave hood combination installation instructions for it is recommended that a qualified electrical installer determine that the electrical connection and wire size are adequate and in Range
A
C
B
D
A
C
B
D
F E
E F
G H
A. 13" (33.0 cm) upper cabinet depth
B. 30" (76.2 cm) min. The model/serial rating plate is manufactured with the neutral terminal connected to combustible...
Installation Guide - Page 6

... be provided at the junction box).
■ Wire sizes and connections must conform with upturned ends, terminating in conformance with kit.
See the "Electrical Connection" section.
Range Rating*
Specified Rating of Power Supply Cord Kit and Circuit Protection
120/240 Volts 120/208 Volts Amps
8.8 - 16.5 KW 7.8 - 12.5 KW 40 or 50...
Installation Guide - Page 7

... 2 measurements you have a square finish (flat) countertop and the opening width is 30" (76.2 cm), no countertop preparation is required. Using 2 or more people to the underside of range's final location. Distance from the floor to move and install range.
C D
A B
30" (76.2 cm)
30 ¾" (78.1 cm)
³⁄₈" (1.0 cm)
If countertop opening . Place...
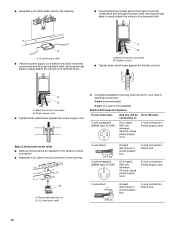
Installation Guide - Page 9

... remove cover.
3. Pull cover down screws B. Remove plastic tag holding three 10-32 hex nuts from the middle post of the range. Use a new 40 amp power supply cord. Electrical Shock Hazard Disconnect power before servicing. Add strain relief. Remove the terminal block cover screws located on the thickness of the terminal...
Installation Guide - Page 10
...(NEMA type 10-50R)
A fused disconnect or circuit breaker box
A UL listed, 250-volt minimum, 40-amp, range power supply cord
4-wire connection: Direct wire
3-wire connection: Power supply cord
B
A.
A B
A. ■ ...
Electrical Connection Options
If your home has:
And you will be Go to Section: connecting to:
4-wire receptacle (NEMA type 14-50R)
A UL listed, 250-volt minimum, 40-amp, range ...
Installation Guide - Page 11
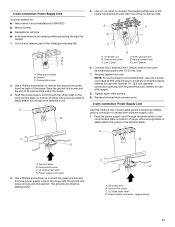
... the ground-link screw from the power supply cord to the center terminal block post with ranges.
8. Save the ground-link screw and the end of the metal ground strap (B).
5. NOTE: For power supply cord replacement, use only a power cord rated at 250 volts minimum, 40 amps or 50 amps that is...
Installation Guide - Page 12

... part of the ground link under the screw.
3. NOTE: For power supply cord replacement, use only a power cord rated at 250 volts minimum, 40 amps or 50 amps... D. Line 1 (black)
3. Tighten strain relief screws.
6. Complete electrical connection according to the center terminal block post with one of range.
Attach terminal lugs to easily attach the wiring terminal block.
3.
Line...
Installation Guide - Page 13

...line 2 (red) and line 1 (black) wires to the outer terminal block posts with one of range.
A.
Connect line 2 (red) and line 1 (black) wires to the outer terminal block posts .... (4.0 N-m)
5. Neutral (white) wire F. Terminal lug
7. Bare (green) ground wire E. Ground-link screw
F. Replace terminal block access cover. Cord/conduit plate
D. A
B
A
G
C
D
E
B F
C
A. 10-32 ...
Installation Guide - Page 14

...damaging the floor covering.
14 Check that all packaging materials.
4. Replace the storage drawer:
■ Fit the ends of the range, first side to children and adults. Tip Over Hazard A child ... check levelness of the drawer rails into an outlet.
■ Electrical supply is plugged into the guides in range or reconnect power. 8. Verify Anti-Tip Bracket Location
IMPORTANT: ■...
Installation Guide - Page 15

...cardboard or
hardboard to do so can result in range. 5. Failure to perform cleaning or maintenance. 3. Perform cleaning or maintenance. 4.
Disconnect wiring (if necessary). 4. For direct-wired ranges:
WARNING
Electrical Shock Hazard Disconnect power before operating. Plug in death or electrical shock.
1. U.S.A. Replace all parts and panels before servicing. Perform cleaning or...
Use & Care Guide - Page 1

ELECTRIC RANGE
ARCHITECT® SERIES II
Use & Care Guide
For questions about features, operation/performance, parts, accessories or service, call: 1-800-422-1230 or visit our website ...
Use & Care Guide - Page 2
...Roast 23 Convection Broil 24 Proofing Bread 24 Timed Cooking 24 Warming Drawer 25
RANGE CARE 26 Self-Cleaning Cycle 26 General Cleaning 27 Oven Light(s 28 Oven ... Storage Drawer 29 Warming Drawer 29
TROUBLESHOOTING 29
ASSISTANCE OR SERVICE 30 In the U.S.A 30 Accessories 31 In Canada 31
WARRANTY 31
2 TABLE OF CONTENTS
RANGE SAFETY 3 The Anti-Tip Bracket 3
PARTS AND FEATURES 5
...
Use & Care Guide - Page 4

... - If a wet sponge or cloth is essential for range-top service without breaking due to unintentional contact with the utensil, the handle of electric shock, or fire.
■ Glazed Cooking Utensils -...cloth.
■ DO NOT TOUCH SURFACE UNITS OR AREAS NEAR UNITS - Do not repair or replace any kind should break, cleaning solutions and spillovers may become hot enough to a hot surface....
Use & Care Guide - Page 10

...pad to immediately reach the HI setting. This allows time for optimal cooking results. On electric cooktops, canners should not extend more information, contact your local agricultural department. HI
■... place canner on the grate or largest surface cooking
area or element.
A
REMEMBER: When range is in death or fire.
Single, Dual and Triple-Size Elements
A
A. Dual size ...
Use & Care Guide - Page 30

... the electronic oven control set ? If you need replacement parts If you use .
In the U.S.A. Custom Knobs...Specialized customer assistance (Spanish speaking, hearing impaired, limited vision, etc.).
30
Oven cooking results not what expected
■ Is the proper cookware...provide assistance with the same precision used ? Level the range. See the Installation Instructions.
■ Is the proper...
Use & Care Guide - Page 31
... warranty does not apply. KitchenAid Canada designated service technicians are trained to "Replacement Parts & Accessories" and click on "applianceaccessories.com." For further assistance If... porcelain edge
■ Any cracking due to KitchenAid Canada with : ■ Features and specifications on "Shopping Options."
KITCHENAID® ELECTRIC RANGE WARRANTY
LIMITED WARRANTY
For one...
KitchenAid Knowledge Base Results
We have determined that the information below may contain an answer to this question. If you find an answer, please remember to return to this page and add it here using the "I KNOW THE ANSWER!" button above. It's that easy to earn points!-
Cleaning the refrigerator
... Cleaner regularly. Cleaning painted metal Damage to smooth finish due to improper use of your refrigerator Removing and replacing the split-level shelf Refrigerator/freezer odor removal Cleaning ceramic glass cooktop - To avoid possible damage, wash exteriors...containing petroleum products on today's order, enter Promo Code F9A75Q4 in warm water. Electric Ranges and Cooktops << -
General cleaning tips for my electric or gas range
...pull out the drawer another inch. Thoroughly dry the warming drawer before replacing it . Gently open position. Electric Ranges and Cooktops Cleaning and caring stainless steel surfaces Rainbow colors in the ...surfaces (on some models) See How do I clean and care for my electric or gas range? To clean cooktop controls Do not use abrasive cleaners, steel-wool pads, gritty... -
Replacing oven light bulbs - Built-in ovens
... and pulling away from the socket. Architect Series II - To replace oven light bulbs: Before replacing any bulbs, make sure the oven is opened . Reconnect power. Superba...gas and electric ranges FAQs Knowledgebase search tips Setting the clock Changing the beverage center light bulb Changing the oven light bulb - How can I replace a bulb(s) if it back into the wall. Replacing oven ...
Similar Questions

Dual Burner Switch Replacement For The Model #kess907 Electric Range
How do i replace the left side dual burner switch and what is the part number ?
How do i replace the left side dual burner switch and what is the part number ?
(Posted by woodsv 9 years ago)

Condensation Runs Down Front Of Range After Baking, Is This Normal?
(Posted by teachlinda1 10 years ago)

Oven Latch Won't Release.
(Posted by Sherrycopeland 12 years ago)

Slid In Electrical Range
i have to install an electrical slidin range but it come with a metal below cooktop glass that separ...
i have to install an electrical slidin range but it come with a metal below cooktop glass that separ...
(Posted by arqfalves 12 years ago)
Electrical Panel Is Off
After self cleaning my oven, then oven door would not open and the electrical panel not functional a...
After self cleaning my oven, then oven door would not open and the electrical panel not functional a...
(Posted by brnfox 13 years ago)