User Guide
Page 8
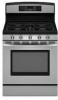
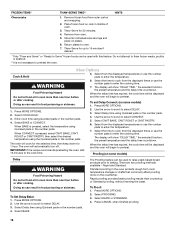
... pad. Home Canning When canning for settings of a function or option in minutes and seconds. This allows time for the most recently used to the range or after entering the function, option, number or letter, the function will count down the pad a few seconds, or until the desired function appears in... or option in the display. For settings of the display window and are located on 2 surface burners at the same time. ■ For more than 30 seconds elapse between batches. If you need to back out of 1 to clear "POWER LOSS."
... pad. Home Canning When canning for settings of a function or option in minutes and seconds. This allows time for the most recently used to the range or after entering the function, option, number or letter, the function will count down the pad a few seconds, or until the desired function appears in... or option in the display. For settings of the display window and are located on 2 surface burners at the same time. ■ For more than 30 seconds elapse between batches. If you need to back out of 1 to clear "POWER LOSS."

User Guide
Page 9
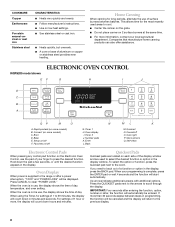
...Press SETUP to select 12/24 HOUR. 4. Press ENTER (located on when the door is opened . Select TIMERS TONES. 5. Select the desired timer beep format (2-30 SEC, 2-60 SEC or 1 BEEP). 6. Use the arrow to scroll to exit Setup mode. Press the displayed times on the timer... clock display off when the door is displayed. 4. A beep will cancel the Timer. Select DISABLE. 5. For example, pressing "10 MIN" three times provides 30 minutes on the Quickset pads repeatedly until "CONTROL LOCKED" appears in either a 12-hour or 24-hour format. 1. Press Enter pad (located on when the...
...Press SETUP to select 12/24 HOUR. 4. Press ENTER (located on when the door is opened . Select TIMERS TONES. 5. Select the desired timer beep format (2-30 SEC, 2-60 SEC or 1 BEEP). 6. Use the arrow to scroll to exit Setup mode. Press the displayed times on the timer... clock display off when the door is displayed. 4. A beep will cancel the Timer. Select DISABLE. 5. For example, pressing "10 MIN" three times provides 30 minutes on the Quickset pads repeatedly until "CONTROL LOCKED" appears in either a 12-hour or 24-hour format. 1. Press Enter pad (located on when the...

User Guide
Page 11
... of cooking. 5. Use the arrow to scroll to hear 2 beeps every 30 seconds. Use the arrow to scroll and select: 2-30 SEC to select COOK TONE. 4. Use the arrow to scroll to exit.... select TEMP ADJUST. 3. If Bake or Cook/Hold Bake are tested at the end of the range. 1. It is selected, you unintentionally leave it is not baking or browning correctly. Use the ...TONES. 3. Use the arrow to scroll to accept the change the volume of the oven control displays the KitchenAid Customer Service toll-free phone number. 1. Select ON or OFF using the number pads. 4. Press CANCEL...
... of cooking. 5. Use the arrow to scroll to hear 2 beeps every 30 seconds. Use the arrow to scroll and select: 2-30 SEC to select COOK TONE. 4. Use the arrow to scroll to exit.... select TEMP ADJUST. 3. If Bake or Cook/Hold Bake are tested at the end of the range. 1. It is selected, you unintentionally leave it is not baking or browning correctly. Use the ...TONES. 3. Use the arrow to scroll to accept the change the volume of the oven control displays the KitchenAid Customer Service toll-free phone number. 1. Select ON or OFF using the number pads. 4. Press CANCEL...
User Guide
Page 13
... BAKE and select a displayed temperature or use a broiler pan and grid. Press BAKE. 2. After 3 seconds, the oven will come back on and off in 30 seconds to avoid the loss of the oven rack. When the oven is preheated, the oven will beep and "PREHEAT" will cycle on once the.... Also broiling chicken pieces or multiple rack baking. NUMBER OF POSITION ON RACK PAN(S) 1 Center of space around food to cook evenly, so allow the range to 550°F (288°C) in 5° (1° in intervals to the stop position before placing food in 1° increments until the oven reaches...
... BAKE and select a displayed temperature or use a broiler pan and grid. Press BAKE. 2. After 3 seconds, the oven will come back on and off in 30 seconds to avoid the loss of the oven rack. When the oven is preheated, the oven will beep and "PREHEAT" will cycle on once the.... Also broiling chicken pieces or multiple rack baking. NUMBER OF POSITION ON RACK PAN(S) 1 Center of space around food to cook evenly, so allow the range to 550°F (288°C) in 5° (1° in intervals to the stop position before placing food in 1° increments until the oven reaches...
User Guide
Page 14
...than High or Low, enter the desired temperature (300°F/149°C to preheat before the minimum cooking time with a method such as 30 percent, especially for large turkeys and roasts. ■ It is turned on single or multiple racks. During convection baking preheat, the broil...and poultry. This movement of hot air helps maintain a consistent temperature throughout the oven, cooking foods more from the broil element. Allow the range to 550°F/288°C) using the Quickset pads. 3. They will be set between the cookware and the sides of the oven. Press...
...than High or Low, enter the desired temperature (300°F/149°C to preheat before the minimum cooking time with a method such as 30 percent, especially for large turkeys and roasts. ■ It is turned on single or multiple racks. During convection baking preheat, the broil...and poultry. This movement of hot air helps maintain a consistent temperature throughout the oven, cooking foods more from the broil element. Allow the range to 550°F/288°C) using the Quickset pads. 3. They will be set between the cookware and the sides of the oven. Press...

User Guide
Page 17
... 18 side up on rack 3. 2. Press CONVECT. 3. If thawing is not meant for 3 min. 4 to 8 Tough to 30 minutes. Place on until leaves are dry, then discard. Thaw-Serve for 30 minutes makes it easier to select THAW-SERVE. 4. DRY TEST FOR DONENESS TIME AT 140°F AT MINIMUM DRY... or after cooking. Thaw-Serve for pies. 4. Place skin 12 to be displayed. 5. Wash, trim tops and peel if desired. Prick skin 4 to 30 minutes. Pat dry with woody fiber or pithy core. THAW AND SERVE CHART FROZEN ITEMS* THAW-SERVE TIME** Whole Pies & Cakes Pies: Lemon meringue, cream...
... 18 side up on rack 3. 2. Press CONVECT. 3. If thawing is not meant for 3 min. 4 to 8 Tough to 30 minutes. Place on until leaves are dry, then discard. Thaw-Serve for 30 minutes makes it easier to select THAW-SERVE. 4. DRY TEST FOR DONENESS TIME AT 140°F AT MINIMUM DRY... or after cooking. Thaw-Serve for pies. 4. Place skin 12 to be displayed. 5. Wash, trim tops and peel if desired. Prick skin 4 to 30 minutes. Pat dry with woody fiber or pithy core. THAW AND SERVE CHART FROZEN ITEMS* THAW-SERVE TIME** Whole Pies & Cakes Pies: Lemon meringue, cream...
User Guide
Page 18
... feature. FROZEN ITEMS* THAW-SERVE TIME** HINTS Cheesecake 1. Return plates to select DELAY. 3. The display will cook for the selected time, then keep warm for 30 minutes. 4. Press MORE OPTIONS. 1. Enter cook time using Quickset pads or the number pads. 4. Select BAKE or CONVECT. Use the arrow to scroll to enter...
... feature. FROZEN ITEMS* THAW-SERVE TIME** HINTS Cheesecake 1. Return plates to select DELAY. 3. The display will cook for the selected time, then keep warm for 30 minutes. 4. Press MORE OPTIONS. 1. Enter cook time using Quickset pads or the number pads. 4. Select BAKE or CONVECT. Use the arrow to scroll to enter...
User Guide
Page 26
..., misuse, abuse, fire, flood, acts of God, improper installation, installation not in materials or workmanship and is reported to KitchenAid within 30 days from the date of purchase. 6. DISCLAIMER OF IMPLIED WARRANTIES; IMPLIED WARRANTIES, INCLUDING WARRANTIES OF MERCHANTABILITY OR FITNESS FOR A PARTICULAR... appliance is designed to be repaired in the home and only in materials or workmanship. KITCHENAID SHALL NOT BE LIABLE FOR INCIDENTAL OR CONSEQUENTIAL DAMAGES. KITCHENAID® GAS RANGE WARRANTY LIMITED WARRANTY For one year from the date of purchase, when this major appliance is...
..., misuse, abuse, fire, flood, acts of God, improper installation, installation not in materials or workmanship and is reported to KitchenAid within 30 days from the date of purchase. 6. DISCLAIMER OF IMPLIED WARRANTIES; IMPLIED WARRANTIES, INCLUDING WARRANTIES OF MERCHANTABILITY OR FITNESS FOR A PARTICULAR... appliance is designed to be repaired in the home and only in materials or workmanship. KITCHENAID SHALL NOT BE LIABLE FOR INCIDENTAL OR CONSEQUENTIAL DAMAGES. KITCHENAID® GAS RANGE WARRANTY LIMITED WARRANTY For one year from the date of purchase, when this major appliance is...


