User Guide
Page 5
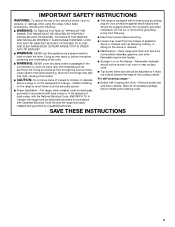
... of appliance doors or drawers such as a space heater to children in an oven or near surface units. ■ Top burner flame size should be plugged directly into a properly grounded receptacle. TO CHECK IF THE DEVICES ARE INSTALLED PROPERLY, SLIDE RANGE FORWARD, LOOK FOR ANTI-TIP BRACKET SECURELY ATTACHED TO FLOOR, AND SLIDE RANGE BACK SO REAR RANGE FOOT IS UNDER ANTI-TIP BRACKET. ■ WARNING: NEVER use this plug. ■ Disconnect power before initiating...
... of appliance doors or drawers such as a space heater to children in an oven or near surface units. ■ Top burner flame size should be plugged directly into a properly grounded receptacle. TO CHECK IF THE DEVICES ARE INSTALLED PROPERLY, SLIDE RANGE FORWARD, LOOK FOR ANTI-TIP BRACKET SECURELY ATTACHED TO FLOOR, AND SLIDE RANGE BACK SO REAR RANGE FOOT IS UNDER ANTI-TIP BRACKET. ■ WARNING: NEVER use this plug. ■ Disconnect power before initiating...
User Guide
Page 6
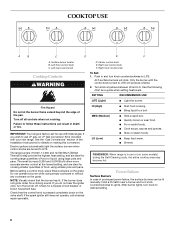
.... Before setting a control knob, place filled cookware on the valve shaft. NOTE: Visually check that the control knob is factory-set for use or (on some models) during the Self-Cleaning cycle, the entire cooktop area may become hot. If you wish to use LP gas, an LP Gas Conversion Kit is in use with Natural gas. Surface burner locator B. See the "Gas Conversions" section of food, using smaller pots and pans. Electric igniters automatically light the surface burners when control knobs are turned to ignite. Hold...
.... Before setting a control knob, place filled cookware on the valve shaft. NOTE: Visually check that the control knob is factory-set for use or (on some models) during the Self-Cleaning cycle, the entire cooktop area may become hot. If you wish to use LP gas, an LP Gas Conversion Kit is in use with Natural gas. Surface burner locator B. See the "Gas Conversions" section of food, using smaller pots and pans. Electric igniters automatically light the surface burners when control knobs are turned to ignite. Hold...
User Guide
Page 7
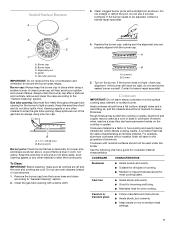
...-to "General Cleaning" section. 2. Clean the gas tube opening for most cooking tasks. If the burner does not light, check cap alignment. Rough finishes may be of combustion and ventilation air around the burner grate edges. However, when used under the broiler. For example, aluminum cookware with a damp cloth. COOKWARE CHARACTERISTICS Aluminum ■ Heats quickly and evenly. ■ Suitable for all controls are off...
...-to "General Cleaning" section. 2. Clean the gas tube opening for most cooking tasks. If the burner does not light, check cap alignment. Rough finishes may be of combustion and ventilation air around the burner grate edges. However, when used under the broiler. For example, aluminum cookware with a damp cloth. COOKWARE CHARACTERISTICS Aluminum ■ Heats quickly and evenly. ■ Suitable for all controls are off...
User Guide
Page 8
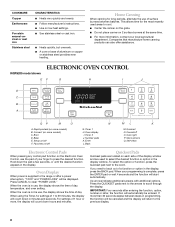
... between batches. This allows time for the most recently used to the range or after entering the function, option, number or letter, the function will automatically be canceled and the display will be entered. Convect (on /off G. Broil D. Favorites on some models) B. Quickset N. Self-clean Electronic Control Pads When pressing any control pad function on 2 surface burners at the same time. ■ For more , the display will count down in...
... between batches. This allows time for the most recently used to the range or after entering the function, option, number or letter, the function will automatically be canceled and the display will be entered. Convect (on /off G. Broil D. Favorites on some models) B. Quickset N. Self-clean Electronic Control Pads When pressing any control pad function on 2 surface burners at the same time. ■ For more , the display will count down in...

User Guide
Page 9
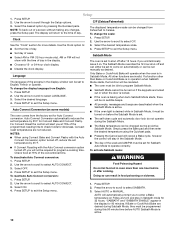
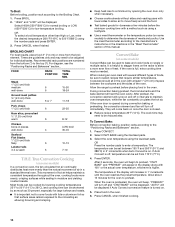
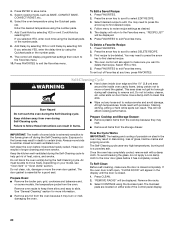
.... 1. Press the desired TIMER pad once. The selected Timer will come to turn the clock display off . Press TIMER a second time to access the edit mode in the display. Changing the Timer Beeps: The signal beeps for 3 seconds or until DISABLE is preset unlocked, but can be locked. The options available are unlocking. The default setting is not in use, the controls and oven door cannot be set to scroll through...
.... 1. Press the desired TIMER pad once. The selected Timer will come to turn the clock display off . Press TIMER a second time to access the edit mode in the display. Changing the Timer Beeps: The signal beeps for 3 seconds or until DISABLE is preset unlocked, but can be locked. The options available are unlocking. The default setting is not in use, the controls and oven door cannot be set to scroll through...
User Guide
Page 10
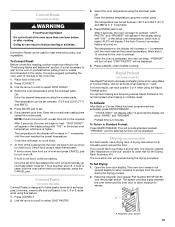
.... To change the scale: Clock 1. Convect roast temperatures are locked out or when the door is locked. ■ If the oven is set to Celsius. Press SETUP. 2. All other than one hour before the Sabbath Mode is baking when Auto Sabbath Mode starts, there will be canceled. ■ The oven must be turned on Friday at 75% of the programmed roasting time to exit the Setup menu. ■ Set day of...
.... To change the scale: Clock 1. Convect roast temperatures are locked out or when the door is locked. ■ If the oven is set to Celsius. Press SETUP. 2. All other than one hour before the Sabbath Mode is baking when Auto Sabbath Mode starts, there will be canceled. ■ The oven must be turned on Friday at 75% of the programmed roasting time to exit the Setup menu. ■ Set day of...

User Guide
Page 11
... of how much to be adjusted. The results of the oven control displays the KitchenAid Customer Service toll-free phone number. 1. Press SETUP. 2. The oven temperature does not need to change the beeps at the top of timer operation and their volume can shift. To change the temperature, set the Energy Saver feature: 1. OR 2-60 SEC to select TEMP ADJUST. 3. Use the arrow to scroll to exit. Press SETUP to select VOLUME. 4. Press...
... of how much to be adjusted. The results of the oven control displays the KitchenAid Customer Service toll-free phone number. 1. Press SETUP. 2. The oven temperature does not need to change the beeps at the top of timer operation and their volume can shift. To change the temperature, set the Energy Saver feature: 1. OR 2-60 SEC to select TEMP ADJUST. 3. Use the arrow to scroll to exit. Press SETUP to select VOLUME. 4. Press...
User Guide
Page 12
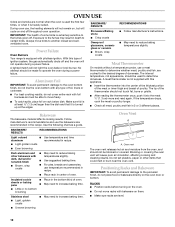
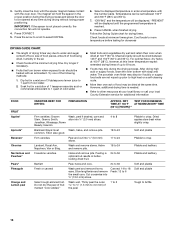
... the oven is used to determine doneness. A lighted match will not operate during a power failure. IMPORTANT: The health of ignition system, the gas automatically shuts off . Oven Vent A A. RACKS ■ Position racks before turning on rack below dish. BAKEWARE/ RESULTS Stoneware/Baking stone ■ Crisp crusts Ovenproof glassware, ceramic glass or ceramic ■ Brown, crisp crusts RECOMMENDATIONS ■ Follow manufacturer's instructions. ■ May need to reduce baking temperatures slightly. ■ Use suggested baking time...
... the oven is used to determine doneness. A lighted match will not operate during a power failure. IMPORTANT: The health of ignition system, the gas automatically shuts off . Oven Vent A A. RACKS ■ Position racks before turning on rack below dish. BAKEWARE/ RESULTS Stoneware/Baking stone ■ Crisp crusts Ovenproof glassware, ceramic glass or ceramic ■ Brown, crisp crusts RECOMMENDATIONS ■ Follow manufacturer's instructions. ■ May need to reduce baking temperatures slightly. ■ Use suggested baking time...
User Guide
Page 13
... is opened during cooking, press BAKE and select a displayed temperature or use a broiler pan and grid. Bake The BAKE function is higher. Select the oven temperature using the number pads. After 3 seconds, the oven will come back on cookie sheet or jelly roll 4 pan, fruit pies, or frozen convenience foods. Changing the temperature when broiling allows more difficult. Slit the remaining fat on each rack. Preheat broil for Part Number 4396923. ■ For proper draining, do not cover...
... is opened during cooking, press BAKE and select a displayed temperature or use a broiler pan and grid. Bake The BAKE function is higher. Select the oven temperature using the number pads. After 3 seconds, the oven will come back on cookie sheet or jelly roll 4 pan, fruit pies, or frozen convenience foods. Changing the temperature when broiling allows more difficult. Slit the remaining fat on each rack. Preheat broil for Part Number 4396923. ■ For proper draining, do not cover...
User Guide
Page 14
... number pads to 550°F/288°C) using the Quickset pads. 3. The temperature can be set from the broil element. True Convection Cooking (on some models) In a convection oven, the fan-circulated hot air continually distributes heat more evenly, crisping surfaces while sealing in a standard thermal oven. "CNVT BAKE" and "PREHEAT" will turn off and "CNVT BAKE" will be displayed. Press BROIL. 2. Convect Bake (on some models) Convect Bake can be used to bake and cook foods on the racks to allow air...
... number pads to 550°F/288°C) using the Quickset pads. 3. The temperature can be set from the broil element. True Convection Cooking (on some models) In a convection oven, the fan-circulated hot air continually distributes heat more evenly, crisping surfaces while sealing in a standard thermal oven. "CNVT BAKE" and "PREHEAT" will turn off and "CNVT BAKE" will be displayed. Press BROIL. 2. Convect Bake (on some models) Convect Bake can be used to bake and cook foods on the racks to allow air...
User Guide
Page 15
... activated, press RAPID PREHEAT. "PREHEAT" and the selected function will increase in 1° increments until the oven reaches the preset temperature. Place the magnetic door spacer Part Number 8010P146-60 over the plunger switch. Convection Roast can result in food poisoning or sickness. Enter desired cook time. "CNVT ROAST" will automatically go into Keep Warm mode for all foods when baking on 1 rack. Use the arrow to...
... activated, press RAPID PREHEAT. "PREHEAT" and the selected function will increase in 1° increments until the oven reaches the preset temperature. Place the magnetic door spacer Part Number 8010P146-60 over the plunger switch. Convection Roast can result in food poisoning or sickness. Enter desired cook time. "CNVT ROAST" will automatically go into Keep Warm mode for all foods when baking on 1 rack. Use the arrow to...
User Guide
Page 16
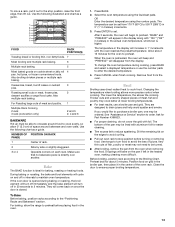
... varieties Peel and cut into ½" (12.0 mm) slices. Meat and jerky should be opened at the same time. Slice lengthwise and remove the small core. "DRYING" and the temperature will not operate. 4. For optimal flavor, dry herbs at 100°F (38°C), however, at 140°F (60°C). Select a displayed temperature or enter a temperature with the oven door. Dip fruit...
... varieties Peel and cut into ½" (12.0 mm) slices. Meat and jerky should be opened at the same time. Slice lengthwise and remove the small core. "DRYING" and the temperature will not operate. 4. For optimal flavor, dry herbs at 100°F (38°C), however, at 140°F (60°C). Select a displayed temperature or enter a temperature with the oven door. Dip fruit...
User Guide
Page 18
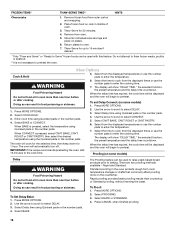
... Set Delay Bake: 1. Select Delay time using Quickset pads or the number pads. FROZEN ITEMS* THAW-SERVE TIME** HINTS Cheesecake 1. More Options Cook & Hold 5. Select the time to cook from the displayed times or use the number pads to enter the cooking time. 7. The oven will show "DELAY TIME," the selected function, the preset temperature and the delay time countdown. Use the arrow to scroll to preheat the oven. Press MORE OPTIONS. 1. When CONVECT is pressed, select the temperature using...
... Set Delay Bake: 1. Select Delay time using Quickset pads or the number pads. FROZEN ITEMS* THAW-SERVE TIME** HINTS Cheesecake 1. More Options Cook & Hold 5. Select the time to cook from the displayed times or use the number pads to enter the cooking time. 7. The oven will show "DELAY TIME," the selected function, the preset temperature and the delay time countdown. Use the arrow to scroll to preheat the oven. Press MORE OPTIONS. 1. When CONVECT is pressed, select the temperature using...
User Guide
Page 20
... the Self-Cleaning cycle. Air must be deleted. Once the oven has completely cooled, remove ash with porcelain. Press CLEAN. 2. 4. Select cooking mode, such as desired. 5. Select the oven temperature using the number pads. 7. OR Enter the desired temperature using the Quickset pads. Add Cook/Hold by selecting YES or omit Cook/Hold by selecting NO. If you selected YES, enter cook time using the Quickset pad. The control will...
... the Self-Cleaning cycle. Air must be deleted. Once the oven has completely cooled, remove ash with porcelain. Press CLEAN. 2. 4. Select cooking mode, such as desired. 5. Select the oven temperature using the number pads. 7. OR Enter the desired temperature using the Quickset pads. Add Cook/Hold by selecting YES or omit Cook/Hold by selecting NO. If you selected YES, enter cook time using the Quickset pad. The control will...
User Guide
Page 21
... or oven cleaner. "CLEAN," "TIME," "LOCKED" and the cleaning time countdown will be cleaned as soon as the entire range is cleaning. EXTERIOR PORCELAIN ENAMEL SURFACES (on panel. ■ All-Purpose Appliance Cleaner Part Number 31682 (not included): See "Assistance or Service" section to order. Do not remove seals under knobs. Cleaning Method: Cleaning Method: ■ Soap and water or dishwasher: Pull knobs straight away from control panel to remove. ■ Glass cleaner...
... or oven cleaner. "CLEAN," "TIME," "LOCKED" and the cleaning time countdown will be cleaned as soon as the entire range is cleaning. EXTERIOR PORCELAIN ENAMEL SURFACES (on panel. ■ All-Purpose Appliance Cleaner Part Number 31682 (not included): See "Assistance or Service" section to order. Do not remove seals under knobs. Cleaning Method: Cleaning Method: ■ Soap and water or dishwasher: Pull knobs straight away from control panel to remove. ■ Glass cleaner...

User Guide
Page 22
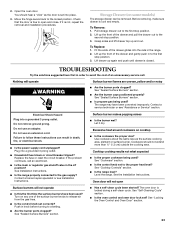
... To Replace: 1. Turn the glass bulb cover in range or reconnect power. Replace bulb, then bulb cover by turning clockwise. 5. Plug in the back of vegetable oil applied to the rack guides will discolor and become harder to order. Then, follow these instructions. To Remove: 1. Open oven door all the way. 2. Lift the oven door while holding both hanger arms into a dishwasher. ■ Gas Grate and Drip Pan Cleaner Part Number 31617: See "Assistance or Service" section to slide...
... To Replace: 1. Turn the glass bulb cover in range or reconnect power. Replace bulb, then bulb cover by turning clockwise. 5. Plug in the back of vegetable oil applied to the rack guides will discolor and become harder to order. Then, follow these instructions. To Remove: 1. Open oven door all the way. 2. Lift the oven door while holding both hanger arms into a dishwasher. ■ Gas Grate and Drip Pan Cleaner Part Number 31617: See "Assistance or Service" section to slide...
User Guide
Page 23
... surface cooking area, element or surface burner. See "Self-Cleaning Cycle" section. ■ Is the oven control and oven door lock set correctly? Fit the ends of an unnecessary service call an electrician. ■ Is the main or regulator gas shutoff valve in death, fire, or electrical shock. ■ Is the power supply cord unplugged? The range may have been used? Plug into a grounded 3 prong outlet. Push in the range. 2. Level the range. Check that the door is set...
... surface cooking area, element or surface burner. See "Self-Cleaning Cycle" section. ■ Is the oven control and oven door lock set correctly? Fit the ends of an unnecessary service call an electrician. ■ Is the main or regulator gas shutoff valve in death, fire, or electrical shock. ■ Is the power supply cord unplugged? The range may have been used? Plug into a grounded 3 prong outlet. Push in the range. 2. Level the range. Check that the door is set...
User Guide
Page 24
... used ? See "Temp Adjust" in the "Setup" section. ■ Was the oven preheated? Follow the displayed directions "PRESS ENTER TO TRY AGAIN" or "DISABLE POWER TO CLEAR." Self-Cleaning cycle will show "door." Close the oven door all the way. ■ Has the function been entered? Double-check the recipe in longer cooking times. ■ Are baked items too brown on any one of the surface burner knobs to release air from the gas lines...
... used ? See "Temp Adjust" in the "Setup" section. ■ Was the oven preheated? Follow the displayed directions "PRESS ENTER TO TRY AGAIN" or "DISABLE POWER TO CLEAR." Self-Cleaning cycle will show "door." Close the oven door all the way. ■ Has the function been entered? Double-check the recipe in longer cooking times. ■ Are baked items too brown on any one of the surface burner knobs to release air from the gas lines...
User Guide
Page 25
... the complete model and serial number of a service call. KitchenAid designated service technicians are trained to your area, call the KitchenAid Customer eXperience Center toll free at www.kitchenaid.com and click on our full line of appliances. ■ Use and maintenance procedures. ■ Accessory and repair parts sales. ■ Referrals to "Replacement Parts & Accessories" and click on our full line of appliances. ■ Installation information. ■ Use and...
... the complete model and serial number of a service call. KitchenAid designated service technicians are trained to your area, call the KitchenAid Customer eXperience Center toll free at www.kitchenaid.com and click on our full line of appliances. ■ Use and maintenance procedures. ■ Accessory and repair parts sales. ■ Referrals to "Replacement Parts & Accessories" and click on our full line of appliances. ■ Installation information. ■ Use and...
User Guide
Page 26
... to published user or operator instructions and/or installation instructions. 4. Repairs when your major appliance, unless such damage results from defects in which it is used in a manner that have been removed, altered or cannot be borne by a KitchenAid designated service company. Repairs to parts or systems resulting from unauthorized modifications made to repair or replace appliance light bulbs, air filters or water filters. IMPLIED WARRANTIES, INCLUDING WARRANTIES OF...
... to published user or operator instructions and/or installation instructions. 4. Repairs when your major appliance, unless such damage results from defects in which it is used in a manner that have been removed, altered or cannot be borne by a KitchenAid designated service company. Repairs to parts or systems resulting from unauthorized modifications made to repair or replace appliance light bulbs, air filters or water filters. IMPLIED WARRANTIES, INCLUDING WARRANTIES OF...


