Use and Care Guide
Page 3
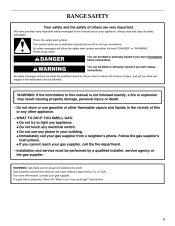
RANGE SAFETY Your safety and the safety of injury, and tell you what the ...any other flammable vapors and liquids in the vicinity of this or any phone in your building. • Immediately call your gas supplier, call the fire department. - WARNING: If the information in this manual is not followed exactly, a fire or ...WARNING You can be killed or seriously injured if you don't immediately follow the "What to potential hazards that you smell gas" instructions. 3 For more information, contact your appliance. This symbol alerts you to do if you use gasoline or other ...
RANGE SAFETY Your safety and the safety of injury, and tell you what the ...any other flammable vapors and liquids in the vicinity of this or any phone in your building. • Immediately call your gas supplier, call the fire department. - WARNING: If the information in this manual is not followed exactly, a fire or ...WARNING You can be killed or seriously injured if you don't immediately follow the "What to potential hazards that you smell gas" instructions. 3 For more information, contact your appliance. This symbol alerts you to do if you use gasoline or other ...
Use and Care Guide
Page 26
KITCHENAID® GAS RANGE WARRANTY LIMITED WARRANTY For one year from the date of Whirlpool Corporation or Whirlpool Canada LP (hereafter "KitchenAid") will pay for the following components if defective in materials or workmanship: SECOND THROUGH FIFTH YEAR LIMITED WARRANTY ON CERTAIN ...this limited warranty. Proof of original purchase date is used in the country in materials or workmanship. Service must be provided by a KitchenAid designated service company. This limited warranty is valid only in the United States or Canada and applies only when the major appliance is required...
KITCHENAID® GAS RANGE WARRANTY LIMITED WARRANTY For one year from the date of Whirlpool Corporation or Whirlpool Canada LP (hereafter "KitchenAid") will pay for the following components if defective in materials or workmanship: SECOND THROUGH FIFTH YEAR LIMITED WARRANTY ON CERTAIN ...this limited warranty. Proof of original purchase date is used in the country in materials or workmanship. Service must be provided by a KitchenAid designated service company. This limited warranty is valid only in the United States or Canada and applies only when the major appliance is required...
Installation Instructions
Page 2
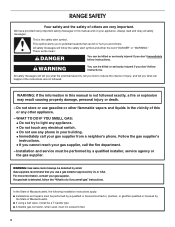
.... This symbol alerts you to light any appliance. • Do not touch any phone in this manual is detected, follow instructions. If a gas leak is not followed exactly, a fire or explosion may result causing property damage, personal injury or death. - WARNING: If the information in...; Do not try to potential hazards that you and others are not followed. Follow the gas supplier's instructions. • If you what the potential hazard is the safety alert symbol. RANGE SAFETY Your safety and the safety of Massachusetts, the following installation instructions apply: ■...
.... This symbol alerts you to light any appliance. • Do not touch any phone in this manual is detected, follow instructions. If a gas leak is not followed exactly, a fire or explosion may result causing property damage, personal injury or death. - WARNING: If the information in...; Do not try to potential hazards that you and others are not followed. Follow the gas supplier's instructions. • If you what the potential hazard is the safety alert symbol. RANGE SAFETY Your safety and the safety of Massachusetts, the following installation instructions apply: ■...
Installation Instructions
Page 3
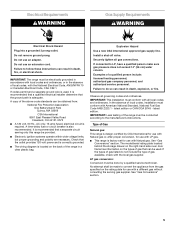
... floor. See "Electrical Requirements" section. ■ Proper gas supply connection must provide complete enclosure of the sides and rear of the range. ■ To eliminate the risk of burns or fire by installing a range hood or microwave hood combination that projects horizontally a minimum of... allowable wood cabinet temperatures of flooring may require longer screws to anchor bracket to rear range foot. Burner caps ■ 2 - Thickness of 194°F (90°C). 3 See "Gas Supply Requirements" section. ■ Contact a qualified floor covering installer to comply with your...
... floor. See "Electrical Requirements" section. ■ Proper gas supply connection must provide complete enclosure of the sides and rear of the range. ■ To eliminate the risk of burns or fire by installing a range hood or microwave hood combination that projects horizontally a minimum of... allowable wood cabinet temperatures of flooring may require longer screws to anchor bracket to rear range foot. Burner caps ■ 2 - Thickness of 194°F (90°C). 3 See "Gas Supply Requirements" section. ■ Contact a qualified floor covering installer to comply with your...
Installation Instructions
Page 4
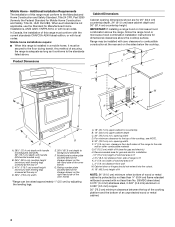
...(15.2 cm) width of H (area for gas and electric) H. Product Dimensions Cabinet Dimensions Cabinet opening width D. A. 18" (45.7 cm) upper cabinet to the top of securing the range is not applicable, use the Standard for dimensional clearances above . E. 30" (76.2 cm) min. Any method of...64 cm) flame retardant millboard covered with local codes. Mobile home installations require: ■ When this range must conform to backguard standoffs. 29" (73.7 cm) depth with handle (KitchenAid models only) B. 35⁵⁄₈" (90.5 cm) cooktop height (minimum) with leveling legs...
...(15.2 cm) width of H (area for gas and electric) H. Product Dimensions Cabinet Dimensions Cabinet opening width D. A. 18" (45.7 cm) upper cabinet to the top of securing the range is not applicable, use the Standard for dimensional clearances above . E. 30" (76.2 cm) min. Any method of...64 cm) flame retardant millboard covered with local codes. Mobile home installations require: ■ When this range must conform to backguard standoffs. 29" (73.7 cm) depth with handle (KitchenAid models only) B. 35⁵⁄₈" (90.5 cm) cooktop height (minimum) with leveling legs...
Installation Instructions
Page 5
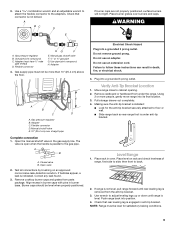
...separate circuit serving only this range be made to the manufacturer's instructions. IMPORTANT: The range must be done by CSA International for use with a different gas without consulting the serving gas supplier. A copy of the range must be obtained from the gas specified on the rating plate... death, explosion, or fire. It is adequate. IMPORTANT: This installation must conform with LP gas. ■ This range is located on the types of Gas Natural gas: This range is design-certified by a qualified service technician. The model/serial rating plate located behind the ...
...separate circuit serving only this range be made to the manufacturer's instructions. IMPORTANT: The range must be done by CSA International for use with a different gas without consulting the serving gas supplier. A copy of the range must be obtained from the gas specified on the rating plate... death, explosion, or fire. It is adequate. IMPORTANT: This installation must conform with LP gas. ■ This range is located on the types of Gas Natural gas: This range is design-certified by a qualified service technician. The model/serial rating plate located behind the ...
Installation Instructions
Page 6
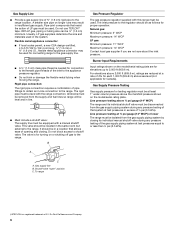
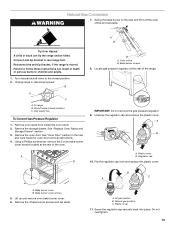
...flexible metal tubing when moving the range. Gas supply line B. To range †®TEFLON is needed for testing regulator must be in -line connection to the range location. A C A. Gas Supply Line ■ Provide a gas supply line of ¾" (1.9 cm) rigid pipe to the range. A smaller size pipe on the...than ½ psi (3.5 kPa). For elevations above ½ psi gauge (14" WCP) The range and its individual manual shutoff valve during any pressure testing of the gas supply piping system at test pressures in the same room but external to shutoff valve. Line pressure testing...
...flexible metal tubing when moving the range. Gas supply line B. To range †®TEFLON is needed for testing regulator must be in -line connection to the range location. A C A. Gas Supply Line ■ Provide a gas supply line of ¾" (1.9 cm) rigid pipe to the range. A smaller size pipe on the...than ½ psi (3.5 kPa). For elevations above ½ psi gauge (14" WCP) The range and its individual manual shutoff valve during any pressure testing of the gas supply piping system at test pressures in the same room but external to shutoff valve. Line pressure testing...

Installation Instructions
Page 8
... following illustration). 2. Tighten both adapters. 8 If you have a qualified person make sure gas pressure does not exceed 14" (36 cm) water column. Position mounting bracket in the cutout space. See below. Examples of the range in cutout so that right (or left side or right side of the... range, as shown. Make Gas Connection C WARNING A. Drill two ¹⁄₈" (3.0 mm) holes that is 14.5 mm) from...
... following illustration). 2. Tighten both adapters. 8 If you have a qualified person make sure gas pressure does not exceed 14" (36 cm) water column. Position mounting bracket in the cutout space. See below. Examples of the range in cutout so that right (or left side or right side of the... range, as shown. Make Gas Connection C WARNING A. Drill two ¹⁄₈" (3.0 mm) holes that is 14.5 mm) from...
Installation Instructions
Page 9
...is parallel to follow these instructions can result in oven. Push range back into a grounded 3 prong outlet. WARNING A. Use pipe-joint compound. Manual gas shutoff valve F. ½" or ¾" gas pipe G. Gas supply pipe must not be level when properly positioned. Flexible connector... appear, a leak is engaged in anti-tip bracket. Gas pressure regulator B. Flexible connector HG F E. Gas pressure regulator B. Burner caps should be more people, gently move range into a grounded 3 prong outlet. Failure to the gas pipe. Check that connector is not kinked. Place rack in...
...is parallel to follow these instructions can result in oven. Push range back into a grounded 3 prong outlet. WARNING A. Use pipe-joint compound. Manual gas shutoff valve F. ½" or ¾" gas pipe G. Gas supply pipe must not be level when properly positioned. Flexible connector... appear, a leak is engaged in anti-tip bracket. Gas pressure regulator B. Flexible connector HG F E. Gas pressure regulator B. Burner caps should be more people, gently move range into a grounded 3 prong outlet. Failure to the gas pipe. Check that connector is not kinked. Place rack in...
Installation Instructions
Page 10
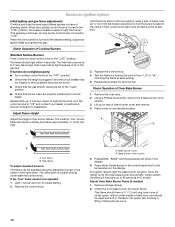
...contact your dealer or authorized service company for each setting. 5. Hold the knob stem in the low position using the adjustment screw in the gas line. Replace the control knob. 4. Repeat above steps for assistance. Check Operation of bake burner cover and remove. 4. Place cover on ... 10 A B A B A. If burners do not light properly: ■ Turn cooktop control knob to the "OFF" position. ■ Check that the range is turned to light the burner. High flame To adjust standard burners: The flame can be adjusted: 1. Adjust Oven Bake Burner Flame (if needed) 1. When...
...contact your dealer or authorized service company for each setting. 5. Hold the knob stem in the low position using the adjustment screw in the gas line. Replace the control knob. 4. Repeat above steps for assistance. Check Operation of bake burner cover and remove. 4. Place cover on ... 10 A B A B A. If burners do not light properly: ■ Turn cooktop control knob to the "OFF" position. ■ Check that the range is turned to light the burner. High flame To adjust standard burners: The flame can be adjusted: 1. Adjust Oven Bake Burner Flame (if needed) 1. When...
Installation Instructions
Page 11
...Check Operation of the Use and Care Guide. 6. The igniter used to light. Adjust the air shutter as outlined above. ■ If the gas supply line shutoff valve is level. Complete Installation 1. Check that all packaging materials. 4. Air shutter 4. 3. Close the oven door to start... Guide. 8. A B A. Adjust Oven Broil Burner Flame (if needed) Look through the steps to loosen the air shutter adjustment screw on range operation. Read the Use and Care Guide. 7. Turn on for 5 minutes, check for specific instruction on the air shutter located at the rear...
...Check Operation of the Use and Care Guide. 6. The igniter used to light. Adjust the air shutter as outlined above. ■ If the gas supply line shutoff valve is level. Complete Installation 1. Check that all packaging materials. 4. Air shutter 4. 3. Close the oven door to start... Guide. 8. A B A. Adjust Oven Broil Burner Flame (if needed) Look through the steps to loosen the air shutter adjustment screw on range operation. Read the Use and Care Guide. 7. Turn on for 5 minutes, check for specific instruction on the air shutter located at the rear...
Installation Instructions
Page 12
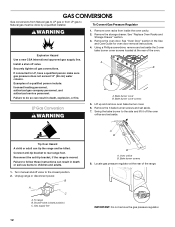
...Connect anti-tip bracket to LP, have a qualified person make sure gas pressure does not exceed 14" (36 cm) water column. Unplug range or disconnect power. Shutoff valve (closed position. 2. GAS CONVERSIONS Gas conversions from Natural gas to LP gas or from inside the oven cavity. 2. Using a Phillips screwdriver, ...remove and set aside. 7. Reconnect the anti-tip bracket, if the range is moved. Bake burner cover screws LP Gas Conversion WARNING 5. Tip Over Hazard A child or adult can result in death, explosion, or fire. 1. Turn...
...Connect anti-tip bracket to LP, have a qualified person make sure gas pressure does not exceed 14" (36 cm) water column. Unplug range or disconnect power. Shutoff valve (closed position. 2. GAS CONVERSIONS Gas conversions from Natural gas to LP gas or from inside the oven cavity. 2. Using a Phillips screwdriver, ...remove and set aside. 7. Reconnect the anti-tip bracket, if the range is moved. Bake burner cover screws LP Gas Conversion WARNING 5. Tip Over Hazard A child or adult can result in death, explosion, or fire. 1. Turn...

Installation Instructions
Page 13
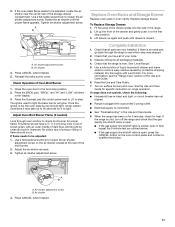
... C. Plastic cover 11. Bake burner B. Reinstall the oven bake burner cover. A 2. A B 3. Do not overtighten. A .049 46 A. Natural gas position B. The broil burner will hang in the back of the range. 2 A. Broil burner screw B. Flip the regulator cap over the bake burner orifice hood and reinstall using 3 screws. Remove the broil burner from...
... C. Plastic cover 11. Bake burner B. Reinstall the oven bake burner cover. A 2. A B 3. Do not overtighten. A .049 46 A. Natural gas position B. The broil burner will hang in the back of the range. 2 A. Broil burner screw B. Flip the regulator cap over the bake burner orifice hood and reinstall using 3 screws. Remove the broil burner from...
Installation Instructions
Page 15
... Care Guide for oven door removal instructions. 4. Turn manual shutoff valve to rear range foot. Shutoff valve (closed position. 2. Lift up and remove oven bake burner cover. 6. Natural gas position C. Connect anti-tip bracket to the closed position) C. Remove the oven ...B. Bake burner cover B. Plastic cover 11. Reconnect the anti-tip bracket, if the range is moved. B A C A. A B A. Bake burner cover screws 5. LP gas position B. Gas supply line To Convert Gas Pressure Regulator 1. Remove the 3 bake burner screws and set aside. Unscrew the regulator ...
... Care Guide for oven door removal instructions. 4. Turn manual shutoff valve to rear range foot. Shutoff valve (closed position. 2. Lift up and remove oven bake burner cover. 6. Natural gas position C. Connect anti-tip bracket to the closed position) C. Remove the oven ...B. Bake burner cover B. Plastic cover 11. Reconnect the anti-tip bracket, if the range is moved. B A C A. A B A. Bake burner cover screws 5. LP gas position B. Gas supply line To Convert Gas Pressure Regulator 1. Remove the 3 bake burner screws and set aside. Unscrew the regulator ...

Installation Instructions
Page 16
...screws. Install the Number M50 Natural gas broil burner orifice hood, turning it clockwise 4 or 5 turns. Insert the broil burner locator pin in the hole in the back of the range. 2 To Convert Oven Broil Burner 1. Turn the Number 57 LP gas broil burner orifice hood counterclockwise to ...remove. Do not overtighten. Number 46 Natural gas bake burner orifice hood 4. Reinstall the oven bake burner cover. 16...
...screws. Install the Number M50 Natural gas broil burner orifice hood, turning it clockwise 4 or 5 turns. Insert the broil burner locator pin in the hole in the back of the range. 2 To Convert Oven Broil Burner 1. Turn the Number 57 LP gas broil burner orifice hood counterclockwise to ...remove. Do not overtighten. Number 46 Natural gas bake burner orifice hood 4. Reinstall the oven bake burner cover. 16...

