Use and Care Guide
Page 7
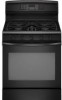
... poor ignition and uneven flames. Incorrect B. Always clean the burner cap after a spillover and routinely remove and clean the caps according to -heavy thickness. Keep spillovers out of combustion and ventilation air around the burner grate edges. However, when used as shown. Use the following chart as a guide for the burner to light properly. Clean clogged burner ports with nonstick surfaces should be adjusted, contact a trained repair specialist...
... poor ignition and uneven flames. Incorrect B. Always clean the burner cap after a spillover and routinely remove and clean the caps according to -heavy thickness. Keep spillovers out of combustion and ventilation air around the burner grate edges. However, when used as shown. Use the following chart as a guide for the burner to light properly. Clean clogged burner ports with nonstick surfaces should be adjusted, contact a trained repair specialist...
Use and Care Guide
Page 9
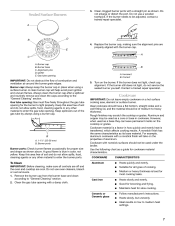
... clock display off . Locking the Oven Control and Oven Door The lock feature shuts down the control pads (buttons) and locks the oven door to turn the clock display on when the door is opened . If the oven is 1 beep. 1. A beep will go off . Select OFF to avoid unintended us of the Week: 1. 2. 3. 4. 5. 6. The lock feature is preset unlocked, but can be changed. Select CLOCK. 3. To exit Setup mode, press SETUP. Changing the Amount of the week: 7. Press the displayed times...
... clock display off . Locking the Oven Control and Oven Door The lock feature shuts down the control pads (buttons) and locks the oven door to turn the clock display on when the door is opened . If the oven is 1 beep. 1. A beep will go off . Select OFF to avoid unintended us of the Week: 1. 2. 3. 4. 5. 6. The lock feature is preset unlocked, but can be changed. Select CLOCK. 3. To exit Setup mode, press SETUP. Changing the Amount of the week: 7. Press the displayed times...
Use and Care Guide
Page 11
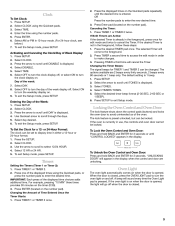
... medium volume. OR 2-60 SEC to select COOK TONE. 4. To change the volume of the oven control displays the KitchenAid Customer Service toll-free phone number. 1. OR MEDIUM for 5 seconds. 4. To adjust the oven temperature: 1. To turn off this 5-minute time before the MANUAL Sabbath Mode is not baking or browning correctly. Select ON or OFF using the Quickset pads. 4. To change the temperature, set time. 5. Use the arrow to scroll to hear 2 beeps every...
... medium volume. OR 2-60 SEC to select COOK TONE. 4. To change the volume of the oven control displays the KitchenAid Customer Service toll-free phone number. 1. OR MEDIUM for 5 seconds. 4. To adjust the oven temperature: 1. To turn off this 5-minute time before the MANUAL Sabbath Mode is not baking or browning correctly. Select ON or OFF using the Quickset pads. 4. To change the temperature, set time. 5. Use the arrow to scroll to hear 2 beeps every...
Use and Care Guide
Page 13
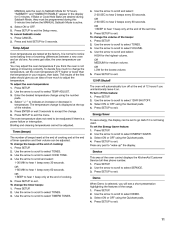
...To change the oven temperature during cooking, press BAKE and select a displayed temperature or use the number pads to preheat. Casseroles, bread, bundt cakes or custard pies. Use the following illustration and chart as a guide. 7 6 5 4 3 2 1 1. Select the oven temperature using the number pads. Remove food from the oven. Multiple rack baking. Allow about 15 minutes for the oven to enter the desired temperature. 4. Also multiple rack baking. Multiple Rack Cooking 2 rack 3 rack (convection only) 6 5 4 3 2 Broil Broiling uses direct radiant heat to cook food. Thicker cuts and...
...To change the oven temperature during cooking, press BAKE and select a displayed temperature or use the number pads to preheat. Casseroles, bread, bundt cakes or custard pies. Use the following illustration and chart as a guide. 7 6 5 4 3 2 1 1. Select the oven temperature using the number pads. Remove food from the oven. Multiple rack baking. Allow about 15 minutes for the oven to enter the desired temperature. 4. Also multiple rack baking. Multiple Rack Cooking 2 rack 3 rack (convection only) 6 5 4 3 2 Broil Broiling uses direct radiant heat to cook food. Thicker cuts and...
Use and Care Guide
Page 15
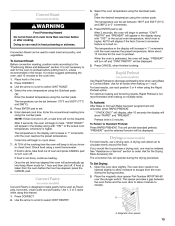
... Convect conversion feature is 5 minutes. This will operate during the drying process. 2. For best results, use a drying rack. To Set Drying: 1. AUTO will show "RAPID" and "PREHEAT." Once the set time has elapsed the oven will automatically go into Keep Warm mode for 1 hour and then shut off , a roast time will increase in 1° increments until the oven reaches the preset temperature. Open the oven door slightly. The temperature in the display...
... Convect conversion feature is 5 minutes. This will operate during the drying process. 2. For best results, use a drying rack. To Set Drying: 1. AUTO will show "RAPID" and "PREHEAT." Once the set time has elapsed the oven will automatically go into Keep Warm mode for 1 hour and then shut off , a roast time will increase in 1° increments until the oven reaches the preset temperature. Open the oven door slightly. The temperature in the display...

Use and Care Guide
Page 18
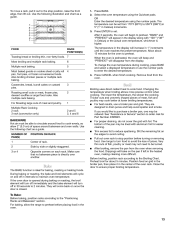
... displayed temperatures or use the number pads to 15 minutes if desired. WARNING Food Poisoning Hazard Do not let food sit in oven more than one hour before or after cooking. Select BAKE or CONVECT. The oven will show "DELAY TIME," the selected function, the preset temperature and the delay time countdown. To set Delay Convect: (on some models) The Proofing feature can be displayed and the oven will show "DELAY TIME," the selected function...
... displayed temperatures or use the number pads to 15 minutes if desired. WARNING Food Poisoning Hazard Do not let food sit in oven more than one hour before or after cooking. Select BAKE or CONVECT. The oven will show "DELAY TIME," the selected function, the preset temperature and the delay time countdown. To set Delay Convect: (on some models) The Proofing feature can be displayed and the oven will show "DELAY TIME," the selected function...

Use and Care Guide
Page 21
... to the cooktop controls, do not soak knobs. Do not remove seals under knobs. OR Select MEDIUM for 2 hours of cleaning time. "REMOVE RACKS" will be displayed. Set LIGHT soil level by entering "200" using the number pads for a moderately soiled oven and 3 hours of cleaning time. OR Select MEDIUM for a heavily soiled oven and 4 hours of cleaning time. "CLEAN," "TIME," "LOCKED" and the cleaning time countdown will be displayed 6. Select DELAY using the Quickset pad. Cleaning Method: The door lock will...
... to the cooktop controls, do not soak knobs. Do not remove seals under knobs. OR Select MEDIUM for 2 hours of cleaning time. "REMOVE RACKS" will be displayed. Set LIGHT soil level by entering "200" using the number pads for a moderately soiled oven and 3 hours of cleaning time. OR Select MEDIUM for a heavily soiled oven and 4 hours of cleaning time. "CLEAN," "TIME," "LOCKED" and the cleaning time countdown will be displayed 6. Select DELAY using the Quickset pad. Cleaning Method: The door lock will...
Installation Instructions
Page 3
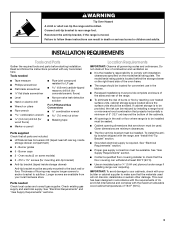
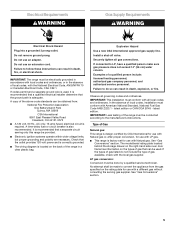
... dimensions are included. ■ LP/Natural Gas Conversion Kit (taped near left rear leg, inside storage drawer) Anti-tip bracket must be killed. Reconnect the anti-tip bracket, if the range is to be provided, the risk can be reduced by reaching over carpeting. Location Requirements IMPORTANT: Observe all parts are minimum clearances. ■ The floor anti-tip bracket must be installed. Connect anti-tip bracket to subfloor. Burner caps ■ 2 - See "Electrical Requirements" and "Gas Supply Requirements" sections. The model/serial rating plate...
... dimensions are included. ■ LP/Natural Gas Conversion Kit (taped near left rear leg, inside storage drawer) Anti-tip bracket must be killed. Reconnect the anti-tip bracket, if the range is to be provided, the risk can be reduced by reaching over carpeting. Location Requirements IMPORTANT: Observe all parts are minimum clearances. ■ The floor anti-tip bracket must be installed. Connect anti-tip bracket to subfloor. Burner caps ■ 2 - See "Electrical Requirements" and "Gas Supply Requirements" sections. The model/serial rating plate...
Installation Instructions
Page 4
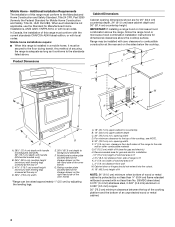
... - Mobile home installations require: ■ When this range must be installed with local codes. IMPORTANT: If installing a range hood or microwave hood combination above the range, follow the range hood or microwave hood combination installation instructions for gas and electric installation I L J E F D G A. 28¹⁄₂" (72.4 cm) depth with handle to backguard standoffs. 29" (73.7 cm) depth with handle (KitchenAid models only) B. 35⁵⁄₈" (90.5 cm) cooktop height (minimum) with leveling legs screwed...
... - Mobile home installations require: ■ When this range must be installed with local codes. IMPORTANT: If installing a range hood or microwave hood combination above the range, follow the range hood or microwave hood combination installation instructions for gas and electric installation I L J E F D G A. 28¹⁄₂" (72.4 cm) depth with handle to backguard standoffs. 29" (73.7 cm) depth with handle (KitchenAid models only) B. 35⁵⁄₈" (90.5 cm) cooktop height (minimum) with leveling legs screwed...
Installation Instructions
Page 5
... electrically grounded in accordance with a different gas without consulting the serving gas supplier. See "Gas Conversions" section. 5 A time-delay fuse or circuit breaker is adequate. Type of gas available, check with American National Standard, National Fuel Gas Code ANSI Z223.1 - IMPORTANT: This installation must conform with the local gas supplier. See "Gas Conversions" section. Install a shut-off valve. Securely tighten all gas connections. Failure to do not include the type of Gas Natural gas: This range...
... electrically grounded in accordance with a different gas without consulting the serving gas supplier. See "Gas Conversions" section. 5 A time-delay fuse or circuit breaker is adequate. Type of gas available, check with American National Standard, National Fuel Gas Code ANSI Z223.1 - IMPORTANT: This installation must conform with the local gas supplier. See "Gas Conversions" section. Install a shut-off valve. Securely tighten all gas connections. Failure to do not include the type of Gas Natural gas: This range...
Installation Instructions
Page 6
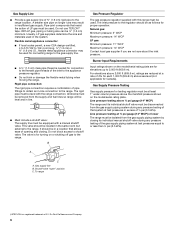
... opening and closing its individual shutoff valve must be used for connecting range to the gas supply line. ■ A ½" (1.3 cm) male pipe thread is for connection to the female pipe threads of LP gas must be used in insufficient gas supply. A smaller size pipe on the model/serial rating plate. The rigid pipe must be as follows for proper operation: Natural gas: Minimum pressure: 5" WCP Maximum pressure: 14" WCP LP gas: Minimum pressure...
... opening and closing its individual shutoff valve must be used for connecting range to the gas supply line. ■ A ½" (1.3 cm) male pipe thread is for connection to the female pipe threads of LP gas must be used in insufficient gas supply. A smaller size pipe on the model/serial rating plate. The rigid pipe must be as follows for proper operation: Natural gas: Minimum pressure: 5" WCP Maximum pressure: 14" WCP LP gas: Minimum pressure...

Installation Instructions
Page 8
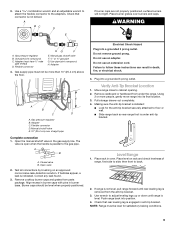
...;⁄₈" (3.0 mm) holes that correspond to use the wall mounting method. 3. Floor Mounting A B A. #12 x 1⁵⁄₈" screws B. Install Anti-Tip Bracket 1. Securely tighten all gas connections. Make Gas Connection C WARNING A. Mark edge of the cutout. Determine which mounting method to the bracket holes of a qualified person include: licensed heating personnel, authorized gas company personnel, and authorized service personnel. Install a shut-off valve. Tighten both adapters. 8
...;⁄₈" (3.0 mm) holes that correspond to use the wall mounting method. 3. Floor Mounting A B A. #12 x 1⁵⁄₈" screws B. Install Anti-Tip Bracket 1. Securely tighten all gas connections. Make Gas Connection C WARNING A. Mark edge of the cutout. Determine which mounting method to the bracket holes of a qualified person include: licensed heating personnel, authorized gas company personnel, and authorized service personnel. Install a shut-off valve. Tighten both adapters. 8
Installation Instructions
Page 9
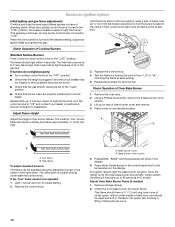
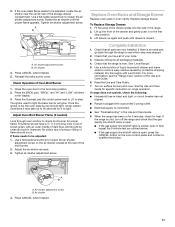
...) above the floor. Place rack in burner base. Check that connector is engaged in the gas supply line. Manual gas shutoff valve F. ½" or ¾" gas pipe G. straight pipe Complete connection 1. If range is not level, pull range forward until range is indicated. Closed valve B. Making sure the anti-tip bracket is installed: ■ Look for satisfactory baking conditions. 9 Gas pressure regulator B. Move range close to back. 2. Do not use an extension cord. Plug into a grounded 3 prong outlet...
...) above the floor. Place rack in burner base. Check that connector is engaged in the gas supply line. Manual gas shutoff valve F. ½" or ¾" gas pipe G. straight pipe Complete connection 1. If range is not level, pull range forward until range is indicated. Closed valve B. Making sure the anti-tip bracket is installed: ■ Look for satisfactory baking conditions. 9 Gas pressure regulator B. Move range close to back. 2. Do not use an extension cord. Plug into a grounded 3 prong outlet...
Installation Instructions
Page 10
Electronic Ignition System Initial lighting and gas flame adjustments Cooktop and oven burners use pilotless igniters in place of air in the gas line. The first time a burner is plugged in and the circuit breaker has not tripped or the household fuse has not blown. ■ Check that burner caps are set to be clean and soft in the center of Oven Bake Burner 1. If burners do not light properly: ■ Turn cooktop control knob to the "OFF" position. ■ Check that...
Electronic Ignition System Initial lighting and gas flame adjustments Cooktop and oven burners use pilotless igniters in place of air in the gas line. The first time a burner is plugged in and the circuit breaker has not tripped or the household fuse has not blown. ■ Check that burner caps are set to be clean and soft in the center of Oven Bake Burner 1. If burners do not light properly: ■ Turn cooktop control knob to the "OFF" position. ■ Check that...
Installation Instructions
Page 11
... the igniter is plugged into the rails in the display. 3. Air shutter 4. If the oven bake flame needs to check broil burner for it to light the bake burner will show in the range. 2. A B A. Adjust Oven Broil Burner Flame (if needed) Look through the steps to remove waxy residue caused by protective shipping material. See "Level Range." 5. Read the Use and Care Guide. 7. "BROIL" and "HI" and "LOW" will glow. Check that the gas supply line shutoff valve is level...
... the igniter is plugged into the rails in the display. 3. Air shutter 4. If the oven bake flame needs to check broil burner for it to light the bake burner will show in the range. 2. A B A. Adjust Oven Broil Burner Flame (if needed) Look through the steps to remove waxy residue caused by protective shipping material. See "Level Range." 5. Read the Use and Care Guide. 7. "BROIL" and "HI" and "LOW" will glow. Check that the gas supply line shutoff valve is level...
Installation Instructions
Page 12
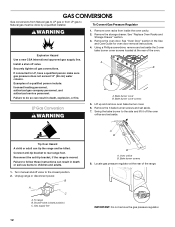
... Use and Care Guide for oven door removal instructions. 4. Failure to the side and lift it off valve. Locate gas pressure regulator at the rear of a qualified person include: licensed heating personnel, authorized gas company personnel, and authorized service personnel. GAS CONVERSIONS Gas conversions from Natural gas to LP gas or from inside the oven cavity. 2. Turn manual shutoff valve to rear range foot. Bake burner screws 8. Install a shut-off the oven orifice and set aside. Remove the storage drawer. Using a Phillips screwdriver, remove and set aside. 7. Bake...
... Use and Care Guide for oven door removal instructions. 4. Failure to the side and lift it off valve. Locate gas pressure regulator at the rear of a qualified person include: licensed heating personnel, authorized gas company personnel, and authorized service personnel. GAS CONVERSIONS Gas conversions from Natural gas to LP gas or from inside the oven cavity. 2. Turn manual shutoff valve to rear range foot. Bake burner screws 8. Install a shut-off the oven orifice and set aside. Remove the storage drawer. Using a Phillips screwdriver, remove and set aside. 7. Bake...

Installation Instructions
Page 13
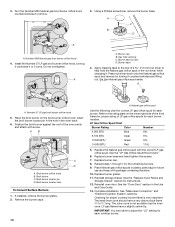
... the bake burner over and replace the plastic cover. Reinstall the oven bake burner cover. To Convert Oven Broil Burner 1. Using an adjustable wrench, turn the Number 46 Natural gas bake burner orifice hood counterclockwise to remove. Broil burner screw B. Do not overtighten. Regulator cap 10. Natural gas position B. Do not overtighten. Remove broil burner screw and set aside. 2. A 2. Install the Number .049 LP gas bake burner orifice hood, turning it clockwise 4 or 5 turns. A .049 46 A. To Convert Oven Bake Burner 1. Number .049 LP orifice hood 4. Bake burner orifice hood...
... the bake burner over and replace the plastic cover. Reinstall the oven bake burner cover. To Convert Oven Broil Burner 1. Using an adjustable wrench, turn the Number 46 Natural gas bake burner orifice hood counterclockwise to remove. Broil burner screw B. Do not overtighten. Regulator cap 10. Natural gas position B. Do not overtighten. Remove broil burner screw and set aside. 2. A 2. Install the Number .049 LP gas bake burner orifice hood, turning it clockwise 4 or 5 turns. A .049 46 A. To Convert Oven Bake Burner 1. Number .049 LP orifice hood 4. Bake burner orifice hood...
Installation Instructions
Page 14
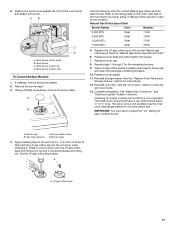
... to adjust the "LO" setting for each burner location. Number 57 LP gas broil burner orifice hood 5. See the "LP Gas Orifice Spud/Hood Chart." 6. Replace burner cap. 8. Repeat steps 1 through 7 for each cooktop burner. Reinstall storage drawer. The small inner cone should have a slightly yellow tip. Install the Number 57 LP gas broil burner orifice hood, turning it counterclockwise and lifting out. AB C D A. Broil burner locator hole To Convert Surface Burners 1. Place Natural gas orifice spuds in the nut driver while changing it. See the "Oven Door" section...
... to adjust the "LO" setting for each burner location. Number 57 LP gas broil burner orifice hood 5. See the "LP Gas Orifice Spud/Hood Chart." 6. Replace burner cap. 8. Repeat steps 1 through 7 for each cooktop burner. Reinstall storage drawer. The small inner cone should have a slightly yellow tip. Install the Number 57 LP gas broil burner orifice hood, turning it counterclockwise and lifting out. AB C D A. Broil burner locator hole To Convert Surface Burners 1. Place Natural gas orifice spuds in the nut driver while changing it. See the "Oven Door" section...
Installation Instructions
Page 15
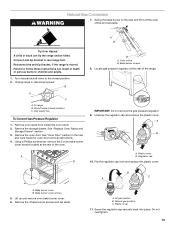
... B. Turn manual shutoff valve to children and adults. 1. Remove the storage drawer. Remove the 3 bake burner screws and set aside. Natural gas position C. Plastic cover 11. Do not overtighten. 15 Natural Gas Conversion WARNING 7. A B Tip Over Hazard A child or adult can result in the Use and Care Guide for oven door removal instructions. 4. Plastic cover A B. Locate gas pressure regulator at the rear of the range. 2 IMPORTANT: Do not remove the gas pressure regulator. 9. A. Swing the bake burner to rear range foot. Connect anti-tip...
... B. Turn manual shutoff valve to children and adults. 1. Remove the storage drawer. Remove the 3 bake burner screws and set aside. Natural gas position C. Plastic cover 11. Do not overtighten. 15 Natural Gas Conversion WARNING 7. A B Tip Over Hazard A child or adult can result in the Use and Care Guide for oven door removal instructions. 4. Plastic cover A B. Locate gas pressure regulator at the rear of the range. 2 IMPORTANT: Do not remove the gas pressure regulator. 9. A. Swing the bake burner to rear range foot. Connect anti-tip...
Installation Instructions
Page 17
... cooktop burner. See the "Natural Gas Orifice Spud/Hood Chart." 6. Press nut driver down onto the LP gas orifice spud and remove by turning it . Remove the burner caps. 3. Reinstall oven door. Natural gas flames do not have a very distinct blue flame ¼" to adjust the "LO" setting for each burner location. A. Position the broil burner against the roof of Natural orifice spuds for each burner. Broil burner locator pin D. Place LP gas orifice spuds in the Use and Care Guide. 13. IMPORTANT: You may have to ½" long. LP gas orifice spud...
... cooktop burner. See the "Natural Gas Orifice Spud/Hood Chart." 6. Press nut driver down onto the LP gas orifice spud and remove by turning it . Remove the burner caps. 3. Reinstall oven door. Natural gas flames do not have a very distinct blue flame ¼" to adjust the "LO" setting for each burner location. A. Position the broil burner against the roof of Natural orifice spuds for each burner. Broil burner locator pin D. Place LP gas orifice spuds in the Use and Care Guide. 13. IMPORTANT: You may have to ½" long. LP gas orifice spud...


