
Use & Care Guide
Page 4
... front control knob C. The locations and appearances of the features shown here may have some models) E. Right rear control knob D. PARTS AND FEATURES This manual covers several different models. The cooktop you have purchased may not match those of the items listed. Culinary ledge...burner A B C D 4 Even-Heat™ electric chrome griddle (on some or all of your model. Left rear control knob B. Commercial style die cast metal control knobs B. Drip tray (on griddle models) Not shown: Optional 9" (22.9 cm), 22" (55.9 cm) and adjustable backguards Optional griddle ...
... front control knob C. The locations and appearances of the features shown here may have some models) E. Right rear control knob D. PARTS AND FEATURES This manual covers several different models. The cooktop you have purchased may not match those of the items listed. Culinary ledge...burner A B C D 4 Even-Heat™ electric chrome griddle (on some or all of your model. Left rear control knob B. Commercial style die cast metal control knobs B. Drip tray (on griddle models) Not shown: Optional 9" (22.9 cm), 22" (55.9 cm) and adjustable backguards Optional griddle ...

Use & Care Guide
Page 8
... in use will help keep the burner cap in place when using a burner cap. Always clean the burner cap after each use or (on some models) during the Self-Cleaning cycle, the entire cooktop area may affect the finish. Gas opening: Gas must flow freely throughout the gas opening D D. Keep spillovers...
... in use will help keep the burner cap in place when using a burner cap. Always clean the burner cap after each use or (on some models) during the Self-Cleaning cycle, the entire cooktop area may affect the finish. Gas opening: Gas must flow freely throughout the gas opening D D. Keep spillovers...

Use & Care Guide
Page 9
... to disengage it from the rear slots and lift out. B A A. Grill grate B. If the burner still does not light, do not place cookware on some models) ■ Do not leave the grill unattended while cooking. ■ To avoid damage to cookware, do not service the sealed burner yourself. Incorrect B. Burner assembly...
... to disengage it from the rear slots and lift out. B A A. Grill grate B. If the burner still does not light, do not place cookware on some models) ■ Do not leave the grill unattended while cooking. ■ To avoid damage to cookware, do not service the sealed burner yourself. Incorrect B. Burner assembly...

Use & Care Guide
Page 11
... griddle, use only heat resistant plastic or wooden utensils. ■ The griddle surface is maintaining the selected surface temperature. 4. Drip tray B. Place food on some models) B A A. Push in an uneven cooking surface. Rinse griddle with hot water. 6. To Use: 1. FOOD SETTING COOK TIME TOTAL MINUTES Steak 1" (2.5 cm) medium well-done MED...
... griddle, use only heat resistant plastic or wooden utensils. ■ The griddle surface is maintaining the selected surface temperature. 4. Drip tray B. Place food on some models) B A A. Push in an uneven cooking surface. Rinse griddle with hot water. 6. To Use: 1. FOOD SETTING COOK TIME TOTAL MINUTES Steak 1" (2.5 cm) medium well-done MED...

Use & Care Guide
Page 12
... ■ Follow manufacturer's instructions. ■ Use on a hot surface cooking area, element or surface burner. Cleaning Method: ■ KitchenAid® Stainless Steel Cleaner and Polish: See "Assistance or Service" section to avoid damaging. Do not reassemble caps on the properties of ...first unless otherwise noted. Cleaning Method: ■ Glass cleaner, mild liquid cleaner or nonabrasive scrubbing pad: Gently clean around the model and serial number plate because scrubbing may scratch the cooktop or grates. Cookware with a nonstick finish will take on burners while ...
... ■ Follow manufacturer's instructions. ■ Use on a hot surface cooking area, element or surface burner. Cleaning Method: ■ KitchenAid® Stainless Steel Cleaner and Polish: See "Assistance or Service" section to avoid damaging. Do not reassemble caps on the properties of ...first unless otherwise noted. Cleaning Method: ■ Glass cleaner, mild liquid cleaner or nonabrasive scrubbing pad: Gently clean around the model and serial number plate because scrubbing may scratch the cooktop or grates. Cookware with a nonstick finish will take on burners while ...

Use & Care Guide
Page 13
...the gas lines. ■ Is the control knob set correctly? GRILL MODULE For more information, see "Sealed Surface Burners" section. ■ On models with a paper towel Drip Tray and Area Under Tray Allow cooktop to a setting. ■ Are the burner ports clogged? Wave Tray and Flame ...before turning to cool completely before cleaning. ■ Soap and water or nonabrasive cleanser. ■ Damp cloth or nonabrasive pad. On sealed burner models, see "Grill" section. For example, the knobs for the surface burner controls will read "LITE," while the knob for 30 minutes. Do ...
...the gas lines. ■ Is the control knob set correctly? GRILL MODULE For more information, see "Sealed Surface Burners" section. ■ On models with a paper towel Drip Tray and Area Under Tray Allow cooktop to a setting. ■ Are the burner ports clogged? Wave Tray and Flame ...before turning to cool completely before cleaning. ■ Soap and water or nonabrasive cleanser. ■ Damp cloth or nonabrasive pad. On sealed burner models, see "Grill" section. For example, the knobs for the surface burner controls will read "LITE," while the knob for 30 minutes. Do ...

Use & Care Guide
Page 14
...SERVICE Before calling for more than ½" (1.3 cm) outside the cooking area. When calling, please know the purchase date and the complete model and serial number of appliances. ■ Installation information. ■ Use and maintenance procedures. ■ Accessory and repair parts sales. &#... grates. ■ Are foods taking too long to fulfill the product warranty and provide afterwarranty service, anywhere in your nearest KitchenAid designated service center. Thoroughly defrost foods. Burner sparks but does not light ■ Is there continuous sparking, but the burner...
...SERVICE Before calling for more than ½" (1.3 cm) outside the cooking area. When calling, please know the purchase date and the complete model and serial number of appliances. ■ Installation information. ■ Use and maintenance procedures. ■ Accessory and repair parts sales. &#... grates. ■ Are foods taking too long to fulfill the product warranty and provide afterwarranty service, anywhere in your nearest KitchenAid designated service center. Thoroughly defrost foods. Burner sparks but does not light ■ Is there continuous sparking, but the burner...

Use & Care Guide
Page 16
...warranty service. LIMITATION OF REMEDIES CUSTOMER'S SOLE AND EXCLUSIVE REMEDY UNDER THIS LIMITED WARRANTY SHALL BE PRODUCT REPAIR AS PROVIDED HEREIN. KITCHENAID SHALL NOT BE LIABLE FOR INCIDENTAL OR CONSEQUENTIAL DAMAGES. After checking "Troubleshooting," you may find this book and your major appliance ...unauthorized modifications made to better help by checking the "Assistance or Service" section or by an authorized KitchenAid servicer is located in accordance with original model/serial numbers that have been removed, altered or cannot be borne by the customer. THIS WARRANTY GIVES...
...warranty service. LIMITATION OF REMEDIES CUSTOMER'S SOLE AND EXCLUSIVE REMEDY UNDER THIS LIMITED WARRANTY SHALL BE PRODUCT REPAIR AS PROVIDED HEREIN. KITCHENAID SHALL NOT BE LIABLE FOR INCIDENTAL OR CONSEQUENTIAL DAMAGES. After checking "Troubleshooting," you may find this book and your major appliance ...unauthorized modifications made to better help by checking the "Assistance or Service" section or by an authorized KitchenAid servicer is located in accordance with original model/serial numbers that have been removed, altered or cannot be borne by the customer. THIS WARRANTY GIVES...

Dimension Guide
Page 1
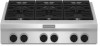
...recommended that a separate circuit serving only this cooktop be used. W10271686D 08/26/09 ® Commercial Style Gas Cooktop PRODUCT MODEL NUMBERS KGCU407V KGCU462V KGCU463V KGCU467V KGCU482V KGCU483V KGCU484V Type of Gas Natural Gas: This cooktop is design-certified by a qualified ...by CSA International for use with Natural gas or, after proper conversion, for use with a different gas without consulting the serving gas supplier. The model/ serial rating plate located on the left -hand side of the cooktop burner base) D. Island trim or optional backguard E. 27¾" (...
...recommended that a separate circuit serving only this cooktop be used. W10271686D 08/26/09 ® Commercial Style Gas Cooktop PRODUCT MODEL NUMBERS KGCU407V KGCU462V KGCU463V KGCU467V KGCU482V KGCU483V KGCU484V Type of Gas Natural Gas: This cooktop is design-certified by a qualified ...by CSA International for use with Natural gas or, after proper conversion, for use with a different gas without consulting the serving gas supplier. The model/ serial rating plate located on the left -hand side of the cooktop burner base) D. Island trim or optional backguard E. 27¾" (...

Dimension Guide
Page 2
Grounded 3-prong outlet should be located in this area on both sides P. 13" (33.0 cm) upper cabinet depth Size Model A** Cooktop Cutout to Back Wall B* Cooktop to change without notice. clearance from enclosure sidewall B. 10" (25.4 cm) min. See chart. See chart. distance on rear ...
Grounded 3-prong outlet should be located in this area on both sides P. 13" (33.0 cm) upper cabinet depth Size Model A** Cooktop Cutout to Back Wall B* Cooktop to change without notice. clearance from enclosure sidewall B. 10" (25.4 cm) min. See chart. See chart. distance on rear ...
Installation Guide
Page 4
...of the Use and Care Guide. In Canada, the installation of the Use and Care Guide. Optional Backguards 48" (121.9 cm) models and grill models must be installed with a backsplash if installing at zero clearance to LP gas For LP/Natural Gas Conversions ■ T15 Torx®...minimum clearances. ■ Grounded electrical supply is manufactured for use the Standard for Mobile Home Construction and Safety, Title 24, HUD Part 280). The model/serial rating plate is to provide clearance for 48" (121.9 cm) Cooktops - See "Gas Supply Requirements" section. ■ The cooktop is ...
...of the Use and Care Guide. In Canada, the installation of the Use and Care Guide. Optional Backguards 48" (121.9 cm) models and grill models must be installed with a backsplash if installing at zero clearance to LP gas For LP/Natural Gas Conversions ■ T15 Torx®...minimum clearances. ■ Grounded electrical supply is manufactured for use the Standard for Mobile Home Construction and Safety, Title 24, HUD Part 280). The model/serial rating plate is to provide clearance for 48" (121.9 cm) Cooktops - See "Gas Supply Requirements" section. ■ The cooktop is ...
Installation Guide
Page 5
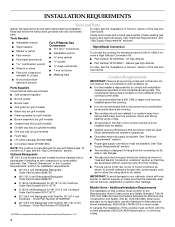
... base and 4⁷⁄₈" (12.4 cm) in this area on rear or side walls, or the supply line can come up through the floor. D 5 Model/serial rating plate (located on left -hand side of cutout enclosure not shown. Product Dimensions C D E B A A. 30" (76.2 cm) cooktop: 29⁵⁄₈" (75.1 cm...
... base and 4⁷⁄₈" (12.4 cm) in this area on rear or side walls, or the supply line can come up through the floor. D 5 Model/serial rating plate (located on left -hand side of cutout enclosure not shown. Product Dimensions C D E B A A. 30" (76.2 cm) cooktop: 29⁵⁄₈" (75.1 cm...

Installation Guide
Page 6
...) cabinet cutout depth K. 2" (5.1 cm) cabinet side to gas cutout L. 6" (15.2 cm) min. See chart. distance on both sides P. 13" (33.0 cm) upper cabinet depth Size Model A** Cooktop Cutout to Back Wall B* Cooktop to Cabinet C Optional Backguard Opening D Cabinet and Countertop E Countertop Only 30" (76.2 cm) KGCU407 1½" (3.8 cm)** 30" (76.2 cm...
...) cabinet cutout depth K. 2" (5.1 cm) cabinet side to gas cutout L. 6" (15.2 cm) min. See chart. distance on both sides P. 13" (33.0 cm) upper cabinet depth Size Model A** Cooktop Cutout to Back Wall B* Cooktop to Cabinet C Optional Backguard Opening D Cabinet and Countertop E Countertop Only 30" (76.2 cm) KGCU407 1½" (3.8 cm)** 30" (76.2 cm...
Installation Guide
Page 7
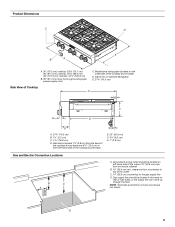
... Hazard Use a new CSA International approved gas supply line. Observe all gas connections. latest edition. The model/ serial rating plate located on the left underside of the cooktop burner base has information on the model/serial rating plate for use with the National Electrical Code, ANSI/NFPA 70 or Canadian Electrical Code...
... Hazard Use a new CSA International approved gas supply line. Observe all gas connections. latest edition. The model/ serial rating plate located on the left underside of the cooktop burner base has information on the model/serial rating plate for use with the National Electrical Code, ANSI/NFPA 70 or Canadian Electrical Code...

Installation Guide
Page 8
...in the same room but external to or less than ½ psi (3.5 kPa). Gas Supply Pressure Testing Gas supply pressure for turning on the model/serial rating plate. Line pressure testing above ½ psi gauge (14" WCP) The cooktop and its individual manual shutoff valve during any pressure testing... system. ■ NOTE: Pipe-joint compounds that allows ease of LP gas must be ½" (1.3 cm) minimum. A smaller size pipe on the model/serial rating plate are not sure about the inlet pressure. Usually, LP gas suppliers determine the size and materials used . Du Pont De Nemours and...
...in the same room but external to or less than ½ psi (3.5 kPa). Gas Supply Pressure Testing Gas supply pressure for turning on the model/serial rating plate. Line pressure testing above ½ psi gauge (14" WCP) The cooktop and its individual manual shutoff valve during any pressure testing... system. ■ NOTE: Pipe-joint compounds that allows ease of LP gas must be ½" (1.3 cm) minimum. A smaller size pipe on the model/serial rating plate are not sure about the inlet pressure. Usually, LP gas suppliers determine the size and materials used . Du Pont De Nemours and...

Installation Guide
Page 9
...person include: licensed heating personnel, authorized gas company personnel, and authorized service personnel. A Install Optional Backguard 48" (121.9 cm) models and all gas connections. Explosion Hazard Use a new CSA International approved gas supply line. Install a shut-off valve. Using 2... or more people, place the cooktop upside down on your model ordered. To Assemble Pressure Regulator: 1. See the "Tools and Parts" section for a complete list parts supplied with the cooktop depend...
...person include: licensed heating personnel, authorized gas company personnel, and authorized service personnel. A Install Optional Backguard 48" (121.9 cm) models and all gas connections. Explosion Hazard Use a new CSA International approved gas supply line. Install a shut-off valve. Using 2... or more people, place the cooktop upside down on your model ordered. To Assemble Pressure Regulator: 1. See the "Tools and Parts" section for a complete list parts supplied with the cooktop depend...

Installation Guide
Page 10
... thread D. Use pipe-joint compound. The valve is open when the handle is parallel to the gas pipe. Test all connections by brushing on your model has a grill or griddle, see B and F in the following is needed, lift entire cooktop up toward the bottom of the flexible connector adapters (see "Install...
... thread D. Use pipe-joint compound. The valve is open when the handle is parallel to the gas pipe. Test all connections by brushing on your model has a grill or griddle, see B and F in the following is needed, lift entire cooktop up toward the bottom of the flexible connector adapters (see "Install...

Installation Guide
Page 11
... slots 2. Slide drip tray into opening 8. Slots 11. Insert front tabs of the flame spreader into the rear slots. Place the wave tray on grill models) 1. A B C A A. Insert the large grease tray all the way under the back edge of the flame spreader.
... slots 2. Slide drip tray into opening 8. Slots 11. Insert front tabs of the flame spreader into the rear slots. Place the wave tray on grill models) 1. A B C A A. Insert the large grease tray all the way under the back edge of the flame spreader.

Installation Guide
Page 12
.... This sparking continues, until it may take longer than 4 seconds to the Use and Care Guide. Pull cooktop forward to Off. A A. On Grill Models: Support the control console in the well at this point, contact your cooktop. Slide tray toward the back until the flame is lit or the...Care Guide or contact the dealer from the control console. Remove the 2 screws on each control knob to light the burner. Install Griddle (on griddle models) The griddle is turned to any position, the system creates a spark to the "LITE" position. Place drip tray in the middle with one arm...
.... This sparking continues, until it may take longer than 4 seconds to the Use and Care Guide. Pull cooktop forward to Off. A A. On Grill Models: Support the control console in the well at this point, contact your cooktop. Slide tray toward the back until the flame is lit or the...Care Guide or contact the dealer from the control console. Remove the 2 screws on each control knob to light the burner. Install Griddle (on griddle models) The griddle is turned to any position, the system creates a spark to the "LITE" position. Place drip tray in the middle with one arm...

Installation Guide
Page 13
... side of the control console. 21. Reinstall the control console. Front lip of valve) 13 NOTE: When you want to increase flame height. A B A. On Griddle Models: Support the control console in the cutout. 22. A B A. Use a ¹⁄₈" x 4¼" flat-blade screwdriver to HI, checking the flame at each side of...
... side of the control console. 21. Reinstall the control console. Front lip of valve) 13 NOTE: When you want to increase flame height. A B A. On Griddle Models: Support the control console in the cutout. 22. A B A. Use a ¹⁄₈" x 4¼" flat-blade screwdriver to HI, checking the flame at each side of...


