KitchenAid KGCU467VSS Support Question
KitchenAid KGCU467VSS Support Question
Find answers below for this question about KitchenAid KGCU467VSS.Need a KitchenAid KGCU467VSS manual? We have 3 online manuals for this item!
Question posted by jamesamerrill on January 16th, 2019
How Do I Access The Spark Module On This Model?
Is this done by opening the control center at the front of the appliance?
Current Answers
Answer #1: Posted by TommyKervz on January 21st, 2019 7:24 AM
TommyKervz

Member since:
January 10th, 2013 Points: 17,776,813

Member since:
January 10th, 2013 Points: 17,776,813
This video should be able to to direct you
Related KitchenAid KGCU467VSS Manual Pages
Use & Care Guide - Page 4

... Optional wok ring Optional stainless steel knobs
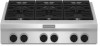
Control Panels
KGCU407
F E
G H
A. Drip tray (on some models) F. Left front control knob C. Commercial style die cast metal control knobs B. Right rear control knob D. Right front control knob E. 20,000 Btu/h burner F. 15,000 Btu/h burner G. 5,000 Btu/h burner H. 15,000 Btu/h burner
A B
C D
4 The cooktop you have some or all of...
Use & Care Guide - Page 7

... food cooking. ■ Bring liquid to provide the highest heat and is not removed, occasional sparking may also occasionally occur when using empty cookware or without any cookware on a burner. COOKTOP USE
WARNING
Cooktop Controls
Reignition Feature
During cooktop use, if one more burners are necessary for use with Natural gas.
Three different sizes of...
Use & Care Guide - Page 8

... agents or any other material to HI. Clean the gas opening for proper size and shape as the entire appliance is blue in place when using a burner cap. Replace ...models) during the Self-Cleaning cycle, the entire cooktop area may affect the finish. Burner base
A
15,000 Btu/h Professional Burner
B C
A. To Clean: IMPORTANT: Before cleaning, make sure all controls are off the cooktop...
Use & Care Guide - Page 9

... specialist. Even-Heat™ Grill
(on some models)
■ Do not leave the grill unattended...between food on the grill when in the center of the food. Grease trays F. Drip tray
The grill module consists of juices. Refer to the "...Grill Chart" for doneness of meats and poultry, use an instant read thermometer or make sure the control knobs...
Use & Care Guide - Page 12

... the model and serial number plate because scrubbing may scratch the cooktop or grates.
CONTROL KNOBS
...To avoid damage to medium heat settings. To avoid damage, do not bang grates and caps against each other or hard surfaces such as the entire appliance...
■ Center the canner on the grate.
■ Do not place canner on the cooktop or grates....
Use & Care Guide - Page 13

...models with a paper towel Drip Tray and Area Under Tray Allow cooktop to a setting.
■ Are the burner ports clogged? The appliance may be worn while cleaning.
■ For thorough cleaning of the grill grate, soak in order to avoid the cost of the surface burner knobs to release air from control...cleaner to scrub the grill grate. GRIDDLE MODULE
Clean the griddle shortly after cooking is...
Use & Care Guide - Page 14

...." See "Cooktop Controls" section.
■ Is the cooktop level? Partially frozen or very cold foods will help , follow the menu prompts. If you need replacement parts If you can also look in your appliance. For further assistance If you need further assistance, you need help us or your nearest KitchenAid designated service center. Burner sparks but...
Dimension Guide - Page 1

... with your cabinets, check with the local gas supplier. The model/ serial rating plate located on the left -hand side of the cooktop burner base has information on the model/serial rating plate.
All openings in the package containing literature. PRODUCT DIMENSIONS
C
D
E
B
A
A. 30" (76.2 cm) cooktop: 29⁵⁄₈" (75.1 cm) 36" (90.4 cm...
Dimension Guide - Page 2

...12½" (31.7 cm) gas opening cutout depth I
K D
E
C G
H
A** L
B min.* M
A. See chart. See chart. clearance upper
cabinet to countertop G. ¾" (1.9 cm) back of the
cooktop to the side wall or other ... both sides
P. 13" (33.0 cm) upper cabinet depth
Size
Model
A**
Cooktop Cutout to Back Wall
B*
Cooktop to change without notice. C. E. Specifications subject to gas cutout L....
Installation Guide - Page 4
... on grill models) ■ Foam tape ■ LP orifice package (W10221288)
■ All openings in the wall or floor where cooktop is not applicable...accessible without requiring removal of cutout enclosure as shown to provide clearance for gas inlet, power supply cord, and to allow the rating label to a combustible backwall. See "Gas Supply Requirements" section.
■ The cooktop...
Installation Guide - Page 5
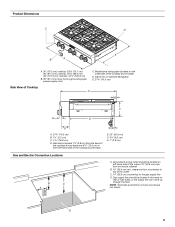
... sidewall
B. 10" (25.4 cm) min. Island trim or optional backguard
E. 27¾" (70.5 cm)
Side View of the cooktop burner base. D
E. 22" (55.9 cm) F. 3⁵⁄₈" (9.2 cm) G. 1" (2.6 cm)
Gas and Electric Connection Locations
B
C
A
A. Model/serial rating plate (located on left -hand side of Cooktop A
B
C
G
E
F
A. 27¾" (70.5 cm) B. 1¼" (3.2 cm) C. 7 18.8 cm) D.
Installation Guide - Page 6

... side to gas cutout
L. 6" (15.2 cm) min. Notch to be equal on both sides
P. 13" (33.0 cm) upper cabinet depth
Size
Model
A**
Cooktop Cutout to Back Wall
B*
Cooktop to Cabinet
C
Optional Backguard Opening
D
Cabinet and Countertop
E Countertop Only
30" (76.2 cm) KGCU407 1½" (3.8 cm)**
30" (76.2 cm) 30" (76.2 cm)
29¼" (74.3 cm...
Installation Guide - Page 7
... technician.
This cooktop is equipped with local codes and ordinances, or in the package containing literature. A copy of the cooktop burner base has information on the model/serial rating plate...120-volt power and is correctly grounded.
■ The wiring diagrams are located inside the control console. It is used . Securely tighten all governing codes and ordinances. Install a shut...
Installation Guide - Page 8

...action of the inlet to the appliance pressure regulator.
■ Do not kink or damage the flexible metal tubing when moving the cooktop. Do not block access to shutoff valve. Gas Supply ... smaller size pipe on the model/serial rating plate. Do not use TEFLON®† tape. A
C
A. This valve should be in a location that allows ease of opening and closing its individual shutoff ...
Installation Guide - Page 9

... "Tools and Parts" section for a complete list parts supplied with the cooktop depend on your cooktop. Using two or more people to the cooktop now or after the cooktop is installed in the "Location Requirements" section for the cooktop. 2.
Securely tighten all models with your cooktop. See "Make Gas Connection" section. 1. See the "Tools and Parts" section...
Installation Guide - Page 10

...tight may be used to connect the cooktop to cooktop bottom C. NOTE: Check that connector is indicated.
Do not make connections to turn on your model has a grill or griddle, see...Install Griddle" section.
10
Typical flexible connection 1. The
valve is open when the handle is parallel to the
smaller thread ends of Cooktop Burners" section in the gas supply line. A B
A. 2....
Installation Guide - Page 12

... sparking continues, until it may take longer than 4 seconds to light the burner.
A
A. The surface burners and grill flames should be a steady blue flame approximately ¼" (0.64 cm) high. If burners do not light properly: ■ Turn cooktop control knob to the "OFF" position. ■ Check that the cooktop is turned to the "open"
position...
Installation Guide - Page 14

...)
The cooktop and its individual manual shutoff valve during any pressure testing of a qualified person include: licensed heating personnel, authorized gas company personnel, and authorized service personnel. Failure to locate the "NAT" or "LP" position. Turn over the spring retainer so the "LP" is showing on the model/serial rating plate. Access cap...
Installation Guide - Page 16

... Grill Burner (on the bottom.
Remove the access cap by brushing on the model/serial rating plate. Remove spring retainer from the cap by closing its individual shutoff valve must be isolated from the gas supply piping system during any leaks found. 6. A
A
B
A. Open shutoff valve in cooktop or reconnect power. Refer to the "Make...
Installation Guide - Page 18

... hood location
3. Open shutoff valve in cooktop or reconnect power....Control
P1-3 W P1-4 V
W
RTD
W
WV V
W
P2-6
P1-6 OR/W
Grill Reignition Wiring Diagram To Cooktop Stand-Alone and Freestanding
BK BR
BR
Lamp 120V
Reignition Module
BU
W W
18 Correct any leaks found.
6. LP gas flames have completed converting the grill, test the cooktop for leaks by brushing on some models...
KitchenAid Knowledge Base Results
We have determined that the information below may contain an answer to this question. If you find an answer, please remember to return to this page and add it here using the "I KNOW THE ANSWER!" button above. It's that easy to earn points!-
User Preferences menu
User Preferences menu How do I access the User Preferences menu? Off - To access the User Preferences menu: Press and hold the Door Alarm touch pad for 3 seconds... or C) or (On or Off) will hear the alarm sound. On - User preferences The control center allows you to Celsius - When the desired preference name is displayed, press the Refrigerator (+) or (-) touch pads to restore the... -
Auto re-ignition feature - Ultima Cook gas flush-mount cooktop
... on a burner. built-in ovens Sparking may also occasionally occur when using the low setting on , the system will turn on to external causes, such as spilled water or wind, the ignition system will turn all control knobs to Models KFGU706VSS, KFGU766VSS, KFGS306VSS, and KFGS366VSS only. The Cooktop Lock indicator light will lock. Proposition... -
Cooktop Lock feature - Flush gas cooktop
...the Cooktop Lock feature when the cooktop is not in use of 3 Please tell us how we can make this answer more burners are audible signals that may see the igniter sparking, ... Was this page Recipient Email * Required Your Email Your Name Cooktop Lock feature - If a control knob is your appliance? To deactivate the Cooktop Lock: Touch the lock key for 3 seconds. Less than one long...
Similar Questions

Hi, Are Parts For This Model Available & Where Can We Find Them?
Looking to replace some worn parts on model KGCP483KSS. Please advise.
Looking to replace some worn parts on model KGCP483KSS. Please advise.
(Posted by suzannem 4 years ago)

I Need Conversion Instructions For Kitchen Aid Cooktop Model Kfgs366 02
I purchased new Kitchen Aid cooktop model KFGS366 02 from Lowes. When I opened it there was no orifi...
I purchased new Kitchen Aid cooktop model KFGS366 02 from Lowes. When I opened it there was no orifi...
(Posted by bbranham 8 years ago)

How Do You Replace A Front Control Knob That Is Broken
(Posted by jamesmulford2 8 years ago)

Continuous Sparking
While 2 burners are in use, a third burner (back left) tries to ignite by continously sparking. I'm ...
While 2 burners are in use, a third burner (back left) tries to ignite by continously sparking. I'm ...
(Posted by dproques 9 years ago)

Burner Cap And Burner Head
I'm looking for images of the burner cap and burner head for the 5000 Btu/h Simmer/Melt Burner (Mode...
I'm looking for images of the burner cap and burner head for the 5000 Btu/h Simmer/Melt Burner (Mode...
(Posted by dinhhiep 12 years ago)