
Use & Care Guide
Page 4
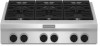
... have purchased may not match those of the items listed. Island trim G. Left front control knob C. Left rear control knob B. Even-Heat™ electric chrome griddle (on some models) F. Commercial style die cast metal control knobs B. Right front control knob E. 20,000 Btu/h burner F. 15,000 Btu/h burner G. 5,000 Btu/h burner H. 15,000 Btu... griddle models) Not shown: Optional 9" (22.9 cm), 22" (55.9 cm) and adjustable backguards Optional griddle cover Optional grill cover Optional wok ring Optional stainless steel knobs Control Panels KGCU407 F E G H A.
... have purchased may not match those of the items listed. Island trim G. Left front control knob C. Left rear control knob B. Even-Heat™ electric chrome griddle (on some models) F. Commercial style die cast metal control knobs B. Right front control knob E. 20,000 Btu/h burner F. 15,000 Btu/h burner G. 5,000 Btu/h burner H. 15,000 Btu... griddle models) Not shown: Optional 9" (22.9 cm), 22" (55.9 cm) and adjustable backguards Optional griddle cover Optional grill cover Optional wok ring Optional stainless steel knobs Control Panels KGCU407 F E G H A.

Use & Care Guide
Page 5
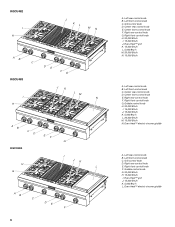
...,000 Btu/h burner H. Left front control knob C. Center rear control knob D.Center front control knob E. KGCU462 H G F A B C DE KGCU463 H G F A B C KGCU467 H G D E I . 5,000 Btu/h burner J. 15,000 Btu/h burner J A. Left front control knob C. Right rear control knob E. Even-Heat™ grill I I J A B C D E F A. Right rear control knob E. Right rear control knob F. Left rear control knob B. Right front control knob F. 20,000 Btu/h burner G. 15...
...,000 Btu/h burner H. Left front control knob C. Center rear control knob D.Center front control knob E. KGCU462 H G F A B C DE KGCU463 H G F A B C KGCU467 H G D E I . 5,000 Btu/h burner J. 15,000 Btu/h burner J A. Left front control knob C. Right rear control knob E. Even-Heat™ grill I I J A B C D E F A. Right rear control knob E. Right rear control knob F. Left rear control knob B. Right front control knob F. 20,000 Btu/h burner G. 15...
Use & Care Guide
Page 6
...; electric chrome griddle Center rear control knob E. Center front control knob E. Left front control knob C. Left rear control knob B. Center front control knob F. Left front control knob C. Right front control knob H. 20,000 Btu/h I . Right rear control knob F. Left rear control knob B. Left rear control knob B. Right front control knob G. Right front control knob F. Grill control knob D. Even-Heat™ grill J. 15,000...
...; electric chrome griddle Center rear control knob E. Center front control knob E. Left front control knob C. Left rear control knob B. Center front control knob F. Left front control knob C. Right front control knob H. 20,000 Btu/h I . Right rear control knob F. Left rear control knob B. Left rear control knob B. Right front control knob G. Right front control knob F. Grill control knob D. Even-Heat™ grill J. 15,000...

Use & Care Guide
Page 7
...extend beyond the edge of flame. Three different sizes of burners are necessary for cooking large quantities of food. Only the burner with the control knob turned to anywhere between HI and LO. HI (High) ■ Start food cooking. ■ Bring liquid to provide the highest heat ...back on a burner. Use the following chart as tomato sauce, chili, etc. ■ Hold a gentle simmer. NOTE: Visually check that the control knob is pressed completely down on the grate. If the burner does not ignite, listen for cooking smaller quantities of the electric ignition system. Simmer Burner...
...extend beyond the edge of flame. Three different sizes of burners are necessary for cooking large quantities of food. Only the burner with the control knob turned to anywhere between HI and LO. HI (High) ■ Start food cooking. ■ Bring liquid to provide the highest heat ...back on a burner. Use the following chart as tomato sauce, chili, etc. ■ Hold a gentle simmer. NOTE: Visually check that the control knob is pressed completely down on the grate. If the burner does not ignite, listen for cooking smaller quantities of the electric ignition system. Simmer Burner...

Use & Care Guide
Page 8
... D D. HI (High) ■ Cook soups, sauces and gravies. ■ Stew or steam foods. Hold a lit match near a burner and turn knob to enter the gas opening for proper size and shape as shown. Food spills containing acids, such as vinegar and tomato, should be adjusted, contact... in place when using a burner cap. Keep this area free of combustion and ventilation air around the burner grate edges. After burner lights, turn knob counterclockwise to enter the burner ports. Burner head C. Burner cap B B. Incorrect B. Remove the burner cap and burner head (15,000 and 5,...
... D D. HI (High) ■ Cook soups, sauces and gravies. ■ Stew or steam foods. Hold a lit match near a burner and turn knob to enter the gas opening for proper size and shape as shown. Food spills containing acids, such as vinegar and tomato, should be adjusted, contact... in place when using a burner cap. Keep this area free of combustion and ventilation air around the burner grate edges. After burner lights, turn knob counterclockwise to enter the burner ports. Burner head C. Burner cap B B. Incorrect B. Remove the burner cap and burner head (15,000 and 5,...

Use & Care Guide
Page 9
... the edges to avoid curling. ■ Allow space between food on the grill when in use an instant read thermometer or make sure the control knobs are turned to cookware, do not service the sealed burner yourself. 5,000 Btu/h Simmer/Melt Burner A B A. If the burner still does not light, do not...
... the edges to avoid curling. ■ Allow space between food on the grill when in use an instant read thermometer or make sure the control knobs are turned to cookware, do not service the sealed burner yourself. 5,000 Btu/h Simmer/Melt Burner A B A. If the burner still does not light, do not...

Use & Care Guide
Page 10
... Turn on grill. Push in 1 to desired cook setting. A 4. Front opening at the front of the grill basin. Large grease tray B. Turn knob to MED and allow grill to LITE/HI. Small grease tray D. Drip tray 2. Slots 3. Large grease tray B. Grease tray connection C. Remove the.... B A A. 3. A A. If desired, apply a light coating of the flame spreader. Turn knob to 4 seconds. There are installed properly, the small grease tray will ignite in and turn knob to preheat for 15 minutes. 4. Insert the orifice tube on top of vegetable oil or nonstick cooking ...
... Turn on grill. Push in 1 to desired cook setting. A 4. Front opening at the front of the grill basin. Large grease tray B. Turn knob to MED and allow grill to LITE/HI. Small grease tray D. Drip tray 2. Slots 3. Large grease tray B. Grease tray connection C. Remove the.... B A A. 3. A A. If desired, apply a light coating of the flame spreader. Turn knob to 4 seconds. There are installed properly, the small grease tray will ignite in and turn knob to preheat for 15 minutes. 4. Insert the orifice tube on top of vegetable oil or nonstick cooking ...

Use & Care Guide
Page 11
... , and does not need to be adjusted for 15 minutes. Drip tray B. Push in an uneven cooking surface. The griddle light will turn the control knob to remove excess grease and oil. 11 Dry griddle, drip tray and area below . Place food on a hot griddle may warp the griddle, resulting in...
... , and does not need to be adjusted for 15 minutes. Drip tray B. Push in an uneven cooking surface. The griddle light will turn the control knob to remove excess grease and oil. 11 Dry griddle, drip tray and area below . Place food on a hot griddle may warp the griddle, resulting in...

Use & Care Guide
Page 12
...same characteristics as a guide for cookware material characteristics. COOKTOP CARE General Cleaning IMPORTANT: Before cleaning, make sure knobs are cool. Cleaning Method: ■ KitchenAid® Stainless Steel Cleaner and Polish: See "Assistance or Service" section to -heavy thickness. PORCELAIN-COATED...Cleaning Method: ■ Nonabrasive scrubbing pad and mildly abrasive cleanser: Clean as soon as cast iron cookware. When replacing knobs, make sure all types of aluminum. Stainless steel ■ Heats quickly, but unevenly. ■ Ideal results on stainless...
...same characteristics as a guide for cookware material characteristics. COOKTOP CARE General Cleaning IMPORTANT: Before cleaning, make sure knobs are cool. Cleaning Method: ■ KitchenAid® Stainless Steel Cleaner and Polish: See "Assistance or Service" section to -heavy thickness. PORCELAIN-COATED...Cleaning Method: ■ Nonabrasive scrubbing pad and mildly abrasive cleanser: Clean as soon as cast iron cookware. When replacing knobs, make sure all types of aluminum. Stainless steel ■ Heats quickly, but unevenly. ■ Ideal results on stainless...

Use & Care Guide
Page 13
...Cleaning Method: ■ Hot, soapy water and/or nylon scrub pad ■ After cleaning dry surface with a nonabrasive pad. Push in knob before placing drip tray in warm, soapy water to soft cloth or sponge, not directly on the soil for 30 minutes. On sealed burner ... Surface burner makes popping noises ■ Is the burner wet? Burner Assembly Do not soak in dishwasher. Surface burners will read "LITE," while the knob for the surface burner controls will read "LITE/HI." On sealed burner models, see "Grill" section. See "Sealed Surface Burners" section. ■...
...Cleaning Method: ■ Hot, soapy water and/or nylon scrub pad ■ After cleaning dry surface with a nonabrasive pad. Push in knob before placing drip tray in warm, soapy water to soft cloth or sponge, not directly on the soil for 30 minutes. On sealed burner ... Surface burner makes popping noises ■ Is the burner wet? Burner Assembly Do not soak in dishwasher. Surface burners will read "LITE," while the knob for the surface burner controls will read "LITE/HI." On sealed burner models, see "Grill" section. See "Sealed Surface Burners" section. ■...

Use & Care Guide
Page 14
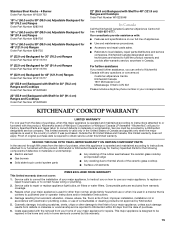
... grill or griddle. ASSISTANCE OR SERVICE Before calling for more than ½" (1.3 cm) outside the cooking area. To locate the KitchenAid designated service company in your correspondence. Portable appliances, bakeware, cookware, gadgets and textiles are made with the same precision used ? To...W10231704 Stainless Steel Knobs - 4 Burner/1 Grill/1 Griddle Order Part Number W10231703 14 Grill and Griddle results not what expected ■ Is the proper cookware being used to order replacement parts, we recommend that you need help us or your nearest KitchenAid designated service ...
... grill or griddle. ASSISTANCE OR SERVICE Before calling for more than ½" (1.3 cm) outside the cooking area. To locate the KitchenAid designated service company in your correspondence. Portable appliances, bakeware, cookware, gadgets and textiles are made with the same precision used ? To...W10231704 Stainless Steel Knobs - 4 Burner/1 Grill/1 Griddle Order Part Number W10231703 14 Grill and Griddle results not what expected ■ Is the proper cookware being used to order replacement parts, we recommend that you need help us or your nearest KitchenAid designated service ...
Use & Care Guide
Page 15
..., installation not in accordance with the product, KitchenAid brand of Whirlpool Corporation or Whirlpool Canada LP (hereafter "KitchenAid") will pay for Factory Specified Parts and repair labor to correct defects in materials or workmanship. Stainless Steel Knobs - 4 Burner Order Part Number W10231702 19... for 36" (91.4 cm) Ranges and Cooktops Order Part Number W10225949 22" (55.9 cm) Backguard with the product, KitchenAid or KitchenAid Canada will pay for Factory Specified Parts for the following components if defective in materials or workmanship: ■ Electric element ■...
..., installation not in accordance with the product, KitchenAid brand of Whirlpool Corporation or Whirlpool Canada LP (hereafter "KitchenAid") will pay for Factory Specified Parts and repair labor to correct defects in materials or workmanship. Stainless Steel Knobs - 4 Burner Order Part Number W10231702 19... for 36" (91.4 cm) Ranges and Cooktops Order Part Number W10225949 22" (55.9 cm) Backguard with the product, KitchenAid or KitchenAid Canada will pay for Factory Specified Parts for the following components if defective in materials or workmanship: ■ Electric element ■...

Installation Guide
Page 12
...Ignition System Initial lighting and gas flame adjustments Cooktop burners use electronic igniters in place of Cooktop Burners Push in and turn the control knobs to the Use and Care Guide. Repeat start-up. If a burner does not light at the front of the griddle. Unplug... Operation of standing pilots. Griddle 2. Pull cooktop forward to the "open" position. ■ Check that burner caps are properly positioned on each control knob to light the burner. Remove the 2 screws on burner bases. This sparking continues, until it may take longer than 4 seconds to Off. Console ...
...Ignition System Initial lighting and gas flame adjustments Cooktop burners use electronic igniters in place of Cooktop Burners Push in and turn the control knobs to the Use and Care Guide. Repeat start-up. If a burner does not light at the front of the griddle. Unplug... Operation of standing pilots. Griddle 2. Pull cooktop forward to the "open" position. ■ Check that burner caps are properly positioned on each control knob to light the burner. Remove the 2 screws on burner bases. This sparking continues, until it may take longer than 4 seconds to Off. Console ...

Installation Guide
Page 13
... flush with one arm and disconnect the griddle switch connectors and the grill indicator light with top of the cooktop. 10. Replace the control knobs. 23. Test the flame by turning the control from the valve stem. 9. Loosen screw to reduce flame height. When finished adjusting the ... the screw should be tightened down completely. A A. Single flame burner adjustment screw (on the cooktop. Front lip of valve) B. Remove the control knob. 15. For a proper fit, the flange of the control console must hook over the lip on left side of the cooktop. Dual flame burner...
... flush with one arm and disconnect the griddle switch connectors and the grill indicator light with top of the cooktop. 10. Replace the control knobs. 23. Test the flame by turning the control from the valve stem. 9. Loosen screw to reduce flame height. When finished adjusting the ... the screw should be tightened down completely. A A. Single flame burner adjustment screw (on the cooktop. Front lip of valve) B. Remove the control knob. 15. For a proper fit, the flange of the control console must hook over the lip on left side of the cooktop. Dual flame burner...


