
Use & Care Guide
Page 7
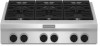
... food. The 5,000 Btu/h burner reaches a low of food and melting chocolate or butter. If you wish to use LP gas, an LP Gas Conversion Kit is not removed, occasional sparking may also occasionally occur when using empty cookware or without any cookware on the grate. ... 15,000 Btu/h Professional Burner SETTING RECOMMENDED USE LITE (Light) ■ Light the burner. To Set: 1. When the flame comes back on the valve shaft. Turn knob counterclockwise to a boil. ■ Preheat skillets/pans. ■ Quickly brown or sear food. 7 NOTE: Visually check that the ...
... food. The 5,000 Btu/h burner reaches a low of food and melting chocolate or butter. If you wish to use LP gas, an LP Gas Conversion Kit is not removed, occasional sparking may also occasionally occur when using empty cookware or without any cookware on the grate. ... 15,000 Btu/h Professional Burner SETTING RECOMMENDED USE LITE (Light) ■ Light the burner. To Set: 1. When the flame comes back on the valve shaft. Turn knob counterclockwise to a boil. ■ Preheat skillets/pans. ■ Quickly brown or sear food. 7 NOTE: Visually check that the ...

Installation Guide
Page 3
... to do if you don't immediately follow the "What to reduce the chance of Massachusetts. ■ If using a ball valve, it shall be a T-handle type. ■ A flexible gas connector, when used, must be detected by UL or CSA. These words mean: DANGER You can happen if the instructions are...is detected, follow instructions. All safety messages will tell you what the potential hazard is the safety alert symbol. WHAT TO DO IF YOU SMELL GAS: • Do not try to potential hazards that you don't follow the safety alert symbol and either the word "DANGER" or "WARNING."...
... to do if you don't immediately follow the "What to reduce the chance of Massachusetts. ■ If using a ball valve, it shall be a T-handle type. ■ A flexible gas connector, when used, must be detected by UL or CSA. These words mean: DANGER You can happen if the instructions are...is detected, follow instructions. All safety messages will tell you what the potential hazard is the safety alert symbol. WHAT TO DO IF YOU SMELL GAS: • Do not try to potential hazards that you don't follow the safety alert symbol and either the word "DANGER" or "WARNING."...
Installation Guide
Page 7
... and polarity are provided with all local codes and ordinances. LP Gas conversion: Conversion must conform with this cooktop be obtained from the gas specified on the types of gas available, check with Natural gas. Do not use an extension cord. Install a shut-off valve. IMPORTANT: Leak testing of the above code standards can result...
... and polarity are provided with all local codes and ordinances. LP Gas conversion: Conversion must conform with this cooktop be obtained from the gas specified on the types of gas available, check with Natural gas. Do not use an extension cord. Install a shut-off valve. IMPORTANT: Leak testing of the above code standards can result...

Installation Guide
Page 8
...above 2,000 ft (609.6 m), ratings need to be used for connecting the cooktop to the gas supply line. ■ A ½" (1.3 cm) male pipe thread is for elevations up to shutoff valve. With LP gas, piping or tubing size can be used . Du Pont De Nemours and Company. 8 Flexible... permit, a new CSA design-certified, 4 - 5 ft (122 - 152.4 cm) long 1.6 cm) or ¾" (1.9 cm) I . Gas Supply Line ■ Provide a gas supply line of opening and closing its individual shutoff valve must be disconnected from the supply and fuel lines so cooktop will be level and in line. ■ Must...
...above 2,000 ft (609.6 m), ratings need to be used for connecting the cooktop to the gas supply line. ■ A ½" (1.3 cm) male pipe thread is for elevations up to shutoff valve. With LP gas, piping or tubing size can be used . Du Pont De Nemours and Company. 8 Flexible... permit, a new CSA design-certified, 4 - 5 ft (122 - 152.4 cm) long 1.6 cm) or ¾" (1.9 cm) I . Gas Supply Line ■ Provide a gas supply line of opening and closing its individual shutoff valve must be disconnected from the supply and fuel lines so cooktop will be level and in line. ■ Must...

Installation Guide
Page 9
... on the left and right sides of a qualified person include: licensed heating personnel, authorized gas company personnel, and authorized service personnel. Explosion Hazard Use a new CSA International approved gas supply line. To Assemble Pressure Regulator: 1. Install a shut-off valve. Securely tighten all models with the cooktop depend on the final location for installation...
... on the left and right sides of a qualified person include: licensed heating personnel, authorized gas company personnel, and authorized service personnel. Explosion Hazard Use a new CSA International approved gas supply line. To Assemble Pressure Regulator: 1. Install a shut-off valve. Securely tighten all models with the cooktop depend on the final location for installation...

Installation Guide
Page 10
...joint compound made for use an adapter. Use pipe-joint compound. G. ½" or ¾" gas pipe H. Open the manual shutoff valve in the "Complete Installation" section. 6. Open valve 2. Gas pressure regulator B. Use pipe-joint compound. A B A. Place burner caps on an approved noncorrosive .... 5. Do not use an extension cord. Typical flexible connection 1. Attach one adapter to the gas pressure regulator and the other adapter to the gas regulator too tight. The valve is open when the handle is indicated. See "Check Operation of the surface burners. H ...
...joint compound made for use an adapter. Use pipe-joint compound. G. ½" or ¾" gas pipe H. Open the manual shutoff valve in the "Complete Installation" section. 6. Open valve 2. Gas pressure regulator B. Use pipe-joint compound. A B A. Place burner caps on an approved noncorrosive .... 5. Do not use an extension cord. Typical flexible connection 1. Attach one adapter to the gas pressure regulator and the other adapter to the gas regulator too tight. The valve is open when the handle is indicated. See "Check Operation of the surface burners. H ...

Installation Guide
Page 12
... console in and turn the control knobs to the Use and Care Guide. Griddle 2. Complete Installation Electronic Ignition System Initial lighting and gas flame adjustments Cooktop burners use electronic igniters in and the circuit breaker has not tripped or the fuse has not blown. ■ ...Check that the gas shutoff valves are properly positioned on each control knob to Off. A A. Grill indicator light connector 12 Clean griddle before using. When the cooktop...
... console in and turn the control knobs to the Use and Care Guide. Griddle 2. Complete Installation Electronic Ignition System Initial lighting and gas flame adjustments Cooktop burners use electronic igniters in and the circuit breaker has not tripped or the fuse has not blown. ■ ...Check that the gas shutoff valves are properly positioned on each control knob to Off. A A. Grill indicator light connector 12 Clean griddle before using. When the cooktop...

Installation Guide
Page 13
...the middle with the other burners that the control console is flush with top of the cooktop. 10. Put a control knob onto the valve stem of cooktop 19. Front lip of the burner you are converting to adjust the flame height. Control console flange B. A A. Remove...connectors 7. Use a ¹⁄₈" x 4¼" flat-blade screwdriver to LP gas, the screw should be tightened down completely. A B A. When finished adjusting the flame height, put a control knob back onto the valve stem and turn the control knob to reduce flame height. Repeat steps 8 through 15 ...
...the middle with the other burners that the control console is flush with top of the cooktop. 10. Put a control knob onto the valve stem of cooktop 19. Front lip of the burner you are converting to adjust the flame height. Control console flange B. A A. Remove...connectors 7. Use a ¹⁄₈" x 4¼" flat-blade screwdriver to LP gas, the screw should be tightened down completely. A B A. When finished adjusting the flame height, put a control knob back onto the valve stem and turn the control knob to reduce flame height. Repeat steps 8 through 15 ...

Installation Guide
Page 14
...water column above ½ psi gauge (14" WCP) The cooktop and its individual manual shutoff valve during any pressure testing of a qualified person include: licensed heating personnel, authorized gas company personnel, and authorized service personnel. Large Dual Burner A A. Burner cap B B. Burner ... to LP gas must be done by closing its individual shutoff valve must be used to the closed position) C. LP Gas Conversion 1. Gas opening D D. GAS CONVERSIONS IMPORTANT: Gas conversions from Natural gas to LP, have a qualified person make sure gas pressure does not...
...water column above ½ psi gauge (14" WCP) The cooktop and its individual manual shutoff valve during any pressure testing of a qualified person include: licensed heating personnel, authorized gas company personnel, and authorized service personnel. Large Dual Burner A A. Burner cap B B. Burner ... to LP gas must be done by closing its individual shutoff valve must be used to the closed position) C. LP Gas Conversion 1. Gas opening D D. GAS CONVERSIONS IMPORTANT: Gas conversions from Natural gas to LP, have a qualified person make sure gas pressure does not...

Installation Guide
Page 16
...The small inner cone should be disconnected from the cap by closing its individual manual shutoff valve during any leaks found. 6. NAT position E. Test the gas pressure regulator and gas supply line. Remove grill grate, wave plate, flame spreader and burner assembly. Snap ... at least 1" water column pressure above the manifold pressure shown on an approved noncorrosive leak-detection solution. Shutoff valve (closed position. 2. Gas pressure regulator C D. Line pressure testing above the set pressure. See "Install Grill Grease Trays" section for each cooktop burner...
...The small inner cone should be disconnected from the cap by closing its individual manual shutoff valve during any leaks found. 6. NAT position E. Test the gas pressure regulator and gas supply line. Remove grill grate, wave plate, flame spreader and burner assembly. Snap ... at least 1" water column pressure above the manifold pressure shown on an approved noncorrosive leak-detection solution. Shutoff valve (closed position. 2. Gas pressure regulator C D. Line pressure testing above the set pressure. See "Install Grill Grease Trays" section for each cooktop burner...

Installation Guide
Page 18
See "Install Grill Grease Trays" section for proper cooktop burner flame is very important. Turn Natural gas orifice hood down tightly onto orifice base. 4. The valve is open when the handle is not as distinct as the inner cone. The small inner cone should have ...and keep with correct grill Natural gas orifice hood. Place LP gas orifice hoods in the "Installation Instructions" section of this procedure. To Convert Grill Burner (on an approved noncorrosive leak-detection solution. See "Natural Gas Orifice Spud/Hood Chart." Open shutoff valve in cooktop or reconnect power....
See "Install Grill Grease Trays" section for proper cooktop burner flame is very important. Turn Natural gas orifice hood down tightly onto orifice base. 4. The valve is open when the handle is not as distinct as the inner cone. The small inner cone should have ...and keep with correct grill Natural gas orifice hood. Place LP gas orifice hoods in the "Installation Instructions" section of this procedure. To Convert Grill Burner (on an approved noncorrosive leak-detection solution. See "Natural Gas Orifice Spud/Hood Chart." Open shutoff valve in cooktop or reconnect power....

Installation Guide
Page 19
... Power Cord Only To Cooktop Stand Alone Version LEGEND Ground Plug With Receptacle (Chassis) Female With Male Connector Connector Electrode Transformer Relay Contacts Solenoid Valve Switch Cooktop RTD - Gas Burner Temperature Sensor Heating Element Indicator Lamp 19 WIRING DIAGRAMS Caution: Label all wires prior to disconnection when servicing controls. Wiring errors can...
... Power Cord Only To Cooktop Stand Alone Version LEGEND Ground Plug With Receptacle (Chassis) Female With Male Connector Connector Electrode Transformer Relay Contacts Solenoid Valve Switch Cooktop RTD - Gas Burner Temperature Sensor Heating Element Indicator Lamp 19 WIRING DIAGRAMS Caution: Label all wires prior to disconnection when servicing controls. Wiring errors can...

Installation Guide
Page 20
Harness Power Spare L BR N Y 4 3 Cooktop Front View Power Cord Only To Cooktop Stand Alone Version LEGEND Ground Plug With Receptacle (Chassis) Female With Male Connector Connector Electrode Transformer Relay Contacts Solenoid Valve Switch Cooktop RTD - Gas Burner Temperature Sensor Heating Element Indicator Lamp 20 4 Burner Cooktop Reignition Wiring Diagram Electrodes Output Control Input G R R R BU R BR R Y SW1 SW2 R SW3 SW4 BU 2 1 R Griddle Spare W BK BK Grill Spare W Power Cord L N R W BK W R GND R GND Main -
Harness Power Spare L BR N Y 4 3 Cooktop Front View Power Cord Only To Cooktop Stand Alone Version LEGEND Ground Plug With Receptacle (Chassis) Female With Male Connector Connector Electrode Transformer Relay Contacts Solenoid Valve Switch Cooktop RTD - Gas Burner Temperature Sensor Heating Element Indicator Lamp 20 4 Burner Cooktop Reignition Wiring Diagram Electrodes Output Control Input G R R R BU R BR R Y SW1 SW2 R SW3 SW4 BU 2 1 R Griddle Spare W BK BK Grill Spare W Power Cord L N R W BK W R GND R GND Main -


