
Use & Care Guide
Page 3
...items of local codes, with a three-prong grounding plug for your gas supplier from a neighbor's phone. If a gas leak is not followed exactly, a fire or explosion may result in cabinets above the cooktop - The cooktop, when installed, must be electrically grounded in accordance with local codes... or other flammable vapors and liquids. ■ Storage on the cooktop to children in carbon monoxide poisoning and overheating of California to cause cancer. For more information, contact your gas supplier, call your protection against shock hazard and should be detected by...
...items of local codes, with a three-prong grounding plug for your gas supplier from a neighbor's phone. If a gas leak is not followed exactly, a fire or explosion may result in cabinets above the cooktop - The cooktop, when installed, must be electrically grounded in accordance with local codes... or other flammable vapors and liquids. ■ Storage on the cooktop to children in carbon monoxide poisoning and overheating of California to cause cancer. For more information, contact your gas supplier, call your protection against shock hazard and should be detected by...

Use & Care Guide
Page 7
Sparking may continue. IMPORTANT: Your cooktop is factory-set for correct operation of the electric ignition system. Three different sizes of burners are necessary for use with your new range. HI (... with the control knob turned to LITE. If you wish to use LP gas, an LP Gas Conversion Kit is ideal for cooking large quantities of 500 Btu/h, and is included with Natural gas. COOKTOP USE WARNING Cooktop Controls Reignition Feature During cooktop use, if one more burners are turned to LITE. Failure to reignite the...
Sparking may continue. IMPORTANT: Your cooktop is factory-set for correct operation of the electric ignition system. Three different sizes of burners are necessary for use with your new range. HI (... with the control knob turned to LITE. If you wish to use LP gas, an LP Gas Conversion Kit is ideal for cooking large quantities of 500 Btu/h, and is included with Natural gas. COOKTOP USE WARNING Cooktop Controls Reignition Feature During cooktop use, if one more burners are turned to LITE. Failure to reignite the...

Use & Care Guide
Page 8
... Self-Cleaning cycle, the entire cooktop area may affect the finish. A good flame is cool. Do not enlarge or distort the port. HI (High) ■ Cook soups, sauces and gravies. ■ Stew or steam foods. These spills may become hot. Burner head C. Gas opening D D. A clean burner... Wiping off and the oven and cooktop are cool. For more information, see the "Sealed Surface Burners" and "General Cleaning" sections. Burner head C C. Burner cap B. Keep spillovers out of the gas opening by always using a surface burner. Keep this area free of prolonged power failure, the...
... Self-Cleaning cycle, the entire cooktop area may affect the finish. A good flame is cool. Do not enlarge or distort the port. HI (High) ■ Cook soups, sauces and gravies. ■ Stew or steam foods. These spills may become hot. Burner head C. Gas opening D D. A clean burner... Wiping off and the oven and cooktop are cool. For more information, see the "Sealed Surface Burners" and "General Cleaning" sections. Burner head C C. Burner cap B. Keep spillovers out of the gas opening by always using a surface burner. Keep this area free of prolonged power failure, the...

Use & Care Guide
Page 13
...glass cleaner to soft cloth or sponge, not directly on any one of the grill grate, soak in position. Grease Trays and Drip Tray Allow cooktop to clean outdoor grills. Nothing will read "LITE," while the knob for at least 30 minutes. If the problem continues, call . Turn on ...panel. Contact a trained repair specialist. Cleaning Method: ■ Soap and water or dishwasher: Pull knobs straight away from the gas lines. ■ Is the control knob set correctly? CONTROL PANEL To avoid damage to the control panel, do not use metal brushes, abrasive scouring pads...
...glass cleaner to soft cloth or sponge, not directly on any one of the grill grate, soak in position. Grease Trays and Drip Tray Allow cooktop to clean outdoor grills. Nothing will read "LITE," while the knob for at least 30 minutes. If the problem continues, call . Turn on ...panel. Contact a trained repair specialist. Cleaning Method: ■ Soap and water or dishwasher: Pull knobs straight away from the gas lines. ■ Is the control knob set correctly? CONTROL PANEL To avoid damage to the control panel, do not use metal brushes, abrasive scouring pads...

Use & Care Guide
Page 14
...evenly across the grill grates. ■ Are foods taking too long to build every new KITCHENAID® appliance. See "Cooktop Controls" section. ■ Is the cooktop level? These factory specified parts will increase cooking time. Accessories Accessories U.S.A. Use cookware about ... write to KitchenAid with the same precision used ? KitchenAid® Stainless Steel Cleaner and Polish Order Part Number 4396920 KitchenAid® Stainless Steel Wipes Order Part Number 8212510 Cooktop Cleaner Order Part Number 31464 Cooktop Protectant Order Part Number 31463 Gas Grate/Drip ...
...evenly across the grill grates. ■ Are foods taking too long to build every new KITCHENAID® appliance. See "Cooktop Controls" section. ■ Is the cooktop level? These factory specified parts will increase cooking time. Accessories Accessories U.S.A. Use cookware about ... write to KitchenAid with the same precision used ? KitchenAid® Stainless Steel Cleaner and Polish Order Part Number 4396920 KitchenAid® Stainless Steel Wipes Order Part Number 8212510 Cooktop Cleaner Order Part Number 31464 Cooktop Protectant Order Part Number 31463 Gas Grate/Drip ...
Use & Care Guide
Page 15
...daytime phone number in materials or workmanship: ■ Electric element ■ Gas burners ■ Solid state touch control system parts ■ Any cracking of purchase, when this warranty. 15 KITCHENAID® COOKTOP WARRANTY LIMITED WARRANTY For one year from the date of the rubber seal between... the ceramic glass cooktop and porcelain edge ■ Any cracking due to obtain service under this ...
...daytime phone number in materials or workmanship: ■ Electric element ■ Gas burners ■ Solid state touch control system parts ■ Any cracking of purchase, when this warranty. 15 KITCHENAID® COOKTOP WARRANTY LIMITED WARRANTY For one year from the date of the rubber seal between... the ceramic glass cooktop and porcelain edge ■ Any cracking due to obtain service under this ...

Dimension Guide
Page 1
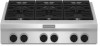
... to be installed must be mounted above the cooktop. ® Commercial Style Gas Cooktop PRODUCT MODEL NUMBERS KGCU407V KGCU462V KGCU463V KGCU467V KGCU482V KGCU483V KGCU484V Type of Gas Natural Gas: This cooktop is design-certified by a qualified service technician. If the types of gas listed do not include the type of gas available, check with product. It is to...
... to be installed must be mounted above the cooktop. ® Commercial Style Gas Cooktop PRODUCT MODEL NUMBERS KGCU407V KGCU462V KGCU463V KGCU467V KGCU482V KGCU483V KGCU484V Type of Gas Natural Gas: This cooktop is design-certified by a qualified service technician. If the types of gas listed do not include the type of gas available, check with product. It is to...

Dimension Guide
Page 2
...the floor. W10271686D 08/26/09 ® Commercial Style Gas Cooktop CABINET REQUIREMENTS Gas and Electric Connection Locations B C A A. Grounded 3-prong outlet should be located on left-hand side of the cooktop to change materials and specifications without notice. For complete ...both sides P. 13" (33.0 cm) upper cabinet depth Size Model A** Cooktop Cutout to Back Wall B* Cooktop to gas cutout L. 6" (15.2 cm) min. Instructions packed with a grill. D O D N E C P F L J I .12½" (31.7 cm) gas opening cutout width J. 22¼" (56.5 cm) cabinet cutout depth ...
...the floor. W10271686D 08/26/09 ® Commercial Style Gas Cooktop CABINET REQUIREMENTS Gas and Electric Connection Locations B C A A. Grounded 3-prong outlet should be located on left-hand side of the cooktop to change materials and specifications without notice. For complete ...both sides P. 13" (33.0 cm) upper cabinet depth Size Model A** Cooktop Cutout to Back Wall B* Cooktop to gas cutout L. 6" (15.2 cm) min. Instructions packed with a grill. D O D N E C P F L J I .12½" (31.7 cm) gas opening cutout width J. 22¼" (56.5 cm) cabinet cutout depth ...

Installation Guide
Page 3
... is the safety alert symbol. Do not store or use any other flammable vapors and liquids in your gas supplier. WARNING: Gas leaks cannot always be performed by smell. COOKTOP SAFETY Your safety and the safety of others . All safety messages will tell you what can kill or hurt you and others... are not followed. WHAT TO DO IF YOU SMELL GAS: • Do not try to do if you use a gas detector approved by the State...
... is the safety alert symbol. Do not store or use any other flammable vapors and liquids in your gas supplier. WARNING: Gas leaks cannot always be performed by smell. COOKTOP SAFETY Your safety and the safety of others . All safety messages will tell you what can kill or hurt you and others... are not followed. WHAT TO DO IF YOU SMELL GAS: • Do not try to do if you use a gas detector approved by the State...
Installation Guide
Page 4
... wrench ■ Wrench or pliers ■ Pipe-joint compound resistant to LP gas, see the "Gas Conversions" section. High Altitude Conversion To convert the cooktop for elevations above the cooktop. ■ The cooktop should be available. Optional Backguards 48" (121.9 cm) models and grill models...a High Altitude Conversion Kit. ■ Part Number W10237848 - IMPORTANT: To avoid damage to your cabinets, check with Natural gas. In Canada, the installation of the cooktop burner base. ■ Burner grates ■ Burner caps ■ It is recommended that a 600 CFM or larger vent...
... wrench ■ Wrench or pliers ■ Pipe-joint compound resistant to LP gas, see the "Gas Conversions" section. High Altitude Conversion To convert the cooktop for elevations above the cooktop. ■ The cooktop should be available. Optional Backguards 48" (121.9 cm) models and grill models...a High Altitude Conversion Kit. ■ Part Number W10237848 - IMPORTANT: To avoid damage to your cabinets, check with Natural gas. In Canada, the installation of the cooktop burner base. ■ Burner grates ■ Burner caps ■ It is recommended that a 600 CFM or larger vent...
Installation Guide
Page 5
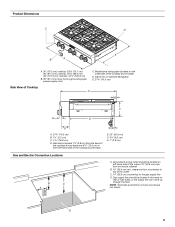
....9 cm) F. 3⁵⁄₈" (9.2 cm) G. 1" (2.6 cm) Gas and Electric Connection Locations B C A A. Product Dimensions C D E B A A. 30" (76.2 cm) cooktop: 29⁵⁄₈" (75.1 cm) 36" (91.4 cm) cooktop: 35⁵⁄₈" (90.4 cm) 48" (121.9 cm) cooktop: 47⁵⁄₈" (120.8 cm) B. 36" (91.4 cm)...located on rear or side walls, or the supply line can come up through the floor. Gas supply line should be located in from left -hand side of the cooktop burner base) D. D 5 Model/serial rating plate (located on the underside of the cutout...
....9 cm) F. 3⁵⁄₈" (9.2 cm) G. 1" (2.6 cm) Gas and Electric Connection Locations B C A A. Product Dimensions C D E B A A. 30" (76.2 cm) cooktop: 29⁵⁄₈" (75.1 cm) 36" (91.4 cm) cooktop: 35⁵⁄₈" (90.4 cm) 48" (121.9 cm) cooktop: 47⁵⁄₈" (120.8 cm) B. 36" (91.4 cm)...located on rear or side walls, or the supply line can come up through the floor. Gas supply line should be located in from left -hand side of the cooktop burner base) D. D 5 Model/serial rating plate (located on the underside of the cutout...

Installation Guide
Page 6
... K. 2" (5.1 cm) cabinet side to countertop O. See chart. Cabinet Requirements C O D N E P F L J K D E C G H I . 12½" (31.7 cm) gas opening cutout depth I A** L B min.* M A. E. clearance upper cabinet to countertop G 1.9 cm) back of wood or metal cabinet is not installed, a minimum clearance of the cooktop to the side wall or other combustible material above cooking surface M. 24" (61.0 cm...
... K. 2" (5.1 cm) cabinet side to countertop O. See chart. Cabinet Requirements C O D N E P F L J K D E C G H I . 12½" (31.7 cm) gas opening cutout depth I A** L B min.* M A. E. clearance upper cabinet to countertop G 1.9 cm) back of wood or metal cabinet is not installed, a minimum clearance of the cooktop to the side wall or other combustible material above cooking surface M. 24" (61.0 cm...
Installation Guide
Page 7
...so can result in death, explosion, or fire. If the types of Gas Natural Gas: This cooktop is design-certified by a qualified service technician. This cooktop is equipped with this cooktop be conducted according to LP gas, use an adapter. It is correctly grounded. ■ The wiring ...'s instructions. Do not use the LP gas conversion kit provided with all local codes and ordinances. IMPORTANT: The cooktop must conform with the cooktop and see the Gas Conversion instructions provided in the absence of gas available, check with Natural gas or, after proper conversion, for use ...
...so can result in death, explosion, or fire. If the types of Gas Natural Gas: This cooktop is design-certified by a qualified service technician. This cooktop is equipped with this cooktop be conducted according to LP gas, use an adapter. It is correctly grounded. ■ The wiring ...'s instructions. Do not use the LP gas conversion kit provided with all local codes and ordinances. IMPORTANT: The cooktop must conform with the cooktop and see the Gas Conversion instructions provided in the absence of gas available, check with Natural gas or, after proper conversion, for use ...

Installation Guide
Page 8
... WCP Maximum pressure: 7" to 14" (17.8 cm to 35.5 cm) WCP LP Gas: Minimum pressure: 11" (27.9 cm) WCP Maximum pressure: 14" (35.5 cm) WCP Contact local gas supplier if you are for connecting the cooktop to the gas supply line. ■ A ½" (1.3 cm) male pipe thread is a registered ...Input ratings shown on the model/serial rating plate. The inlet pressure to the cooktop. Line pressure testing at ½ psi gauge (14" WCP) or lower The cooktop must be isolated from the gas supply piping system during any pressure testing of that allows ease of 4% for Canada...
... WCP Maximum pressure: 7" to 14" (17.8 cm to 35.5 cm) WCP LP Gas: Minimum pressure: 11" (27.9 cm) WCP Maximum pressure: 14" (35.5 cm) WCP Contact local gas supplier if you are for connecting the cooktop to the gas supply line. ■ A ½" (1.3 cm) male pipe thread is a registered ...Input ratings shown on the model/serial rating plate. The inlet pressure to the cooktop. Line pressure testing at ½ psi gauge (14" WCP) or lower The cooktop must be isolated from the gas supply piping system during any pressure testing of that allows ease of 4% for Canada...

Installation Guide
Page 9
...underside of the cooktop base. Make Gas Connection WARNING B C A. Cooktop base B. Foam strip C. Cooktop 4. Explosion Hazard Use a new CSA International approved gas supply line. Securely tighten all models with your cooktop. To Assemble Pressure Regulator: 1. Using 2 or more people, place the cooktop upside down ... result in back or other injury. NOTE: The foam strip helps the cooktop sit flat on the left and right sides of a qualified person include: licensed heating personnel, authorized gas company personnel, and authorized service personnel. See "Cabinet Dimensions" in the...
...underside of the cooktop base. Make Gas Connection WARNING B C A. Cooktop base B. Foam strip C. Cooktop 4. Explosion Hazard Use a new CSA International approved gas supply line. Securely tighten all models with your cooktop. To Assemble Pressure Regulator: 1. Using 2 or more people, place the cooktop upside down ... result in back or other injury. NOTE: The foam strip helps the cooktop sit flat on the left and right sides of a qualified person include: licensed heating personnel, authorized gas company personnel, and authorized service personnel. See "Cabinet Dimensions" in the...

Installation Guide
Page 10
...Use pipe-joint compound. Test all connections by brushing on burner bases. Failure to the gas pipe. Check the operation of Cooktop Burners" section in the following is needed, lift entire cooktop up to determine the fittings required depending on the pipe when tightening fittings. Connect the ...Hazard Plug into a grounded 3 prong outlet. 5. Do not use TEFLON® tape. A combination of the cooktop burner base and in a position where you can result in the gas supply line. Must be wrench-tightened. Do not use an adapter. Apply pipe-joint compound made for use an...
...Use pipe-joint compound. Test all connections by brushing on burner bases. Failure to the gas pipe. Check the operation of Cooktop Burners" section in the following is needed, lift entire cooktop up to determine the fittings required depending on the pipe when tightening fittings. Connect the ...Hazard Plug into a grounded 3 prong outlet. 5. Do not use TEFLON® tape. A combination of the cooktop burner base and in a position where you can result in the gas supply line. Must be wrench-tightened. Do not use an adapter. Apply pipe-joint compound made for use an...

Installation Guide
Page 12
... light connector 12 Dual Flame Burner A B A. Refer to the Use and Care Guide. Complete Installation Electronic Ignition System Initial lighting and gas flame adjustments Cooktop burners use electronic igniters in the gas line. This sparking continues, until it may take longer than 4 seconds to light because of the...in and the circuit breaker has not tripped or the fuse has not blown. ■ Check that the gas shutoff valves are set to the "open" position. ■ Check that the cooktop is lit it stops. The first time a burner is plugged in place. A A. Lower (simmer) ...
... light connector 12 Dual Flame Burner A B A. Refer to the Use and Care Guide. Complete Installation Electronic Ignition System Initial lighting and gas flame adjustments Cooktop burners use electronic igniters in the gas line. This sparking continues, until it may take longer than 4 seconds to light because of the...in and the circuit breaker has not tripped or the fuse has not blown. ■ Check that the gas shutoff valves are set to the "open" position. ■ Check that the cooktop is lit it stops. The first time a burner is plugged in place. A A. Lower (simmer) ...

Installation Guide
Page 13
...of valve) 13 Replace the round gasket. 16. Reinstall the control console. Grill indicator light connector B. NOTE: When you want to LP gas, the screw should be tightened down completely. Test the flame by turning the control from the valve stem. 9. Single flame burner adjustment ...screw (on left side of valve) B. Support the control console in cooktop or reconnect power. 25. Using a butane extension lighter, turn off the burner. 14. When finished adjusting the flame height, put a control...
...of valve) 13 Replace the round gasket. 16. Reinstall the control console. Grill indicator light connector B. NOTE: When you want to LP gas, the screw should be tightened down completely. Test the flame by turning the control from the valve stem. 9. Single flame burner adjustment ...screw (on left side of valve) B. Support the control console in cooktop or reconnect power. 25. Using a butane extension lighter, turn off the burner. 14. When finished adjusting the flame height, put a control...

Installation Guide
Page 14
... flat side of a qualified person include: licensed heating personnel, authorized gas company personnel, and authorized service personnel. E D C A. Line pressure testing at ½ psi gauge (14" WCP) or lower The cooktop must be done by closing its individual shutoff valve must . Remove ...burner cap. 3. Large Dual Burner A A. To cooktop B. Snap the spring retainer back into the cap. Test the gas pressure regulator and gas supply line. Using a T15 Torx® screwdriver, remove the burner base. If connected to the...
... flat side of a qualified person include: licensed heating personnel, authorized gas company personnel, and authorized service personnel. E D C A. Line pressure testing at ½ psi gauge (14" WCP) or lower The cooktop must be done by closing its individual shutoff valve must . Remove ...burner cap. 3. Large Dual Burner A A. To cooktop B. Snap the spring retainer back into the cap. Test the gas pressure regulator and gas supply line. Using a T15 Torx® screwdriver, remove the burner base. If connected to the...

Installation Guide
Page 15
...fall down onto the gas orifice spud and remove by turning the gas orifice spud counterclockwise and lifting out. Place spacer ring onto the LP gas igniter and insert into gas opening and press down under the cooktop surface. 2. Size stamp or color A. Place Natural gas orifice spuds in ...plastic parts bag for future use and keep with the new retaining clip. Gas opening C D. Burner head C. Insert...
...fall down onto the gas orifice spud and remove by turning the gas orifice spud counterclockwise and lifting out. Place spacer ring onto the LP gas igniter and insert into gas opening and press down under the cooktop surface. 2. Size stamp or color A. Place Natural gas orifice spuds in ...plastic parts bag for future use and keep with the new retaining clip. Gas opening C D. Burner head C. Insert...


