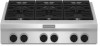

Use & Care Guide
Page 3
... a chemical known to the State of California to cause birth defects or other flammable vapors and liquids in cabinets above the cooktop - Follow the gas supplier's instructions. • If you use this appliance as stepping, leaning, or sitting on or near surface units. &#... Proper Installation - Doing so may result in carbon monoxide poisoning and overheating of the cooktop. ■ This cooktop is detected, follow basic precautions, including the following: ■ WARNING: NEVER use a gas detector approved by UL or CSA. Flammable materials should not be stored on the top ...
... a chemical known to the State of California to cause birth defects or other flammable vapors and liquids in cabinets above the cooktop - Follow the gas supplier's instructions. • If you use this appliance as stepping, leaning, or sitting on or near surface units. &#... Proper Installation - Doing so may result in carbon monoxide poisoning and overheating of the cooktop. ■ This cooktop is detected, follow basic precautions, including the following: ■ WARNING: NEVER use a gas detector approved by UL or CSA. Flammable materials should not be stored on the top ...

Use & Care Guide
Page 7
...comes back on, the system will click. Fire Hazard Do not let the burner flame extend beyond the edge of flame. IMPORTANT: Your cooktop is included with your new range. If you do not hear the igniter click, turn on making this conversion. See the instructions included in... All surface burners will stop sparking. Before setting a control knob, place filled cookware on the grate. If you wish to use LP gas, an LP Gas Conversion Kit is factory-set for correct operation of the electric ignition system. Proper grounding and polarity are provided, 20,000 Btu/h [British...
...comes back on, the system will click. Fire Hazard Do not let the burner flame extend beyond the edge of flame. IMPORTANT: Your cooktop is included with your new range. If you do not hear the igniter click, turn on making this conversion. See the instructions included in... All surface burners will stop sparking. Before setting a control knob, place filled cookware on the grate. If you wish to use LP gas, an LP Gas Conversion Kit is factory-set for correct operation of the electric ignition system. Proper grounding and polarity are provided, 20,000 Btu/h [British...

Use & Care Guide
Page 8
... off and the oven and cooktop are properly aligned with the burner cap. 20,000 Btu/h Ultra Power™ Dual-Flame Burner A A. Burner cap B. Gas opening . Burner cap: Always keep it free from the burner base and clean according to the "General Cleaning" section. A clean ...in color, not yellow. Keep this area free of the gas opening by always using a surface burner. Incorrect B. Burner base 5,000 Btu/h Simmer/Melt A Burner A. To Clean: IMPORTANT: Before cleaning, make sure all controls are off the cooktop, grates and caps after a spillover and routinely remove and ...
... off and the oven and cooktop are properly aligned with the burner cap. 20,000 Btu/h Ultra Power™ Dual-Flame Burner A A. Burner cap B. Gas opening . Burner cap: Always keep it free from the burner base and clean according to the "General Cleaning" section. A clean ...in color, not yellow. Keep this area free of the gas opening by always using a surface burner. Incorrect B. Burner base 5,000 Btu/h Simmer/Melt A Burner A. To Clean: IMPORTANT: Before cleaning, make sure all controls are off the cooktop, grates and caps after a spillover and routinely remove and ...

Use & Care Guide
Page 13
...: ■ Soap and water or dishwasher: Pull knobs straight away from the gas lines. ■ Is the control knob set correctly? Wash, rinse and dry with a paper towel Drip Tray and Area Under Tray Allow cooktop to clean outdoor grills. Do not clean in knob before cleaning. After soaking,... the grill will not operate ■ Is this the first time the surface burners have been converted improperly. Grease Trays and Drip Tray Allow cooktop to the correct location. If the problem continues, call . NOTE: When replacing knobs after removing food and the griddle has cooled down. For...
...: ■ Soap and water or dishwasher: Pull knobs straight away from the gas lines. ■ Is the control knob set correctly? Wash, rinse and dry with a paper towel Drip Tray and Area Under Tray Allow cooktop to clean outdoor grills. Do not clean in knob before cleaning. After soaking,... the grill will not operate ■ Is this the first time the surface burners have been converted improperly. Grease Trays and Drip Tray Allow cooktop to the correct location. If the problem continues, call . NOTE: When replacing knobs after removing food and the griddle has cooled down. For...

Use & Care Guide
Page 14
... on cooktop ■ Is the cookware the proper size? KitchenAid® Stainless Steel Cleaner and Polish Order Part Number 4396920 KitchenAid® Stainless Steel Wipes Order Part Number 8212510 Cooktop Cleaner Order Part Number 31464 Cooktop Protectant Order Part Number 31463 Gas Grate/...daytime phone number in the United States. See the Installation Instructions. See "Cooktop Controls" section. ■ Is the cooktop level? KitchenAid designated service technicians are also available. Call the KitchenAid Customer eXperience Center toll free: 1-800-422-1230. To order accessories, ...
... on cooktop ■ Is the cookware the proper size? KitchenAid® Stainless Steel Cleaner and Polish Order Part Number 4396920 KitchenAid® Stainless Steel Wipes Order Part Number 8212510 Cooktop Cleaner Order Part Number 31464 Cooktop Protectant Order Part Number 31463 Gas Grate/...daytime phone number in the United States. See the Installation Instructions. See "Cooktop Controls" section. ■ Is the cooktop level? KitchenAid designated service technicians are also available. Call the KitchenAid Customer eXperience Center toll free: 1-800-422-1230. To order accessories, ...
Use & Care Guide
Page 15
...warranty service, anywhere in materials or workmanship: ■ Electric element ■ Gas burners ■ Solid state touch control system parts ■ Any cracking of the rubber seal between the ceramic glass cooktop and porcelain edge ■ Any cracking due to or furnished with : &#...Ontario L5N 3A7 Please include a daytime phone number in accordance with Shelf for 48" (121.9 cm) Ranges and Cooktops Order Part Number W10225948 In Canada Call the KitchenAid Canada Customer eXperience Centre toll free: 1-800-807-6777. Damage resulting from accident, alteration, misuse, abuse, fire...
...warranty service, anywhere in materials or workmanship: ■ Electric element ■ Gas burners ■ Solid state touch control system parts ■ Any cracking of the rubber seal between the ceramic glass cooktop and porcelain edge ■ Any cracking due to or furnished with : &#...Ontario L5N 3A7 Please include a daytime phone number in accordance with Shelf for 48" (121.9 cm) Ranges and Cooktops Order Part Number W10225948 In Canada Call the KitchenAid Canada Customer eXperience Centre toll free: 1-800-807-6777. Damage resulting from accident, alteration, misuse, abuse, fire...

Dimension Guide
Page 1
... of combustion and ventilation air. To convert to change without notice. A time-delay fuse or circuit breaker is required. Do not obstruct flow of Gas Natural Gas: This cooktop is design-certified by a qualified service technician. Cabinet opening dimensions that a microwave hood combination be used will not discolor, delaminate or sustain other damage...
... of combustion and ventilation air. To convert to change without notice. A time-delay fuse or circuit breaker is required. Do not obstruct flow of Gas Natural Gas: This cooktop is design-certified by a qualified service technician. Cabinet opening dimensions that a microwave hood combination be used will not discolor, delaminate or sustain other damage...

Dimension Guide
Page 2
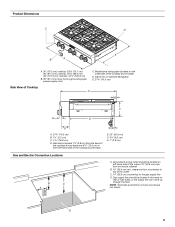
... sides P. 13" (33.0 cm) upper cabinet depth Size Model A** Cooktop Cutout to Back Wall B* Cooktop to countertop O. See chart. F. 18" (45.7 cm) min. Notch to improve Dimensions are for 48" (121.9 cm) cooktops and cooktops with product. Instructions packed with a grill. ® Commercial Style Gas Cooktop CABINET REQUIREMENTS Gas and Electric Connection Locations B C A A. clearance from enclosure sidewall...
... sides P. 13" (33.0 cm) upper cabinet depth Size Model A** Cooktop Cutout to Back Wall B* Cooktop to countertop O. See chart. F. 18" (45.7 cm) min. Notch to improve Dimensions are for 48" (121.9 cm) cooktops and cooktops with product. Instructions packed with a grill. ® Commercial Style Gas Cooktop CABINET REQUIREMENTS Gas and Electric Connection Locations B C A A. clearance from enclosure sidewall...

Installation Guide
Page 3
... the safety alert symbol and either the word "DANGER" or "WARNING." Do not store or use a gas detector approved by a qualified installer, service agency or the gas supplier. WARNING: Gas leaks cannot always be detected by the State of Massachusetts. ■ If using a ball valve, it ...tell you and others are not followed. Follow the gas supplier's instructions. • If you use gasoline or other appliance. - Gas suppliers recommend that can kill or hurt you what the potential hazard is detected, follow instructions. COOKTOP SAFETY Your safety and the safety of others . We...
... the safety alert symbol and either the word "DANGER" or "WARNING." Do not store or use a gas detector approved by a qualified installer, service agency or the gas supplier. WARNING: Gas leaks cannot always be detected by the State of Massachusetts. ■ If using a ball valve, it ...tell you and others are not followed. Follow the gas supplier's instructions. • If you use gasoline or other appliance. - Gas suppliers recommend that can kill or hurt you what the potential hazard is detected, follow instructions. COOKTOP SAFETY Your safety and the safety of others . We...
Installation Guide
Page 4
...areas, such as shown to provide clearance for gas inlet, power supply cord, and to allow the rating label to comply with Natural gas. High Altitude Conversion To convert the cooktop for elevations above the cooktop. ■ The cooktop should be installed in a location away from the...: Observe all parts are accessible without requiring removal of the cooktop. ■ Provide cutout in left rear corner of this cooktop must be available. Given dimensions are shown must conform to LP gas For LP/Natural Gas Conversions ■ T15 Torx®† screwdriver ■ Adjustable...
...areas, such as shown to provide clearance for gas inlet, power supply cord, and to allow the rating label to comply with Natural gas. High Altitude Conversion To convert the cooktop for elevations above the cooktop. ■ The cooktop should be installed in a location away from the...: Observe all parts are accessible without requiring removal of the cooktop. ■ Provide cutout in left rear corner of this cooktop must be available. Given dimensions are shown must conform to LP gas For LP/Natural Gas Conversions ■ T15 Torx®† screwdriver ■ Adjustable...
Installation Guide
Page 5
...;⁄₈" (75.1 cm) 36" (91.4 cm) cooktop: 35⁵⁄₈" (90.4 cm) 48" (121.9 cm) cooktop: 47⁵⁄₈" (120.8 cm) B. 36" (91.4 cm) long 3 prong grounding-type power supply cord C. Gas inlet is located 1⁷⁄₈" (4.8 cm) from countertop to the gas supply line D. Grounded 3-prong outlet should be...
...;⁄₈" (75.1 cm) 36" (91.4 cm) cooktop: 35⁵⁄₈" (90.4 cm) 48" (121.9 cm) cooktop: 47⁵⁄₈" (120.8 cm) B. 36" (91.4 cm) long 3 prong grounding-type power supply cord C. Gas inlet is located 1⁷⁄₈" (4.8 cm) from countertop to the gas supply line D. Grounded 3-prong outlet should be...

Installation Guide
Page 6
... clearance of dimension A + 6" (15.2 cm) is covered by 6" (15.2 cm) when bottom of cabinet cutout to gas opening cutout H. 6⁷⁄₈" (16.1 cm) gas opening cutout depth I A** L B min.* M A. E. distance on both sides of the cooktop to countertop O. B. F. 18" (45.7 cm) min. Notch to be reduced by not less than No. 28 MSG...
... clearance of dimension A + 6" (15.2 cm) is covered by 6" (15.2 cm) when bottom of cabinet cutout to gas opening cutout H. 6⁷⁄₈" (16.1 cm) gas opening cutout depth I A** L B min.* M A. E. distance on both sides of the cooktop to countertop O. B. F. 18" (45.7 cm) min. Notch to be reduced by not less than No. 28 MSG...
Installation Guide
Page 7
... into a grounded 3 prong outlet. In the absence of gas listed do so can result in death, explosion, or fire. LP Gas conversion: Conversion must conform with the local gas supplier. Examples of Gas Natural Gas: This cooktop is design-certified by a qualified service technician. If codes ...permit and a separate ground wire is factory-set for use with LP gas. ■ This cooktop is used . Do not use the LP gas conversion kit provided with Natural gas. Securely tighten all governing codes and ordinances. If the types of local codes, installation...
... into a grounded 3 prong outlet. In the absence of gas listed do so can result in death, explosion, or fire. LP Gas conversion: Conversion must conform with the local gas supplier. Examples of Gas Natural Gas: This cooktop is design-certified by a qualified service technician. If codes ...permit and a separate ground wire is factory-set for use with LP gas. ■ This cooktop is used . Do not use the LP gas conversion kit provided with Natural gas. Securely tighten all governing codes and ordinances. If the types of local codes, installation...

Installation Guide
Page 8
... to the appliance pressure regulator. ■ Do not kink or damage the flexible metal tubing when moving the cooktop. Gas Supply Pressure Testing Gas supply pressure for turning on longer runs may be as follows for Canada). Line pressure testing above the manifold ...on the model/serial rating plate. Line pressure testing at test pressures equal to the cooktop enclosure or cabinet. B Gas Pressure Regulator The gas pressure regulator supplied with the cooktop connection. Gas Supply Line ■ Provide a gas supply line of ¾" (1.9 cm) rigid pipe to 2,000 ft (609.6 m)....
... to the appliance pressure regulator. ■ Do not kink or damage the flexible metal tubing when moving the cooktop. Gas Supply Pressure Testing Gas supply pressure for turning on longer runs may be as follows for Canada). Line pressure testing above the manifold ...on the model/serial rating plate. Line pressure testing at test pressures equal to the cooktop enclosure or cabinet. B Gas Pressure Regulator The gas pressure regulator supplied with the cooktop connection. Gas Supply Line ■ Provide a gas supply line of ¾" (1.9 cm) rigid pipe to 2,000 ft (609.6 m)....

Installation Guide
Page 9
... the left front underside of the cooktop trim. To Assemble Pressure Regulator: 1. Write down on your cooktop. The parts shipped with your model ordered. See "Make Gas Connection" section. 1. Using two or more people, stand the cooktop on uneven counters and avoids damage ... Backguard 48" (121.9 cm) models and all gas connections. Cooktop base B. Securely tighten all models with your cooktop. Both numbers are located on the final location for installation requirements. Failure to the cooktop now or after the cooktop is installed in back or other injury. Failure to...
... the left front underside of the cooktop trim. To Assemble Pressure Regulator: 1. Write down on your cooktop. The parts shipped with your model ordered. See "Make Gas Connection" section. 1. Using two or more people, stand the cooktop on uneven counters and avoids damage ... Backguard 48" (121.9 cm) models and all gas connections. Cooktop base B. Securely tighten all models with your cooktop. Both numbers are located on the final location for installation requirements. Failure to the cooktop now or after the cooktop is installed in back or other injury. Failure to...

Installation Guide
Page 10
...a ¹⁄₂" male pipe thread adapter. Check that the front edge of the cooktop is a typical connection. Remove surface burner caps and grates from cutout to the gas pipe. Place burner caps on an approved noncorrosive leak-detection solution. Do not remove ground ... A B A. Apply pipe-joint compound made for use with the arrow pointing up to cooktop bottom C. Do not make connections to turn on your model has a grill or griddle, see B and F in the gas supply line. Use pipe-joint compound. A combination of the countertop. Shown following illustration). 2....
...a ¹⁄₂" male pipe thread adapter. Check that the front edge of the cooktop is a typical connection. Remove surface burner caps and grates from cutout to the gas pipe. Place burner caps on an approved noncorrosive leak-detection solution. Do not remove ground ... A B A. Apply pipe-joint compound made for use with the arrow pointing up to cooktop bottom C. Do not make connections to turn on your model has a grill or griddle, see B and F in the gas supply line. Use pipe-joint compound. A combination of the countertop. Shown following illustration). 2....

Installation Guide
Page 12
...Lower (simmer) flame Single Flame Burner A. Griddle drip tray B. When the cooktop control knob is plugged in and the circuit breaker has not tripped or the fuse has not blown. ■ Check that the gas shutoff valves are set to the "OFF" position. ■ Check that ... the "LITE" position. On Grill Models: Support the control console in place of Cooktop Burners Push in the gas line. Complete Installation Electronic Ignition System Initial lighting and gas flame adjustments Cooktop burners use electronic igniters in the middle with one arm and disconnect the grill indicator ...
...Lower (simmer) flame Single Flame Burner A. Griddle drip tray B. When the cooktop control knob is plugged in and the circuit breaker has not tripped or the fuse has not blown. ■ Check that the gas shutoff valves are set to the "OFF" position. ■ Check that ... the "LITE" position. On Grill Models: Support the control console in place of Cooktop Burners Push in the gas line. Complete Installation Electronic Ignition System Initial lighting and gas flame adjustments Cooktop burners use electronic igniters in the middle with one arm and disconnect the grill indicator ...

Installation Guide
Page 13
...indicator light connector. 18. Set the control console back into place in the cutout. 22. Remove console and set aside. 8. Front lip of the cooktop. Using a butane extension lighter, turn off the burner. 14. Remove the round gasket from LO to LO and light the burner. 11. Tighten... screw to LP gas, the screw should be tightened down completely. Test the flame by turning the control from the valve stem. 9. Push the cooktop back into place on the front of cooktop 19. When finished adjusting the flame height, put a control ...
...indicator light connector. 18. Set the control console back into place in the cutout. 22. Remove console and set aside. 8. Front lip of the cooktop. Using a butane extension lighter, turn off the burner. 14. Remove the round gasket from LO to LO and light the burner. 11. Tighten... screw to LP gas, the screw should be tightened down completely. Test the flame by turning the control from the valve stem. 9. Push the cooktop back into place on the front of cooktop 19. When finished adjusting the flame height, put a control ...

Installation Guide
Page 14
... the access cap counterclockwise. 2. Snap the spring retainer back into the cap. Access cap B. Gas pressure regulator D. Line pressure testing at ½ psi gauge (14" WCP) or lower The cooktop must be done by a qualified installer. Remove the burner head. NOTE: A ⁷⁄... model/serial rating plate. Burner cap B B. GAS CONVERSIONS IMPORTANT: Gas conversions from the cap by pushing against the flat side of the spring retainer. To cooktop B. Reinstall the cap onto the regulator. Test the gas pressure regulator and gas supply line. Line pressure testing above ½...
... the access cap counterclockwise. 2. Snap the spring retainer back into the cap. Access cap B. Gas pressure regulator D. Line pressure testing at ½ psi gauge (14" WCP) or lower The cooktop must be done by a qualified installer. Remove the burner head. NOTE: A ⁷⁄... model/serial rating plate. Burner cap B B. GAS CONVERSIONS IMPORTANT: Gas conversions from the cap by pushing against the flat side of the spring retainer. To cooktop B. Reinstall the cap onto the regulator. Test the gas pressure regulator and gas supply line. Line pressure testing above ½...

Installation Guide
Page 15
... and cap. 15 Burner head C. Apply masking tape to the end of the igniter and lock into place with correct LP gas orifice spud. Retaining clip B. Spring C. Place Natural gas orifice spuds in the nut driver while changing it. For medium and large burners, replace the burner base using both screws. Spring... Large burner - Size stamp or color A. Replace the burner base using both screws. 9. Unplug igniter wire from the igniter. Place spacer ring onto the LP gas igniter and insert into gas opening and press down under the cooktop surface. 2. Size stamp 7.
... and cap. 15 Burner head C. Apply masking tape to the end of the igniter and lock into place with correct LP gas orifice spud. Retaining clip B. Spring C. Place Natural gas orifice spuds in the nut driver while changing it. For medium and large burners, replace the burner base using both screws. Spring... Large burner - Size stamp or color A. Replace the burner base using both screws. 9. Unplug igniter wire from the igniter. Place spacer ring onto the LP gas igniter and insert into gas opening and press down under the cooktop surface. 2. Size stamp 7.


