Use & Care Guide
Page 5
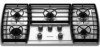
...36" [91.4 cm] shown) Control Panel OFF C Lt Hi Lo Med D OFF Lt Hi Lo Med OFF Lt E Hi Lo Med B A A. Left rear burner control knob D. Right rear burner control knob F. Right front burner control knob F G E D H C I . Center grate H. 6,000 Btu/h burner I B J A A. 17,000 Btu/h burner B. All Btu/h ratings shown are shown. Model...listed. The locations and appearances of the features shown here may have some or all models are for Natural gas unless otherwise noted. Control knob off position Cooktop OFF OFF Lt Hi Lo Med C. Center rear burner control knob Lt F Hi...
...36" [91.4 cm] shown) Control Panel OFF C Lt Hi Lo Med D OFF Lt Hi Lo Med OFF Lt E Hi Lo Med B A A. Left rear burner control knob D. Right rear burner control knob F. Right front burner control knob F G E D H C I . Center grate H. 6,000 Btu/h burner I B J A A. 17,000 Btu/h burner B. All Btu/h ratings shown are shown. Model...listed. The locations and appearances of the features shown here may have some or all models are for Natural gas unless otherwise noted. Control knob off position Cooktop OFF OFF Lt Hi Lo Med C. Center rear burner control knob Lt F Hi...
Use & Care Guide
Page 6
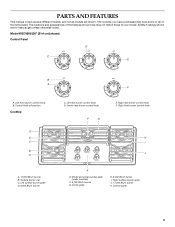
... C Lite Hi Lo Med D OFF Lite Hi Lo Med OFF Lite E Hi Lo Med B OFF A Lite Hi Lo Med A. Model and serial number plate (under cooktop) F. 9,100 Btu/h burner (on 36" [91.4 cm] models only) G. Right rear burner control knob F. Control panel 6 Left front burner control knob B. Surface burner cap C. Right surface burner grate...
... C Lite Hi Lo Med D OFF Lite Hi Lo Med OFF Lite E Hi Lo Med B OFF A Lite Hi Lo Med A. Model and serial number plate (under cooktop) F. 9,100 Btu/h burner (on 36" [91.4 cm] models only) G. Right rear burner control knob F. Control panel 6 Left front burner control knob B. Surface burner cap C. Right surface burner grate...

Use & Care Guide
Page 7
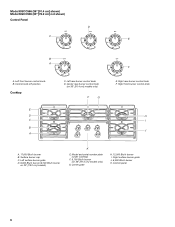
... C I . Model and serial number plate (under cooktop) F. 9,100 Btu/h burner (on 30" [72.6 cm] models) K E. Left surface burner grate D. 6,000 Btu/h burner (9,100 Btu/h burner on 36" [91.4 cm] models only) G. Center rear burner control knob (on 36" [91.4 cm] models only) F G OFF Lite F Hi Lo Med E. Model KGCK366 (36" [91.4 cm] shown) Model KGCK306 (30" [...,500 Btu/h burner I B A J A. 17,000 Btu/h burner B. Right surface burner grate J. 6,000 Btu/h burner K. Control panel 7 Control knob off position Cooktop C. Left front burner control knob B. Surface burner cap C.
... C I . Model and serial number plate (under cooktop) F. 9,100 Btu/h burner (on 30" [72.6 cm] models) K E. Left surface burner grate D. 6,000 Btu/h burner (9,100 Btu/h burner on 36" [91.4 cm] models only) G. Center rear burner control knob (on 36" [91.4 cm] models only) F G OFF Lite F Hi Lo Med E. Model KGCK366 (36" [91.4 cm] shown) Model KGCK306 (30" [...,500 Btu/h burner I B A J A. 17,000 Btu/h burner B. Right surface burner grate J. 6,000 Btu/h burner K. Control panel 7 Control knob off position Cooktop C. Left front burner control knob B. Surface burner cap C.
Use & Care Guide
Page 8
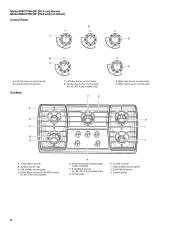
...,000 Btu/h burner B. Right surface burner grate J. 6,000 Btu/h burner K. Surface burner cap C. Control knob off position Cooktop C. Right rear burner control knob F. Model and serial number plate (under cooktop) F. 9,100 Btu/h burner (on 36" [91.4 cm] models only) F G OFF Lite F Hi Lo Med E. Left surface burner grate D. 6,000 Btu/h burner (9,100 BTU burner on...
...,000 Btu/h burner B. Right surface burner grate J. 6,000 Btu/h burner K. Surface burner cap C. Control knob off position Cooktop C. Right rear burner control knob F. Model and serial number plate (under cooktop) F. 9,100 Btu/h burner (on 36" [91.4 cm] models only) F G OFF Lite F Hi Lo Med E. Left surface burner grate D. 6,000 Btu/h burner (9,100 BTU burner on...

Use & Care Guide
Page 10
...allowed to hold the grates in place. Contact a trained repair specialist. To Clean: IMPORTANT: Before cleaning, make sure all models except for model KGCV566, the locator pin on the left and right grates. Surface Grates with the burner base. On some...burner. Incorrect B. Then, while wearing oven mitts, remove the spills while the surface is cool. Gas tube opening: Gas must flow freely throughout the gas tube opening for proper size and shape as shown above the cooktop. A B A. A. Clean clogged burner ports with a damp cloth. 3. These grooves must always...
...allowed to hold the grates in place. Contact a trained repair specialist. To Clean: IMPORTANT: Before cleaning, make sure all models except for model KGCV566, the locator pin on the left and right grates. Surface Grates with the burner base. On some...burner. Incorrect B. Then, while wearing oven mitts, remove the spills while the surface is cool. Gas tube opening: Gas must flow freely throughout the gas tube opening for proper size and shape as shown above the cooktop. A B A. A. Clean clogged burner ports with a damp cloth. 3. These grooves must always...

Use & Care Guide
Page 12
...Method: ■ Soap and water or dishwasher: Pull knobs straight away from aluminum and copper ■ Cooktop Cleaner: Clean as soon as cooktop, grates and caps are cool. ■ Gas Grate and Drip Pan Cleaner (not included): See "Assistance or Service" section to order. These spills ... caps on panel. ■ All Purpose Appliance Cleaner (not included): See "Assistance or Service" section to order. SURFACE BURNERS Sealed Burner models See "Sealed Surface Burners" section. Metal marks from control panel to soft cloth or sponge, not directly on burners while wet. Cleaning Method...
...Method: ■ Soap and water or dishwasher: Pull knobs straight away from aluminum and copper ■ Cooktop Cleaner: Clean as soon as cooktop, grates and caps are cool. ■ Gas Grate and Drip Pan Cleaner (not included): See "Assistance or Service" section to order. These spills ... caps on panel. ■ All Purpose Appliance Cleaner (not included): See "Assistance or Service" section to order. SURFACE BURNERS Sealed Burner models See "Sealed Surface Burners" section. Metal marks from control panel to soft cloth or sponge, not directly on burners while wet. Cleaning Method...
Use & Care Guide
Page 13
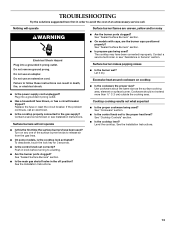
...the solutions suggested here first in order to avoid the cost of the surface burner knobs to release air from the gas lines. ■ On some models, is the cooktop lock activated? Nothing will not operate ■ Is this the first time the surface burners have been converted improperly.... Failure to the proper heat level? See "Sealed Surface Burners" section. ■ Is the main gas shutoff valve in death, fire, or ...
...the solutions suggested here first in order to avoid the cost of the surface burner knobs to release air from the gas lines. ■ On some models, is the cooktop lock activated? Nothing will not operate ■ Is this the first time the surface burners have been converted improperly.... Failure to the proper heat level? See "Sealed Surface Burners" section. ■ Is the main gas shutoff valve in death, fire, or ...
Use & Care Guide
Page 14
... : ■ Features and specifications on "applianceaccessories.com." Accessories Cooktop Cleaner (ceramic glass models) Order Part Number 31464 Cooktop Protectant (ceramic glass models) Order Part Number 31463 Cooktop Scraper (ceramic glass models) Order Part Number WA906B KitchenAid® Stainless Steel Cleaner and Polish (stainless steel models) Order Part Number 4396920 Gas Grate and Drip Pan Cleaner Order Part Number 31617...
... : ■ Features and specifications on "applianceaccessories.com." Accessories Cooktop Cleaner (ceramic glass models) Order Part Number 31464 Cooktop Protectant (ceramic glass models) Order Part Number 31463 Cooktop Scraper (ceramic glass models) Order Part Number WA906B KitchenAid® Stainless Steel Cleaner and Polish (stainless steel models) Order Part Number 4396920 Gas Grate and Drip Pan Cleaner Order Part Number 31617...
Use & Care Guide
Page 15
...need service, first see the "Troubleshooting" section of the Use & Care Guide. Dealer name Address Phone number Model number Serial number Purchase date 15 LIMITATION OF REMEDIES CUSTOMER'S SOLE AND EXCLUSIVE REMEDY UNDER THIS LIMITED WARRANTY SHALL BE...Gas burners ■ Solid state touch control system parts ■ Any cracking of the rubber seal between the ceramic glass cooktop and porcelain edge ■ Any cracking due to correct house wiring or plumbing. 2. Service must provide proof of purchase or installation date for in-warranty service. KITCHENAID® COOKTOP...
...need service, first see the "Troubleshooting" section of the Use & Care Guide. Dealer name Address Phone number Model number Serial number Purchase date 15 LIMITATION OF REMEDIES CUSTOMER'S SOLE AND EXCLUSIVE REMEDY UNDER THIS LIMITED WARRANTY SHALL BE...Gas burners ■ Solid state touch control system parts ■ Any cracking of the rubber seal between the ceramic glass cooktop and porcelain edge ■ Any cracking due to correct house wiring or plumbing. 2. Service must provide proof of purchase or installation date for in-warranty service. KITCHENAID® COOKTOP...
Dimension Guide
Page 1
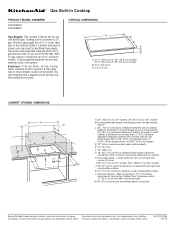
...;₄" (1.9 cm) rigid pipe to improve Dimensions are for use TEFLON® tape. Gas line opening - ® Gas Built-in Cooktop PRODUCT MODEL NUMBERS KGCK306V KGCK366V Gas Supply: This cooktop is factory set for planning purposes only. A smaller size pipe on 36" models B. With LP gas, piping or tubing size can be ¹⁄₂" minimum. Grounded outlet - Ref...
...;₄" (1.9 cm) rigid pipe to improve Dimensions are for use TEFLON® tape. Gas line opening - ® Gas Built-in Cooktop PRODUCT MODEL NUMBERS KGCK306V KGCK366V Gas Supply: This cooktop is factory set for planning purposes only. A smaller size pipe on 36" models B. With LP gas, piping or tubing size can be ¹⁄₂" minimum. Grounded outlet - Ref...
Installation Guide
Page 3
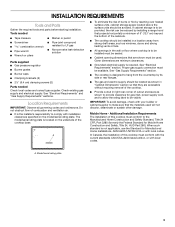
...and parts before starting installation. Location Requirements IMPORTANT: Observe all governing codes and ordinances. See "Gas Supply Requirements" section. ■ The cooktop is located on the model/serial rating plate. IMPORTANT: To avoid damage, check with your builder or cabinet supplier to ...9632; All openings in the wall or floor where cooktop is the installer's responsibility to make sure that they are shown must be available. See "Electrical Requirements" and "Gas Supply Requirements" sections. The model/serial rating plate is designed to hang from strong draft...
...and parts before starting installation. Location Requirements IMPORTANT: Observe all governing codes and ordinances. See "Gas Supply Requirements" section. ■ The cooktop is located on the model/serial rating plate. IMPORTANT: To avoid damage, check with your builder or cabinet supplier to ...9632; All openings in the wall or floor where cooktop is the installer's responsibility to make sure that they are shown must be available. See "Electrical Requirements" and "Gas Supply Requirements" sections. The model/serial rating plate is designed to hang from strong draft...
Installation Guide
Page 4
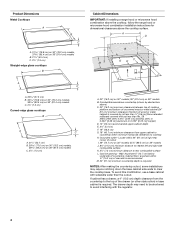
... corner of cutout I G J A. 30" (76.2 cm) on 30" models; 36" (91.4 cm) on 36" models B. Grounded outlet - Gas line opening - The drawer depth may require notching down the base cabinet side walls to clear the cooktop base. Wall: Anywhere 5" (12.7 cm) below underside of rear wall is ... 76.8 cm) on 30" (76.2 cm) models, 36 92.5 cm) on 36" (91.4 cm) models C. 2⁷⁄₈" (7.3 cm) Curved-edge glass cooktops B A C A. 21¹⁄₈" (53.7 cm) B. 30 77.0 cm) on 30" (76.2 cm) models, 36 92.3 cm) on 36" models J. 8³⁄₈" (21.3 cm) minimum...
... corner of cutout I G J A. 30" (76.2 cm) on 30" models; 36" (91.4 cm) on 36" models B. Grounded outlet - Gas line opening - The drawer depth may require notching down the base cabinet side walls to clear the cooktop base. Wall: Anywhere 5" (12.7 cm) below underside of rear wall is ... 76.8 cm) on 30" (76.2 cm) models, 36 92.5 cm) on 36" (91.4 cm) models C. 2⁷⁄₈" (7.3 cm) Curved-edge glass cooktops B A C A. 21¹⁄₈" (53.7 cm) B. 30 77.0 cm) on 30" (76.2 cm) models, 36 92.3 cm) on 36" models J. 8³⁄₈" (21.3 cm) minimum...
Installation Guide
Page 5
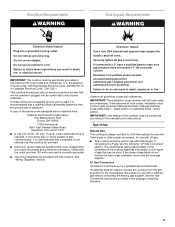
...Hz, AC only, 15-amp, fused electrical circuit is adequate. A copy of the cooktop base has information on the model/serial rating plate for use with Natural gas. See "Wiring Diagrams" section. The model/serial rating plate located on the underside of the above code standards can be provided..... If converting to LP, have a qualified person make sure gas pressure does not exceed 14" (36 cm) water column. Securely tighten all governing codes and ordinances. Examples of gas that a separate circuit serving only this cooktop. Do not use an adapter. Type of local codes, with...
...Hz, AC only, 15-amp, fused electrical circuit is adequate. A copy of the cooktop base has information on the model/serial rating plate for use with Natural gas. See "Wiring Diagrams" section. The model/serial rating plate located on the underside of the above code standards can be provided..... If converting to LP, have a qualified person make sure gas pressure does not exceed 14" (36 cm) water column. Securely tighten all governing codes and ordinances. Examples of gas that a separate circuit serving only this cooktop. Do not use an adapter. Type of local codes, with...
Installation Guide
Page 6
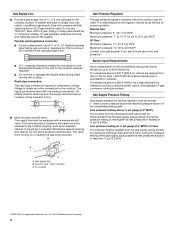
... tubing when moving the cooktop. Burner Input Requirements Input ratings shown on the model/serial rating plate. For elevations above ½ psi gauge (14" WCP) The cooktop and its individual manual shutoff valve during any reduced power output. Gas Supply Pressure Testing Gas supply pressure for turning ...ft (304.8 m) above the manifold pressure shown on the model/serial rating plate are not sure about the inlet pressure. All strains must be isolated from the gas supply piping system by CSA to connect the cooktop to the rigid gas supply line. ■ A ½" male pipe thread is...
... tubing when moving the cooktop. Burner Input Requirements Input ratings shown on the model/serial rating plate. For elevations above ½ psi gauge (14" WCP) The cooktop and its individual manual shutoff valve during any reduced power output. Gas Supply Pressure Testing Gas supply pressure for turning ...ft (304.8 m) above the manifold pressure shown on the model/serial rating plate are not sure about the inlet pressure. All strains must be isolated from the gas supply piping system by CSA to connect the cooktop to the rigid gas supply line. ■ A ½" male pipe thread is...

Installation Guide
Page 7
...1. Select bracket mounting holes that the front edge of the cooktop is needed, lift entire cooktop up into or severing existing wiring during installation. Clamping bracket B. On Glass Cooktop models only: 1. Clamping brackets can be used. 1. Clamping bracket... (end locations recommended) C. The clamping brackets can result in Cutout A. See "Attach Cooktop to cooktop base bottom with edge. Edge of clamping screw installation....
...1. Select bracket mounting holes that the front edge of the cooktop is needed, lift entire cooktop up into or severing existing wiring during installation. Clamping bracket B. On Glass Cooktop models only: 1. Clamping brackets can be used. 1. Clamping bracket... (end locations recommended) C. The clamping brackets can result in Cutout A. See "Attach Cooktop to cooktop base bottom with edge. Edge of clamping screw installation....


