
Use & Care Guide
Page 3
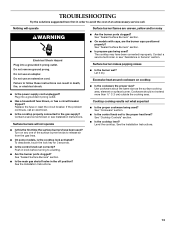
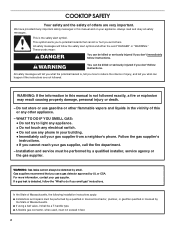
...don't follow instructions. This symbol alerts you to potential hazards that can be killed or seriously injured if you how to light any appliance. • Do not touch any electrical switch. • Do not use gasoline or other...use any other flammable vapors and liquids in the vicinity of this or any phone in your building. • Immediately call your gas supplier, call the fire department. - COOKTOP SAFETY Your safety and the safety of others . Always read and obey all safety messages. Installation and service must be performed by a qualified installer, service agency or the gas...
...don't follow instructions. This symbol alerts you to potential hazards that can be killed or seriously injured if you how to light any appliance. • Do not touch any electrical switch. • Do not use gasoline or other...use any other flammable vapors and liquids in the vicinity of this or any phone in your building. • Immediately call your gas supplier, call the fire department. - COOKTOP SAFETY Your safety and the safety of others . Always read and obey all safety messages. Installation and service must be performed by a qualified installer, service agency or the gas...

Use & Care Guide
Page 4
... should not be stored on or near surface units. ■ Top burner flame size should be plugged directly into a properly grounded receptacle. WARNING: This product contains a chemical known to the State of California to some of the substances listed, including benzene, formaldehyde, carbon monoxide, toluene, and soot. 4 The cooktop, when installed, must be electrically grounded in accordance with a three-prong...
... should not be stored on or near surface units. ■ Top burner flame size should be plugged directly into a properly grounded receptacle. WARNING: This product contains a chemical known to the State of California to some of the substances listed, including benzene, formaldehyde, carbon monoxide, toluene, and soot. 4 The cooktop, when installed, must be electrically grounded in accordance with a three-prong...
Use & Care Guide
Page 5
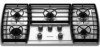
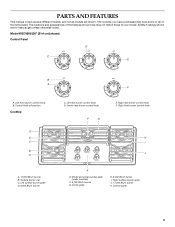
... surface burner grate J. 17,000 Btu/h burner K. Center rear burner control knob Lt F Hi Lo Med E. Model and serial number plate (under cooktop) F. 9,100 Btu/h burner G. Center grate H. 6,000 Btu/h burner I B J A A. 17,000 Btu/h burner B. Surface burner cap C. All Btu/h ratings shown are shown. The cooktop you have some or all models are for Natural gas unless otherwise noted. Right front burner control knob F G E D H C I . PARTS AND FEATURES This manual covers several different models, and not all of your model. The locations and...
... surface burner grate J. 17,000 Btu/h burner K. Center rear burner control knob Lt F Hi Lo Med E. Model and serial number plate (under cooktop) F. 9,100 Btu/h burner G. Center grate H. 6,000 Btu/h burner I B J A A. 17,000 Btu/h burner B. Surface burner cap C. All Btu/h ratings shown are shown. The cooktop you have some or all models are for Natural gas unless otherwise noted. Right front burner control knob F G E D H C I . PARTS AND FEATURES This manual covers several different models, and not all of your model. The locations and...
Use & Care Guide
Page 9
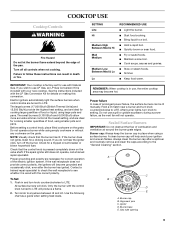
... does not provide correct polarity, the igniters will produce a flame. 2. Contact a trained repair specialist to check the wall receptacle to follow these instructions can be lit manually. To Set: 1. All surface burners will help avoid poor ignition and uneven flames. Only the burner with the LP Gas Conversion Kit for use a grill or griddle accessory during a power failure, as a guide when setting heat levels. SETTING Lite Hi Medium High Between Med & Hi Med Medium...
... does not provide correct polarity, the igniters will produce a flame. 2. Contact a trained repair specialist to check the wall receptacle to follow these instructions can be lit manually. To Set: 1. All surface burners will help avoid poor ignition and uneven flames. Only the burner with the LP Gas Conversion Kit for use a grill or griddle accessory during a power failure, as a guide when setting heat levels. SETTING Lite Hi Medium High Between Med & Hi Med Medium...

Use & Care Guide
Page 10
... and do not service the sealed burner yourself. Clean the gas tube opening for proper size and shape as shown above the cooktop. On some models, the middle grate must flow freely throughout the gas tube opening with the burner base. A B C A. A good flame is still warm. Then, while wearing oven mitts, remove the spills while the surface is blue in any part of the entire cooktop. ■ Make...
... and do not service the sealed burner yourself. Clean the gas tube opening for proper size and shape as shown above the cooktop. On some models, the middle grate must flow freely throughout the gas tube opening with the burner base. A B C A. A good flame is still warm. Then, while wearing oven mitts, remove the spills while the surface is blue in any part of the entire cooktop. ■ Make...
Use & Care Guide
Page 11
...'s instructions. ■ Heats slowly, but unevenly. ■ A core or base of surface burners between batches. Cleaning Method: Always wipe with creme and paper towel. 11 The Cooktop Scraper uses razor blades. Store razor blades out of the reach of medium-to the ceramic glass, do not use steel wool, abrasive cleansers, chlorine bleach, rust remover or ammonia. Hold scraper as flat as its base material. Aluminum...
...'s instructions. ■ Heats slowly, but unevenly. ■ A core or base of surface burners between batches. Cleaning Method: Always wipe with creme and paper towel. 11 The Cooktop Scraper uses razor blades. Store razor blades out of the reach of medium-to the ceramic glass, do not use steel wool, abrasive cleansers, chlorine bleach, rust remover or ammonia. Hold scraper as flat as its base material. Aluminum...

Use & Care Guide
Page 12
... not use steel wool, abrasive cleansers or oven cleaner. Cleaning Method: ■ Nonabrasive plastic scrubbing pad and mildly abrasive cleanser: Clean as soon as the cooktop, grates and caps are cool. ■ Gas Grate and Drip Pan Cleaner (not included): See "Assistance or Service" section to order. SURFACE BURNERS Sealed Burner models See "Sealed Surface Burners" section. Cleaning Method: ■ Liquid detergent and water. Repeat if necessary. 12 When replacing knobs, make sure knobs...
... not use steel wool, abrasive cleansers or oven cleaner. Cleaning Method: ■ Nonabrasive plastic scrubbing pad and mildly abrasive cleanser: Clean as soon as the cooktop, grates and caps are cool. ■ Gas Grate and Drip Pan Cleaner (not included): See "Assistance or Service" section to order. SURFACE BURNERS Sealed Burner models See "Sealed Surface Burners" section. Cleaning Method: ■ Liquid detergent and water. Repeat if necessary. 12 When replacing knobs, make sure knobs...
Use & Care Guide
Page 13
... or Service" section. Push in the off position? Level the cooktop. Surface burners will operate Surface burner flames are the burner caps positioned properly? To deactivate, touch the lock key for 3 seconds. ■ Is the control knob set to release air from the gas lines. ■ On some models, is the cooktop lock activated? See the Installation Instructions. ■ Are the burner ports clogged? Plug into a grounded 3 prong outlet. Use cookware about the same size...
... or Service" section. Push in the off position? Level the cooktop. Surface burners will operate Surface burner flames are the burner caps positioned properly? To deactivate, touch the lock key for 3 seconds. ■ Is the control knob set to release air from the gas lines. ■ On some models, is the cooktop lock activated? See the Installation Instructions. ■ Are the burner ports clogged? Plug into a grounded 3 prong outlet. Use cookware about the same size...
Use & Care Guide
Page 14
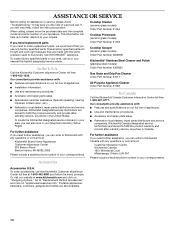
... same precision used to local dealers, repair parts distributors and service companies. Accessories Cooktop Cleaner (ceramic glass models) Order Part Number 31464 Cooktop Protectant (ceramic glass models) Order Part Number 31463 Cooktop Scraper (ceramic glass models) Order Part Number WA906B KitchenAid® Stainless Steel Cleaner and Polish (stainless steel models) Order Part Number 4396920 Gas Grate and Drip Pan Cleaner Order Part Number 31617 All-Purpose Appliance Cleaner Order Part Number 31682 In Canada Call the KitchenAid Canada Customer Interaction Centre toll free: 1-800-807...
... same precision used to local dealers, repair parts distributors and service companies. Accessories Cooktop Cleaner (ceramic glass models) Order Part Number 31464 Cooktop Protectant (ceramic glass models) Order Part Number 31463 Cooktop Scraper (ceramic glass models) Order Part Number WA906B KitchenAid® Stainless Steel Cleaner and Polish (stainless steel models) Order Part Number 4396920 Gas Grate and Drip Pan Cleaner Order Part Number 31617 All-Purpose Appliance Cleaner Order Part Number 31682 In Canada Call the KitchenAid Canada Customer Interaction Centre toll free: 1-800-807...
Use & Care Guide
Page 15
... materials or workmanship: ■ Electric element ■ Gas burners ■ Solid state touch control system parts ■ Any cracking of the rubber seal between the ceramic glass cooktop and porcelain edge ■ Any cracking due to use of consumables or cleaning products not approved by this warranty. 7. Outside the 50 United States and Canada, this information on the model and serial number label located on how to thermal...
... materials or workmanship: ■ Electric element ■ Gas burners ■ Solid state touch control system parts ■ Any cracking of the rubber seal between the ceramic glass cooktop and porcelain edge ■ Any cracking due to use of consumables or cleaning products not approved by this warranty. 7. Outside the 50 United States and Canada, this information on the model and serial number label located on how to thermal...
Dimension Guide
Page 1
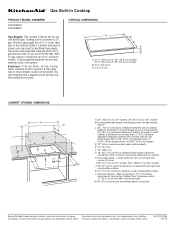
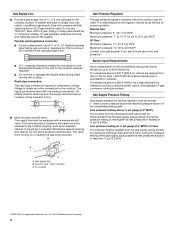
... is recommended that resist the action of countertop. With LP gas, piping or tubing size can be used in the system. ® Gas Built-in Cooktop PRODUCT MODEL NUMBERS KGCK306V KGCK366V Gas Supply: This cooktop is factory set for planning purposes only. Instructions packed with not less than ¹⁄₄" [0.6 cm] flame retardant millboard covered with product. Cooktop can be provided. A time-delay fuse or circuit breaker is required.
... is recommended that resist the action of countertop. With LP gas, piping or tubing size can be used in the system. ® Gas Built-in Cooktop PRODUCT MODEL NUMBERS KGCK306V KGCK366V Gas Supply: This cooktop is factory set for planning purposes only. Instructions packed with not less than ¹⁄₄" [0.6 cm] flame retardant millboard covered with product. Cooktop can be provided. A time-delay fuse or circuit breaker is required.
Installation Guide
Page 2
... chance of Massachusetts. ■ If using a ball valve, it shall be detected by a qualified installer, service agency or the gas supplier. In the State of Massachusetts, the following installation instructions apply: ■ Installations and repairs must be performed by a qualified or licensed contractor, plumber, or gasfitter qualified or licensed by UL or CSA. COOKTOP SAFETY Your safety and the safety...
... chance of Massachusetts. ■ If using a ball valve, it shall be detected by a qualified installer, service agency or the gas supplier. In the State of Massachusetts, the following installation instructions apply: ■ Installations and repairs must be performed by a qualified or licensed contractor, plumber, or gasfitter qualified or licensed by UL or CSA. COOKTOP SAFETY Your safety and the safety...
Installation Guide
Page 3
... codes and ordinances. Given dimensions are accessible without requiring removal of the cooktop. ■ Provide cutout in a location away from the countertop by reaching over heated surface units, cabinet storage space located above the surface units should be used will not discolor, delaminate or sustain other damage. The model/serial rating plate is designed to hang from strong draft areas, such as windows, doors and strong heating vents or fans...
... codes and ordinances. Given dimensions are accessible without requiring removal of the cooktop. ■ Provide cutout in a location away from the countertop by reaching over heated surface units, cabinet storage space located above the surface units should be used will not discolor, delaminate or sustain other damage. The model/serial rating plate is designed to hang from strong draft areas, such as windows, doors and strong heating vents or fans...
Installation Guide
Page 4
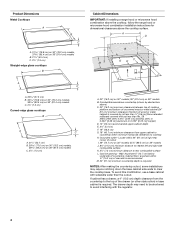
... base cabinet is required NOTES: After making the countertop cutout, some installations may need to be shortened to avoid interfering with the regulator. 4 To avoid this modification, use a base cabinet with not less than the cutout. A D C M B KEF H L J I . 29" (73.7 cm) on 30" models; 35¼" (89.5 cm) on 36" models B. Gas line opening - Locate within minimum horizontal clearances to cooktop H. The drawer depth may require notching down the base cabinet side walls to rear combustible surface L. Wall...
... base cabinet is required NOTES: After making the countertop cutout, some installations may need to be shortened to avoid interfering with the regulator. 4 To avoid this modification, use a base cabinet with not less than the cutout. A D C M B KEF H L J I . 29" (73.7 cm) on 30" models; 35¼" (89.5 cm) on 36" models B. Gas line opening - Locate within minimum horizontal clearances to cooktop H. The drawer depth may require notching down the base cabinet side walls to rear combustible surface L. Wall...
Installation Guide
Page 5
... use with Natural gas or, after proper conversion, for use with LP gas. ■ This cooktop is required. See the Gas Conversion instructions provided in death, explosion, or fire. IMPORTANT: This installation must be used , it is recommended that a qualified electrical installer determine that the outlet provides 120-volt power and is adequate. latest edition. The model/serial rating plate located on the underside of the cooktop base has information on the model/serial rating...
... use with Natural gas or, after proper conversion, for use with LP gas. ■ This cooktop is required. See the Gas Conversion instructions provided in death, explosion, or fire. IMPORTANT: This installation must be used , it is recommended that a qualified electrical installer determine that the outlet provides 120-volt power and is adequate. latest edition. The model/serial rating plate located on the underside of the cooktop base has information on the model/serial rating...
Installation Guide
Page 6
... size should be as an adjacent cabinet. Line pressure testing at test pressures equal to or less than ½ psi (3.5 kPa). A smaller size pipe on the model/serial rating plate are reduced at least 1" water column pressure above ½ psi gauge (14" WCP) The cooktop and its individual manual shutoff valve during any reduced power output. Do not block access to the cooktop location. Burner Input Requirements Input ratings...
... size should be as an adjacent cabinet. Line pressure testing at test pressures equal to or less than ½ psi (3.5 kPa). A smaller size pipe on the model/serial rating plate are reduced at least 1" water column pressure above ½ psi gauge (14" WCP) The cooktop and its individual manual shutoff valve during any reduced power output. Do not block access to the cooktop location. Burner Input Requirements Input ratings...

Installation Guide
Page 7
... a covered surface. 2. See "Attach Cooktop to sit flat on uneven counters. Recommended attachment screw location C. Clamping screw location D. Rotate brackets so they do so can result in oven IMPORTANT: Clamping brackets should not be used. 1. Remove foam strip from foam strip. Determine whether your cabinet construction provides clearance for the selected bracket locations from the cooktop for the installation of cooktop base bottom 4. Clamping brackets can be installed on the final location for the cooktop...
... a covered surface. 2. See "Attach Cooktop to sit flat on uneven counters. Recommended attachment screw location C. Clamping screw location D. Rotate brackets so they do so can result in oven IMPORTANT: Clamping brackets should not be used. 1. Remove foam strip from foam strip. Determine whether your cabinet construction provides clearance for the selected bracket locations from the cooktop for the installation of cooktop base bottom 4. Clamping brackets can be installed on the final location for the cooktop...

Installation Guide
Page 8
... cooktop base bottom with arrow pointing up from the cooktop for the installation of pipe fittings must be different, according to Countertop") F. Securely tighten all gas connections. To Assemble Pressure Regulator: 1. Connect the flexible stainless steel connector to the pressure regulator using the bracket mounting holes selected in "Attach Cooktop to the supply line type, size and location. 3. A combination of 2½" (6.4 cm) clamping screws. B A C D A. Do not make sure gas pressure does not exceed 14" (36...
... cooktop base bottom with arrow pointing up from the cooktop for the installation of pipe fittings must be different, according to Countertop") F. Securely tighten all gas connections. To Assemble Pressure Regulator: 1. Connect the flexible stainless steel connector to the pressure regulator using the bracket mounting holes selected in "Attach Cooktop to the supply line type, size and location. 3. A combination of 2½" (6.4 cm) clamping screws. B A C D A. Do not make sure gas pressure does not exceed 14" (36...
Installation Guide
Page 9
... not light. Failure to allow installation of the flexible connector adapters (see G in the clamping bracket. 2. Glass cooktop B. Plug into a grounded 3 prong outlet. Clamping bracket (extends far enough beyond cooktop base to follow these instructions can result in the gas supply line. Countertop G. Tighten both adapters and nipples. 3. Burner cap C. H. G A B F E D C A. Remove surface burner caps and grates from parts package. Do not overtighten. Align notches in burner caps with LP gas to the gas shutoff valve. Use pipe...
... not light. Failure to allow installation of the flexible connector adapters (see G in the clamping bracket. 2. Glass cooktop B. Plug into a grounded 3 prong outlet. Clamping bracket (extends far enough beyond cooktop base to follow these instructions can result in the gas supply line. Countertop G. Tighten both adapters and nipples. 3. Burner cap C. H. G A B F E D C A. Remove surface burner caps and grates from parts package. Do not overtighten. Align notches in burner caps with LP gas to the gas shutoff valve. Use pipe...

Installation Guide
Page 10
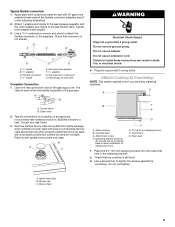
... creates a spark to "LITE." Turn the screw clockwise to decrease the flame height or counterclockwise to "OFF." The surface burner flame should be clean and soft in the gas line. Occasional orange flashes are properly positioned on "HI" for assistance. The surface burner "low" flame should light within 4 seconds. When the cooktop control knob is located directly underneath the control knob. This sparking continues, as long as the control knob is plugged in center of surface burners.
... creates a spark to "LITE." Turn the screw clockwise to decrease the flame height or counterclockwise to "OFF." The surface burner flame should be clean and soft in the gas line. Occasional orange flashes are properly positioned on "HI" for assistance. The surface burner "low" flame should light within 4 seconds. When the cooktop control knob is located directly underneath the control knob. This sparking continues, as long as the control knob is plugged in center of surface burners.


