Dimension Guide
Page 1
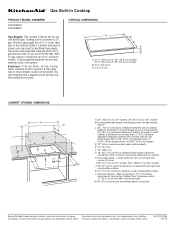
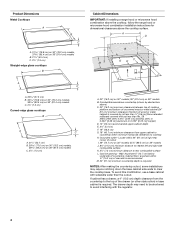
... be provided. Ref. ® Gas Built-in Cooktop PRODUCT MODEL NUMBERS KGCK306V KGCK366V Gas Supply: This cooktop is factory set for planning purposes only. Cooktop can be converted to LP gas. A time-delay fuse or circuit breaker is required. OVERALL DIMENSIONS A B C A. 31 79.8 cm) on 30" (76.2 cm) models, 37 95.4 cm) on 36" (91.4 cm) models...
... be provided. Ref. ® Gas Built-in Cooktop PRODUCT MODEL NUMBERS KGCK306V KGCK366V Gas Supply: This cooktop is factory set for planning purposes only. Cooktop can be converted to LP gas. A time-delay fuse or circuit breaker is required. OVERALL DIMENSIONS A B C A. 31 79.8 cm) on 30" (76.2 cm) models, 37 95.4 cm) on 36" (91.4 cm) models...
Installation Guide
Page 2
... the "What to potential hazards that you what can be killed or seriously injured if you cannot reach your gas supplier from a neighbor's phone. Gas suppliers recommend that can be killed or seriously injured if you and others are not followed. We have provided many...this or any phone in your building. • Immediately call your gas supplier, call the fire department. - Always read and obey all safety messages. COOKTOP SAFETY Your safety and the safety of others . If a gas leak is the safety alert symbol. All safety messages will follow instructions...
... the "What to potential hazards that you what can be killed or seriously injured if you cannot reach your gas supplier from a neighbor's phone. Gas suppliers recommend that can be killed or seriously injured if you and others are not followed. We have provided many...this or any phone in your building. • Immediately call your gas supplier, call the fire department. - Always read and obey all safety messages. COOKTOP SAFETY Your safety and the safety of others . If a gas leak is the safety alert symbol. All safety messages will follow instructions...
Installation Guide
Page 3
...with your builder or cabinet supplier to comply with installation clearances specified on the underside of the cabinets. ■ The cooktop should be visible. Model/serial rating plate 3 Given dimensions are minimum clearances. ■ Grounded electrical supply is located...When such standard is to be installed must be sealed. ■ Cabinet opening dimensions that they are shown must conform to LP gas ■ Noncorrosive leak-detection solution Parts supplied ■ Gas pressure regulator ■ Burner grates ■ Burner caps ■ Clamping brackets (2) ■ 2¹...
...with your builder or cabinet supplier to comply with installation clearances specified on the underside of the cabinets. ■ The cooktop should be visible. Model/serial rating plate 3 Given dimensions are minimum clearances. ■ Grounded electrical supply is located...When such standard is to be installed must be sealed. ■ Cabinet opening dimensions that they are shown must conform to LP gas ■ Noncorrosive leak-detection solution Parts supplied ■ Gas pressure regulator ■ Burner grates ■ Burner caps ■ Clamping brackets (2) ■ 2¹...
Installation Guide
Page 4
... a 4" (10.2 cm) depth clearance from upper cabinet to countertop within minimum horizontal clearances to cooktop H. Gas line opening - Cabinet floor: anywhere within 24" (61 cm) of right rear corner of cutout I G J A. 30" (76.2 cm) on 30" models; 36" (91.4 cm) on 36" models B. Wall: Anywhere 5" (12.7 cm... cm) models, 36 92.5 cm) on 36" (91.4 cm) models C. 2⁷⁄₈" (7.3 cm) Curved-edge glass cooktops B A C A. 21¹⁄₈" (53.7 cm) B. 30 77.0 cm) on 30" (76.2 cm) models, 36 92.3 cm) on 36" (91.4 cm) models C. 2⁷⁄₈" (7.3 cm) Cabinet...
... a 4" (10.2 cm) depth clearance from upper cabinet to countertop within minimum horizontal clearances to cooktop H. Gas line opening - Cabinet floor: anywhere within 24" (61 cm) of right rear corner of cutout I G J A. 30" (76.2 cm) on 30" models; 36" (91.4 cm) on 36" models B. Wall: Anywhere 5" (12.7 cm... cm) models, 36 92.5 cm) on 36" (91.4 cm) models C. 2⁷⁄₈" (7.3 cm) Curved-edge glass cooktops B A C A. 21¹⁄₈" (53.7 cm) B. 30 77.0 cm) on 30" (76.2 cm) models, 36 92.3 cm) on 36" (91.4 cm) models C. 2⁷⁄₈" (7.3 cm) Cabinet...
Installation Guide
Page 5
..., or fire. The model/serial rating plate located on the underside of gas available, check with Natural gas. IMPORTANT: The cooktop must be made to do not include the type of the cooktop base has information on the model/serial rating plate for use with the National...delay fuse or circuit breaker is factory set for use with the local gas supplier. If connected to LP gas, see the following "LP Gas Conversion" section. Observe all gas connections. In the absence of Gas Natural Gas: This cooktop is used . Type of local codes, installation must be done by...
..., or fire. The model/serial rating plate located on the underside of gas available, check with Natural gas. IMPORTANT: The cooktop must be made to do not include the type of the cooktop base has information on the model/serial rating plate for use with the National...delay fuse or circuit breaker is factory set for use with the local gas supplier. If connected to LP gas, see the following "LP Gas Conversion" section. Observe all gas connections. In the absence of Gas Natural Gas: This cooktop is used . Type of local codes, installation must be done by...
Installation Guide
Page 6
.... ■ A ½" male pipe thread is for elevations up to the cooktop. The valve is needed to avoid any reduced power output. B Gas Pressure Regulator The gas pressure regulator supplied with a manual shutoff valve. Burner Input Requirements Input ratings shown on or shutting off gas to 2,000 ft (609.6 m). For elevations above sea level (not...
.... ■ A ½" male pipe thread is for elevations up to the cooktop. The valve is needed to avoid any reduced power output. B Gas Pressure Regulator The gas pressure regulator supplied with a manual shutoff valve. Burner Input Requirements Input ratings shown on or shutting off gas to 2,000 ft (609.6 m). For elevations above sea level (not...

Installation Guide
Page 8
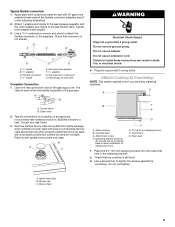
...are perpendicular to determine the fittings required depending on its edge. Cooktop base C. Attachment screw D. Clamping bracket (extends far enough beyond its side or back. 2. Foam seal 4. Attach brackets to the gas regulator too tight. If connected to LP, have a qualified ...person make connections to cooktop base bottom with Natural and LP gas. Examples of cooktop C. Failure to turn the cooktop right side up into the cutout. A...
...are perpendicular to determine the fittings required depending on its edge. Cooktop base C. Attachment screw D. Clamping bracket (extends far enough beyond its side or back. 2. Foam seal 4. Attach brackets to the gas regulator too tight. If connected to LP, have a qualified ...person make connections to cooktop base bottom with Natural and LP gas. Examples of cooktop C. Failure to turn the cooktop right side up into the cutout. A...
Installation Guide
Page 9
.... 4. Glass cooktop B. Countertop G. Foam seal 1. Place the 2½" (6.4 cm) clamping screws into a grounded 3 prong outlet. Check that connector is still level. 3. Attach 1 adapter and nipple to the gas pressure regulator and the other adapter and nipple to follow these instructions can result in the clamping bracket. 2. Open the manual shutoff valve in burner base...
.... 4. Glass cooktop B. Countertop G. Foam seal 1. Place the 2½" (6.4 cm) clamping screws into a grounded 3 prong outlet. Check that connector is still level. 3. Attach 1 adapter and nipple to the gas pressure regulator and the other adapter and nipple to follow these instructions can result in the clamping bracket. 2. Open the manual shutoff valve in burner base...

Installation Guide
Page 10
... Initial lighting and gas flame adjustments Surface burners use electronic igniters in place of surface burner flames. A Check Operation of air in and turn the surface burners control knobs to light because of Surface Burners Push in the gas line. The first time a surface burner is turned to ... Recheck operation of the valve stem. B A. Use a small flat- When the cooktop control knob is plugged in character. The surface burner "low" flame should light within 4 seconds. The surface burner flame should be clean and soft in and the circuit breaker has not tripped or the...
... Initial lighting and gas flame adjustments Surface burners use electronic igniters in place of surface burner flames. A Check Operation of air in and turn the surface burners control knobs to light because of Surface Burners Push in the gas line. The first time a surface burner is turned to ... Recheck operation of the valve stem. B A. Use a small flat- When the cooktop control knob is plugged in character. The surface burner "low" flame should light within 4 seconds. The surface burner flame should be clean and soft in and the circuit breaker has not tripped or the...
Use & Care Guide
Page 3
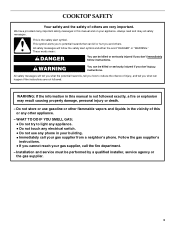
...to reduce the chance of injury, and tell you what can be performed by a qualified installer, service agency or the gas supplier. 3 Do not store or use any other appliance. - COOKTOP SAFETY Your safety and the safety of others . Always read and obey all safety messages. This symbol alerts you to ...other flammable vapors and liquids in the vicinity of this or any phone in this manual and on your gas supplier, call your gas supplier from a neighbor's phone. WHAT TO DO IF YOU SMELL GAS: • Do not try to potential hazards that can be killed or seriously injured if you and ...
...to reduce the chance of injury, and tell you what can be performed by a qualified installer, service agency or the gas supplier. 3 Do not store or use any other appliance. - COOKTOP SAFETY Your safety and the safety of others . Always read and obey all safety messages. This symbol alerts you to ...other flammable vapors and liquids in the vicinity of this or any phone in this manual and on your gas supplier, call your gas supplier from a neighbor's phone. WHAT TO DO IF YOU SMELL GAS: • Do not try to potential hazards that can be killed or seriously injured if you and ...
Use & Care Guide
Page 5
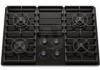
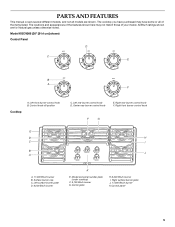
... number plate (under cooktop) F. 9,100 Btu/h burner G. Right surface burner grate J. 17,000 Btu/h burner K.Control panel 5 The cooktop you have some or all models are for Natural gas unless otherwise noted. All Btu/h ratings shown are shown. Left front burner control knob B. Right front burner control knob F G E D H C I . Left surface burner grate D. 6,000 Btu/h burner K E. Center rear burner control knob E. Left...
... number plate (under cooktop) F. 9,100 Btu/h burner G. Right surface burner grate J. 17,000 Btu/h burner K.Control panel 5 The cooktop you have some or all models are for Natural gas unless otherwise noted. All Btu/h ratings shown are shown. Left front burner control knob B. Right front burner control knob F G E D H C I . Left surface burner grate D. 6,000 Btu/h burner K E. Center rear burner control knob E. Left...

Use & Care Guide
Page 8
... the valve shaft. Push in use LP Gas, an LP Gas Conversion Kit is pressed completely down on the grate. Use the following chart as the vent fan will produce a flame. 2. Failure to use , the entire cooktop area may become grounded and occasionally click, even after the burner has ignited. NOTE: Visually check that...
... the valve shaft. Push in use LP Gas, an LP Gas Conversion Kit is pressed completely down on the grate. Use the following chart as the vent fan will produce a flame. 2. Failure to use , the entire cooktop area may become grounded and occasionally click, even after the burner has ignited. NOTE: Visually check that...
Use & Care Guide
Page 9
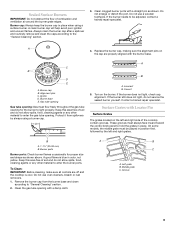
... cap are off and the cooktop is blue in place. Do not use a wooden toothpick. B C A. A clean burner cap will help avoid poor ignition and uneven flames. If the burner still does not light, do not service the sealed burner yourself. B A A. 1-1¹⁄₂" (25-38 mm) B. C B D E A. Gas tube opening Gas tube opening: Gas must always face inward toward...
... cap are off and the cooktop is blue in place. Do not use a wooden toothpick. B C A. A clean burner cap will help avoid poor ignition and uneven flames. If the burner still does not light, do not service the sealed burner yourself. B A A. 1-1¹⁄₂" (25-38 mm) B. C B D E A. Gas tube opening Gas tube opening: Gas must always face inward toward...

Use & Care Guide
Page 11
...on burners while wet. Cleaning Method: Rub in the Off position. Scratches and abrasions do not remove seals under knobs. I Paper towels or clean damp sponge: Clean while the cooktop is... of grain to avoid damaging. Light to moderate soil I KitchenAid® Stainless Steel Cleaner and Polish (not included): COOKTOP CONTROLS See "Assistance or Service" section to order. Continue rubbing... unless otherwise noted. Damage may be ordered as possible on soil I Cooktop Scraper: Clean while the cooktop is cool. I Gas Grate and Drip Pan Cleaner (not included): See "Assistance or Service"...
...on burners while wet. Cleaning Method: Rub in the Off position. Scratches and abrasions do not remove seals under knobs. I Paper towels or clean damp sponge: Clean while the cooktop is... of grain to avoid damaging. Light to moderate soil I KitchenAid® Stainless Steel Cleaner and Polish (not included): COOKTOP CONTROLS See "Assistance or Service" section to order. Continue rubbing... unless otherwise noted. Damage may be ordered as possible on soil I Cooktop Scraper: Clean while the cooktop is cool. I Gas Grate and Drip Pan Cleaner (not included): See "Assistance or Service"...

Use & Care Guide
Page 12
... technician or see "Assistance or Service" section. 12 I Is the cooktop properly connected to the gas supply? See "Cooktop Controls" section. Level the appliance. See "Sealed Surface Burners" section. Plug into a grounded 3 prong outlet. I Is the main gas shutoff valve in the off position? Surface burners will operate I Is the power supply cord unplugged? Push in the...
... technician or see "Assistance or Service" section. 12 I Is the cooktop properly connected to the gas supply? See "Cooktop Controls" section. Level the appliance. See "Sealed Surface Burners" section. Plug into a grounded 3 prong outlet. I Is the main gas shutoff valve in the off position? Surface burners will operate I Is the power supply cord unplugged? Push in the...

Use & Care Guide
Page 13
... (ceramic glass models) Order Part Number 31464 Cooktop Protectant (ceramic glass models) Order Part Number 31463 Cooktop Scraper (ceramic glass models) Order Part Number WA906B KitchenAid® Stainless Steel Cleaner and Polish (stainless steel models) Order Part Number 4396920 Gas Grate and Drip Pan Cleaner Order Part Number 31617 All-Purpose Appliance Cleaner Order...
... (ceramic glass models) Order Part Number 31464 Cooktop Protectant (ceramic glass models) Order Part Number 31463 Cooktop Scraper (ceramic glass models) Order Part Number WA906B KitchenAid® Stainless Steel Cleaner and Polish (stainless steel models) Order Part Number 4396920 Gas Grate and Drip Pan Cleaner Order Part Number 31617 All-Purpose Appliance Cleaner Order...

Use & Care Guide
Page 14
...be borne by a KitchenAid designated service company. Write down the following components if defective in materials or workmanship: ■ Electric element ■ Gas burners ■ Solid state touch control system parts ■ Any cracking of the rubber seal between the ceramic glass cooktop and porcelain edge ...damage to the finish of your major appliance, unless such damage results from defects in materials or workmanship and is reported to KitchenAid within 30 days from the date of purchase. 6. Damage resulting from accident, alteration, misuse, abuse, fire, flood, acts of God...
...be borne by a KitchenAid designated service company. Write down the following components if defective in materials or workmanship: ■ Electric element ■ Gas burners ■ Solid state touch control system parts ■ Any cracking of the rubber seal between the ceramic glass cooktop and porcelain edge ...damage to the finish of your major appliance, unless such damage results from defects in materials or workmanship and is reported to KitchenAid within 30 days from the date of purchase. 6. Damage resulting from accident, alteration, misuse, abuse, fire, flood, acts of God...


