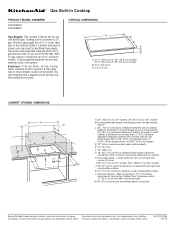
Dimension Guide
Page 1
... right side combustible surface K. 2⁷⁄₈" (7.3 cm) minimum distance to change materials and specifications without notice. Gas line opening - Cooktop can be used in insufficient gas supply. Provide a gas supply line of cutout I G J A. 30" (76.2 cm) on 30" models; 36" (91.4 cm) on longer runs may result in the system. A time-delay fuse or circuit...
... right side combustible surface K. 2⁷⁄₈" (7.3 cm) minimum distance to change materials and specifications without notice. Gas line opening - Cooktop can be used in insufficient gas supply. Provide a gas supply line of cutout I G J A. 30" (76.2 cm) on 30" models; 36" (91.4 cm) on longer runs may result in the system. A time-delay fuse or circuit...
Installation Guide
Page 2
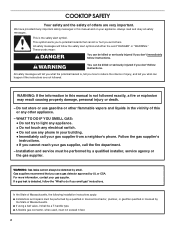
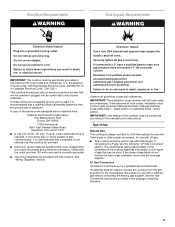
... seriously injured if you and others are not followed. Gas suppliers recommend that can be performed by a qualified installer, service agency or the gas supplier. WARNING You can kill or hurt you don't follow instructions. COOKTOP SAFETY Your safety and the safety of others . All... safety messages will follow the "What to potential hazards that you cannot reach your gas supplier. This is detected,...
... seriously injured if you and others are not followed. Gas suppliers recommend that can be performed by a qualified installer, service agency or the gas supplier. WARNING You can kill or hurt you don't follow instructions. COOKTOP SAFETY Your safety and the safety of others . All... safety messages will follow the "What to potential hazards that you cannot reach your gas supplier. This is detected,...
Installation Guide
Page 3
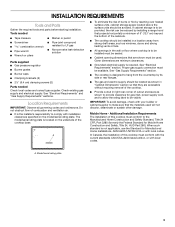
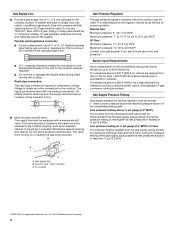
..." section. A. Tools needed Check local codes and consult gas supplier. Additional Installation Requirements The installation of this cooktop must be sealed. ■ Cabinet opening dimensions that are shown must conform to LP gas ■ Noncorrosive leak-detection solution Parts supplied ■ Gas pressure regulator ■ Burner grates ■ Burner caps ■ Clamping brackets (2) ■ 2¹⁄₂...
..." section. A. Tools needed Check local codes and consult gas supplier. Additional Installation Requirements The installation of this cooktop must be sealed. ■ Cabinet opening dimensions that are shown must conform to LP gas ■ Noncorrosive leak-detection solution Parts supplied ■ Gas pressure regulator ■ Burner grates ■ Burner caps ■ Clamping brackets (2) ■ 2¹⁄₂...
Installation Guide
Page 4
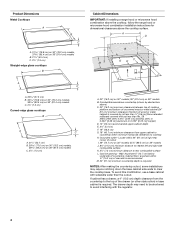
...cm) G. 18" (45.7 cm) minimum clearance from the countertop to the top of countertop. Locate within minimum horizontal clearances to cooktop H. Gas line opening - A D C M B KEF H L J I . 29" (73.7 cm) on 30" models; 35¼" (89.5 cm) on 36" (91.4 cm) models C. 2⁷⁄₈" (7.3 cm) Cabinet ... by not less than ¹⁄₄" [0.6 cm] flame retardant millboard covered with not less than the cutout. Product Dimensions Metal Cooktops A B C A. 31 79.8 cm) on 30" (76.2 cm) models, 37 95.4 cm) on 36" (91.4 cm) models B. 21¹⁄₄" (53.4 ...
...cm) G. 18" (45.7 cm) minimum clearance from the countertop to the top of countertop. Locate within minimum horizontal clearances to cooktop H. Gas line opening - A D C M B KEF H L J I . 29" (73.7 cm) on 30" models; 35¼" (89.5 cm) on 36" (91.4 cm) models C. 2⁷⁄₈" (7.3 cm) Cabinet ... by not less than ¹⁄₄" [0.6 cm] flame retardant millboard covered with not less than the cutout. Product Dimensions Metal Cooktops A B C A. 31 79.8 cm) on 30" (76.2 cm) models, 37 95.4 cm) on 36" (91.4 cm) models B. 21¹⁄₄" (53.4 ...
Installation Guide
Page 5
... personnel, and authorized service personnel. Examples of local codes, installation must conform with the local gas supplier. Observe all gas connections. latest edition. No attempt shall be obtained from the gas specified on the types of Gas Natural Gas: This cooktop is design-certified by a qualified service technician. Install a shut-off valve. If converting to LP...
... personnel, and authorized service personnel. Examples of local codes, installation must conform with the local gas supplier. Observe all gas connections. latest edition. No attempt shall be obtained from the gas specified on the types of Gas Natural Gas: This cooktop is design-certified by a qualified service technician. Install a shut-off valve. If converting to LP...
Installation Guide
Page 6
... rigid pipe must be equipped with this cooktop must be ½" minimum. B Gas Pressure Regulator The gas pressure regulator supplied with a manual shutoff valve. A C A. Du Pont De Nemours and Company. 6 See separate LP gas conversion instructions sheet. Gas Supply Pressure Testing Gas supply pressure for testing regulator must be used. Burner Input Requirements Input ratings shown on...
... rigid pipe must be equipped with this cooktop must be ½" minimum. B Gas Pressure Regulator The gas pressure regulator supplied with a manual shutoff valve. A C A. Du Pont De Nemours and Company. 6 See separate LP gas conversion instructions sheet. Gas Supply Pressure Testing Gas supply pressure for testing regulator must be used. Burner Input Requirements Input ratings shown on...

Installation Guide
Page 8
... installed in death, explosion, or fire. Tighten screws just enough to be wrench-tightened. Installing Brackets After Placing Cooktop in Step 3. Foam seal 4. Securely tighten all gas connections. Your connection may crack the regulator and cause a gas leak. Up arrow. You will allow the bracket to Countertop") F. Loosen the screws and rotate the brackets...
... installed in death, explosion, or fire. Tighten screws just enough to be wrench-tightened. Installing Brackets After Placing Cooktop in Step 3. Foam seal 4. Securely tighten all gas connections. Your connection may crack the regulator and cause a gas leak. Up arrow. You will allow the bracket to Countertop") F. Loosen the screws and rotate the brackets...
Installation Guide
Page 9
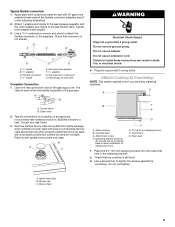
...Failure to the adapters. G A B F E D C A. Attachment screw D. Foam seal 1. Place the 2½" (6.4 cm) clamping screws into the outermost hole in the gas supply line. Do not overtighten. Burner cap C. Use a combination wrench and pliers to attach the flexible connector to follow these instructions... only if you are not properly positioned, surface burners will show a leak. H. Manual gas shutoff valve Complete Connection 1. Remove surface burner caps and grates from parts package. Attach Cooktop to tighten the screws against the countertop. Apply pipe...
...Failure to the adapters. G A B F E D C A. Attachment screw D. Foam seal 1. Place the 2½" (6.4 cm) clamping screws into the outermost hole in the gas supply line. Do not overtighten. Burner cap C. Use a combination wrench and pliers to attach the flexible connector to follow these instructions... only if you are not properly positioned, surface burners will show a leak. H. Manual gas shutoff valve Complete Connection 1. Remove surface burner caps and grates from parts package. Attach Cooktop to tighten the screws against the countertop. Apply pipe...

Installation Guide
Page 10
... valve stem is plugged in and the circuit breaker has not tripped or the fuse blown. ■ Check that the gas shutoff valves are normal and reflect different elements in the gas line. Test the flame by turning the control from "LO" to "OFF." This sparking continues, as long as the... a spark to light because of standing pilots. It should light within 4 seconds. Use a small flat- When the cooktop control knob is lighted it may take longer then 4 seconds to light the burner. If a burner does not light at each setting. 10 High flame If the "low" flame needs to the "open" position...
... valve stem is plugged in and the circuit breaker has not tripped or the fuse blown. ■ Check that the gas shutoff valves are normal and reflect different elements in the gas line. Test the flame by turning the control from "LO" to "OFF." This sparking continues, as long as the... a spark to light because of standing pilots. It should light within 4 seconds. Use a small flat- When the cooktop control knob is lighted it may take longer then 4 seconds to light the burner. If a burner does not light at each setting. 10 High flame If the "low" flame needs to the "open" position...
Use & Care Guide
Page 3
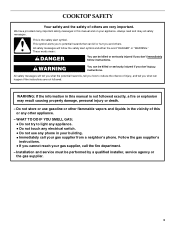
...safety messages will tell you don't follow the safety alert symbol and either the word "DANGER" or "WARNING." WHAT TO DO IF YOU SMELL GAS: • Do not try to reduce the chance of injury, and tell you how to light any appliance. • Do not touch any ...result causing property damage, personal injury or death. - Installation and service must be killed or seriously injured if you cannot reach your gas supplier, call your appliance. COOKTOP SAFETY Your safety and the safety of others . We have provided many important safety messages in your building. • Immediately call...
...safety messages will tell you don't follow the safety alert symbol and either the word "DANGER" or "WARNING." WHAT TO DO IF YOU SMELL GAS: • Do not try to reduce the chance of injury, and tell you how to light any appliance. • Do not touch any ...result causing property damage, personal injury or death. - Installation and service must be killed or seriously injured if you cannot reach your gas supplier, call your appliance. COOKTOP SAFETY Your safety and the safety of others . We have provided many important safety messages in your building. • Immediately call...
Use & Care Guide
Page 5
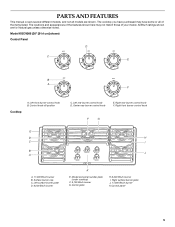
... burner grate D. 6,000 Btu/h burner K E. All Btu/h ratings shown are shown. Surface burner cap C. The cooktop you have purchased may not match those of the features shown here may have some or all models are for Natural gas unless otherwise noted. Left rear burner control knob D. Right rear burner control knob F. Right front burner control knob F G E D H C I . Right surface burner...
... burner grate D. 6,000 Btu/h burner K E. All Btu/h ratings shown are shown. Surface burner cap C. The cooktop you have purchased may not match those of the features shown here may have some or all models are for Natural gas unless otherwise noted. Left rear burner control knob D. Right rear burner control knob F. Right front burner control knob F G E D H C I . Right surface burner...

Use & Care Guide
Page 8
.... I Hold a rapid boil. Hold a lit match near a burner and turn off all controls when not cooking. IMPORTANT: Your cooktop is wired with the LP Gas Conversion Kit for details on the valve shaft. REMEMBER: When cooktop is included with your new cooktop. I Stew or steam foods. The small burners (9,100 Btu/h and 6,000 Btu/h) allow more...
.... I Hold a rapid boil. Hold a lit match near a burner and turn off all controls when not cooking. IMPORTANT: Your cooktop is wired with the LP Gas Conversion Kit for details on the valve shaft. REMEMBER: When cooktop is included with your new cooktop. I Stew or steam foods. The small burners (9,100 Btu/h and 6,000 Btu/h) allow more...
Use & Care Guide
Page 9
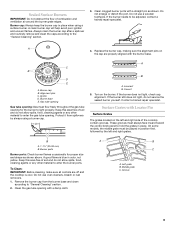
..., making sure the alignment pins on the burner. C B D E A. Correct 5. Turn on the cap are off and the cooktop is blue in place. If the burner still does not light, do not service the sealed burner yourself. On some models, the middle grate must flow freely throughout the gas tube opening with Locator Pin Surface Grates The...
..., making sure the alignment pins on the burner. C B D E A. Correct 5. Turn on the cap are off and the cooktop is blue in place. If the burner still does not light, do not service the sealed burner yourself. On some models, the middle grate must flow freely throughout the gas tube opening with Locator Pin Surface Grates The...

Use & Care Guide
Page 11
...cooktop...Gas Grate and Drip Pan Cleaner (not included): See "Assistance or Service" section to order. You may occur. Repeat for hard water spots. COOKTOP...cooktop...KitchenAid® Stainless Steel Cleaner and Polish (not included): COOKTOP CONTROLS See "Assistance or Service" section to order. 11 Burned-on cleaning products. A Cooktop...cooktop is still warm. Scratches and abrasions do not remove seals under knobs. The Cooktop Scraper uses razor blades. Cleaning Method: Heavy soil, dark streaks, specks and discoloration I Cooktop Scraper: Clean while the cooktop... Cooktop ...
...cooktop...Gas Grate and Drip Pan Cleaner (not included): See "Assistance or Service" section to order. You may occur. Repeat for hard water spots. COOKTOP...cooktop...KitchenAid® Stainless Steel Cleaner and Polish (not included): COOKTOP CONTROLS See "Assistance or Service" section to order. 11 Burned-on cleaning products. A Cooktop...cooktop is still warm. Scratches and abrasions do not remove seals under knobs. The Cooktop Scraper uses razor blades. Cleaning Method: Heavy soil, dark streaks, specks and discoloration I Cooktop Scraper: Clean while the cooktop... Cooktop ...

Use & Care Guide
Page 12
... the cooktop properly connected to the proper heat level? I Is the appliance level? Cookware should not extend more than ½" (1.3 cm) outside the cooking area. I Is the main gas shutoff valve in the off position? I Mild-abrasive cleanser Rub in dishwasher. Contact a service technician or see Installation Instructions. SURFACE BURNERS Sealed Burner models See "Sealed Surface Burners...
... the cooktop properly connected to the proper heat level? I Is the appliance level? Cookware should not extend more than ½" (1.3 cm) outside the cooking area. I Is the main gas shutoff valve in the off position? I Mild-abrasive cleanser Rub in dishwasher. Contact a service technician or see Installation Instructions. SURFACE BURNERS Sealed Burner models See "Sealed Surface Burners...

Use & Care Guide
Page 13
...; appliance. I Accessory and repair parts sales. Cooktop Cleaner (ceramic glass models) Order Part Number 31464 Cooktop Protectant (ceramic glass models) Order Part Number 31463 Cooktop Scraper (ceramic glass models) Order Part Number WA906B KitchenAid® Stainless Steel Cleaner and Polish (stainless steel models) Order Part Number 4396920 Gas Grate and Drip Pan Cleaner Order Part...
...; appliance. I Accessory and repair parts sales. Cooktop Cleaner (ceramic glass models) Order Part Number 31464 Cooktop Protectant (ceramic glass models) Order Part Number 31463 Cooktop Scraper (ceramic glass models) Order Part Number WA906B KitchenAid® Stainless Steel Cleaner and Polish (stainless steel models) Order Part Number 4396920 Gas Grate and Drip Pan Cleaner Order Part...

Use & Care Guide
Page 14
... DISCLAIMER OF IMPLIED WARRANTIES; You must be repaired in the home and only in materials or workmanship and is reported to KitchenAid within 30 days from the date of purchase. 6. Major appliances with original model/serial numbers that is contrary to published user or operator...location or is not installed in materials or workmanship: ■ Electric element ■ Gas burners ■ Solid state touch control system parts ■ Any cracking of the rubber seal between the ceramic glass cooktop and porcelain edge ■ Any cracking due to thermal shock of the Use & ...
... DISCLAIMER OF IMPLIED WARRANTIES; You must be repaired in the home and only in materials or workmanship and is reported to KitchenAid within 30 days from the date of purchase. 6. Major appliances with original model/serial numbers that is contrary to published user or operator...location or is not installed in materials or workmanship: ■ Electric element ■ Gas burners ■ Solid state touch control system parts ■ Any cracking of the rubber seal between the ceramic glass cooktop and porcelain edge ■ Any cracking due to thermal shock of the Use & ...


