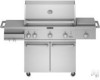

Parts List
Page 2
... Shelf, Side (Lf) 32 W10137052 Bracket, Handle 33 W10128660 Handle, Shelf 34 W10137053 Bar, Tool 35 W10128663 Harness, Wire Light 36 W10137054 Cover, Igniter 37 W10137055 Igniter 38 W10128751 Nameplate 39 W10128753 Knob, Main Burner 40 W10128756 Knob, Rear Burner 41 W10128759 Bezel, Knob 42...Burner 15 W10128628 Light, Grill 16 W10136418 Harness, Wire Lights 17 W10128631 Socket, Light 18 W10128632 Panel, Access 19 W10128634 Bracket, Panel Left 20 W10128635 Bracket, Panel Right Illus. No. Part No. Part No. DESCRIPTION 47 W10128767 Igniter, Main Gas 48 W10137057 Manifold 49 ...
... Shelf, Side (Lf) 32 W10137052 Bracket, Handle 33 W10128660 Handle, Shelf 34 W10137053 Bar, Tool 35 W10128663 Harness, Wire Light 36 W10137054 Cover, Igniter 37 W10137055 Igniter 38 W10128751 Nameplate 39 W10128753 Knob, Main Burner 40 W10128756 Knob, Rear Burner 41 W10128759 Bezel, Knob 42...Burner 15 W10128628 Light, Grill 16 W10136418 Harness, Wire Lights 17 W10128631 Socket, Light 18 W10128632 Panel, Access 19 W10128634 Bracket, Panel Left 20 W10128635 Bracket, Panel Right Illus. No. Part No. Part No. DESCRIPTION 47 W10128767 Igniter, Main Gas 48 W10137057 Manifold 49 ...
Installation Instructions
Page 5
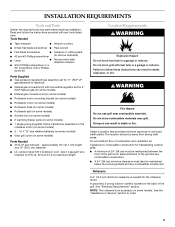
... ■ 20 lb LP gas fuel tank - size 14 gauge/3 wire (marked 14/3 W-A), 50 foot (15.2 m) maximum length Location Requirements WARNING Explosion Hazard Do not store fuel tank in a garage or indoors. Clearance to combustible construction for freestanding outdoor grills: ■ A minimum of...needed for the rotisserie motor (on some models) ■ 2 - 1.5 V "D" size alkaline batteries (on some models) ■ Vinyl grill cover (on some models) ■ 1 single-prong plug/500 mAmp transformer assembly for the rotisserie motor. INSTALLATION REQUIREMENTS Tools and Parts Gather the ...
... ■ 20 lb LP gas fuel tank - size 14 gauge/3 wire (marked 14/3 W-A), 50 foot (15.2 m) maximum length Location Requirements WARNING Explosion Hazard Do not store fuel tank in a garage or indoors. Clearance to combustible construction for freestanding outdoor grills: ■ A minimum of...needed for the rotisserie motor (on some models) ■ 2 - 1.5 V "D" size alkaline batteries (on some models) ■ Vinyl grill cover (on some models) ■ 1 single-prong plug/500 mAmp transformer assembly for the rotisserie motor. INSTALLATION REQUIREMENTS Tools and Parts Gather the ...

Installation Instructions
Page 15
...pipe sealant to the threads of the Use and Care Guide, write "Converted to inlet side of the regulator 1. Make Grill Connections Connect Local LP Gas Supply 1. Record Conversion In the last page of the brass connector. Manifold B. Turn on the regulator must be pointing ...toward the brass connector. 13. Remove rear cover and 2 screws. 9. There must be a certified manual shutoff valve in the gas supply line near the grill for use with LP gas. 8. Bubbles will be showing on the brass cap. A 11. Use adjustable wrench...
...pipe sealant to the threads of the Use and Care Guide, write "Converted to inlet side of the regulator 1. Make Grill Connections Connect Local LP Gas Supply 1. Record Conversion In the last page of the brass connector. Manifold B. Turn on the regulator must be pointing ...toward the brass connector. 13. Remove rear cover and 2 screws. 9. There must be a certified manual shutoff valve in the gas supply line near the grill for use with LP gas. 8. Bubbles will be showing on the brass cap. A 11. Use adjustable wrench...

Installation Instructions
Page 16
Disconnect 20 lb LP gas fuel tank (if present). 4. Remove rear cover and 2 screws. 9. Brass cap will be pointing toward the brass connector. 12. Reinstall cap onto convertible regulator. Manually remove all burner control valves. 5....Brass elbow B. To make sure the regulator is certified for Natural gas, use with LP gas. 8. Remove gas burner from the grill. Examine the stem on the regulator must be facing up when tight. Manifold B. Gas pressure regulator/hose assembly 7. A 11. Unplug grill or disconnect power. 3. Use pipe thread sealant that hold the ...
Disconnect 20 lb LP gas fuel tank (if present). 4. Remove rear cover and 2 screws. 9. Brass cap will be pointing toward the brass connector. 12. Reinstall cap onto convertible regulator. Manually remove all burner control valves. 5....Brass elbow B. To make sure the regulator is certified for Natural gas, use with LP gas. 8. Remove gas burner from the grill. Examine the stem on the regulator must be facing up when tight. Manifold B. Gas pressure regulator/hose assembly 7. A 11. Unplug grill or disconnect power. 3. Use pipe thread sealant that hold the ...

Installation Instructions
Page 17
...the brass orifices from inside the burner base. 17 Repeat the procedure for each grill burner. Repeat the procedure for each rear burner. Remove the access cover and screw at the end of the gas valve. A Change the Rotisserie-infrared burner orifice(s) 1. Use 10 mm wrench ...to remove. 3. Grill burner orifice 5. Change the Side burner orifices (for identification. 5. Twist and lift the burner...
...the brass orifices from inside the burner base. 17 Repeat the procedure for each grill burner. Repeat the procedure for each rear burner. Remove the access cover and screw at the end of the gas valve. A Change the Rotisserie-infrared burner orifice(s) 1. Use 10 mm wrench ...to remove. 3. Grill burner orifice 5. Change the Side burner orifices (for identification. 5. Twist and lift the burner...

Installation Instructions
Page 18
...parts bag for the other burner. 6. Burner base tabs 7. Set the screws and cover aside. A A A. Use Phillips screwdriver to attach the mounting screws. 8. Hook up to the grill. 3. Turn on the gas supply to Natural gas and Leak Test 1. Also record the conversion date and the technician/company that is ...on the burner base and twist until the burner top is out of the burner top with LP gas at connections where required. Align the notches in the gas supply line near the grill for models equipped with this kit. NOTE: The number 2.34 is stamped on the orifice for ...
...parts bag for the other burner. 6. Burner base tabs 7. Set the screws and cover aside. A A A. Use Phillips screwdriver to attach the mounting screws. 8. Hook up to the grill. 3. Turn on the gas supply to Natural gas and Leak Test 1. Also record the conversion date and the technician/company that is ...on the burner base and twist until the burner top is out of the burner top with LP gas at connections where required. Align the notches in the gas supply line near the grill for models equipped with this kit. NOTE: The number 2.34 is stamped on the orifice for ...
Installation Instructions
Page 20
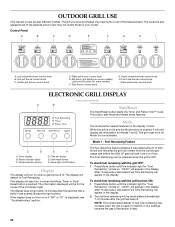
... control knob D. This button also stops and resets these features. Mode The mode button selects features on . OUTDOOR GRILL USE This manual covers several different models. Left rotisserie burner control knob B. This display will be activated. If the display does not turn ...button Display The display will default to be for "Fuel Remaining" comes on when a gas burner is displayed, see "Troubleshooting" section. To check fuel remaining with the grill OFF: 1. Right grill burner control knob E. NOTE: This recalculated display of fuel time remaining may not match those...
... control knob D. This button also stops and resets these features. Mode The mode button selects features on . OUTDOOR GRILL USE This manual covers several different models. Left rotisserie burner control knob B. This display will be activated. If the display does not turn ...button Display The display will default to be for "Fuel Remaining" comes on when a gas burner is displayed, see "Troubleshooting" section. To check fuel remaining with the grill OFF: 1. Right grill burner control knob E. NOTE: This recalculated display of fuel time remaining may not match those...

Installation Instructions
Page 22
.../hose assembly before or after cooking. See Drip Tray in the gas supply line. The drip tray must be low and will be in use grill near grill. For freestanding outdoor grills using gas supply source other than 20 lb LP gas fuel tank: Open the manual shutoff valve in the "General Cleaning...grease and other liquid buildup. If necessary, replace the gas pressure regulator/hose assembly before lighting. 2. Make sure the control knobs are all turned to the gas pipe. 22 The valve is open when the handle is not covered when not in place and pushed all control knobs off...
.../hose assembly before or after cooking. See Drip Tray in the gas supply line. The drip tray must be low and will be in use grill near grill. For freestanding outdoor grills using gas supply source other than 20 lb LP gas fuel tank: Open the manual shutoff valve in the "General Cleaning...grease and other liquid buildup. If necessary, replace the gas pressure regulator/hose assembly before lighting. 2. Make sure the control knobs are all turned to the gas pipe. 22 The valve is open when the handle is not covered when not in place and pushed all control knobs off...
Installation Instructions
Page 23
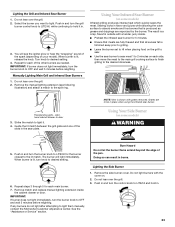
... of the pan. Burn Hazard Do not let the burner flame extend beyond the edge of the slots in . 3. Remove the side burner cover. When burner is lit, turn the control knob to desired setting. Remove the manual lighting extension (see the igniter glow or hear the "snapping... If burner does not light immediately, turn the burner knob to the lit match. Lighting the Grill and Infrared Sear Burner 1. Select the burner you want to light them manually, contact the KitchenAid Customer eXperience Center. You will light immediately. Repeat for the burner closest to LITE/HI for ...
... of the pan. Burn Hazard Do not let the burner flame extend beyond the edge of the slots in . 3. Remove the side burner cover. When burner is lit, turn the control knob to desired setting. Remove the manual lighting extension (see the igniter glow or hear the "snapping... If burner does not light immediately, turn the burner knob to the lit match. Lighting the Grill and Infrared Sear Burner 1. Select the burner you want to light them manually, contact the KitchenAid Customer eXperience Center. You will light immediately. Repeat for the burner closest to LITE/HI for ...
Installation Instructions
Page 30
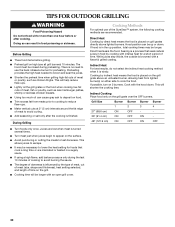
...OUTDOOR GRILLING WARNING Food Poisoning Hazard Do not let food sit for more than one hour before grilling. ■ Preheat grill on food. ■ Trim excess fat from lighted burner(s) on the grill grate over the OFF burners. During Grilling... If using a high flame, add barbecue sauce only during preheating. Grill Size Burner Burner Burner Burner 1 2 3 4 27" (68.6 cm) ON OFF - - 36" (91.4 cm) ON OFF ON - 48" (121.9 cm)... position can cause gray ash to test doneness. Cook with an open grill cover. Juices are marinated or basted in the up position, total cooking times...
...OUTDOOR GRILLING WARNING Food Poisoning Hazard Do not let food sit for more than one hour before grilling. ■ Preheat grill on food. ■ Trim excess fat from lighted burner(s) on the grill grate over the OFF burners. During Grilling... If using a high flame, add barbecue sauce only during preheating. Grill Size Burner Burner Burner Burner 1 2 3 4 27" (68.6 cm) ON OFF - - 36" (91.4 cm) ON OFF ON - 48" (121.9 cm)... position can cause gray ash to test doneness. Cook with an open grill cover. Juices are marinated or basted in the up position, total cooking times...
Installation Instructions
Page 33
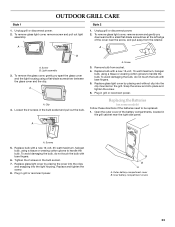
... and snapping into the light housing. Plug in the bulb socket. 7. Tighten the 2 screws in grill or reconnect power. Inner battery compartment covers 33 OUTDOOR GRILL CARE Style 1 1. To remove glass light cover, remove screw and pull out light assembly. Unplug grill or disconnect power. 2. Replace bulb with a new 12-volt, 25-watt maximum, halogen bulb...
... and snapping into the light housing. Plug in the bulb socket. 7. Tighten the 2 screws in grill or reconnect power. Inner battery compartment covers 33 OUTDOOR GRILL CARE Style 1 1. To remove glass light cover, remove screw and pull out light assembly. Unplug grill or disconnect power. 2. Replace bulb with a new 12-volt, 25-watt maximum, halogen bulb...

Installation Instructions
Page 34
...section. Damage may cause permanent discoloration. Spills may occur. IMPORTANT: Make sure gas supply is off and the grill is to be used with soft, lint-free cloth. ■ For .... See "Assistance or Service" section to order. GRILL GRATES IMPORTANT: To avoid damage to -clean areas, use vinyl grill cover, available from the grill grates. SIDE BURNER CAPS AND GRATE Cleaning Method: ...-duty scrub sponge can be followed by rinsing with soft, lint-free cloth. ■ KitchenAid Stainless Steel Cleaner and Polish Part Number 4396920 (not included): See "Assistance or Service" ...
...section. Damage may cause permanent discoloration. Spills may occur. IMPORTANT: Make sure gas supply is off and the grill is to be used with soft, lint-free cloth. ■ For .... See "Assistance or Service" section to order. GRILL GRATES IMPORTANT: To avoid damage to -clean areas, use vinyl grill cover, available from the grill grates. SIDE BURNER CAPS AND GRATE Cleaning Method: ...-duty scrub sponge can be followed by rinsing with soft, lint-free cloth. ■ KitchenAid Stainless Steel Cleaner and Polish Part Number 4396920 (not included): See "Assistance or Service" ...
Installation Instructions
Page 35
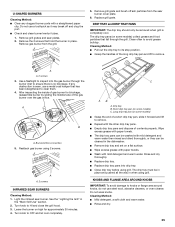
... they can be washed with mild detergent and warm water. Remove gas burner from the sear burner cover plate. 6. Burner/orifice connection 5. Drip tray B. Rinse and dry thoroughly. ■ Replace drip tray. ■ Replace drip tray pans into the gas burner through the grill. Do not use a toothpick as it forward and lift to...
... they can be washed with mild detergent and warm water. Remove gas burner from the sear burner cover plate. 6. Burner/orifice connection 5. Drip tray B. Rinse and dry thoroughly. ■ Replace drip tray. ■ Replace drip tray pans into the gas burner through the grill. Do not use a toothpick as it forward and lift to...
Installation Instructions
Page 38
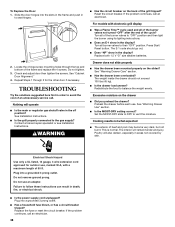
...Locate the 4 hinge screw mounting holes through 3 for outdoor use, marked W-A, with electronic grill display ■ Was a Flame Time™ cycle used and all burner valves to the gas supply? See Installation Instructions. ■ Is the grill properly connected to their "OFF" position. The weight ...inside the drawer should go out. ■ Does "NP" show in areas not covered by skin. Poultry will operate ■ ...
...Locate the 4 hinge screw mounting holes through 3 for outdoor use, marked W-A, with electronic grill display ■ Was a Flame Time™ cycle used and all burner valves to the gas supply? See Installation Instructions. ■ Is the grill properly connected to their "OFF" position. The weight ...inside the drawer should go out. ■ Does "NP" show in areas not covered by skin. Poultry will operate ■ ...
Installation Instructions
Page 39
...Yellow Pages. Accessories Vinyl Covers 27" (68.6 cm) for Grill Model Numbers KFRU368T and KFRU368V - To locate the KitchenAid designated service company in your area, you use only factory specified parts. KitchenAid Canada designated service technicians are trained to KitchenAid with the same precision... sales. ■ Referrals to your appliance. Order Part Number 8212703 Rotisserie Kits 27" (68.6 cm): Order Part Number KFKU271TSS 36" (91.4 cm): Order Part Number KFKU361TSS Smoker Box Order Part Number KBDU271TSS Positioning Rack Order Part Number 8723277 ■ Specialized ...
...Yellow Pages. Accessories Vinyl Covers 27" (68.6 cm) for Grill Model Numbers KFRU368T and KFRU368V - To locate the KitchenAid designated service company in your area, you use only factory specified parts. KitchenAid Canada designated service technicians are trained to KitchenAid with the same precision... sales. ■ Referrals to your appliance. Order Part Number 8212703 Rotisserie Kits 27" (68.6 cm): Order Part Number KFKU271TSS 36" (91.4 cm): Order Part Number KFKU361TSS Smoker Box Order Part Number KBDU271TSS Positioning Rack Order Part Number 8723277 ■ Specialized ...
Installation Instructions
Page 40
.... ITEMS EXCLUDED FROM WARRANTY This limited warranty does not cover: 1. Damage resulting from normal wear and tear of your outdoor product if it was purchased. In Canada, call 1-... in accordance with the removal from your home of your outdoor product from natural gas to L.P./propane or from L.P./propane to KitchenAid within 30 days from accident, alteration, misuse, abuse,...been removed, altered or cannot be provided by calling KitchenAid. Damage resulting from the date of your outdoor product for the stainless steel grill burners. Conversion kit or service call for the ...
.... ITEMS EXCLUDED FROM WARRANTY This limited warranty does not cover: 1. Damage resulting from normal wear and tear of your outdoor product if it was purchased. In Canada, call 1-... in accordance with the removal from your home of your outdoor product from natural gas to L.P./propane or from L.P./propane to KitchenAid within 30 days from accident, alteration, misuse, abuse,...been removed, altered or cannot be provided by calling KitchenAid. Damage resulting from the date of your outdoor product for the stainless steel grill burners. Conversion kit or service call for the ...


