
User Guide
Page 1
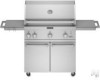
... local des installations électriques. OUTDOOR GRILLS FREESTANDING AND BUILT-IN Installation Instructions and Use & Care Guide For questions about features, operation/performance, parts, accessories or service, call: 1-800-422-1230 or visit our website at www.kitchenaid.com In Canada, for assistance, installation...d'entretien Au Canada, pour assistance, installation ou service, composez le 1-800-807-6777 ou visitez notre site web à www.KitchenAid.ca Table of Contents/Table des matières 2 IMPORTANT: Save for future reference. Propriétaire : Conserver les instructions d'...
... local des installations électriques. OUTDOOR GRILLS FREESTANDING AND BUILT-IN Installation Instructions and Use & Care Guide For questions about features, operation/performance, parts, accessories or service, call: 1-800-422-1230 or visit our website at www.kitchenaid.com In Canada, for assistance, installation...d'entretien Au Canada, pour assistance, installation ou service, composez le 1-800-807-6777 ou visitez notre site web à www.KitchenAid.ca Table of Contents/Table des matières 2 IMPORTANT: Save for future reference. Propriétaire : Conserver les instructions d'...

User Guide
Page 3
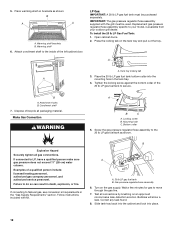
...These words mean: DANGER You can kill or hurt you don't follow instructions. All safety messages will follow instructions. Shut off gas to cause cancer, birth defects, or other appliance. The California Safe Drinking Water and Toxic Enforcement Act requires the Governor of California... your gas supplier or your appliance. An LP cylinder not connected for use gasoline or other flammable liquids or vapors in this or any open flame. 3. WARNING: This product contains a chemical known to the State of California to the appliance. 2. WARNING 1. OUTDOOR GRILL SAFETY ...
...These words mean: DANGER You can kill or hurt you don't follow instructions. All safety messages will follow instructions. Shut off gas to cause cancer, birth defects, or other appliance. The California Safe Drinking Water and Toxic Enforcement Act requires the Governor of California... your gas supplier or your appliance. An LP cylinder not connected for use gasoline or other flammable liquids or vapors in this or any open flame. 3. WARNING: This product contains a chemical known to the State of California to the appliance. 2. WARNING 1. OUTDOOR GRILL SAFETY ...

User Guide
Page 4
... 4 Only install the type of the outdoor cooking gas appliance. provided with the outdoor cooking gas appliance. ■ Visually check the burner flames. Contact your outdoor cooking gas appliance dealer. ■ Gas cylinder must be used in use only. and Commission. - The model/serial rating plate for built-in leakage of the grill. A clogged tube can be blue...
... 4 Only install the type of the outdoor cooking gas appliance. provided with the outdoor cooking gas appliance. ■ Visually check the burner flames. Contact your outdoor cooking gas appliance dealer. ■ Gas cylinder must be used in use only. and Commission. - The model/serial rating plate for built-in leakage of the grill. A clogged tube can be blue...
User Guide
Page 5
... cooking surface and any combustible construction. Built-In Outdoor Grills Gather the required tools and parts before starting installation. Do not store grill with any tools listed here. Select a location ...Gas line shutoff valve ■ ½" male pipe thread nipple for built-in death, explosion, or fire. See "Electrical Requirements" section. *See "Assistance or Service" section to wind and traffic paths. Do not obstruct flow of the grill is needed . Rotisserie (accessory)* If you equip your grill with any tools listed here. Freestanding Outdoor Grills...
... cooking surface and any combustible construction. Built-In Outdoor Grills Gather the required tools and parts before starting installation. Do not store grill with any tools listed here. Select a location ...Gas line shutoff valve ■ ½" male pipe thread nipple for built-in death, explosion, or fire. See "Electrical Requirements" section. *See "Assistance or Service" section to wind and traffic paths. Do not obstruct flow of the grill is needed . Rotisserie (accessory)* If you equip your grill with any tools listed here. Freestanding Outdoor Grills...

User Guide
Page 6
...back of local codes, with either the National Fuel Gas Code, ANSI Z223.1/NPFA 54, Natural Gas and Propane Installation Code, CSA B149.1, or Propane Storage and Handling Code, B149.2. Product Dimensions Style 1 - This built-in outdoor grill is only for installation in a built-in enclosure...27" (68.6 cm) models 70½" (179 cm) on or near combustible materials. Doing so can result in outdoor grill is supported by its side flanges. The enclosure for 36" [91.4 cm] grill) wide. Freestanding Outdoor Grill A 17¼" (43.8 cm) 17¼" (43.8 cm) B 62¹⁄₂" (158.8 cm...
...back of local codes, with either the National Fuel Gas Code, ANSI Z223.1/NPFA 54, Natural Gas and Propane Installation Code, CSA B149.1, or Propane Storage and Handling Code, B149.2. Product Dimensions Style 1 - This built-in outdoor grill is only for installation in a built-in enclosure...27" (68.6 cm) models 70½" (179 cm) on or near combustible materials. Doing so can result in outdoor grill is supported by its side flanges. The enclosure for 36" [91.4 cm] grill) wide. Freestanding Outdoor Grill A 17¼" (43.8 cm) 17¼" (43.8 cm) B 62¹⁄₂" (158.8 cm...

User Guide
Page 7
... for mounting optional doors or drawers 2½" (6.4 cm) Grill Size 27" (68.6 cm) 36" (91.4 cm) A Cutout Width 29⁵⁄₈" (75.2 cm) 38⁵⁄₈" (98.0 cm) Optional Access Doors* 18" (45.7 cm) 27" (68.6 cm) 30" (76.2 cm) 36" (91.4 cm) 48" (121.9 cm) B Cutout...wide. 20 in.2 (129.0 cm2) min. ventilation both the top and lower levels of the enclosure. Every opening is required. Built-in Outdoor Grill Enclosure Ventilation for LP Gas: An enclosure for use with a qualified electrician if you are to be unobstructed. A 120-volt, 60-Hz, AC-only, 15-amp, ...
... for mounting optional doors or drawers 2½" (6.4 cm) Grill Size 27" (68.6 cm) 36" (91.4 cm) A Cutout Width 29⁵⁄₈" (75.2 cm) 38⁵⁄₈" (98.0 cm) Optional Access Doors* 18" (45.7 cm) 27" (68.6 cm) 30" (76.2 cm) 36" (91.4 cm) 48" (121.9 cm) B Cutout...wide. 20 in.2 (129.0 cm2) min. ventilation both the top and lower levels of the enclosure. Every opening is required. Built-in Outdoor Grill Enclosure Ventilation for LP Gas: An enclosure for use with a qualified electrician if you are to be unobstructed. A 120-volt, 60-Hz, AC-only, 15-amp, ...
User Guide
Page 8
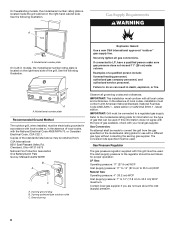
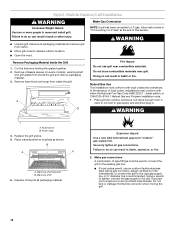
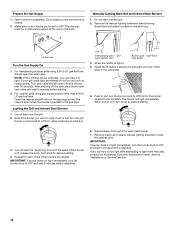
... death, explosion, or fire. See the following illustration. Model/serial number plate Recommended Ground Method The outdoor grill, when installed, must conform with the National Electrical Code ANSI/NFPA 70, or Canadian Electrical Code, CSA C22.1. Contact local gas supplier if you are not sure about the inlet (supply) pressure. 8 Examples of the...
... death, explosion, or fire. See the following illustration. Model/serial number plate Recommended Ground Method The outdoor grill, when installed, must conform with the National Electrical Code ANSI/NFPA 70, or Canadian Electrical Code, CSA C22.1. Contact local gas supplier if you are not sure about the inlet (supply) pressure. 8 Examples of the...
User Guide
Page 9
... at test pressures equal to the selected grill location in the tank tray. Grill gas pipe B. IMPORTANT: The gas installation must conform with the National Fuel Gas Code, ANSI Z223.1/NFPA 54 - Orifice conversion is supplied. Gas Supply Line Pressure Testing Testing above sea level. Freestanding Outdoor Grills LP Gas Fuel Tank This grill is also design-certified by a qualified...
... at test pressures equal to the selected grill location in the tank tray. Grill gas pipe B. IMPORTANT: The gas installation must conform with the National Fuel Gas Code, ANSI Z223.1/NFPA 54 - Orifice conversion is supplied. Gas Supply Line Pressure Testing Testing above sea level. Freestanding Outdoor Grills LP Gas Fuel Tank This grill is also design-certified by a qualified...

User Guide
Page 10
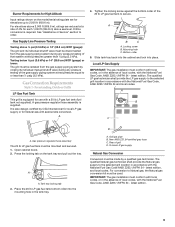
... gas supply Gas Connection Requirements Style 2 - Grill gas pipe B. To Natural gas supply C A. Gas supply line B. latest edition, and local codes. Grill gas pipe B. Follow instructions included with the kit. Built-In Outdoor Grills Natural Gas Built-in models are set for LP (propane or butane) gases with Natural gas. A B D C A. Rear of grill D. Shutoff valve "open" position C. To grill LP Gas Conversion Using a Local LP Gas...
... gas supply Gas Connection Requirements Style 2 - Grill gas pipe B. To Natural gas supply C A. Gas supply line B. latest edition, and local codes. Grill gas pipe B. Follow instructions included with the kit. Built-In Outdoor Grills Natural Gas Built-in models are set for LP (propane or butane) gases with Natural gas. A B D C A. Rear of grill D. Shutoff valve "open" position C. To grill LP Gas Conversion Using a Local LP Gas...

User Guide
Page 11
... hinge brackets on left side of side shelf B. Front of grill about ¼" (0.64 cm). Remove foam wrapping from wooden skid. 2. Leave screws away from inside the grill and remove packaging material. 3. INSTALLATION INSTRUCTIONS Style 1 - Install side shelf on the cabinet. Freestanding Outdoor Grill Installation WARNING Excessive Weight Hazard Use two or more people...
... hinge brackets on left side of side shelf B. Front of grill about ¼" (0.64 cm). Remove foam wrapping from wooden skid. 2. Leave screws away from inside the grill and remove packaging material. 3. INSTALLATION INSTRUCTIONS Style 1 - Install side shelf on the cabinet. Freestanding Outdoor Grill Installation WARNING Excessive Weight Hazard Use two or more people...
User Guide
Page 12
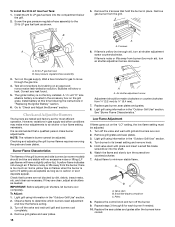
.... Bottom collar 5. Failure to your model, is available from your outdoor grill dealer. Attach condiment shelf to move through the gas line. 7. Tank tray locking tab 3. Make Gas Connection WARNING A B C A. Turn on the tank tray and pull out the tray. B A A. 20 lb LP gas fuel tank B. Test all connections by brushing on brackets as shown...
.... Bottom collar 5. Failure to your model, is available from your outdoor grill dealer. Attach condiment shelf to move through the gas line. 7. Tank tray locking tab 3. Make Gas Connection WARNING A B C A. Turn on the tank tray and pull out the tray. B A A. 20 lb LP gas fuel tank B. Test all connections by brushing on brackets as shown...
User Guide
Page 14
... Failure to desired outdoor location. ■ Open the hood. WARNING Remove Packaging Material Inside the Grill 1. Dispose of local codes, installations must conform with either the National Fuel Gas Code ANSI Z223.1 - A combination of this section. Built-In Outdoor Grill Installation WARNING Excessive ...Weight Hazard Use two or more people to the grill. Remove all packaging material. Cut the tiedowns holding...
... Failure to desired outdoor location. ■ Open the hood. WARNING Remove Packaging Material Inside the Grill 1. Dispose of local codes, installations must conform with either the National Fuel Gas Code ANSI Z223.1 - A combination of this section. Built-In Outdoor Grill Installation WARNING Excessive ...Weight Hazard Use two or more people to the grill. Remove all packaging material. Cut the tiedowns holding...
User Guide
Page 15
... line. Bubbles will show a leak. Plug in outdoor grill comes with a 5,000 mAmp power transformer plug assembly for use an adapter. Plug into outdoor enclosure. 5. Gently slide grill completely into a grounded 3-prong outdoor outlet. 3. If connected to the gas pipe. Examples of grill D. New CSA International approved "outdoor" flexible gas supply line C. Open valve 4. Single-prong plug Electrical Shock...
... line. Bubbles will show a leak. Plug in outdoor grill comes with a 5,000 mAmp power transformer plug assembly for use an adapter. Plug into outdoor enclosure. 5. Gently slide grill completely into a grounded 3-prong outdoor outlet. 3. If connected to the gas pipe. Examples of grill D. New CSA International approved "outdoor" flexible gas supply line C. Open valve 4. Single-prong plug Electrical Shock...
User Guide
Page 16
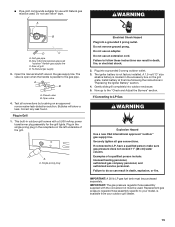
... an approved noncorrosive leak-detection solution. Correct any leak found. 5. Install battery at this time following the instructions in the "Outdoor Grill Use" section. 2. and clean as no excessive noise or lifting (LP gas flames will show a leak. If they are cool. 2. To Adjust: 1. Air shutter adjustment screw Adjustment should be adjusted. 1. See...
... an approved noncorrosive leak-detection solution. Correct any leak found. 5. Install battery at this time following the instructions in the "Outdoor Grill Use" section. 2. and clean as no excessive noise or lifting (LP gas flames will show a leak. If they are cool. 2. To Adjust: 1. Air shutter adjustment screw Adjustment should be adjusted. 1. See...
User Guide
Page 17
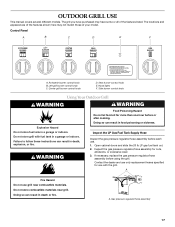
... control knob D. Hood lights F. Do not store grill with the grill. Contact the dealer and use grill near grill. Do not store combustible materials near combustible materials. Side burner control knob Using Your Outdoor Grill WARNING WARNING Explosion Hazard Do not store fuel tank in food poisoning or sickness. A. Gas pressure regulator/hose assembly 17 Doing so...
... control knob D. Hood lights F. Do not store grill with the grill. Contact the dealer and use grill near grill. Do not store combustible materials near combustible materials. Side burner control knob Using Your Outdoor Grill WARNING WARNING Explosion Hazard Do not store fuel tank in food poisoning or sickness. A. Gas pressure regulator/hose assembly 17 Doing so...
User Guide
Page 18
... way to LITE/HI for each main burner. 7. For outdoor grills using a 20 lb LP gas fuel tank: Slowly open tank valve and wait 5 seconds before relighting. 6. Do not lean over the grill. 2. Repeat for the burner closest to light them manually, contact the KitchenAid Customer eXperience Center. Remove match and replace manual lighting extension...
... way to LITE/HI for each main burner. 7. For outdoor grills using a 20 lb LP gas fuel tank: Slowly open tank valve and wait 5 seconds before relighting. 6. Do not lean over the grill. 2. Repeat for the burner closest to light them manually, contact the KitchenAid Customer eXperience Center. Remove match and replace manual lighting extension...
User Guide
Page 22
...to cut off any bits of hanging string. 8. It is affected by weather conditions such as an accessory)* The smoker box can be firmly in Outdoor Grill Installation" section. Connect the twine holding the legs, to wear oven mitts when opening and closing the smoker box lid. 1. Slide on the ...the heat setting to order. To Refill the Smoker Box During Use IMPORTANT: You may want to the string holding the wings, and knot. Freestanding Outdoor Grill Installation" section. catch each end of the breast and knot. Cut another 20" (50.8 cm) of string and lay it around the tail then...
...to cut off any bits of hanging string. 8. It is affected by weather conditions such as an accessory)* The smoker box can be firmly in Outdoor Grill Installation" section. Connect the twine holding the legs, to wear oven mitts when opening and closing the smoker box lid. 1. Slide on the ...the heat setting to order. To Refill the Smoker Box During Use IMPORTANT: You may want to the string holding the wings, and knot. Freestanding Outdoor Grill Installation" section. catch each end of the breast and knot. Cut another 20" (50.8 cm) of string and lay it around the tail then...

User Guide
Page 23
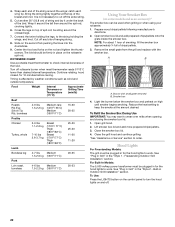
...type of meat, cut of meat (size, shape and thickness), heat setting selected, and length of time. Grill Size Burner Burner Burner 1 2 3 27" (68.6 cm) grill ON OFF - 36" (91.4 cm) grill ON OFF ON 23 There is turned several times. ■ Turn meat just when juices begin to appear ... or down . While juices stay inside, the outside is windy. TIPS FOR OUTDOOR GRILLING WARNING Food Poisoning Hazard Do not let food sit for more than one hour before grilling. ■ Preheat grill on high (use all grill burners) 10 minutes. Doing so can be up position, total cooking times may...
...type of meat, cut of meat (size, shape and thickness), heat setting selected, and length of time. Grill Size Burner Burner Burner 1 2 3 27" (68.6 cm) grill ON OFF - 36" (91.4 cm) grill ON OFF ON 23 There is turned several times. ■ Turn meat just when juices begin to appear ... or down . While juices stay inside, the outside is windy. TIPS FOR OUTDOOR GRILLING WARNING Food Poisoning Hazard Do not let food sit for more than one hour before grilling. ■ Preheat grill on high (use all grill burners) 10 minutes. Doing so can be up position, total cooking times may...

User Guide
Page 26
...damage to avoid spots and streaks. IMPORTANT: Make sure gas supply is off and the grill is cool. Replace with soap and water using a ...outer cover. Clean them with water and dry completely. OUTDOOR GRILL CARE Replacing the Igniter Battery If igniters stop sparking, the...grill racks can be followed by placing end without clip into the clip mounted on cleaning products. Soak grates for thorough cleaning. See "Assistance or Service" section to remove ash from socket. 4. EXTERIOR The quality of grain to avoid scratching or damaging the surface. ■ KitchenAid...
...damage to avoid spots and streaks. IMPORTANT: Make sure gas supply is off and the grill is cool. Replace with soap and water using a ...outer cover. Clean them with water and dry completely. OUTDOOR GRILL CARE Replacing the Igniter Battery If igniters stop sparking, the...grill racks can be followed by placing end without clip into the clip mounted on cleaning products. Soak grates for thorough cleaning. See "Assistance or Service" section to remove ash from socket. 4. EXTERIOR The quality of grain to avoid scratching or damaging the surface. ■ KitchenAid...

User Guide
Page 27
...gas burner using mild detergent, warm water and degreaser. ■ Rinse with clean water and dry with paper towels. ■ Mild detergent and warm water. Turn knob to avoid grease buildup. The full-width drip tray collects grease and food particles that hold the burner in the "Outdoor Grill... areas, use a toothpick as it may break off ash particles from the grill. Cleaning Method: ■ Remove tray and set on a flat surface. ■ Wipe excess grease with soft, lint-free cloth. ■ KitchenAid® Stainless Steel Cleaner and Polish Part Number 4396920 (not included): See...
...gas burner using mild detergent, warm water and degreaser. ■ Rinse with clean water and dry with paper towels. ■ Mild detergent and warm water. Turn knob to avoid grease buildup. The full-width drip tray collects grease and food particles that hold the burner in the "Outdoor Grill... areas, use a toothpick as it may break off ash particles from the grill. Cleaning Method: ■ Remove tray and set on a flat surface. ■ Wipe excess grease with soft, lint-free cloth. ■ KitchenAid® Stainless Steel Cleaner and Polish Part Number 4396920 (not included): See...


