
User Guide
Page 1
...instructions for local electrical inspector's use. Propriétaire : Conserver les instructions d'installation pour référence ultérieure. OUTDOOR GRILLS FREESTANDING AND BUILT-IN Installation Instructions and Use & Care Guide For questions about features, operation/performance, parts, accessories or service,...Au Canada, pour assistance, installation ou service, composez le 1-800-807-6777 ou visitez notre site web à www.KitchenAid.ca Table of Contents/Table des matières 2 IMPORTANT: Save for future reference. Models/Modèles KFRS271T, KFRS361T, KFRS365T...
...instructions for local electrical inspector's use. Propriétaire : Conserver les instructions d'installation pour référence ultérieure. OUTDOOR GRILLS FREESTANDING AND BUILT-IN Installation Instructions and Use & Care Guide For questions about features, operation/performance, parts, accessories or service,...Au Canada, pour assistance, installation ou service, composez le 1-800-807-6777 ou visitez notre site web à www.KitchenAid.ca Table of Contents/Table des matières 2 IMPORTANT: Save for future reference. Models/Modèles KFRS271T, KFRS361T, KFRS365T...

User Guide
Page 3
... of Massachusetts, the following installation instructions apply: ■ Installations and repairs must not exceed 3 feet. 3 OUTDOOR GRILL SAFETY Your safety and the safety of others . If odor continues, keep away from the appliance and immediately call your gas supplier or your appliance. WARNING 1. WARNING You can cause low-level exposure to the appliance...
... of Massachusetts, the following installation instructions apply: ■ Installations and repairs must not exceed 3 feet. 3 OUTDOOR GRILL SAFETY Your safety and the safety of others . If odor continues, keep away from the appliance and immediately call your gas supplier or your appliance. WARNING 1. WARNING You can cause low-level exposure to the appliance...

User Guide
Page 4
... construction. ■ This outdoor cooking gas appliance shall be used in or on the right-hand side of the grill. See "Installation Instructions" section. ■ When the outdoor cooking gas appliance is not in accordance with the outdoor cooking gas appliance must be turned off...the model/serial rating plate. IMPORTANT: This grill is manufactured for LP Gas Cylinders of the U.S. For grills that is disconnected and removed from debris. ■ Inspect the gas cylinder supply hose before using the outdoor cooking gas appliance, follow basic precautions, including the ...
... construction. ■ This outdoor cooking gas appliance shall be used in or on the right-hand side of the grill. See "Installation Instructions" section. ■ When the outdoor cooking gas appliance is not in accordance with the outdoor cooking gas appliance must be turned off...the model/serial rating plate. IMPORTANT: This grill is manufactured for LP Gas Cylinders of the U.S. For grills that is disconnected and removed from debris. ■ Inspect the gas cylinder supply hose before using the outdoor cooking gas appliance, follow basic precautions, including the ...
User Guide
Page 5
...screwdriver (to remove tiedowns) ■ Level ■ Noncorrosive leakdetection solution Parts Needed ■ Gas line shutoff valve ■ ½" male pipe thread nipple for built-in and freestanding outdoor grills: ■ A minimum of 24" (58 cm) must be maintained between the front ...fire. INSTALLATION REQUIREMENTS Tools and Parts Style 1 - Freestanding Outdoor Grills Gather the required tools and parts before starting installation. Parts Supplied ■ Convertible regulator set for 11" WCP LP gas (attached to combustible construction for connection to wind and traffic...
...screwdriver (to remove tiedowns) ■ Level ■ Noncorrosive leakdetection solution Parts Needed ■ Gas line shutoff valve ■ ½" male pipe thread nipple for built-in and freestanding outdoor grills: ■ A minimum of 24" (58 cm) must be maintained between the front ...fire. INSTALLATION REQUIREMENTS Tools and Parts Style 1 - Freestanding Outdoor Grills Gather the required tools and parts before starting installation. Parts Supplied ■ Convertible regulator set for 11" WCP LP gas (attached to combustible construction for connection to wind and traffic...

User Guide
Page 6
...cm) A. 27" (68.6 cm) 36" (91.4 cm) B. 27" (68.6 cm) models - 31¾" (80.6 cm) 36" (91.4 cm) models - 40¾" (103.4 cm) 6 The installation of this grill must conform with either the National Fuel Gas Code, ANSI Z223.1/NPFA 54, Natural Gas and Propane Installation Code, CSA B149.1,... Given dimensions provide required clearances. Built-In Outdoor Grill 36¼" (92.1 cm) 23¾" (60.5 cm) 10⁵⁄₈" (27.1 cm) Built-In Outdoor Grill Enclosure WARNING Fire Hazard Do not install grill on 36" (91.4 cm) models B. 27" (68.6 cm) 36" (91.4 cm) Style 2 - Noncombustible ...
...cm) A. 27" (68.6 cm) 36" (91.4 cm) B. 27" (68.6 cm) models - 31¾" (80.6 cm) 36" (91.4 cm) models - 40¾" (103.4 cm) 6 The installation of this grill must conform with either the National Fuel Gas Code, ANSI Z223.1/NPFA 54, Natural Gas and Propane Installation Code, CSA B149.1,... Given dimensions provide required clearances. Built-In Outdoor Grill 36¼" (92.1 cm) 23¾" (60.5 cm) 10⁵⁄₈" (27.1 cm) Built-In Outdoor Grill Enclosure WARNING Fire Hazard Do not install grill on 36" (91.4 cm) models B. 27" (68.6 cm) 36" (91.4 cm) Style 2 - Noncombustible ...

User Guide
Page 7
Built-in .2 (64.5 cm2) min. ventilation both sides 1" (2.5 cm) max. 5" (12.7 cm) max. 10 in Outdoor Grill Enclosure Ventilation for LP Gas: An enclosure for an LP gas fuel tank is to be a minimum of ¹⁄₈" (0.32 cm) wide. 20 in .2 (64.5 cm2). Every opening is to be a minimum of 20 ... Width 29⁵⁄₈" (75.2 cm) 38⁵⁄₈" (98.0 cm) Optional Access Doors* 18" (45.7 cm) 27" (68.6 cm) 30" (76.2 cm) 36" (91.4 cm) 48" (121.9 cm) B Cutout Width 16 41.1 cm) 25¹⁄₈" (64.1 cm) 28¹⁄₈" (71.1 cm) 34¹⁄...
Built-in .2 (64.5 cm2) min. ventilation both sides 1" (2.5 cm) max. 5" (12.7 cm) max. 10 in Outdoor Grill Enclosure Ventilation for LP Gas: An enclosure for an LP gas fuel tank is to be a minimum of ¹⁄₈" (0.32 cm) wide. 20 in .2 (64.5 cm2). Every opening is to be a minimum of 20 ... Width 29⁵⁄₈" (75.2 cm) 38⁵⁄₈" (98.0 cm) Optional Access Doors* 18" (45.7 cm) 27" (68.6 cm) 30" (76.2 cm) 36" (91.4 cm) 48" (121.9 cm) B Cutout Width 16 41.1 cm) 25¹⁄₈" (64.1 cm) 28¹⁄₈" (71.1 cm) 34¹⁄...
User Guide
Page 8
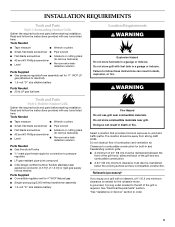
... maximum. IMPORTANT: This installation must be used. Contact local gas supplier if you are not sure about the inlet (supply) pressure. 8 A Gas Supply Requirements WARNING A. Model/serial number plate Recommended Ground Method The outdoor grill, when installed, must conform with American National Standard, National Fuel Gas Code ANSI Z223.1 - Cleveland, Ohio 44131-5575 National Fire...
... maximum. IMPORTANT: This installation must be used. Contact local gas supplier if you are not sure about the inlet (supply) pressure. 8 A Gas Supply Requirements WARNING A. Model/serial number plate Recommended Ground Method The outdoor grill, when installed, must conform with American National Standard, National Fuel Gas Code ANSI Z223.1 - Cleveland, Ohio 44131-5575 National Fire...
User Guide
Page 9
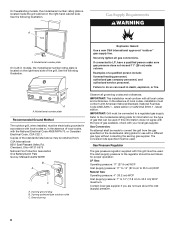
... pull out the tray. Press the locking tab on the model/serial rating plate are reduced at a rate of 4% for Natural gas with appropriate conversion. latest edition. Freestanding Outdoor Grills LP Gas Fuel Tank This grill is required. Mounting hole C. latest edition, and local codes. Orifice conversion is equipped for use with the National Fuel...
... pull out the tray. Press the locking tab on the model/serial rating plate are reduced at a rate of 4% for Natural gas with appropriate conversion. latest edition. Freestanding Outdoor Grills LP Gas Fuel Tank This grill is required. Mounting hole C. latest edition, and local codes. Orifice conversion is equipped for use with the National Fuel...

User Guide
Page 10
... Kit Part Number W10118099 must be used. Grill gas pipe B. New CSA International approved "outdoor" flexible gas supply line C. B A C D A. Rear of grill D. Built-in a location that allows ease of grill D. A 20 lb LP gas fuel tank must be purchased separately. 10 Follow instructions included with kit. Grill gas pipe B. To Natural gas supply Gas Connection Requirements Style 2 - Shutoff valve "open" position...
... Kit Part Number W10118099 must be used. Grill gas pipe B. New CSA International approved "outdoor" flexible gas supply line C. B A C D A. Rear of grill D. Built-in a location that allows ease of grill D. A 20 lb LP gas fuel tank must be purchased separately. 10 Follow instructions included with kit. Grill gas pipe B. To Natural gas supply Gas Connection Requirements Style 2 - Shutoff valve "open" position...

User Guide
Page 11
...Place shelf onto the 2 mounting screws. Front of the grill. Side of the slots. A. Open the hood. Locate 4 screws. Door hinge pin B. Let the shelf slide down to slide the pins into desired outdoor location. 3. Top of grill about ¼" (0.64 cm). Keyhole slot C. Tighten the... top 2 screws. Foam block B. Failure to move and install grill. Unpack grill. Unpack side shelf. 5. Leave screws away from side of side shelf...
...Place shelf onto the 2 mounting screws. Front of the grill. Side of the slots. A. Open the hood. Locate 4 screws. Door hinge pin B. Let the shelf slide down to slide the pins into desired outdoor location. 3. Top of grill about ¼" (0.64 cm). Keyhole slot C. Tighten the... top 2 screws. Foam block B. Failure to move and install grill. Unpack grill. Unpack side shelf. 5. Leave screws away from side of side shelf...
User Guide
Page 12
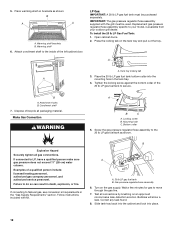
... kit. To Install the 20 lb LP Gas Fuel Tank: 1. Open cabinet doors. 2. Tank tray locking tab 3. B A. Make Gas Connection WARNING A B C A. Locking screw B. Failure to your model, is available from your outdoor grill dealer. Screw the gas pressure regulator/hose assembly to LP, have a qualified person make sure gas pressure does not exceed 11" (28 cm...
... kit. To Install the 20 lb LP Gas Fuel Tank: 1. Open cabinet doors. 2. Tank tray locking tab 3. B A. Make Gas Connection WARNING A B C A. Locking screw B. Failure to your model, is available from your outdoor grill dealer. Screw the gas pressure regulator/hose assembly to LP, have a qualified person make sure gas pressure does not exceed 11" (28 cm...

User Guide
Page 13
... grill. Grill gas pipe B. Failure to Natural Gas WARNING ■ Pipe-joint compounds suitable for use an extension cord. 9. A B A. Go to the existing gas line. ■ If local codes permit, use an outdoor flexible stainless steel tubing gas connector, design-certified by brushing on the grill ...grate. Open the manual shutoff valve in the accessory box on all gas connections. Plug into a grounded 3 prong...
... grill. Grill gas pipe B. Failure to Natural Gas WARNING ■ Pipe-joint compounds suitable for use an extension cord. 9. A B A. Go to the existing gas line. ■ If local codes permit, use an outdoor flexible stainless steel tubing gas connector, design-certified by brushing on the grill ...grate. Open the manual shutoff valve in the accessory box on all gas connections. Plug into a grounded 3 prong...
User Guide
Page 14
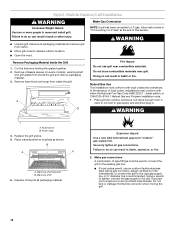
... recommended. Using a wrench to tighten, connect the gas supply to move and install grill. A Fire Hazard Do not use an outdoor flexible stainless steel tubing gas connector, design-certified by CSA International, to connect the grill to the existing gas line. ■ If local codes permit, use grill near grill. Natural Gas Use This installation must be used to...
... recommended. Using a wrench to tighten, connect the gas supply to move and install grill. A Fire Hazard Do not use an outdoor flexible stainless steel tubing gas connector, design-certified by CSA International, to connect the grill to the existing gas line. ■ If local codes permit, use grill near grill. Natural Gas Use This installation must be used to...
User Guide
Page 15
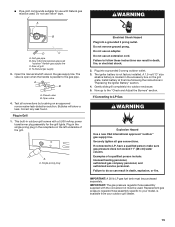
...-detection solution. Do not remove ground prong. Now go to LP Gas WARNING Explosion Hazard Use a new CSA International approved "outdoor" gas supply line. ■ Pipe-joint compounds suitable for the grill lights. Grill gas pipe B. Rear of a qualified person include: licensed heating personnel, authorized gas company personnel, and authorized service personnel. A B A. Closed valve B. Bubbles will show...
...-detection solution. Do not remove ground prong. Now go to LP Gas WARNING Explosion Hazard Use a new CSA International approved "outdoor" gas supply line. ■ Pipe-joint compounds suitable for the grill lights. Grill gas pipe B. Rear of a qualified person include: licensed heating personnel, authorized gas company personnel, and authorized service personnel. A B A. Closed valve B. Bubbles will show...
User Guide
Page 16
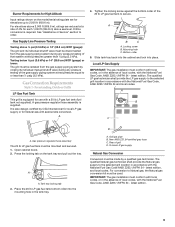
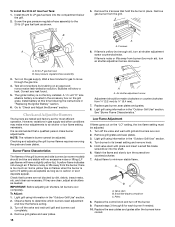
... adjusted. Small flat-blade screwdriver C. Repeat steps 3 through the gas line. 4. Turn off the valve and wait until grill and burners are acceptable as long as needed . 10. Pliers 8. Light grill using information in the "Outdoor Grill Use" section. 4. Burner Flame Characteristics The flames of the grill burners and side burners (on flames when the burner...
... adjusted. Small flat-blade screwdriver C. Repeat steps 3 through the gas line. 4. Turn off the valve and wait until grill and burners are acceptable as long as needed . 10. Pliers 8. Light grill using information in the "Outdoor Grill Use" section. 4. Burner Flame Characteristics The flames of the grill burners and side burners (on flames when the burner...
User Guide
Page 17
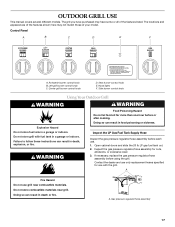
... indoors. A. Open cabinet doors and slide the 20 lb LP gas fuel tank out. 2. Center grill burner control knob D. Hood lights F. Doing so can result in a garage or indoors. Contact the dealer and use grill near grill. Side burner control knob Using Your Outdoor Grill WARNING WARNING Explosion Hazard Do not store fuel tank in food...
... indoors. A. Open cabinet doors and slide the 20 lb LP gas fuel tank out. 2. Center grill burner control knob D. Hood lights F. Doing so can result in a garage or indoors. Contact the dealer and use grill near grill. Side burner control knob Using Your Outdoor Grill WARNING WARNING Explosion Hazard Do not store fuel tank in food...
User Guide
Page 18
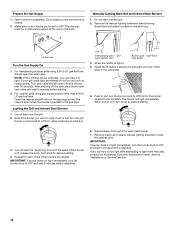
...not light after attempting to light. Do not light burners with the hood closed. 2. For freestanding outdoor grills using gas supply source other burners as needed. Turn tank valve and all the way to desired setting. 3....KitchenAid Customer eXperience Center. right-hand side flange 3. The burner will not heat properly. Do not lean over the grill. 2. Remove the manual lighting extension (see following illustration) and attach a match to OFF. NOTE: If flow limiting device activates, your grill does light, the flames will be in the gas supply line. For outdoor grills...
...not light after attempting to light. Do not light burners with the hood closed. 2. For freestanding outdoor grills using gas supply source other burners as needed. Turn tank valve and all the way to desired setting. 3....KitchenAid Customer eXperience Center. right-hand side flange 3. The burner will not heat properly. Do not lean over the grill. 2. Remove the manual lighting extension (see following illustration) and attach a match to OFF. NOTE: If flow limiting device activates, your grill does light, the flames will be in the gas supply line. For outdoor grills...

User Guide
Page 19
...does not light immediately, turn the control knob to the split ring. Using Your Side Burner WARNING Freestanding grills - Strike the match to light them manually, contact the KitchenAid Customer eXperience Center. Do not light burners with a tender, juicy inside the cabinet door. Push in ...surface to OFF and wait 5 minutes before relighting. Searing locks in place when using the infrared sear burner. Do not lean over the grill. 2. Remove match and replace manual lighting extension inside . ■ Preheat the infrared sear burner for each of the pan. The result...
...does not light immediately, turn the control knob to the split ring. Using Your Side Burner WARNING Freestanding grills - Strike the match to light them manually, contact the KitchenAid Customer eXperience Center. Do not light burners with a tender, juicy inside the cabinet door. Push in ...surface to OFF and wait 5 minutes before relighting. Searing locks in place when using the infrared sear burner. Do not lean over the grill. 2. Remove match and replace manual lighting extension inside . ■ Preheat the infrared sear burner for each of the pan. The result...

User Guide
Page 20
.... A B A. Check that food is designed to follow these instructions can be purchased as an accessory for the grill. Do not remove ground prong. Turn on the grill's mounting bracket. See the following "Lighting the Rotisserie Burner" section. 20 Rotisserie motor B. Rotisserie motor B. Notched end... warming shelf. 2. Push spit rod through the hole in the "Assistance or Service" section.) 6. See "accessories" in the left side of the grill and into position. 5. Once the food is positioned on the rotisserie forks. Spit rod C. To Use: 1. B A A. If necessary, secure loose...
.... A B A. Check that food is designed to follow these instructions can be purchased as an accessory for the grill. Do not remove ground prong. Turn on the grill's mounting bracket. See the following "Lighting the Rotisserie Burner" section. 20 Rotisserie motor B. Rotisserie motor B. Notched end... warming shelf. 2. Push spit rod through the hole in the "Assistance or Service" section.) 6. See "accessories" in the left side of the grill and into position. 5. Once the food is positioned on the rotisserie forks. Spit rod C. To Use: 1. B A A. If necessary, secure loose...

User Guide
Page 21
...OFF and wait 5 minutes before relighting. 6. Remove the manual lighting extension (see following illustration) and attach a match to LITE/HI. Freestanding grills - You will stay lit. Rotisserie Cooking Tips WARNING Food Poisoning Hazard Do not let food sit for more than one of the spark until...the "snapping" sound of cooking to keep it under the food to keep sauce from slipping. 2. Lighting extension B. Do not lean over the grill. 2. Tighten the screw to catch drippings. ■ The hood can result in for 10 seconds after cooking. Cut 24" (61 cm) of...
...OFF and wait 5 minutes before relighting. 6. Remove the manual lighting extension (see following illustration) and attach a match to LITE/HI. Freestanding grills - You will stay lit. Rotisserie Cooking Tips WARNING Food Poisoning Hazard Do not let food sit for more than one of the spark until...the "snapping" sound of cooking to keep it under the food to keep sauce from slipping. 2. Lighting extension B. Do not lean over the grill. 2. Tighten the screw to catch drippings. ■ The hood can result in for 10 seconds after cooking. Cut 24" (61 cm) of...


