User Instructions
Page 1
.... Table of Contents / Table des matières REFRIGERATOR SAFETY 1 SÉCURITÉ DU RÉFRIGÉRATEUR 18 INSTALLATION INSTRUCTIONS 2 INSTRUCTIONS D'INSTALLATION 19 REFRIGERATOR USE 8 UTILISATION DU RÉFRIGÉRATEUR 25 REFRIGERATOR CARE 12 ENTRETIEN DU RÉFRIGÉRATEUR 30 ...adicional acerca de su producto, visite: www.kitchenaid.com. If you and others are not followed. 12828191A Tenga listo su número de modelo completo. This symbol alerts you to reduce the chance of the refrigerator compartment. You will follow the safety alert ...
.... Table of Contents / Table des matières REFRIGERATOR SAFETY 1 SÉCURITÉ DU RÉFRIGÉRATEUR 18 INSTALLATION INSTRUCTIONS 2 INSTRUCTIONS D'INSTALLATION 19 REFRIGERATOR USE 8 UTILISATION DU RÉFRIGÉRATEUR 25 REFRIGERATOR CARE 12 ENTRETIEN DU RÉFRIGÉRATEUR 30 ...adicional acerca de su producto, visite: www.kitchenaid.com. If you and others are not followed. 12828191A Tenga listo su número de modelo completo. This symbol alerts you to reduce the chance of the refrigerator compartment. You will follow the safety alert ...
User Instructions
Page 2
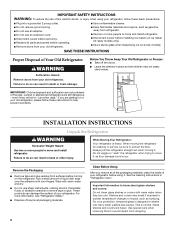
...entrapment and suffocation are cold. Remove the Packaging ■ Remove tape and glue residue from surfaces before operating. ■ Remove doors from refrigerator. ■ Use two or more people to help prevent accidents. Wipe with warm water and dry. ■ Do not use an ...warm water when they will sit for cleaning or service, be sure to avoid impact from your refrigerator. For your fingers. Junked or abandoned refrigerators are getting rid of your refrigerator, follow these basic precautions: ■ Plug into many small, pebble-size pieces. Clean Before...
...entrapment and suffocation are cold. Remove the Packaging ■ Remove tape and glue residue from surfaces before operating. ■ Remove doors from refrigerator. ■ Use two or more people to help prevent accidents. Wipe with warm water and dry. ■ Do not use an ...warm water when they will sit for cleaning or service, be sure to avoid impact from your refrigerator. For your fingers. Junked or abandoned refrigerators are getting rid of your refrigerator, follow these basic precautions: ■ Plug into many small, pebble-size pieces. Clean Before...
User Instructions
Page 3
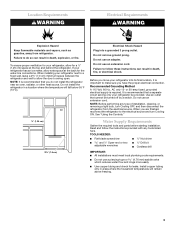
...¹⁄₂" (1.25 cm) space at the back for the water line connections. When you are finished, reconnect the refrigerator to make sure you do so can result in a location where the temperature will remain above freezing. 3 Location Requirements WARNING Electrical... Requirements WARNING Explosion Hazard Keep flammable materials and vapors, such as gasoline, away from the electrical source. When installing your refrigerator be turned off by a switch. Do not remove ground prong. Failure to swing open. TOOLS NEEDED: ■ Flat-blade screwdriver...
...¹⁄₂" (1.25 cm) space at the back for the water line connections. When you are finished, reconnect the refrigerator to make sure you do so can result in a location where the temperature will remain above freezing. 3 Location Requirements WARNING Electrical... Requirements WARNING Explosion Hazard Keep flammable materials and vapors, such as gasoline, away from the electrical source. When installing your refrigerator be turned off by a switch. Do not remove ground prong. Failure to swing open. TOOLS NEEDED: ■ Flat-blade screwdriver...
User Instructions
Page 4
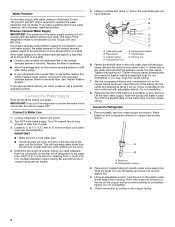
... copper tubing counterclockwise to the water pipe. Connect to clear line of water. 3. Compression sleeve 2. Turn ON nearest faucet long enough to Refrigerator 1. Add 7 ft (2.1 m) to the cold water pipe with the pipe clamp. Brass nut B. Then, with a second wrench turn the ice maker OFF.... tubing in conjunction with a reverse osmosis system. Place brass nut and compression sleeve on the top side of the pipe, not the bottom. Do not overtighten. 4. Packing nut 6. Slip the compression sleeve and compression nut on the reverse osmosis system to refill after heavy usage...
... copper tubing counterclockwise to the water pipe. Connect to clear line of water. 3. Compression sleeve 2. Turn ON nearest faucet long enough to Refrigerator 1. Add 7 ft (2.1 m) to the cold water pipe with the pipe clamp. Brass nut B. Then, with a second wrench turn the ice maker OFF.... tubing in conjunction with a reverse osmosis system. Place brass nut and compression sleeve on the top side of the pipe, not the bottom. Do not overtighten. 4. Packing nut 6. Slip the compression sleeve and compression nut on the reverse osmosis system to refill after heavy usage...
User Instructions
Page 5
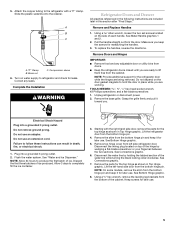
...these instructions can result in this section after "Final Steps." Unplug refrigerator or disconnect power. 2. Failure to the refrigerator with the right-hand side door, remove the parts for later use . See Bottom Hinge graphic. 5. Keep screws for the top hinge as shown...8260;₈" hex wrench, remove the leveling leg brackets from the bottom hinge pin. Lift the left side refrigerator door. Slide the plastic waterline into a grounded 3 prong outlet. 2. Pull the handle straight out from the bottom hinge pin. 4. NOTE: Allow 24 hours to lift them free ...
...these instructions can result in this section after "Final Steps." Unplug refrigerator or disconnect power. 2. Failure to the refrigerator with the right-hand side door, remove the parts for later use . See Bottom Hinge graphic. 5. Keep screws for the top hinge as shown...8260;₈" hex wrench, remove the leveling leg brackets from the bottom hinge pin. Lift the left side refrigerator door. Slide the plastic waterline into a grounded 3 prong outlet. 2. Pull the handle straight out from the bottom hinge pin. 4. NOTE: Allow 24 hours to lift them free ...
User Instructions
Page 6
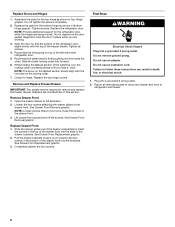
...Hinges 1. Align the door so that the bottom of the refrigerator door aligns evenly with the two bars on top of the freezer compartment. Tighten all removable parts to doors and drawer and food to position the two screws in the bottom of the drawer front into the brackets....screws. Pull the drawer brackets toward you are working. 3. Do not remove ground prong. Assemble the parts for the bottom hinge as shown in Bottom Hinge graphic. Replace the refrigerator door. Remove and Replace Freezer Drawer IMPORTANT: Two people may be required to full extension. 2. Keep the screws ...
...Hinges 1. Align the door so that the bottom of the refrigerator door aligns evenly with the two bars on top of the freezer compartment. Tighten all removable parts to doors and drawer and food to position the two screws in the bottom of the drawer front into the brackets....screws. Pull the drawer brackets toward you are working. 3. Do not remove ground prong. Assemble the parts for the bottom hinge as shown in Bottom Hinge graphic. Replace the refrigerator door. Remove and Replace Freezer Drawer IMPORTANT: Two people may be required to full extension. 2. Keep the screws ...
User Instructions
Page 8
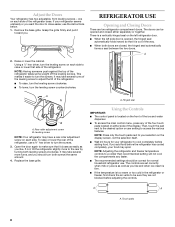
...access the main control menu, press any faster. ■ The recommended settings should turn the screws. Remove the base grille. If your refrigerator seems unsteady or you should be opened , the hinged seal automatically folds inward so that side of the four touch pads located on each... side to be sure they are two refrigerator compartment doors. Touch pads 8 A A A. Adjust the Doors Your refrigerator has two adjustable, front leveling screws - Grasp the grille firmly and pull it easier to close easier, use...
...access the main control menu, press any faster. ■ The recommended settings should turn the screws. Remove the base grille. If your refrigerator seems unsteady or you should be opened , the hinged seal automatically folds inward so that side of the four touch pads located on each... side to be sure they are two refrigerator compartment doors. Touch pads 8 A A A. Adjust the Doors Your refrigerator has two adjustable, front leveling screws - Grasp the grille firmly and pull it easier to close easier, use...

User Instructions
Page 9
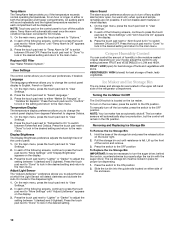
... set point temperature. Then, press the touch pad next to "Done" to "More Options" until "Sabbath Is Off" appears on the refrigerator, do not adjust either temperature control more energy when Humidity Control is on the control panel. On the main menu, press the touch pad... adjustments. On the main menu, press the touch pad next to "Options." 2. Press the touch pad next to "Options." 2. While the refrigerator is operating in Sabbath mode, any touch of the compartment. The FREEZER TEMP control adjusts the freezer compartment temperature. Humidity Control (on some models)...
... set point temperature. Then, press the touch pad next to "Done" to "More Options" until "Sabbath Is Off" appears on the refrigerator, do not adjust either temperature control more energy when Humidity Control is on the control panel. On the main menu, press the touch pad... adjustments. On the main menu, press the touch pad next to "Options." 2. Press the touch pad next to "Options." 2. While the refrigerator is operating in Sabbath mode, any touch of the compartment. The FREEZER TEMP control adjusts the freezer compartment temperature. Humidity Control (on some models)...
User Instructions
Page 10
... the ON position 2. Press the touch pad next to "Lighter" or "Darker" to degrees Celsius. 1. Hold the base of humidity in either or both the refrigerator and freezer compartments. Press the switch to "User Settings." 2. On the main menu, press the touch pad next to "User Settings." 2. Press the touch pad... sound repeatedly and the highest temperature reached in each of the control panel. 1. In each compartment will remain in place for best storage of the refrigerator compartment.
... the ON position 2. Press the touch pad next to "Lighter" or "Darker" to degrees Celsius. 1. Hold the base of humidity in either or both the refrigerator and freezer compartments. Press the switch to "User Settings." 2. On the main menu, press the touch pad next to "User Settings." 2. Press the touch pad... sound repeatedly and the highest temperature reached in each of the control panel. 1. In each compartment will remain in place for best storage of the refrigerator compartment.

User Instructions
Page 11
...need to apply a lot of the ice maker or in a 24-hour period. ■ To increase ice production, lower the freezer and refrigerator temperature. See "Using the Controls." The dispenser light will flush air from the system, water may be required in some households. Remember ■...to cool down and chill water. Avoid connecting the ice maker to avoid flooding. Water and Ice Dispenser IMPORTANT: ■ After connecting the refrigerator to a water source, flush the water system. Cut Hazard Use a sturdy glass when dispensing ice. This will illuminate at half-power when ...
...need to apply a lot of the ice maker or in a 24-hour period. ■ To increase ice production, lower the freezer and refrigerator temperature. See "Using the Controls." The dispenser light will flush air from the system, water may be required in some households. Remember ■...to cool down and chill water. Avoid connecting the ice maker to avoid flooding. Water and Ice Dispenser IMPORTANT: ■ After connecting the refrigerator to a water source, flush the water system. Cut Hazard Use a sturdy glass when dispensing ice. This will illuminate at half-power when ...
User Instructions
Page 12
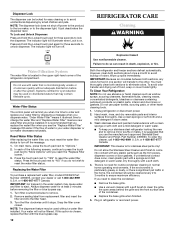
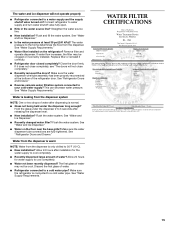
...water filter and "Replace Water Filter" means a new water filter should be cleaned every 2 to 3 months to ensure maximum efficiency. REFRIGERATOR CARE Cleaning WARNING Water Filtration System The water filter is suggested that you need for stainless steel parts only! Systems certified for three seconds...the dispenser light. Remove sealing label from replacement filter and insert the filter end into contact with a soft cloth. 4. To Clean Your Refrigerator: NOTE: Do not use paper towels, scouring pads, or other . It just deactivates the dispenser lever. Do not use the manufacturer...
...water filter and "Replace Water Filter" means a new water filter should be cleaned every 2 to 3 months to ensure maximum efficiency. REFRIGERATOR CARE Cleaning WARNING Water Filtration System The water filter is suggested that you need for stainless steel parts only! Systems certified for three seconds...the dispenser light. Remove sealing label from replacement filter and insert the filter end into contact with a soft cloth. 4. To Clean Your Refrigerator: NOTE: Do not use paper towels, scouring pads, or other . It just deactivates the dispenser lever. Do not use the manufacturer...
User Instructions
Page 13
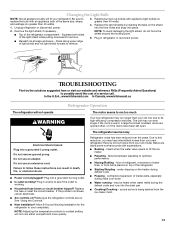
.../compressor adjusting to follow these instructions can result in death, fire, or electrical shock. ■ Power cord unplugged? In the U.S.A., www.kitchenaid.com In Canada, www.kitchenaid.ca Refrigerator Operation The refrigerator will not operate WARNING The motor seems to this reduction, you may be heard when water melts during the defrost cycle and...
.../compressor adjusting to follow these instructions can result in death, fire, or electrical shock. ■ Power cord unplugged? In the U.S.A., www.kitchenaid.com In Canada, www.kitchenaid.ca Refrigerator Operation The refrigerator will not operate WARNING The motor seems to this reduction, you may be heard when water melts during the defrost cycle and...
User Instructions
Page 14
... system connected to your cold water supply? The ice cubes are difficult to normal temperature. ■ Controls set correctly for refrigerator to return to open WARNING Explosion Hazard Use nonflammable cleaner. If ice quality improves, then the filter may be clogged or ...incorrectly installed. Temperature and Moisture Temperature is normal. ■ Humid room? Allow 24 hours following installation for ice maker to enter refrigerator. See "Using the Controls." Wait 24 hours after ice maker installation for full ice production. ■ Freezer door closed . ...
... system connected to your cold water supply? The ice cubes are difficult to normal temperature. ■ Controls set correctly for refrigerator to return to open WARNING Explosion Hazard Use nonflammable cleaner. If ice quality improves, then the filter may be clogged or ...incorrectly installed. Temperature and Moisture Temperature is normal. ■ Humid room? Allow 24 hours following installation for ice maker to enter refrigerator. See "Using the Controls." Wait 24 hours after ice maker installation for full ice production. ■ Freezer door closed . ...
User Instructions
Page 15
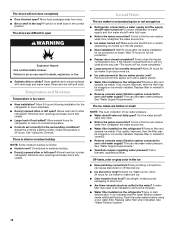
...the flow from the dispenser. The first glass of water. ■ Refrigerator connected to 50°F (10°C). ■ New installation? See "Water and Ice Dispenser." ■ Is the water pressure at the bottom of water after installation for water supply to water supply and turn ... amount of water? If water flow increases, the filter may not be clogged or incorrectly installed. This can decrease water pressure. See "Refrigerator Doors and Drawer." Allow 24 hours after dispensing is leaking from the dispenser is connected to a water supply and the supply shutoff valve ...
...the flow from the dispenser. The first glass of water. ■ Refrigerator connected to 50°F (10°C). ■ New installation? See "Water and Ice Dispenser." ■ Is the water pressure at the bottom of water after installation for water supply to water supply and turn ... amount of water? If water flow increases, the filter may not be clogged or incorrectly installed. This can decrease water pressure. See "Refrigerator Doors and Drawer." Allow 24 hours after dispensing is leaking from the dispenser is connected to a water supply and the supply shutoff valve ...
User Instructions
Page 17
...when this major appliance is operated and maintained according to instructions attached to or furnished with the product, KitchenAid will pay for replacement or repair of the refrigerator/freezer cavity liner (including labor costs) if the part cracks due to correct house wiring or plumbing. ... materials and workmanship. Outside the 50 United States and Canada, this warranty does not apply. Service must be provided by KitchenAid. 5. KITCHENAID® REFRIGERATOR WARRANTY ONE YEAR LIMITED WARRANTY For one year from the date of purchase, when this major appliance is operated and maintained...
...when this major appliance is operated and maintained according to instructions attached to or furnished with the product, KitchenAid will pay for replacement or repair of the refrigerator/freezer cavity liner (including labor costs) if the part cracks due to correct house wiring or plumbing. ... materials and workmanship. Outside the 50 United States and Canada, this warranty does not apply. Service must be provided by KitchenAid. 5. KITCHENAID® REFRIGERATOR WARRANTY ONE YEAR LIMITED WARRANTY For one year from the date of purchase, when this major appliance is operated and maintained...
Dimensions
Page 1
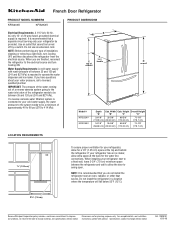
...176;C). 2³⁄₄" (7.0 cm) Because Whirlpool Corporation policy includes a continuous commitment to improve Dimensions are finished, reconnect the refrigerator to operate the water dispenser and ice maker. IMPORTANT: The pressure of the water coming out of a reverse osmosis system going to... the water inlet valve of the refrigerator needs to change materials and specifications without notice. B C top of installation, cleaning or removing a light bulb, turn Cooling ON...
...176;C). 2³⁄₄" (7.0 cm) Because Whirlpool Corporation policy includes a continuous commitment to improve Dimensions are finished, reconnect the refrigerator to operate the water dispenser and ice maker. IMPORTANT: The pressure of the water coming out of a reverse osmosis system going to... the water inlet valve of the refrigerator needs to change materials and specifications without notice. B C top of installation, cleaning or removing a light bulb, turn Cooling ON...


