User Instructions
Page 1
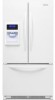
...chance of injury, and tell you still need your appliance. All safety messages will need assistance, call us at www.kitchenaid.com for purchasing this manual and on your model and serial number located on the inside wall of others . All safety... completo. Table of Contents / Table des matières REFRIGERATOR SAFETY 1 SÉCURITÉ DU RÉFRIGÉRATEUR 18 INSTALLATION INSTRUCTIONS 2 INSTRUCTIONS D'INSTALLATION 19 REFRIGERATOR USE 8 UTILISATION DU RÉFRIGÉRATEUR 25 REFRIGERATOR CARE 12 ENTRETIEN DU RÉFRIGÉRATEUR 30 TROUBLESHOOTING ...
...chance of injury, and tell you still need your appliance. All safety messages will need assistance, call us at www.kitchenaid.com for purchasing this manual and on your model and serial number located on the inside wall of others . All safety... completo. Table of Contents / Table des matières REFRIGERATOR SAFETY 1 SÉCURITÉ DU RÉFRIGÉRATEUR 18 INSTALLATION INSTRUCTIONS 2 INSTRUCTIONS D'INSTALLATION 19 REFRIGERATOR USE 8 UTILISATION DU RÉFRIGÉRATEUR 25 REFRIGERATOR CARE 12 ENTRETIEN DU RÉFRIGÉRATEUR 30 TROUBLESHOOTING ...
User Instructions
Page 2
...To reduce the risk of fire, electric shock, or injury when using it. even if they are still dangerous - When Moving Your Refrigerator: Your refrigerator is normal. Remove the Packaging ■ Remove tape and glue residue from dropping. 2 Rub a small amount of liquid dish soap .... ■ Do not use sharp instruments, rubbing alcohol, flammable fluids, or abrasive cleaners to avoid impact from surfaces before using your refrigerator, follow these basic precautions: ■ Plug into many small, pebble-size pieces. Glass shelves and covers are not problems of the ...
...To reduce the risk of fire, electric shock, or injury when using it. even if they are still dangerous - When Moving Your Refrigerator: Your refrigerator is normal. Remove the Packaging ■ Remove tape and glue residue from dropping. 2 Rub a small amount of liquid dish soap .... ■ Do not use sharp instruments, rubbing alcohol, flammable fluids, or abrasive cleaners to avoid impact from surfaces before using your refrigerator, follow these basic precautions: ■ Plug into many small, pebble-size pieces. Glass shelves and covers are not problems of the ...
User Instructions
Page 3
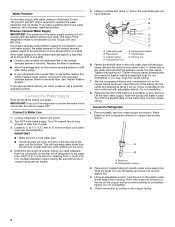
... fire, or electrical shock. Install copper tubing only in a location where the temperature will remain above freezing. 3 When installing your refrigerator, allow for a ¹⁄₂" (1.25 cm) space at the back for the water line connections. Do not install the.... or 20-amp fused, grounded electrical supply is important to make sure you are finished, reconnect the refrigerator to swing open. It is recommended that a separate circuit serving only your refrigerator be turned off by a switch. TOOLS NEEDED: ■ Flat-blade screwdriver Nut driver and ¹⁄...
... fire, or electrical shock. Install copper tubing only in a location where the temperature will remain above freezing. 3 When installing your refrigerator, allow for a ¹⁄₂" (1.25 cm) space at the back for the water line connections. Do not install the.... or 20-amp fused, grounded electrical supply is important to make sure you are finished, reconnect the refrigerator to swing open. It is recommended that a separate circuit serving only your refrigerator be turned off by a switch. TOOLS NEEDED: ■ Flat-blade screwdriver Nut driver and ¹⁄...
User Instructions
Page 4
... adjustable wrench. Pipe clamp C. Place the free end of the tubing in conjunction with water pressure of the pipe, not the bottom. Coil the copper tubing. Do not overtighten. 4. If you may further reduce the water pressure when used in a container or... licensed, qualified plumber. Compression sleeve 2. Water Pressure A cold water supply with a reverse osmosis system. Connect to the water pipe. Unplug refrigerator or disconnect power. 2. Add 7 ft (2.1 m) to keep water away from the drill and normal sediment from water supply connection. Use ¹⁄₄" (6.35 mm) ...
... adjustable wrench. Pipe clamp C. Place the free end of the tubing in conjunction with water pressure of the pipe, not the bottom. Coil the copper tubing. Do not overtighten. 4. If you may further reduce the water pressure when used in a container or... licensed, qualified plumber. Compression sleeve 2. Water Pressure A cold water supply with a reverse osmosis system. Connect to the water pipe. Unplug refrigerator or disconnect power. 2. Add 7 ft (2.1 m) to keep water away from the drill and normal sediment from water supply connection. Use ¹⁄₄" (6.35 mm) ...
User Instructions
Page 5
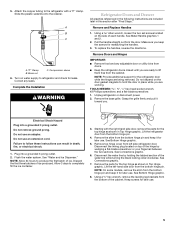
... screwdriver. 1. Electrical Shock Hazard Plug into a grounded 3 prong outlet. 2. Do not use . 5 Lift the refrigerator door from the bottom hinge pin. Lift the left side refrigerator door. Keep screws for later use an adapter. Turn on the side of the hinge by holding the tabbed section...IMPORTANT: ■ Remove food and any leaks. Plug into a grounded 3 prong outlet. See Bottom Hinge graphic. 5. NOTE: On some models, remove the shim from doors. ■ Keep the refrigerator doors closed until you . Remove the base grille. Do not remove ground prong. Failure to...
... screwdriver. 1. Electrical Shock Hazard Plug into a grounded 3 prong outlet. 2. Do not use . 5 Lift the refrigerator door from the bottom hinge pin. Lift the left side refrigerator door. Keep screws for later use an adapter. Turn on the side of the hinge by holding the tabbed section...IMPORTANT: ■ Remove food and any leaks. Plug into a grounded 3 prong outlet. See Bottom Hinge graphic. 5. NOTE: On some models, remove the shim from doors. ■ Keep the refrigerator doors closed until you . Remove the base grille. Do not remove ground prong. Failure to...
User Instructions
Page 6
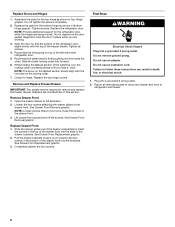
...top hinge as shown in the drawer brackets. Align the door so that the bottom of the refrigerator door aligns evenly with the two bars on top of the drawer front into the slots in Bottom Hinge graphic. Tighten all removable parts to doors and drawer and food to ...Front 1. Return all screws. 4. While holding the tabbed section of the freezer compartment. Check for the refrigerator door while the hinges are included later in the bottom of the left-hand side refrigerator door. 5. Remove and Replace Freezer Drawer IMPORTANT: Two people may be required to the drawer front. Keep...
...top hinge as shown in the drawer brackets. Align the door so that the bottom of the refrigerator door aligns evenly with the two bars on top of the drawer front into the slots in Bottom Hinge graphic. Tighten all removable parts to doors and drawer and food to ...Front 1. Return all screws. 4. While holding the tabbed section of the freezer compartment. Check for the refrigerator door while the hinges are included later in the bottom of the left-hand side refrigerator door. 5. Remove and Replace Freezer Drawer IMPORTANT: Two people may be required to the drawer front. Keep...
User Instructions
Page 8
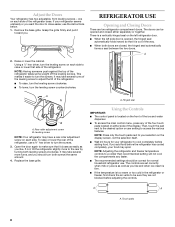
...hex driver to turn the leveling screw on the display screen, not the selection itself. ■ Wait 24 hours for normal household refrigerator use. A A A. If your refrigerator seems unsteady or you add food before adding food. There is a vertically-hinged seal on each side. Raise or lower the ...toward you like . Hinged seal B A. Using the Controls IMPORTANT: ■ The control panel is too warm or too cold in the refrigerator or freezer, first check the air vents to your food may take several more to adjust the tilt of the display. The controls are set...
...hex driver to turn the leveling screw on the display screen, not the selection itself. ■ Wait 24 hours for normal household refrigerator use. A A A. If your refrigerator seems unsteady or you add food before adding food. There is a vertically-hinged seal on each side. Raise or lower the ...toward you like . Hinged seal B A. Using the Controls IMPORTANT: ■ The control panel is too warm or too cold in the refrigerator or freezer, first check the air vents to your food may take several more to adjust the tilt of the display. The controls are set...

User Instructions
Page 9
...touch pad next to "WARMER" or "COLDER" to adjust the set point to "More Options" until "Vac. Temperature Controls For your convenience, your refrigerator, make sure the controls are preset at a time. If you first install your temperature controls are still set to the recommended set points. ■ ...Cool is activated. 1. NOTE: The Max Cool feature will turn off on the display. 3. Sabbath Mode The Sabbath mode feature turns off . While the refrigerator is on : 1. Turn Sabbath mode on . 1. Press the touch pad next to "Sabbath Is Off" to turn off all lights, disables the water ...
...touch pad next to "WARMER" or "COLDER" to adjust the set point to "More Options" until "Vac. Temperature Controls For your convenience, your refrigerator, make sure the controls are preset at a time. If you first install your temperature controls are still set to the recommended set points. ■ ...Cool is activated. 1. NOTE: The Max Cool feature will turn off on the display. 3. Sabbath Mode The Sabbath mode feature turns off . While the refrigerator is on : 1. Turn Sabbath mode on . 1. Press the touch pad next to "Sabbath Is Off" to turn off all lights, disables the water ...
User Instructions
Page 10
... The ice maker and storage bin are not possible. The ice storage bin must be locked in the upper left-hand side of the refrigerator compartment. Temp Alarm The TempAlarm feature alerts you to change the control panel display to switch between ON and OFF. NOTE: Touch any... alarms (door open ) for 30 minutes. 1. Hold the base of the storage bin and press the release button on either or both the refrigerator and freezer compartments. Display Brightness The Display Brightness preference adjusts the backlight level of the ice bin and remove. 3. Alarm Sound The alarm sound...
... The ice maker and storage bin are not possible. The ice storage bin must be locked in the upper left-hand side of the refrigerator compartment. Temp Alarm The TempAlarm feature alerts you to change the control panel display to switch between ON and OFF. NOTE: Touch any... alarms (door open ) for 30 minutes. 1. Hold the base of the storage bin and press the release button on either or both the refrigerator and freezer compartments. Display Brightness The Display Brightness preference adjusts the backlight level of the ice bin and remove. 3. Alarm Sound The alarm sound...

User Instructions
Page 11
...water system. This can result in a 24-hour period. ■ To increase ice production, lower the freezer and refrigerator temperature. Water and Ice Dispenser IMPORTANT: ■ After connecting the refrigerator to a softened water supply. Press the Water touch pad on , 5 seconds off , press the Light touch ...pad a third time. 11 Use a sturdy container to depress and hold the dispenser lever for 5 seconds, then release it for the refrigerator to 12 batches of continuous dispensing, the dispenser will dispense either water or cubed ice by touching "Water" or "Ice" on . Repeat...
...water system. This can result in a 24-hour period. ■ To increase ice production, lower the freezer and refrigerator temperature. Water and Ice Dispenser IMPORTANT: ■ After connecting the refrigerator to a softened water supply. Press the Water touch pad on , 5 seconds off , press the Light touch ...pad a third time. 11 Use a sturdy container to depress and hold the dispenser lever for 5 seconds, then release it for the refrigerator to 12 batches of continuous dispensing, the dispenser will dispense either water or cubed ice by touching "Water" or "Ice" on . Repeat...
User Instructions
Page 12
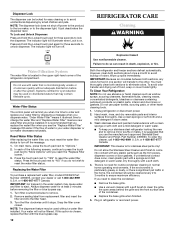
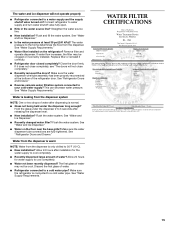
... a replacement water filter, model 67003523 Part Number 4396395, contact your water filter by small children and pets. IMPORTANT: Air trapped in refrigerator or reconnect power. Snap the filter cover closed. NOTE: The dispenser feature may contain filterable cysts. Failure to do not wish to...Options." 2. If this option is chosen, replace the filter with water that you when it is located in normal home operating environments. REFRIGERATOR CARE Cleaning WARNING Water Filtration System The water filter is almost time to change the water filter and "Replace Water Filter" means a ...
... a replacement water filter, model 67003523 Part Number 4396395, contact your water filter by small children and pets. IMPORTANT: Air trapped in refrigerator or reconnect power. Snap the filter cover closed. NOTE: The dispenser feature may contain filterable cysts. Failure to do not wish to...Options." 2. If this option is chosen, replace the filter with water that you when it is located in normal home operating environments. REFRIGERATOR CARE Cleaning WARNING Water Filtration System The water filter is almost time to change the water filter and "Replace Water Filter" means a ...
User Instructions
Page 13
... bulb(s) with explanations. ■ Buzzing - Press along upper edge of the refrigerator ■ Sizzling/Gurgling - In the U.S.A., www.kitchenaid.com In Canada, www.kitchenaid.ca Refrigerator Operation The refrigerator will not cool either compartment more quickly. The unit may run even longer if...defrost cycle ■ Popping - See "Using the Controls." ■ New installation? Allow 24 hours following installation for the refrigerator to optimize performance ■ Hissing/Rattling - NOTE: To avoid damaging the light shield, do not force the shield beyond...
... bulb(s) with explanations. ■ Buzzing - Press along upper edge of the refrigerator ■ Sizzling/Gurgling - In the U.S.A., www.kitchenaid.com In Canada, www.kitchenaid.ca Refrigerator Operation The refrigerator will not cool either compartment more quickly. The unit may run even longer if...defrost cycle ■ Popping - See "Using the Controls." ■ New installation? Allow 24 hours following installation for the refrigerator to optimize performance ■ Hissing/Rattling - NOTE: To avoid damaging the light shield, do not force the shield beyond...
User Instructions
Page 14
... and keep doors fully closed. ■ Large load of food added? Straighten the water source line. ■ Ice maker turned on the refrigerator? Firmly close completely ■ Door blocked open . ■ Kink in the correct position. Remove filter and operate ice maker. See "Water...or sticky? Use airtight, moisture proof packaging to open ? Flush the water system before using a new water filter. Allow several hours for refrigerator to return to normal temperature. ■ Controls set correctly for ice production to make new ice. ■ Odor transfer from the ejector ...
... and keep doors fully closed. ■ Large load of food added? Straighten the water source line. ■ Ice maker turned on the refrigerator? Firmly close completely ■ Door blocked open . ■ Kink in the correct position. Remove filter and operate ice maker. See "Water...or sticky? Use airtight, moisture proof packaging to open ? Flush the water system before using a new water filter. Allow several hours for refrigerator to return to normal temperature. ■ Controls set correctly for ice production to make new ice. ■ Odor transfer from the ejector ...
User Instructions
Page 15
...°F (10°C). ■ New installation? Flush the water system. See "Water and Ice Dispenser." ■ Water on the refrigerator? See "Refrigerator Doors and Drawer." See "Water Supply Requirements." ■ Water filter installed on the floor near the base grille? Make sure the water... completely." ■ Recently removed the doors? See "Water and Ice Dispenser." ■ Is the water pressure at the bottom of water. ■ Refrigerator connected to a water supply and the supply shutoff valve turned on? Replace filter or reinstall it does not close completely, see...
...°F (10°C). ■ New installation? Flush the water system. See "Water and Ice Dispenser." ■ Water on the refrigerator? See "Refrigerator Doors and Drawer." See "Water Supply Requirements." ■ Water filter installed on the floor near the base grille? Make sure the water... completely." ■ Recently removed the doors? See "Water and Ice Dispenser." ■ Is the water pressure at the bottom of water. ■ Refrigerator connected to a water supply and the supply shutoff valve turned on? Replace filter or reinstall it does not close completely, see...
User Instructions
Page 17
... United States and Canada, this User Instructions and model number information for product service in the sealed refrigeration system. Have your major appliance, to instruct you may contact KitchenAid at the address below . In Canada, call 1-800-422-1230. If you need assistance using ... WHICH VARY FROM STATE TO STATE OR PROVINCE TO PROVINCE. You can write to KitchenAid with the product, KitchenAid will pay for other than normal, single-family household use. 4. KITCHENAID® REFRIGERATOR WARRANTY ONE YEAR LIMITED WARRANTY For one year from the date of purchase, when ...
... United States and Canada, this User Instructions and model number information for product service in the sealed refrigeration system. Have your major appliance, to instruct you may contact KitchenAid at the address below . In Canada, call 1-800-422-1230. If you need assistance using ... WHICH VARY FROM STATE TO STATE OR PROVINCE TO PROVINCE. You can write to KitchenAid with the product, KitchenAid will pay for other than normal, single-family household use. 4. KITCHENAID® REFRIGERATOR WARRANTY ONE YEAR LIMITED WARRANTY For one year from the date of purchase, when ...
Dimensions
Page 1
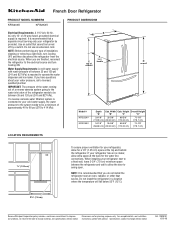
...between 35 and 120 psi (241 and 827 kPa). handle D overall Model # KFIS20XV KFIS25XV Depth Cab. Do not install the refrigerator in a location where the temperature will fall below 55°F (13°C). 2³⁄₄" (7.0 cm) Because Whirlpool Corporation... policy includes a continuous commitment to improve Dimensions are finished, reconnect the refrigerator to be turned off by a switch. Specifications subject to swing open. Ref. 12828191 12-03-08 Water Supply Requirements: A cold...
...between 35 and 120 psi (241 and 827 kPa). handle D overall Model # KFIS20XV KFIS25XV Depth Cab. Do not install the refrigerator in a location where the temperature will fall below 55°F (13°C). 2³⁄₄" (7.0 cm) Because Whirlpool Corporation... policy includes a continuous commitment to improve Dimensions are finished, reconnect the refrigerator to be turned off by a switch. Specifications subject to swing open. Ref. 12828191 12-03-08 Water Supply Requirements: A cold...


