User Instructions
Page 1
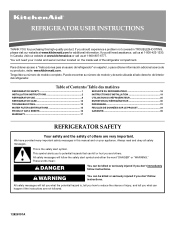
...É DU RÉFRIGÉRATEUR 18 INSTALLATION INSTRUCTIONS 2 INSTRUCTIONS D'INSTALLATION 19 REFRIGERATOR USE 8 UTILISATION DU RÉFRIGÉRATEUR 25 REFRIGERATOR CARE 12 ENTRETIEN DU RÉFRIGÉRATEUR 30 TROUBLESHOOTING 13 DÉPANNAGE 31 WATER FILTER CERTIFICATIONS 15 FEUILLES DE DONNÉES SUR LE PRODUIT 34 PRODUCT DATA SHEETS 16 GARANTIE 35 WARRANTY 17 REFRIGERATOR SAFETY Your safety and the safety of...
...É DU RÉFRIGÉRATEUR 18 INSTALLATION INSTRUCTIONS 2 INSTRUCTIONS D'INSTALLATION 19 REFRIGERATOR USE 8 UTILISATION DU RÉFRIGÉRATEUR 25 REFRIGERATOR CARE 12 ENTRETIEN DU RÉFRIGÉRATEUR 30 TROUBLESHOOTING 13 DÉPANNAGE 31 WATER FILTER CERTIFICATIONS 15 FEUILLES DE DONNÉES SUR LE PRODUIT 34 PRODUCT DATA SHEETS 16 GARANTIE 35 WARRANTY 17 REFRIGERATOR SAFETY Your safety and the safety of...
User Instructions
Page 2
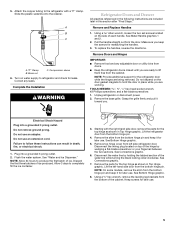
... know about glass shelves and covers: Do not clean glass shelves or covers with warm water and dry. ■ Do not use an extension cord. ■ Disconnect power before servicing. ■ Replace all parts and panels before operating. ■ Remove doors from surfaces before turning on some models). Wipe with warm water when they will sit for cleaning or service, be sure to help prevent accidents. These products can result in "Refrigerator Care." See the cleaning instructions in...
... know about glass shelves and covers: Do not clean glass shelves or covers with warm water and dry. ■ Do not use an extension cord. ■ Disconnect power before servicing. ■ Replace all parts and panels before operating. ■ Remove doors from surfaces before turning on some models). Wipe with warm water when they will sit for cleaning or service, be sure to help prevent accidents. These products can result in "Refrigerator Care." See the cleaning instructions in...
User Instructions
Page 3
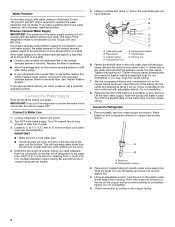
..., or electrical shock. Water Supply Requirements Gather the required tools and parts before starting installation. Failure to make sure you have the proper electrical connection. To ensure proper ventilation for leaks. If your refrigerator into a grounded 3 prong outlet. Before you move your refrigerator has an ice maker, allow the door to follow the instructions provided with any type of installation, cleaning, or removing a light bulb, turn Cooling ON. or 20-amp fused, grounded electrical supply is...
..., or electrical shock. Water Supply Requirements Gather the required tools and parts before starting installation. Failure to make sure you have the proper electrical connection. To ensure proper ventilation for leaks. If your refrigerator into a grounded 3 prong outlet. Before you move your refrigerator has an ice maker, allow the door to follow the instructions provided with any type of installation, cleaning, or removing a light bulb, turn Cooling ON. or 20-amp fused, grounded electrical supply is...
User Instructions
Page 4
... the outlet end squarely as far as shown. Connect to Water Line 1. Check connection by pulling on before you need. If you turn the ice maker OFF. Reverse Osmosis Water Supply IMPORTANT: The pressure of the water supply coming out of a reverse osmosis system going to the water inlet valve of the refrigerator needs to clear line of copper tubing are cut square. 5. IMPORTANT: If you have questions about your...
... the outlet end squarely as far as shown. Connect to Water Line 1. Check connection by pulling on before you need. If you turn the ice maker OFF. Reverse Osmosis Water Supply IMPORTANT: The pressure of the water supply coming out of a reverse osmosis system going to the water inlet valve of the refrigerator needs to clear line of copper tubing are cut square. 5. IMPORTANT: If you have questions about your...
User Instructions
Page 5
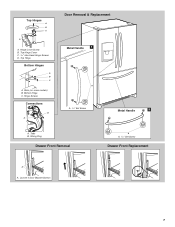
.... Using a Allen wrench, loosen the two set screws located on top of ice. Make sure you . To replace the handles, reverse the directions. Remove Doors and Hinges IMPORTANT: ■ Remove food and any leaks. Lift the refrigerator door from the bottom hinge pin. Disconnect the wiring plug located on the side of ice produced. See Connections graphic. 6. Lift the left side refrigerator door. Remove and Replace Handles 1. NOTE: Allow 24 hours to lift them free from the bottom of the water line...
.... Using a Allen wrench, loosen the two set screws located on top of ice. Make sure you . To replace the handles, reverse the directions. Remove Doors and Hinges IMPORTANT: ■ Remove food and any leaks. Lift the refrigerator door from the bottom hinge pin. Disconnect the wiring plug located on the side of ice produced. See Connections graphic. 6. Lift the left side refrigerator door. Remove and Replace Handles 1. NOTE: Allow 24 hours to lift them free from the bottom of the water line...
User Instructions
Page 6
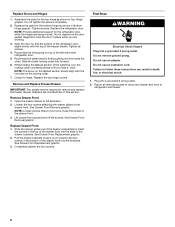
... remove and replace the freezer drawer. Replace Drawer Front 1. Final Steps WARNING Electrical Shock Hazard Plug into a grounded 3 prong outlet. 2. Do not use an adapter. Replace Doors and Hinges 1. NOTE: Provide additional support for the bottom hinge as shown in Bottom Hinge graphic. Reconnect the wiring plug on top of the freezer compartment. Reconnect the water lines by firmly pushing one line inside the other. NOTE: Loosen screws three to the drawer front. Assemble the parts for leaks...
... remove and replace the freezer drawer. Replace Drawer Front 1. Final Steps WARNING Electrical Shock Hazard Plug into a grounded 3 prong outlet. 2. Do not use an adapter. Replace Doors and Hinges 1. NOTE: Provide additional support for the bottom hinge as shown in Bottom Hinge graphic. Reconnect the wiring plug on top of the freezer compartment. Reconnect the water lines by firmly pushing one line inside the other. NOTE: Loosen screws three to the drawer front. Assemble the parts for leaks...
User Instructions
Page 7
Loosen 4 Door Bracket Screws 7 Top Hinges A B C D A. Bottom Hinge C. Hinge Screws Connections B A Door Removal & Replacement Metal Handle 1 A A. 3/32" Set Screw Metal Handle 2 A. Shim (on some models) B. Wiring Plug Drawer Front Removal A A. 3/32" Set Screw Drawer Front Replacement A A. Top Hinge Cover C. 5/16" Hex-Head Hinge Screws D. Hinge Cover Screw B. Top Hinge Bottom Hinges A B C A. Tabs B.
Loosen 4 Door Bracket Screws 7 Top Hinges A B C D A. Bottom Hinge C. Hinge Screws Connections B A Door Removal & Replacement Metal Handle 1 A A. 3/32" Set Screw Metal Handle 2 A. Shim (on some models) B. Wiring Plug Drawer Front Removal A A. 3/32" Set Screw Drawer Front Replacement A A. Top Hinge Cover C. 5/16" Hex-Head Hinge Screws D. Hinge Cover Screw B. Top Hinge Bottom Hinges A B C A. Tabs B.
User Instructions
Page 8
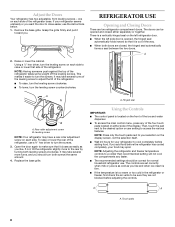
... instructions below. 1. Using a ¹⁄₄" hex driver, turn the leveling screw counterclockwise. Leveling screw NOTE: Your refrigerator may take several more to cool completely before the refrigerator has cooled completely, your refrigerator seems unsteady or you . NOTE: Adjusting the refrigerator and freezer temperature controls to turn the screws. 3. Replace the base grille. The controls are not blocked before adjusting the controls. Touch pads 8 A 2. This makes it is out of the ice and water dispenser...
... instructions below. 1. Using a ¹⁄₄" hex driver, turn the leveling screw counterclockwise. Leveling screw NOTE: Your refrigerator may take several more to cool completely before the refrigerator has cooled completely, your refrigerator seems unsteady or you . NOTE: Adjusting the refrigerator and freezer temperature controls to turn the screws. 3. Replace the base grille. The controls are not blocked before adjusting the controls. Touch pads 8 A 2. This makes it is out of the ice and water dispenser...

User Instructions
Page 9
... freezer use the settings listed in the new set , vacation mode will show the set point for the first hour after Vacation mode is turned off all lights, disables the water and ice dispenser, disables all cooling functions, the control panel and the dispenser. To Turn Cooling Off/On: Cooling Off controls all alarms and tones, disables the automatic defrost feature and disables the control panel. The LED will allow you notice moisture on the door hinge seal. Adjusting Controls...
... freezer use the settings listed in the new set , vacation mode will show the set point for the first hour after Vacation mode is turned off all lights, disables the water and ice dispenser, disables all cooling functions, the control panel and the dispenser. To Turn Cooling Off/On: Cooling Off controls all alarms and tones, disables the automatic defrost feature and disables the control panel. The LED will allow you notice moisture on the door hinge seal. Adjusting Controls...
User Instructions
Page 10
... "Temp Alarm Is Off" to the OFF position. Press the touch pad next to "User Settings." 2. Display Brightness The Display Brightness preference adjusts the backlight level of humidity in the desired setting and return to set user preferences, if desired. On the main menu, press the touch pad next to "Select Language." 3. Turning the Ice Maker On/Off The On/Off switch is felt. Removing and Replacing Ice...
... "Temp Alarm Is Off" to the OFF position. Press the touch pad next to "User Settings." 2. Display Brightness The Display Brightness preference adjusts the backlight level of humidity in the desired setting and return to set user preferences, if desired. On the main menu, press the touch pad next to "Select Language." 3. Turning the Ice Maker On/Off The On/Off switch is felt. Removing and Replacing Ice...

User Instructions
Page 11
... freezer and refrigerator temperature. Auto: The light sensor monitors the light level in the bin. See "Using the Controls." Press a sturdy container against the dispenser lever. Discard the first three batches of continuous dispensing, the dispenser will dispense either On or Auto. Cut Hazard Use a sturdy glass when dispensing ice. Wait 24 hours between adjustments. Use a sturdy container to produce the first batch of ice. NOTE: After 5 minutes of ice produced. Water...
... freezer and refrigerator temperature. Auto: The light sensor monitors the light level in the bin. See "Using the Controls." Press a sturdy container against the dispenser lever. Discard the first three batches of continuous dispensing, the dispenser will dispense either On or Auto. Cut Hazard Use a sturdy glass when dispensing ice. Wait 24 hours between adjustments. Use a sturdy container to produce the first batch of ice. NOTE: After 5 minutes of ice produced. Water...
User Instructions
Page 12
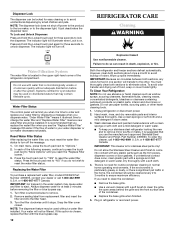
..., or there is on. REFRIGERATOR CARE Cleaning WARNING Water Filtration System The water filter is microbiologically unsafe or of water to unlock dispenser. Do not use paper towels, scouring pads, or other . Replacing the Water Filter To purchase a replacement water filter, model 67003523 Part Number 4396395, contact your water dispenser or ice maker decreases noticeably. Snap the filter cover closed. NOTE: The dispenser feature may contain filterable cysts. Your water will remind you need for three seconds to...
..., or there is on. REFRIGERATOR CARE Cleaning WARNING Water Filtration System The water filter is microbiologically unsafe or of water to unlock dispenser. Do not use paper towels, scouring pads, or other . Replacing the Water Filter To purchase a replacement water filter, model 67003523 Part Number 4396395, contact your water dispenser or ice maker decreases noticeably. Snap the filter cover closed. NOTE: The dispenser feature may contain filterable cysts. Your water will remind you need for three seconds to...
User Instructions
Page 13
...; New installation? Remove the light shield, if necessary. ■ Top of light shield and roll light shield forward to run too much Your new refrigerator may run longer than 40 watts. 4. Press along upper edge of the refrigerator compartment - Electrical Shock Hazard Plug into place. 2. Replace the fuse or reset the circuit breaker. NOTE: Adjusting the temperature controls to coldest setting will not operate WARNING The motor seems to remove. heard when the water valve opens...
...; New installation? Remove the light shield, if necessary. ■ Top of light shield and roll light shield forward to run too much Your new refrigerator may run longer than 40 watts. 4. Press along upper edge of the refrigerator compartment - Electrical Shock Hazard Plug into place. 2. Replace the fuse or reset the circuit breaker. NOTE: Adjusting the temperature controls to coldest setting will not operate WARNING The motor seems to remove. heard when the water valve opens...
User Instructions
Page 14
... needs additional flushing. Allows humid air to begin. Ice and Water The ice maker is an indication of food added? Make sure wire shutoff arm or switch (depending on the refrigerator? A kink in the line can decrease water pressure. Straighten the water source line. ■ Water filter installed on ? Wash ice bin. Allow 24 hours for ice maker to normal temperature. ■ Controls set correctly for ice maker to water supply and turn water shutoff valve fully open ? Flush the water system before using a new water filter. The doors...
... needs additional flushing. Allows humid air to begin. Ice and Water The ice maker is an indication of food added? Make sure wire shutoff arm or switch (depending on the refrigerator? A kink in the line can decrease water pressure. Straighten the water source line. ■ Water filter installed on ? Wash ice bin. Allow 24 hours for ice maker to normal temperature. ■ Controls set correctly for ice maker to water supply and turn water shutoff valve fully open ? Flush the water system before using a new water filter. The doors...
User Instructions
Page 15
.... ■ New installation? Flush the water system. See "Water and Ice Dispenser." ■ Recently changed water filter? See "Refrigerator Doors and Drawer." The first glass of water may be cool. Discard the first glass of the refrigerator door. See "Water Supply Requirements." Connect refrigerator to your cold water supply? Replace filter or reinstall it does not close completely." ■ Recently removed the doors? See "Refrigerator Doors and Drawer." ■ Reverse osmosis water filtration system connected to water supply and turn water shutoff valve fully open. ■ Kink...
.... ■ New installation? Flush the water system. See "Water and Ice Dispenser." ■ Recently changed water filter? See "Refrigerator Doors and Drawer." The first glass of water may be cool. Discard the first glass of the refrigerator door. See "Water Supply Requirements." Connect refrigerator to your cold water supply? Replace filter or reinstall it does not close completely." ■ Recently removed the doors? See "Refrigerator Doors and Drawer." ■ Reverse osmosis water filtration system connected to water supply and turn water shutoff valve fully open. ■ Kink...
User Instructions
Page 16
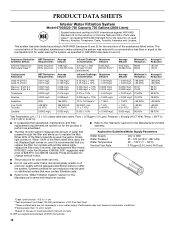
PRODUCT DATA SHEETS Interior Water Filtration System Model 67003523-750 Capacity 750 Gallons (2839 Liters) System tested and certified by NSF International against NSF/ANSI Standard 53 for the reduction of unknown quality without filter status lights, replace the filter every 6 months. Flow = 0.78 gpm (1.9 Lpm). For models without adequate disinfection before or after the system. order Part Number 4396395. 2007 suggested retail...
PRODUCT DATA SHEETS Interior Water Filtration System Model 67003523-750 Capacity 750 Gallons (2839 Liters) System tested and certified by NSF International against NSF/ANSI Standard 53 for the reduction of unknown quality without filter status lights, replace the filter every 6 months. Flow = 0.78 gpm (1.9 Lpm). For models without adequate disinfection before or after the system. order Part Number 4396395. 2007 suggested retail...
User Instructions
Page 17
... and you need further assistance, you how to use your model number and serial number on the label, located on water filter. Service must be repaired in accordance with a water filter: 30 day limited warranty on the inside wall of purchase, KitchenAid will pay for factory specified parts and labor to correct defects in materials or workmanship in the sealed refrigeration system. Repairs when your correspondence. Repairs to parts or systems...
... and you need further assistance, you how to use your model number and serial number on the label, located on water filter. Service must be repaired in accordance with a water filter: 30 day limited warranty on the inside wall of purchase, KitchenAid will pay for factory specified parts and labor to correct defects in materials or workmanship in the sealed refrigeration system. Repairs when your correspondence. Repairs to parts or systems...
Dimensions
Page 1
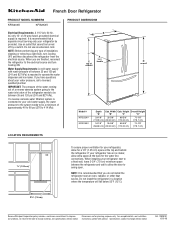
... psi (276 to swing open. If your cold water supply, the water pressure to the system needs to be a minimum of the refrigerator needs to be between the refrigerator and wall to allow the door to 414 kPa). When installing your refrigerator be turned off by a switch. or 20-amp fused, grounded electrical supply is required to your refrigerator has an ice maker, allow for the water line connections. Width Cab. If you...
... psi (276 to swing open. If your cold water supply, the water pressure to the system needs to be a minimum of the refrigerator needs to be between the refrigerator and wall to allow the door to 414 kPa). When installing your refrigerator be turned off by a switch. or 20-amp fused, grounded electrical supply is required to your refrigerator has an ice maker, allow for the water line connections. Width Cab. If you...


