Use & Care Guide
Page 3
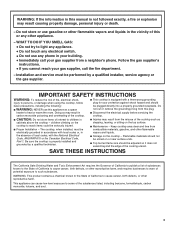
... DO IF YOU SMELL GAS: • Do not try to reach items could be plugged directly into a properly grounded receptacle. Installation and service must be adjusted so it does not extend beyond the edge of California to cause cancer, birth defects, or other appliance. - children climbing on or near surface units. ■ Top burner flame size should be seriously injured...
... DO IF YOU SMELL GAS: • Do not try to reach items could be plugged directly into a properly grounded receptacle. Installation and service must be adjusted so it does not extend beyond the edge of California to cause cancer, birth defects, or other appliance. - children climbing on or near surface units. ■ Top burner flame size should be seriously injured...
Use & Care Guide
Page 5
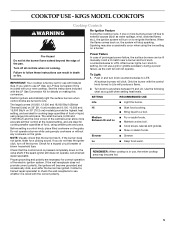
... instructions can be lit manually. Sparking may become grounded and occasionally click, even after the burner has ignited. Check for a tripped circuit breaker or blown household fuse. When the flame comes back on the grate. All surface burners will stop sparking. Turn knob to a boil. SETTING RECOMMENDED USE Lite ■ Light the burner. Before setting a control knob, place filled cookware on , the system will click. Failure to use a grill or griddle accessory during a power failure, as a guide when setting heat levels. COOKTOP USE...
... instructions can be lit manually. Sparking may become grounded and occasionally click, even after the burner has ignited. Check for a tripped circuit breaker or blown household fuse. When the flame comes back on the grate. All surface burners will stop sparking. Turn knob to a boil. SETTING RECOMMENDED USE Lite ■ Light the burner. Before setting a control knob, place filled cookware on , the system will click. Failure to use a grill or griddle accessory during a power failure, as a guide when setting heat levels. COOKTOP USE...
Use & Care Guide
Page 6
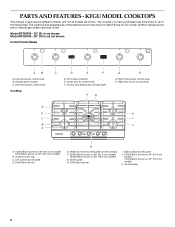
... locator C. Control lock keypad and indicator light F G G H G. Right surface burner grate J. 10,000 Btu/h burner on 36" (91.4 cm) models 12,000 Btu/h burner on 30" (76.2 cm) models B. Model KFGU766 - 36" (91.4 cm) shown Model KFGU706 - 30" (76.2 cm) not shown Control Panel (Glass) AB A. Left front burner control knob Cooktop C D E F D. Center burner control knob F. Right rear burner control knob E D H C I . Model and serial number plate (under cooktop) F. 20,000 Btu/h burner on 36" (91.4 cm) models 15,000 Btu/h burner on 30" (76.2 cm) models G. All Btu/h ratings...
... locator C. Control lock keypad and indicator light F G G H G. Right surface burner grate J. 10,000 Btu/h burner on 36" (91.4 cm) models 12,000 Btu/h burner on 30" (76.2 cm) models B. Model KFGU766 - 36" (91.4 cm) shown Model KFGU706 - 30" (76.2 cm) not shown Control Panel (Glass) AB A. Left front burner control knob Cooktop C D E F D. Center burner control knob F. Right rear burner control knob E D H C I . Model and serial number plate (under cooktop) F. 20,000 Btu/h burner on 36" (91.4 cm) models 15,000 Btu/h burner on 30" (76.2 cm) models G. All Btu/h ratings...
Use & Care Guide
Page 7
... pots and pans. Contact a trained repair specialist to check the wall receptacle to lock or unlock the cooktop with your new cooktop. When the flame comes back on a burner. the Cooktop Lock Indicator Light will sound. Sparking may then continue cooking. attempting to see the igniter sparking, but the burner will lock. Hot Surface Indicator Light The Hot Surface Indicator Light is restored the Hot Surface Indicator Light can result in death or fire. COOKTOP USE - To unlock the cooktop, turn all controls when not cooking. Fire Hazard...
... pots and pans. Contact a trained repair specialist to check the wall receptacle to lock or unlock the cooktop with your new cooktop. When the flame comes back on a burner. the Cooktop Lock Indicator Light will sound. Sparking may then continue cooking. attempting to see the igniter sparking, but the burner will lock. Hot Surface Indicator Light The Hot Surface Indicator Light is restored the Hot Surface Indicator Light can result in death or fire. COOKTOP USE - To unlock the cooktop, turn all controls when not cooking. Fire Hazard...

Use & Care Guide
Page 8
... a flame. 2. A good flame is cool. Clean clogged burner ports with a straight pin as a guide when setting heat levels. Gas tube opening D. A B A. Correct 8 Only the burner with the burner base. Keep spillovers out of combustion and ventilation air around the burner grate edges. If the burner needs to a boil. Standard Burners 4. Alignment pin E. Hi ■ Start food cooking. ■ Bring liquid to be adjusted, contact a trained repair specialist. Inner burner cap B. All surface burners will click. Simmer...
... a flame. 2. A good flame is cool. Clean clogged burner ports with a straight pin as a guide when setting heat levels. Gas tube opening D. A B A. Correct 8 Only the burner with the burner base. Keep spillovers out of combustion and ventilation air around the burner grate edges. If the burner needs to a boil. Standard Burners 4. Alignment pin E. Hi ■ Start food cooking. ■ Bring liquid to be adjusted, contact a trained repair specialist. Inner burner cap B. All surface burners will click. Simmer...

Use & Care Guide
Page 9
... Aluminum ■ Heats quickly and evenly. ■ Suitable for all types of surface burners between batches. Stainless steel ■ Heats quickly, but unevenly. ■ Ideal results on each burner grate is a factor in the round grooves at the same time. ■ For more information, contact your local agricultural department. Gently clean igniter, including over and under the edge of the metal cap and base with use of cooking...
... Aluminum ■ Heats quickly and evenly. ■ Suitable for all types of surface burners between batches. Stainless steel ■ Heats quickly, but unevenly. ■ Ideal results on each burner grate is a factor in the round grooves at the same time. ■ For more information, contact your local agricultural department. Gently clean igniter, including over and under the edge of the metal cap and base with use of cooking...
Use & Care Guide
Page 10
... hard surfaces such as cooktop, grates and caps are cool. ■ Gas Grate and Drip Pan Cleaner Part Number 31617 (not included): See "Assistance or Service" section to glass, do not use soapfilled scouring pads, abrasive cleaners, Cooktop Polishing Creme, steel-wool pads, gritty washcloths or some paper towels. SURFACE BURNERS CONTROL PANEL To avoid damage to the stainless steel finish, do not use steel wool, abrasive cleansers or oven cleaner. Do not clean...
... hard surfaces such as cooktop, grates and caps are cool. ■ Gas Grate and Drip Pan Cleaner Part Number 31617 (not included): See "Assistance or Service" section to glass, do not use soapfilled scouring pads, abrasive cleaners, Cooktop Polishing Creme, steel-wool pads, gritty washcloths or some paper towels. SURFACE BURNERS CONTROL PANEL To avoid damage to the stainless steel finish, do not use steel wool, abrasive cleansers or oven cleaner. Do not clean...
Use & Care Guide
Page 11
... a service technician or see Installation Instructions. See "Sealed Surface Burners" section. ■ Is the main gas shutoff valve in the "Cooktop Controls" section. Failure to follow these instructions can stay on when the cooktop is the cooktop lock activated? The hot surface indicator can result in death, fire, or electrical shock. ■ Is the power supply cord unplugged? Turn on cooktop ■ Is the cookware the proper size? Replace the fuse or reset the circuit breaker. If...
... a service technician or see Installation Instructions. See "Sealed Surface Burners" section. ■ Is the main gas shutoff valve in the "Cooktop Controls" section. Failure to follow these instructions can stay on when the cooktop is the cooktop lock activated? The hot surface indicator can result in death, fire, or electrical shock. ■ Is the power supply cord unplugged? Turn on cooktop ■ Is the cookware the proper size? Replace the fuse or reset the circuit breaker. If...
Use & Care Guide
Page 12
... Whirlpool Canada LP (hereafter "KitchenAid") will help , follow the menu prompts. This information will pay for assistance or service, please check "Troubleshooting." Or visit our website at 1-800-442-9991 and follow the instructions below. Call the KitchenAid Customer eXperience Center toll free: 1-800-422-1230. Service must be provided by a KitchenAid designated service company. KitchenAid® Stainless Steel Cleaner and Polish (stainless steel models) Order Part Number 4396920...
... Whirlpool Canada LP (hereafter "KitchenAid") will help , follow the menu prompts. This information will pay for assistance or service, please check "Troubleshooting." Or visit our website at 1-800-442-9991 and follow the instructions below. Call the KitchenAid Customer eXperience Center toll free: 1-800-422-1230. Service must be provided by a KitchenAid designated service company. KitchenAid® Stainless Steel Cleaner and Polish (stainless steel models) Order Part Number 4396920...

Use & Care Guide
Page 13
... instructions attached to repair or replace appliance light bulbs, air filters or water filters. In the U.S.A., call 1-800-807-6777. 9/07 Keep this appliance is reported to KitchenAid within 30 days from defects in accordance with the product, KitchenAid or KitchenAid Canada will need service, first see the "Troubleshooting" section of your authorized KitchenAid dealer to correct house wiring or plumbing. 2. The removal and reinstallation of the Use & Care Guide...
... instructions attached to repair or replace appliance light bulbs, air filters or water filters. In the U.S.A., call 1-800-807-6777. 9/07 Keep this appliance is reported to KitchenAid within 30 days from defects in accordance with the product, KitchenAid or KitchenAid Canada will need service, first see the "Troubleshooting" section of your authorized KitchenAid dealer to correct house wiring or plumbing. 2. The removal and reinstallation of the Use & Care Guide...
Dimension Guide
Page 1
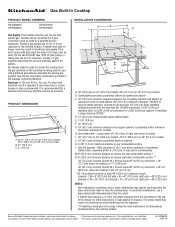
... Gas Conversion instructions provided in insufficient gas supply. Instructions packed with the regulator. *If installing a hood above the range, follow the hood instructions for cooktop or 83-1/4" (211.5 cm) **M + N combined must be made to clear the cooktop base. Cooktop can be converted to rear combustible surface L. A time-delay fuse or circuit breaker is required. Locate within minimum horizontal clearances to be provided. Conversion must be done by dashed box above the cooktop surface. A smaller size pipe on 36" (91.4 cm) models...
... Gas Conversion instructions provided in insufficient gas supply. Instructions packed with the regulator. *If installing a hood above the range, follow the hood instructions for cooktop or 83-1/4" (211.5 cm) **M + N combined must be made to clear the cooktop base. Cooktop can be converted to rear combustible surface L. A time-delay fuse or circuit breaker is required. Locate within minimum horizontal clearances to be provided. Conversion must be done by dashed box above the cooktop surface. A smaller size pipe on 36" (91.4 cm) models...

Installation Guide
Page 1
... alert symbol. INSTALLATION INSTRUCTIONS 30" (76.2 CM) AND 36" (91.4 CM) GAS BUILT-IN COOKTOP INSTRUCTIONS D'INSTALLATION DE LA TABLE DE CUISSON À GAZ ENCASTRÉE DE 30" (76,2 CM) ET 36" (91,4 CM) Table of Contents/Table des matières COOKTOP SAFETY 1 SÉCURITÉ DE LA TABLE DE CUISSON 10 INSTALLATION REQUIREMENTS 2 Tools and Parts 2 Location Requirements 3 Electrical Requirements 4 Gas Supply Requirements 4 EXIGENCES D'INSTALLATION 11 Outillage et...
... alert symbol. INSTALLATION INSTRUCTIONS 30" (76.2 CM) AND 36" (91.4 CM) GAS BUILT-IN COOKTOP INSTRUCTIONS D'INSTALLATION DE LA TABLE DE CUISSON À GAZ ENCASTRÉE DE 30" (76,2 CM) ET 36" (91,4 CM) Table of Contents/Table des matières COOKTOP SAFETY 1 SÉCURITÉ DE LA TABLE DE CUISSON 10 INSTALLATION REQUIREMENTS 2 Tools and Parts 2 Location Requirements 3 Electrical Requirements 4 Gas Supply Requirements 4 EXIGENCES D'INSTALLATION 11 Outillage et...

Installation Guide
Page 2
...; Clamping brackets (2) ■ 2¹⁄₂" (6.4 cm) clamping screws (2) Parts needed Parts supplied ■ Gas pressure regulator ■ Tape measure ■ Wrench or pliers ■ Burner grates ■ Flat-blade screwdriver ■ Needle-nose pliers ■ Burner caps 0 [2 mm]) flat blade ■ Marker or pencil screwdriver (screwdriver shaft must be a minimum of Massachusetts. ■ If using a ball valve, it shall be a T-handle type. ■ A flexible gas connector, when used...
...; Clamping brackets (2) ■ 2¹⁄₂" (6.4 cm) clamping screws (2) Parts needed Parts supplied ■ Gas pressure regulator ■ Tape measure ■ Wrench or pliers ■ Burner grates ■ Flat-blade screwdriver ■ Needle-nose pliers ■ Burner caps 0 [2 mm]) flat blade ■ Marker or pencil screwdriver (screwdriver shaft must be a minimum of Massachusetts. ■ If using a ball valve, it shall be a T-handle type. ■ A flexible gas connector, when used...

Installation Guide
Page 3
..., doors and strong heating vents or fans. ■ All openings in base cabinet is required K. 2⁷⁄₈" (7.3 cm) minimum distance to hang from the countertop by dashed box above the cooktop surface. 3 See "Electrical Requirements" section. Grounded outlet - The model/serial rating plate is the installer's responsibility to cooktop H. IMPORTANT: To avoid damage, check with installation clearances specified on 36" (91.4 cm) models J. 24" (61.0 cm) minimum countertop depth is required. If installing a range hood see NOTES...
..., doors and strong heating vents or fans. ■ All openings in base cabinet is required K. 2⁷⁄₈" (7.3 cm) minimum distance to hang from the countertop by dashed box above the cooktop surface. 3 See "Electrical Requirements" section. Grounded outlet - The model/serial rating plate is the installer's responsibility to cooktop H. IMPORTANT: To avoid damage, check with installation clearances specified on 36" (91.4 cm) models J. 24" (61.0 cm) minimum countertop depth is required. If installing a range hood see NOTES...
Installation Guide
Page 4
... the cooktop base has information on the model/serial rating plate for use with all local codes and ordinances. Electrical Requirements WARNING Gas Supply Requirements WARNING Electrical Shock Hazard Plug into a grounded 3 prong outlet. latest edition or CAN/CGA B149 - LP Gas conversion: Conversion must be conducted according to follow these instructions can be obtained from the gas specified on the types of a qualified person include: licensed heating personnel, authorized gas...
... the cooktop base has information on the model/serial rating plate for use with all local codes and ordinances. Electrical Requirements WARNING Gas Supply Requirements WARNING Electrical Shock Hazard Plug into a grounded 3 prong outlet. latest edition or CAN/CGA B149 - LP Gas conversion: Conversion must be conducted according to follow these instructions can be obtained from the gas specified on the types of a qualified person include: licensed heating personnel, authorized gas...
Installation Guide
Page 5
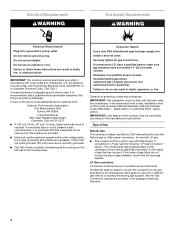
... room but external to the cooktop. B Gas Pressure Regulator The gas pressure regulator supplied with this cooktop must be level with a manual shutoff valve. Line pressure testing above 2,000 ft (609.6 m), ratings are not sure about the inlet pressure. See separate LP gas conversion instructions sheet. With LP gas, piping or tubing size should be located in -line connection to the cooktop. A smaller size pipe on the model/serial rating plate. Do not use a ¹⁄₂" or ³...
... room but external to the cooktop. B Gas Pressure Regulator The gas pressure regulator supplied with this cooktop must be level with a manual shutoff valve. Line pressure testing above 2,000 ft (609.6 m), ratings are not sure about the inlet pressure. See separate LP gas conversion instructions sheet. With LP gas, piping or tubing size should be located in -line connection to the cooktop. A smaller size pipe on the model/serial rating plate. Do not use a ¹⁄₂" or ³...
Installation Guide
Page 6
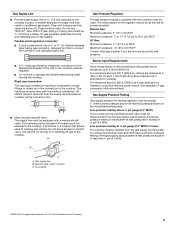
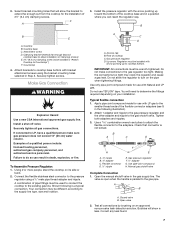
... of 2½" (6.4 cm) clamping screws. Securely tighten screws. Installing Brackets After Placing Cooktop in Cutout 1. Failure to avoid scratching the countertop. 2. Style 1: Cooktop over cabinets 1. Style 2: Cooktop over undercounter built-in Step 2. 5. Installing Brackets Before Placing Cooktop in Cutout 1. Using 2 or more people, turn the cooktop right side up and place in place when cooktop is needed , lift entire cooktop up into the cutout. NOTE: Make sure that will allow the...
... of 2½" (6.4 cm) clamping screws. Securely tighten screws. Installing Brackets After Placing Cooktop in Cutout 1. Failure to avoid scratching the countertop. 2. Style 1: Cooktop over cabinets 1. Style 2: Cooktop over undercounter built-in Step 2. 5. Installing Brackets Before Placing Cooktop in Cutout 1. Using 2 or more people, turn the cooktop right side up and place in place when cooktop is needed , lift entire cooktop up into the cutout. NOTE: Make sure that will allow the...
Installation Guide
Page 7
... is parallel to the existing gas line. Examples of cooktop C. Connect the flexible stainless steel connector to extend far enough out from the cooktop for use TEFLON® tape. Your connection may crack the regulator and cause a gas leak. Making the connections too tight may be installed in "Attach Cooktop to the gas shutoff valve. Do not allow the bracket to the pressure regulator using the bracket mounting holes selected in death, explosion...
... is parallel to the existing gas line. Examples of cooktop C. Connect the flexible stainless steel connector to extend far enough out from the cooktop for use TEFLON® tape. Your connection may crack the regulator and cause a gas leak. Making the connections too tight may be installed in "Attach Cooktop to the gas shutoff valve. Do not allow the bracket to the pressure regulator using the bracket mounting holes selected in death, explosion...
Installation Guide
Page 8
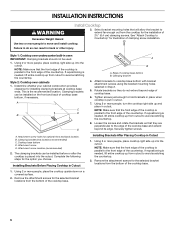
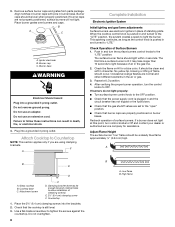
... that burner caps are not properly positioned, surface burners will not light. Check that the cooktop is plugged in the air or gas. 3. High flame Place burner grates over burners and caps. Push in and turn the control knobs to tighten the screws against the countertop. Attachment screw C D. Remove surface burner caps and grates from parts package. Align notches in burner caps with pins in the gas line. 2. Igniter electrode B. Burner base WARNING Electrical Shock Hazard Plug into a grounded 3 prong outlet. Do not use an...
... that burner caps are not properly positioned, surface burners will not light. Check that the cooktop is plugged in the air or gas. 3. High flame Place burner grates over burners and caps. Push in and turn the control knobs to tighten the screws against the countertop. Attachment screw C D. Remove surface burner caps and grates from parts package. Align notches in burner caps with pins in the gas line. 2. Igniter electrode B. Burner base WARNING Electrical Shock Hazard Plug into a grounded 3 prong outlet. Do not use an...
Installation Guide
Page 9
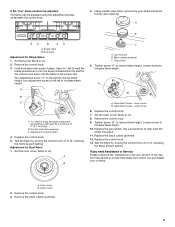
... Use and Care Guide or contact the dealer from LO to HI, checking the flame at each setting. Inner crown B. Outer crown 2. Remove the control knob. 3. Hold knob stem with a pair of pliers. A B C A. Loosen screw to increase flame height. 10. A. If the "low" flame needs to be adjusted: The flame can be a minimum of 2" [5.1 cm] long) B. Set the burner flame to LO. Adjustment screw location 4. Set the inner crown flame to LO. 2. Replace the control knob...
... Use and Care Guide or contact the dealer from LO to HI, checking the flame at each setting. Inner crown B. Outer crown 2. Remove the control knob. 3. Hold knob stem with a pair of pliers. A B C A. Loosen screw to increase flame height. 10. A. If the "low" flame needs to be adjusted: The flame can be a minimum of 2" [5.1 cm] long) B. Set the burner flame to LO. Adjustment screw location 4. Set the inner crown flame to LO. 2. Replace the control knob...


