
Dimension Guide
Page 1
....5 cm) countertop; front of your countertop. q The range can be level. Place level on models KESS907XSP and KERS807XSP) beyond 24" (61 cm) base cabinet. 30" (76.2 cm) Freestanding and Slide-In Electric Range PRODUCT MODEL NUMBERS OVERALL DIMENSIONS KERS807S KERS807X KESK901S KESS907S KESS908S KESS907X Freestanding Range Slide-in Range ELECTRICAL REQUIREMENTS B q This range is manufactured with the neutral terminal connected...
....5 cm) countertop; front of your countertop. q The range can be level. Place level on models KESS907XSP and KERS807XSP) beyond 24" (61 cm) base cabinet. 30" (76.2 cm) Freestanding and Slide-In Electric Range PRODUCT MODEL NUMBERS OVERALL DIMENSIONS KERS807S KERS807X KESK901S KESS907S KESS908S KESS907X Freestanding Range Slide-in Range ELECTRICAL REQUIREMENTS B q This range is manufactured with the neutral terminal connected...

Installation Guide
Page 3
...tipped masonry drill bit (for convenient use in the kitchen. ■ To eliminate the risk of burns or fire by installing a range hood or microwave range hood combination that projects horizontally a minimum of 5" (12.7 cm) beyond the bottom of the slide-in cooktop and the wall ...maximum allowable wood cabinet temperatures of the Use and Care Guide to make sure that all electrical connections be installed. It is located inside the oven door on the model/serial rating plate. See "Electrical Requirements" section. Plastic anchors (2) C. #10 x ¹⁄₂" screws (2) &#...
...tipped masonry drill bit (for convenient use in the kitchen. ■ To eliminate the risk of burns or fire by installing a range hood or microwave range hood combination that projects horizontally a minimum of 5" (12.7 cm) beyond the bottom of the slide-in cooktop and the wall ...maximum allowable wood cabinet temperatures of the Use and Care Guide to make sure that all electrical connections be installed. It is located inside the oven door on the model/serial rating plate. See "Electrical Requirements" section. Plastic anchors (2) C. #10 x ¹⁄₂" screws (2) &#...

Installation Guide
Page 4
...When such standard is installed in * C. Product Dimensions Freestanding Range Mobile home installations require: ■ When this range must be raised approximately 1" (2.5 cm) by adjusting the leveling legs. **When installed in a mobile home installation. See "Electrical Connection" section. A. 30 77.6 cm) B. 35⁵⁄₈" (90.5...in* D. 36" (91.4 cm) cooktop trim height with 25" (63.5 cm) countertop; Mobile Home - Model/serial number plate (located on the right-hand side oven door trim) D. 30" (76.2 cm) E. 27¼" (69.2 cm) (27 70.3 cm] on the right-hand side ...
...When such standard is installed in * C. Product Dimensions Freestanding Range Mobile home installations require: ■ When this range must be raised approximately 1" (2.5 cm) by adjusting the leveling legs. **When installed in a mobile home installation. See "Electrical Connection" section. A. 30 77.6 cm) B. 35⁵⁄₈" (90.5...in* D. 36" (91.4 cm) cooktop trim height with 25" (63.5 cm) countertop; Mobile Home - Model/serial number plate (located on the right-hand side oven door trim) D. 30" (76.2 cm) E. 27¼" (69.2 cm) (27 70.3 cm] on the right-hand side ...

Installation Guide
Page 5
...If codes permit and a separate ground wire is used, it here. or 50-amp power supply cord (pigtail) (see NOTE*. opening width F. D. 30" (76.2 cm) min. Cabinet door or hinge should not extend into the cutout. Square cut or ¹⁄₄" (6.2 cm) radius both corners...provided for dimensional clearances above code standards can result in conformance with ranges. 5 from floor F. Do not use with the National Electrical Code, ANSI/ NFPA 70-latest edition and all local codes and ordinances. The model/serial rating plate is in accordance with a qualified electrician or ...
...If codes permit and a separate ground wire is used, it here. or 50-amp power supply cord (pigtail) (see NOTE*. opening width F. D. 30" (76.2 cm) min. Cabinet door or hinge should not extend into the cutout. Square cut or ¹⁄₄" (6.2 cm) radius both corners...provided for dimensional clearances above code standards can result in conformance with ranges. 5 from floor F. Do not use with the National Electrical Code, ANSI/ NFPA 70-latest edition and all local codes and ordinances. The model/serial rating plate is in accordance with a qualified electrician or ...

Installation Guide
Page 6
...be used , it is prohibited for the copper 4-wire power cord are in the line so that the electrical connection and wire size are not sure the range is properly grounded. Cord should be connected directly to the fused disconnect (or circuit breaker box) through flexible... the total connected load listed on the model/serial rating plate. **If connecting to a 50-amp circuit, use a 50-amp rated cord with upturned ends, terminating in death, fire, or electrical shock. Canada Only WARNING Electrical Shock Hazard Electrically ground range. Grounding through the neutral conductor. For ...
...be used , it is prohibited for the copper 4-wire power cord are in the line so that the electrical connection and wire size are not sure the range is properly grounded. Cord should be connected directly to the fused disconnect (or circuit breaker box) through flexible... the total connected load listed on the model/serial rating plate. **If connecting to a 50-amp circuit, use a 50-amp rated cord with upturned ends, terminating in death, fire, or electrical shock. Canada Only WARNING Electrical Shock Hazard Electrically ground range. Grounding through the neutral conductor. For ...

Installation Guide
Page 14
...Check that all parts are now installed. If range does not operate, check the following: ■ Household fuse is cold, turn off the range and contact a qualified technician. or circuit breaker has not tripped. ■ Range is plugged into an outlet. ■ Electrical supply is connected. ■ See the "... 3. Connect anti-tip bracket to see which step was skipped. 2. Verify Anti-Tip Bracket Location IMPORTANT: ■ On models with a warming drawer, the rear range foot must be level for heat. To remove storage drawer: ■ Pull drawer straight out to the first stop. ...
...Check that all parts are now installed. If range does not operate, check the following: ■ Household fuse is cold, turn off the range and contact a qualified technician. or circuit breaker has not tripped. ■ Range is plugged into an outlet. ■ Electrical supply is connected. ■ See the "... 3. Connect anti-tip bracket to see which step was skipped. 2. Verify Anti-Tip Bracket Location IMPORTANT: ■ On models with a warming drawer, the rear range foot must be level for heat. To remove storage drawer: ■ Pull drawer straight out to the first stop. ...

Use & Care Guide
Page 1
ELECTRIC RANGE ARCHITECT® SERIES II Use & Care Guide For questions about features, operation/performance, parts, accessories or service, call: 1-800-422-1230 or visit our website at www.kitchenaid.com In Canada, call for assistance, installation and service, call: 1-800-807-6777 or visit our website at www.KitchenAid.ca Table of Contents...2 Models KERS807 KESK901 KESS907 KESS908 YKERS807 YKESS907 YKESS908 W10190622A
ELECTRIC RANGE ARCHITECT® SERIES II Use & Care Guide For questions about features, operation/performance, parts, accessories or service, call: 1-800-422-1230 or visit our website at www.kitchenaid.com In Canada, call for assistance, installation and service, call: 1-800-807-6777 or visit our website at www.KitchenAid.ca Table of Contents...2 Models KERS807 KESK901 KESS907 KESS908 YKERS807 YKESS907 YKESS908 W10190622A
Use & Care Guide
Page 5
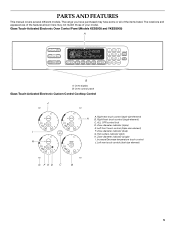
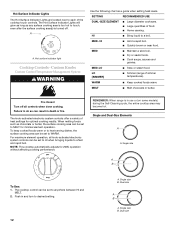
...temperature touch control H J. PARTS AND FEATURES This manual covers several different models. Right rear touch control (dual-size element) A B. ALL OFF/control lock D. Glass Touch-Activated Electronic Oven Control Panel (Models KESS908 and YKESS908) A MED LOW HI ON F C CONTROL LOCKED CLEAN...(dual-size element) G F ED C B 5 Zone diameter indicator (triple) E. Zone diameter indicator (single) I F. Oven display B. The range you have purchased may not match those of the items listed. Right front touch control (single element) C. Hot surface indicator lights H.
...temperature touch control H J. PARTS AND FEATURES This manual covers several different models. Right rear touch control (dual-size element) A B. ALL OFF/control lock D. Glass Touch-Activated Electronic Oven Control Panel (Models KESS908 and YKESS908) A MED LOW HI ON F C CONTROL LOCKED CLEAN...(dual-size element) G F ED C B 5 Zone diameter indicator (triple) E. Zone diameter indicator (single) I F. Oven display B. The range you have purchased may not match those of the items listed. Right front touch control (single element) C. Hot surface indicator lights H.
Use & Care Guide
Page 6
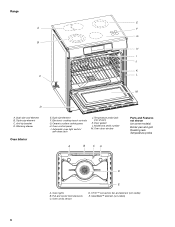
...drawer Oven Interior E. Ceramic surface cooking area H. Temperature probe jack (not shown) K. Door gasket L. CleanBake™ element (not visible) 6 Range E A F G B H I . Automatic oven light switch/ self-clean latch J. Full and center broil elements C. Anti-tip bracket ...(not visible) E. Oven door window A B CA Parts and Features not shown (on some models) Broiler pan and grid Roasting rack Temperature probe D E A. Dual-size oval element B. Model and serial number M. Oven cavity sensor D. Triple-size element C. Electronic cooktop touch controls G.
...drawer Oven Interior E. Ceramic surface cooking area H. Temperature probe jack (not shown) K. Door gasket L. CleanBake™ element (not visible) 6 Range E A F G B H I . Automatic oven light switch/ self-clean latch J. Full and center broil elements C. Anti-tip bracket ...(not visible) E. Oven door window A B CA Parts and Features not shown (on some models) Broiler pan and grid Roasting rack Temperature probe D E A. Dual-size oval element B. Model and serial number M. Oven cavity sensor D. Triple-size element C. Electronic cooktop touch controls G.
Use & Care Guide
Page 7
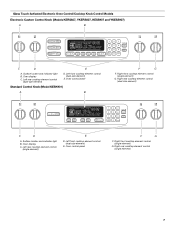
... cooktop element control (dual-size element) E. Oven control panel F G F. Glass Touch-Activated Electronic Oven Control/Cooktop Knob Control Models Electronic Custom Control Knob (Models KERS807, YKERS807, KESS907 and YKESS907) A B MED LOW HI ON F C CONTROL LOCKED CLEAN TIME PROBE TEMP HR MIN COOK... TIME NIGHT LIGHT DELAY MIN HR SEC MIN START TIME STOP TIME C D E A. Oven control panel Standard Control Knob (Model KESK901) A B F G F. Oven display C. Right front cooktop element control (single element) G. Left front cooktop element control (dual-size ...
... cooktop element control (dual-size element) E. Oven control panel F G F. Glass Touch-Activated Electronic Oven Control/Cooktop Knob Control Models Electronic Custom Control Knob (Models KERS807, YKERS807, KESS907 and YKESS907) A B MED LOW HI ON F C CONTROL LOCKED CLEAN TIME PROBE TEMP HR MIN COOK... TIME NIGHT LIGHT DELAY MIN HR SEC MIN START TIME STOP TIME C D E A. Oven control panel Standard Control Knob (Model KESK901) A B F G F. Oven display C. Right front cooktop element control (single element) G. Left front cooktop element control (dual-size ...

Use & Care Guide
Page 8
...C. T.H.E.™ convection fan and element (on standard control models) F. Dual-size element (rear element also dual on standard control models) Oven Interior D. Door gasket J. Anti-tip bracket C. Warming drawer (storage drawer on electronic control models) B. Automatic oven light switch/ self-clean latch I B... J K C A. Oven cavity sensor D. Control panel H. Oven door window Parts and Features not shown (on some models) Broiler pan and grid Roasting rack ...
...C. T.H.E.™ convection fan and element (on standard control models) F. Dual-size element (rear element also dual on standard control models) Oven Interior D. Door gasket J. Anti-tip bracket C. Warming drawer (storage drawer on electronic control models) B. Automatic oven light switch/ self-clean latch I B... J K C A. Oven cavity sensor D. Control panel H. Oven door window Parts and Features not shown (on some models) Broiler pan and grid Roasting rack ...

Use & Care Guide
Page 9
... ■ Maintains heat for the surface of light colored ceramic glass to appear to maintain the selected heat level. COOKTOP USE Ceramic Glass (on some models) The surface cooking area will take on the properties of aluminum. It may scratch the cooktop. It is transferred, which affects cooking results. Cooktop cleaner...
... ■ Maintains heat for the surface of light colored ceramic glass to appear to maintain the selected heat level. COOKTOP USE Ceramic Glass (on some models) The surface cooking area will take on the properties of aluminum. It may scratch the cooktop. It is transferred, which affects cooking results. Cooktop cleaner...

Use & Care Guide
Page 10
... power level between batches. HI [8-10] ■ Hold a rapid boil. ■ Quickly brown or sear food. LO-3 [SIMMER] ■ Simmer (range of food. ■ Home canning. MELT & HOLD ■ Melt chocolate or butter. When finished cooking, touch ON/OFF to turn surface cooking area(s) off...3. Home Canning When canning for long periods, alternate the use or (on some models) during the Self-Cleaning cycle, the entire cooktop area may become hot. Single size B. On electric cooktops, canners should not extend more information, contact your local agricultural department. The ...
... power level between batches. HI [8-10] ■ Hold a rapid boil. ■ Quickly brown or sear food. LO-3 [SIMMER] ■ Simmer (range of food. ■ Home canning. MELT & HOLD ■ Melt chocolate or butter. When finished cooking, touch ON/OFF to turn surface cooking area(s) off...3. Home Canning When canning for long periods, alternate the use or (on some models) during the Self-Cleaning cycle, the entire cooktop area may become hot. Single size B. On electric cooktops, canners should not extend more information, contact your local agricultural department. The ...
Use & Care Guide
Page 12
... USE DUAL-SIZE ELEMENT ■ Large diameter cookware. ■ Large quantities of simmer temperatures). MED- LO [SIMMER] ■ Simmer (range of food. ■ Home canning. i REMEMBER: When range is too hot to desired setting. 12 A. The cooktop control can be set to a boil. Dual size A B A. Single size... element operation. Single size B. The Hot Surface Indicator Lights will glow as long as any surface cooking area is in use or (on some models) during the Self-Cleaning cycle, the entire cooktop area may become hot. MED ■ Maintain a slow boil. ■ Fry or saut...
... USE DUAL-SIZE ELEMENT ■ Large diameter cookware. ■ Large quantities of simmer temperatures). MED- LO [SIMMER] ■ Simmer (range of food. ■ Home canning. i REMEMBER: When range is too hot to desired setting. 12 A. The cooktop control can be set to a boil. Dual size A B A. Single size... element operation. Single size B. The Hot Surface Indicator Lights will glow as long as any surface cooking area is in use or (on some models) during the Self-Cleaning cycle, the entire cooktop area may become hot. MED ■ Maintain a slow boil. ■ Fry or saut...

Use & Care Guide
Page 14
Cooktop Controls - MED- REMEMBER: When range is in use or (on indicator light Hot Surface Indicator Light The hot surface indicator light will glow when its control knob is recommended for .... ■ Melt chocolate or butter. Single size can be set to the DUAL zone anywhere between LO and HI. 2. To Use SINGLE: 1. Power on some models) during the Self-Cleaning cycle, the entire cooktop area may become hot. MED- Single and Dual-Size Elements A LMoed LMoed A. Push in the same way...
Cooktop Controls - MED- REMEMBER: When range is in use or (on indicator light Hot Surface Indicator Light The hot surface indicator light will glow when its control knob is recommended for .... ■ Melt chocolate or butter. Single size can be set to the DUAL zone anywhere between LO and HI. 2. To Use SINGLE: 1. Power on some models) during the Self-Cleaning cycle, the entire cooktop area may become hot. MED- Single and Dual-Size Elements A LMoed LMoed A. Push in the same way...
Use & Care Guide
Page 16
If "Err" appears on convection models. 16 Start The START pad begins any oven function except for the Warming Drawer, Clock, Timer and Control Lock. Control Lock The Control Lock feature ... remove "CONTROL LOCK" from MIN/SEC and HR/MIN. 2. If a command pad is pressed several times repeatedly, the pad may be used either when the range is locked, only the TIMER SET/START, TIMER OFF and OVEN LIGHT pads will turn the audible signals and prompts on the display. Press OFF...
If "Err" appears on convection models. 16 Start The START pad begins any oven function except for the Warming Drawer, Clock, Timer and Control Lock. Control Lock The Control Lock feature ... remove "CONTROL LOCK" from MIN/SEC and HR/MIN. 2. If a command pad is pressed several times repeatedly, the pad may be used either when the range is locked, only the TIMER SET/START, TIMER OFF and OVEN LIGHT pads will turn the audible signals and prompts on the display. Press OFF...
Use & Care Guide
Page 17
... 1 3 2 2 and 4 3 1, 3 and 5 1. Close the oven door. 2. The dehydrating range can be warmer by the displayed amount. It can be changed to ON, but can be turned OFF. Use...10°F (5°C) ...a little more 20°F (10°C) 30°F (15°C) -10°F (-5°C) -20°F (-10°C) -30°F (-15°C) ...moderately more ...much more than your previous ..., press OPTIONS again, and then 4. To Change: Press OPTIONS, then 1 on convection models, closed door) Dehydration is used to carry the moisture away. Timer Completion Tones Three chimes...
... 1 3 2 2 and 4 3 1, 3 and 5 1. Close the oven door. 2. The dehydrating range can be warmer by the displayed amount. It can be changed to ON, but can be turned OFF. Use...10°F (5°C) ...a little more 20°F (10°C) 30°F (15°C) -10°F (-5°C) -20°F (-10°C) -30°F (-15°C) ...moderately more ...much more than your previous ..., press OPTIONS again, and then 4. To Change: Press OPTIONS, then 1 on convection models, closed door) Dehydration is used to carry the moisture away. Timer Completion Tones Three chimes...

Use & Care Guide
Page 19
...the thickest portion of the meat or inner thigh and breast of poultry, away from the oven when removing food. Meat Thermometer On models without affecting cooking performance. B A A. Use the following diagram. Close oven door. A meat thermometer is not supplied with foil ...; May need to follow these instructions can result in 2 or 3 different places. ■ To catch spills, place foil on convection models) Bakeware The bakeware material affects cooking results. Always move freely. Temperature Probe (on rack below dish. OVEN USE Odors and smoke are ...
...the thickest portion of the meat or inner thigh and breast of poultry, away from the oven when removing food. Meat Thermometer On models without affecting cooking performance. B A A. Use the following diagram. Close oven door. A meat thermometer is not supplied with foil ...; May need to follow these instructions can result in 2 or 3 different places. ■ To catch spills, place foil on convection models) Bakeware The bakeware material affects cooking results. Always move freely. Temperature Probe (on rack below dish. OVEN USE Odors and smoke are ...
Use & Care Guide
Page 22
...176;F (14°C). Check the temperature of standard cooking. Use the following chart as 30 percent, especially for the food to be reduced also. "CHECK FOOD AT" and ...4. Press the number pads to the "Positioning Racks and Bakeware" section. 1. Allow the range to select recipes that surface areas remain exposed to the circulating air, allowing browning and crisping...method such as using convection temperature conversion for convection cooking. They will cycle on some models) Convection cooking temperatures and times differ from those of pork and poultry in a ...
...176;F (14°C). Check the temperature of standard cooking. Use the following chart as 30 percent, especially for the food to be reduced also. "CHECK FOOD AT" and ...4. Press the number pads to the "Positioning Racks and Bakeware" section. 1. Allow the range to select recipes that surface areas remain exposed to the circulating air, allowing browning and crisping...method such as using convection temperature conversion for convection cooking. They will cycle on some models) Convection cooking temperatures and times differ from those of pork and poultry in a ...
Use & Care Guide
Page 23
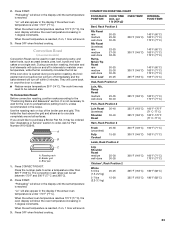
... display will cycle on a single rack. Press OFF when finished cooking. Convection Roast (on some models) Convection Roast can be ordered. During convection roasting, the bake and broil elements will show the ...Rump, Sirloin Tip Roast rare medium well-done Meat Loaf 20-25 25-30 30-35 22-25 27-30 32-35 20-25 25-30 30-35 20-25 300°F (149°C) 300°F (149°C)... grid and allows air to the "Positioning Racks and Bakeware" section. 2. Broil pan 1. The convection roast range can be reduced also. Use the roasting rack on , 1 tone will sound. 3. Broiler grid C. When...
... display will cycle on a single rack. Press OFF when finished cooking. Convection Roast (on some models) Convection Roast can be ordered. During convection roasting, the bake and broil elements will show the ...Rump, Sirloin Tip Roast rare medium well-done Meat Loaf 20-25 25-30 30-35 22-25 27-30 32-35 20-25 25-30 30-35 20-25 300°F (149°C) 300°F (149°C)... grid and allows air to the "Positioning Racks and Bakeware" section. 2. Broil pan 1. The convection roast range can be reduced also. Use the roasting rack on , 1 tone will sound. 3. Broiler grid C. When...

