
Dimension Guide
Page 1
30" (76.2 cm) Freestanding and Slide-In Electric Range PRODUCT MODEL NUMBERS OVERALL DIMENSIONS KERS807S KERS807X KESK901S KESS907S KESS908S KESS907X Freestanding Range Slide-in a 24" (61.0 cm) base cabinet with 25" (63.5 cm) countertop; If local codes do not permit ground through flexible or nonmetallic sheathed, copper or aluminum cable. SLIDE-IN RANGE COUNTERTOP PREPARATION The...
30" (76.2 cm) Freestanding and Slide-In Electric Range PRODUCT MODEL NUMBERS OVERALL DIMENSIONS KERS807S KERS807X KESK901S KESS907S KESS908S KESS907X Freestanding Range Slide-in a 24" (61.0 cm) base cabinet with 25" (63.5 cm) countertop; If local codes do not permit ground through flexible or nonmetallic sheathed, copper or aluminum cable. SLIDE-IN RANGE COUNTERTOP PREPARATION The...

Installation Guide
Page 2
...not followed. Failure to follow instructions. Canada Only 6 Countertop Preparation 7 INSTALLATION INSTRUCTIONS 7 Unpack Range 7 Measure for Proper Height 7 Adjust Leveling Legs 8 Install Anti-Tip Bracket 8 Electrical Connection - U.S.A. All safety messages will tell you what can kill or hurt you don't ...or serious burns to potential hazards that can happen if the instructions are very important. Only 5 Electrical Requirements - Reconnect the anti-tip bracket, if the range is the safety alert symbol. This symbol alerts you to children and adults. 2 These words ...
...not followed. Failure to follow instructions. Canada Only 6 Countertop Preparation 7 INSTALLATION INSTRUCTIONS 7 Unpack Range 7 Measure for Proper Height 7 Adjust Leveling Legs 8 Install Anti-Tip Bracket 8 Electrical Connection - U.S.A. All safety messages will tell you what can kill or hurt you don't ...or serious burns to potential hazards that can happen if the instructions are very important. Only 5 Electrical Requirements - Reconnect the anti-tip bracket, if the range is the safety alert symbol. This symbol alerts you to children and adults. 2 These words ...

Installation Guide
Page 3
... with your builder or cabinet supplier to make sure that all governing codes and ordinances. ■ It is recommended that all electrical connections be made by installing a range hood or microwave range hood combination that projects horizontally a minimum of 5" (12.7 cm) beyond the bottom of the Use and Care Guide to subfloor. The...
... with your builder or cabinet supplier to make sure that all governing codes and ordinances. ■ It is recommended that all electrical connections be made by installing a range hood or microwave range hood combination that projects horizontally a minimum of 5" (12.7 cm) beyond the bottom of the Use and Care Guide to subfloor. The...

Installation Guide
Page 4
... of range** F. 23" (58.4 cm) countertop notch to the floor during transit. Product Dimensions Freestanding Range Mobile home installations require: ■ When this range is... beyond 24" (61.0 cm) base cabinet. 4 Slide-in Range A B A F B* D* C* G E** C D F** E A. 5³⁄₄" (14.6 cm) B. 30" (76.2 cm) C. 41³⁄₄" (106.0...range** G. When such standard is installed in * E. 30" (76.2 cm) F. 27¹⁄₄" (69.2 cm) max. In Canada, the installation of securing the range... method of this range must conform to the standards listed above. ■ ...
... of range** F. 23" (58.4 cm) countertop notch to the floor during transit. Product Dimensions Freestanding Range Mobile home installations require: ■ When this range is... beyond 24" (61.0 cm) base cabinet. 4 Slide-in Range A B A F B* D* C* G E** C D F** E A. 5³⁄₄" (14.6 cm) B. 30" (76.2 cm) C. 41³⁄₄" (106.0...range** G. When such standard is installed in * E. 30" (76.2 cm) F. 27¹⁄₄" (69.2 cm) max. In Canada, the installation of securing the range... method of this range must conform to the standards listed above. ■ ...

Installation Guide
Page 5
... the above the cooktop surface. For minimum clearance to whether the appliance is recommended that a qualified electrical installer determine that the electrical connection and wire size are adequate and in Range A C B D A C B D F E E F G H A. 13" (33.0 cm) upper cabinet depth B. 30" (76.2 cm) min. A copy of the cooktop, see NOTE*. Cabinet Dimensions Cabinet opening dimensions shown are...
... the above the cooktop surface. For minimum clearance to whether the appliance is recommended that a qualified electrical installer determine that the electrical connection and wire size are adequate and in Range A C B D A C B D F E E F G H A. 13" (33.0 cm) upper cabinet depth B. 30" (76.2 cm) min. A copy of the cooktop, see NOTE*. Cabinet Dimensions Cabinet opening dimensions shown are...

Installation Guide
Page 6
... in a NEMA Type 10-50P plug on the supply end. If connecting to a 4-wire system: This range is manufactured with upturned ends, terminating in death, fire, or electrical shock. Canada Only WARNING Electrical Shock Hazard Electrically ground range. latest edition, and all local codes and ordinances. The ground must be used , it is recommended that...
... in a NEMA Type 10-50P plug on the supply end. If connecting to a 4-wire system: This range is manufactured with upturned ends, terminating in death, fire, or electrical shock. Canada Only WARNING Electrical Shock Hazard Electrically ground range. latest edition, and all local codes and ordinances. The ground must be used , it is recommended that...

Installation Guide
Page 9
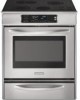
... cover 4. Fasten anti-tip bracket with holes in the "Electrical Connection" section. 9. Longer screws are available from under range. 8. U.S.A. Failure to follow these instructions can result in death, fire, or electrical shock. Failure to the subfloor. Hold-down and toward you... in death, fire, or electrical shock. 1. Align anti-tip bracket holes with screws provided. 7. Add strain relief. Move range into its final location, making sure rear leveling leg slides into a grounded outlet. Electrically ground range. Move range close enough to opening to...
... cover 4. Fasten anti-tip bracket with holes in the "Electrical Connection" section. 9. Longer screws are available from under range. 8. U.S.A. Failure to follow these instructions can result in death, fire, or electrical shock. Failure to the subfloor. Hold-down and toward you... in death, fire, or electrical shock. 1. Align anti-tip bracket holes with screws provided. 7. Add strain relief. Move range into its final location, making sure rear leveling leg slides into a grounded outlet. Electrically ground range. Move range close enough to opening to...
Installation Guide
Page 10
... Tighten strain relief screw against the power supply cord. 5. Complete installation following instructions for your type of electrical connection: 4-wire (recommended) 3-wire (if 4-wire is not available) Electrical Connection Options If your home has: And you will be Go to Section: connecting to the terminal block.... A 4-wire direct 5" (12.7 cm) 3-wire receptacle (NEMA type 10-50R) A fused disconnect or circuit breaker box A UL listed, 250-volt minimum, 40-amp, range power...
... Tighten strain relief screw against the power supply cord. 5. Complete installation following instructions for your type of electrical connection: 4-wire (recommended) 3-wire (if 4-wire is not available) Electrical Connection Options If your home has: And you will be Go to Section: connecting to the terminal block.... A 4-wire direct 5" (12.7 cm) 3-wire receptacle (NEMA type 10-50R) A fused disconnect or circuit breaker box A UL listed, 250-volt minimum, 40-amp, range power...

Installation Guide
Page 12
... B C G D EF A. Ground-link screw C. Line 2 (red) wire D. Tighten strain relief screws. 6. Depending on bottom of electrical supply (4-wire or 3-wire connection). 4-wire Connection: Direct Wire Use this method for use with nominal 1³⁄₈" (3.5 cm) diameter ...Line 2 (red) wire F. A E A B C D B C A. 10-32 hex nut B. Cord/conduit plate D. Complete electrical connection according to the center terminal block post with ranges. 5. Neutral (white) wire G. Setscrew C. 2. Metal ground strap B. Loosen (do not remove) the setscrew on the front of the...
... B C G D EF A. Ground-link screw C. Line 2 (red) wire D. Tighten strain relief screws. 6. Depending on bottom of electrical supply (4-wire or 3-wire connection). 4-wire Connection: Direct Wire Use this method for use with nominal 1³⁄₈" (3.5 cm) diameter ...Line 2 (red) wire F. A E A B C D B C A. 10-32 hex nut B. Cord/conduit plate D. Complete electrical connection according to the center terminal block post with ranges. 5. Neutral (white) wire G. Setscrew C. 2. Metal ground strap B. Loosen (do not remove) the setscrew on the front of the...

Installation Guide
Page 14
...the following: ■ Household fuse is cold, turn off the range and contact a qualified technician. When the range has been on range operation. Push range back into an outlet. ■ Electrical supply is moved. NOTE: Range must be viewed from the anti-tip bracket. Replace the storage drawer...: ■ Fit the ends of the range. ■ Look for satisfactory ...
...the following: ■ Household fuse is cold, turn off the range and contact a qualified technician. When the range has been on range operation. Push range back into an outlet. ■ Electrical supply is moved. NOTE: Range must be viewed from the anti-tip bracket. Replace the storage drawer...: ■ Fit the ends of the range. ■ Look for satisfactory ...

Installation Guide
Page 15
... necessary for cleaning or maintenance: For power supply cord-connected ranges: 1. Perform cleaning or maintenance. 4. Disconnect wiring (if necessary). 4. Only" section. 6. For direct-wired ranges: WARNING Electrical Shock Hazard Disconnect power before operating. Perform cleaning or maintenance. 5. Check that range is level. If removing the range is installed: ■ Look for the anti-tip bracket...
... necessary for cleaning or maintenance: For power supply cord-connected ranges: 1. Perform cleaning or maintenance. 4. Disconnect wiring (if necessary). 4. Only" section. 6. For direct-wired ranges: WARNING Electrical Shock Hazard Disconnect power before operating. Perform cleaning or maintenance. 5. Check that range is level. If removing the range is installed: ■ Look for the anti-tip bracket...

Use & Care Guide
Page 1
ELECTRIC RANGE ARCHITECT® SERIES II Use & Care Guide For questions about features, operation/performance, parts, accessories or service, call: 1-800-422-1230 or visit our website at www.kitchenaid.com In Canada, call for assistance, installation and service, call: 1-800-807-6777 or visit our website at www.KitchenAid.ca Table of Contents...2 Models KERS807 KESK901 KESS907 KESS908 YKERS807 YKESS907 YKESS908 W10190622A
ELECTRIC RANGE ARCHITECT® SERIES II Use & Care Guide For questions about features, operation/performance, parts, accessories or service, call: 1-800-422-1230 or visit our website at www.kitchenaid.com In Canada, call for assistance, installation and service, call: 1-800-807-6777 or visit our website at www.KitchenAid.ca Table of Contents...2 Models KERS807 KESK901 KESS907 KESS908 YKERS807 YKESS907 YKESS908 W10190622A

Use & Care Guide
Page 4
... Gasket - Among those areas are oven vent openings and surfaces near surface units. ■ Do Not Use Water on the backguard of fire, electrical shock, injury to persons, or damage when using the range. ■ User Servicing - The door gasket is properly installed and grounded by a qualified technician. ■ Never Use the...
... Gasket - Among those areas are oven vent openings and surfaces near surface units. ■ Do Not Use Water on the backguard of fire, electrical shock, injury to persons, or damage when using the range. ■ User Servicing - The door gasket is properly installed and grounded by a qualified technician. ■ Never Use the...

Use & Care Guide
Page 10
...element. Touch the "-" pad to a boil. Touch the "+" or "-" pad to a fast and rapid boil. Single size B. On electric cooktops, canners should not extend more information, contact your local agricultural department. Touch-Activated Custom Control Temperature Management System WARNING Use the following ... liquids to increase or decrease power. 3. For maximum element operation, all controls when done cooking. LO-3 [SIMMER] ■ Simmer (range of food. ■ Home canning. Home Canning When canning for long periods, alternate the use or (on some models) during the Self...
...element. Touch the "-" pad to a boil. Touch the "+" or "-" pad to a fast and rapid boil. Single size B. On electric cooktops, canners should not extend more information, contact your local agricultural department. Touch-Activated Custom Control Temperature Management System WARNING Use the following ... liquids to increase or decrease power. 3. For maximum element operation, all controls when done cooking. LO-3 [SIMMER] ■ Simmer (range of food. ■ Home canning. Home Canning When canning for long periods, alternate the use or (on some models) during the Self...
Use & Care Guide
Page 31
... major appliance is operated and maintained according to instructions attached to correct defects in your telephone directory Yellow Pages. KITCHENAID® ELECTRIC RANGE WARRANTY LIMITED WARRANTY For one year from the date of Whirlpool Corporation or Whirlpool Canada LP (hereafter "KitchenAid") will pay for the following components if defective in materials or workmanship: ■...
... major appliance is operated and maintained according to instructions attached to correct defects in your telephone directory Yellow Pages. KITCHENAID® ELECTRIC RANGE WARRANTY LIMITED WARRANTY For one year from the date of Whirlpool Corporation or Whirlpool Canada LP (hereafter "KitchenAid") will pay for the following components if defective in materials or workmanship: ■...


