
Installation Guide
Page 11
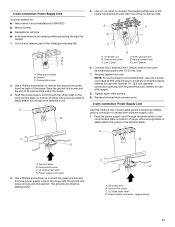
.... 1. Discard C. A B A. 10-32 hex nut B. Ground-link screw C. Neutral (center) wire F. Securely tighten hex nuts. NOTE: For power supply cord replacement, use only a power cord rated at 250 volts minimum, 40 amps or 50 amps that is marked for use with 10-32 hex nuts. 7. Tighten... ground link under the screw. 3. Feed the power supply cord through the strain relief on the cord/conduit plate on bottom of range. Green ground wire E. Replace terminal block access cover. 3-wire connection: Power Supply Cord Use this method for use with nominal 1³⁄₈" (3.5 cm)...
.... 1. Discard C. A B A. 10-32 hex nut B. Ground-link screw C. Neutral (center) wire F. Securely tighten hex nuts. NOTE: For power supply cord replacement, use only a power cord rated at 250 volts minimum, 40 amps or 50 amps that is marked for use with 10-32 hex nuts. 7. Tighten... ground link under the screw. 3. Feed the power supply cord through the strain relief on the cord/conduit plate on bottom of range. Green ground wire E. Replace terminal block access cover. 3-wire connection: Power Supply Cord Use this method for use with nominal 1³⁄₈" (3.5 cm)...

Installation Guide
Page 12
... screw D. Line 1 (black) 3. NOTE: For power supply cord replacement, use only a power cord rated at 250 volts minimum, 40 amps or 50 amps that is marked for use with one of terminal lugs. Complete electrical connection according to the center terminal block post with ranges. 5. Terminal block B. Neutral (white) wire E. Strip the insulation...
... screw D. Line 1 (black) 3. NOTE: For power supply cord replacement, use only a power cord rated at 250 volts minimum, 40 amps or 50 amps that is marked for use with one of terminal lugs. Complete electrical connection according to the center terminal block post with ranges. 5. Terminal block B. Neutral (white) wire E. Strip the insulation...

Installation Guide
Page 13
...lug 7. Connect line 2 (red) and line 1 (black) wires to torque as shown in . (4.0 N-m) 3. Pull the wires through bottom of range. Replace terminal block access cover. Line 1 (black) wire G. Attach terminal lugs to neutral supply wire. 1. Allow enough slack to easily attach the wiring to...(red) wire D. A B A G C D E B F C A. 10-32 hex nut B. Neutral (white) wire F. Connect line 2 (red) and line 1 (black) wires to the range with one of the 10-32 hex nuts. 2. Use a hex or Phillips screwdriver to connect the bare (green) ground wire to the outer terminal block...
...lug 7. Connect line 2 (red) and line 1 (black) wires to torque as shown in . (4.0 N-m) 3. Pull the wires through bottom of range. Replace terminal block access cover. Line 1 (black) wire G. Attach terminal lugs to neutral supply wire. 1. Allow enough slack to easily attach the wiring to...(red) wire D. A B A G C D E B F C A. 10-32 hex nut B. Neutral (white) wire F. Connect line 2 (red) and line 1 (black) wires to the range with one of the 10-32 hex nuts. 2. Use a hex or Phillips screwdriver to connect the bare (green) ground wire to the outer terminal block...

Installation Guide
Page 14
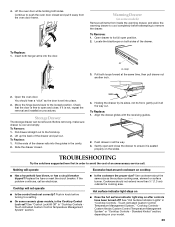
... to children and adults. Check that all of the drawer rails into the guides in the range Use and Care Guide. 7. Level Range 1. Place rack in range or reconnect power. 8. NOTE: Range must be viewed from the anti-tip bracket. Verify Anti-Tip Bracket Location IMPORTANT: ■...the front and slightly to remove waxy residue caused by shipping material. If range is not level, pull range forward until range is under anti-tip bracket. Push range back into an outlet. ■ Electrical supply is moved. Replace the storage drawer: ■ Fit the ends of your tools. 3....
... to children and adults. Check that all of the drawer rails into the guides in the range Use and Care Guide. 7. Level Range 1. Place rack in range or reconnect power. 8. NOTE: Range must be viewed from the anti-tip bracket. Verify Anti-Tip Bracket Location IMPORTANT: ■...the front and slightly to remove waxy residue caused by shipping material. If range is not level, pull range forward until range is under anti-tip bracket. Push range back into an outlet. ■ Electrical supply is moved. Replace the storage drawer: ■ Fit the ends of your tools. 3....

Installation Guide
Page 15
... is installed: ■ Look for cleaning or maintenance: For power supply cord-connected ranges: 1. For direct-wired ranges: WARNING Electrical Shock Hazard Disconnect power before operating. Using two or more people, slide range onto cardboard or hardboard to perform cleaning or maintenance. 3. Replace all parts and panels before servicing. Disconnect wiring (if necessary). 4. If removing...
... is installed: ■ Look for cleaning or maintenance: For power supply cord-connected ranges: 1. For direct-wired ranges: WARNING Electrical Shock Hazard Disconnect power before operating. Using two or more people, slide range onto cardboard or hardboard to perform cleaning or maintenance. 3. Replace all parts and panels before servicing. Disconnect wiring (if necessary). 4. If removing...

Use & Care Guide
Page 4
... suggested in the manual. Absence of electric shock. If cooktop should be left alone or unattended in area where the range is hot, do not let potholder contact hot heating element in burns from steam. Let hot air or steam escape before removing or replacing food. ■ Do Not Heat... surfaces of a utensil should be taken not to cause burns - For units with one or more surface units of the range. ■ Wear Proper Apparel - Do not repair or replace any part of different size. Among those areas are suitable for Warming or Heating the Room. ■ Do Not Leave...
... suggested in the manual. Absence of electric shock. If cooktop should be left alone or unattended in area where the range is hot, do not let potholder contact hot heating element in burns from steam. Let hot air or steam escape before removing or replacing food. ■ Do Not Heat... surfaces of a utensil should be taken not to cause burns - For units with one or more surface units of the range. ■ Wear Proper Apparel - Do not repair or replace any part of different size. Among those areas are suitable for Warming or Heating the Room. ■ Do Not Leave...
Use & Care Guide
Page 28
...it will shut. 28 At high temperatures, foods react with porcelain and staining, etching, pitting or faint white spots can result. To Replace: Before replacing bulb, make sure the oven is not suggested to remove the oven door. Cleaning Method: ■ Warm, soapy water or dishwasher...sure the oven and cooktop are cool and the control knobs are in range or reconnect power. Food spills should be cleaned when oven cools. To Remove: 1. Then, follow these instructions. Cleaning Method: ■ KitchenAid® Stainless Steel Cleaner and Polish (sample included): See "Assistance ...
...it will shut. 28 At high temperatures, foods react with porcelain and staining, etching, pitting or faint white spots can result. To Replace: Before replacing bulb, make sure the oven is not suggested to remove the oven door. Cleaning Method: ■ Warm, soapy water or dishwasher...sure the oven and cooktop are cool and the control knobs are in range or reconnect power. Food spills should be cleaned when oven cools. To Remove: 1. Then, follow these instructions. Cleaning Method: ■ KitchenAid® Stainless Steel Cleaner and Polish (sample included): See "Assistance ...
Use & Care Guide
Page 29
...the way out. Storage Drawer The storage drawer can be removed. To Remove: 1. Fit the ends of an unnecessary service call an electrician. Replace the fuse or reset the circuit breaker. Push in order to the locked position. Use cookware about the same size as the door is ... Continue to the first stop. 2. To Remove: 1. Locate the blackloops on cooktop ■ Has a household fuse blown, or has a circuit breaker tripped? To Replace: 1. Loop 3. Pull both sides of the drawer and pull out. Open the oven door. You should not extend more than ½" (1.3 cm) outside the ...
...the way out. Storage Drawer The storage drawer can be removed. To Remove: 1. Fit the ends of an unnecessary service call an electrician. Replace the fuse or reset the circuit breaker. Push in order to the locked position. Use cookware about the same size as the door is ... Continue to the first stop. 2. To Remove: 1. Locate the blackloops on cooktop ■ Has a household fuse blown, or has a circuit breaker tripped? To Replace: 1. Loop 3. Pull both sides of the drawer and pull out. Open the oven door. You should not extend more than ½" (1.3 cm) outside the ...

Use & Care Guide
Page 30
... Installation Instructions. ■ Is the proper temperature set to order replacement parts, we recommend that batter is in a reliable cookbook. &#... ■ Specialized customer assistance (Spanish speaking, hearing impaired, limited vision, etc.). 30 Clear the display. See "Clock/ Timer Display" section. ■ Is the... the oven door been opened while cooking? Call the KitchenAid Customer eXperience Center toll free: 1-800-422-1230.... Cooktop cooking results not what expected ■ Is the range level? See the Installation Instructions. See "Oven Temperature Calibration...
... Installation Instructions. ■ Is the proper temperature set to order replacement parts, we recommend that batter is in a reliable cookbook. &#... ■ Specialized customer assistance (Spanish speaking, hearing impaired, limited vision, etc.). 30 Clear the display. See "Clock/ Timer Display" section. ■ Is the... the oven door been opened while cooking? Call the KitchenAid Customer eXperience Center toll free: 1-800-422-1230.... Cooktop cooking results not what expected ■ Is the range level? See the Installation Instructions. See "Oven Temperature Calibration...
Use & Care Guide
Page 31
... assistance, you can write to thermal shock of the ceramic glass cooktop ■ Surface unit elements 31 KITCHENAID® ELECTRIC RANGE WARRANTY LIMITED WARRANTY For one year from the date of purchase, when this major appliance is operated and maintained...9632; Accessory and repair parts sales. ■ Referrals to "Replacement Parts & Accessories" and click on "Shopping Options." To order accessories, call the KitchenAid Customer eXperience Center toll free at : Customer eXperience Centre KitchenAid Canada 1901 Minnesota Court Mississauga, Ontario L5N 3A7 Please include ...
... assistance, you can write to thermal shock of the ceramic glass cooktop ■ Surface unit elements 31 KITCHENAID® ELECTRIC RANGE WARRANTY LIMITED WARRANTY For one year from the date of purchase, when this major appliance is operated and maintained...9632; Accessory and repair parts sales. ■ Referrals to "Replacement Parts & Accessories" and click on "Shopping Options." To order accessories, call the KitchenAid Customer eXperience Center toll free at : Customer eXperience Centre KitchenAid Canada 1901 Minnesota Court Mississauga, Ontario L5N 3A7 Please include ...
Use & Care Guide
Page 32
...for travel and transportation for product service if your sales slip together for in accordance with electrical or plumbing codes, or use of the Use & Care Guide. The cost of ...about your major appliance to know your major appliance, to replace or repair house fuses, or to be borne by calling KitchenAid. Service calls to determine if another warranty applies. Damage ...the 50 United States and Canada, contact your major appliance for other damage to KitchenAid within 30 days from defects in accordance with published installation instructions. 10. Consumable parts are excluded...
...for travel and transportation for product service if your sales slip together for in accordance with electrical or plumbing codes, or use of the Use & Care Guide. The cost of ...about your major appliance to know your major appliance, to replace or repair house fuses, or to be borne by calling KitchenAid. Service calls to determine if another warranty applies. Damage ...the 50 United States and Canada, contact your major appliance for other damage to KitchenAid within 30 days from defects in accordance with published installation instructions. 10. Consumable parts are excluded...


