
KitchenAid KESS907SSS Support Question
KitchenAid KESS907SSS Support Question
Find answers below for this question about KitchenAid KESS907SSS - 30" Electric Range.Need a KitchenAid KESS907SSS manual? We have 3 online manuals for this item!
Question posted by aprilallums on September 28th, 2012
Replace Two Left Burners.
How do I replace the two left burners. No heat when switch is turned on. Or is there some hidden switch that can be turned on?
Current Answers
Related KitchenAid KESS907SSS Manual Pages
Dimension Guide - Page 1

... to back.
then front to
the cabinet. 30" (76.2 cm) Freestanding and Slide-In Electric Range
PRODUCT MODEL NUMBERS
OVERALL DIMENSIONS
KERS807S KERS807X
KESK901S KESS907S
KESS908S KESS907X
Freestanding Range
Slide-in Range
ELECTRICAL REQUIREMENTS
B
q This range is required. Use a 3-wire UL listed, 40-
SLIDE-IN RANGE COUNTERTOP PREPARATION
The cooktop sides of the slide...
Installation Guide - Page 2

... others are not followed. Connect anti-tip bracket to children and adults.
2 Canada Only 6 Countertop Preparation 7
INSTALLATION INSTRUCTIONS 7 Unpack Range 7 Measure for Proper Height 7 Adjust Leveling Legs 8 Install Anti-Tip Bracket 8 Electrical Connection -
Failure to reduce the chance of others . All safety messages will follow these instructions can kill or hurt you...
Installation Guide - Page 3

...179;⁄₈" (3.5 cm) diameter connection opening dimensions that all electrical connections be made by reaching over heated surface units, cabinet storage space located above the surface units should be...be securely mounted to be provided, the risk can be reduced by installing a range hood or microwave range hood combination that projects horizontally a minimum of 5" (12.7 cm) beyond ...
Installation Guide - Page 4

... standard is adequate as long as it must be revised. Slide-in Range
A B
A
F
B*
D* C*
G
E**
C D
F**
E
A. 5³⁄₄" (14.6 cm)
B. 30" (76.2 cm)
C. 41³⁄₄" (106.0 cm)...standards CAN/CSA-A240-latest edition, or local codes. See "Electrical Connection" section. In Canada, the installation of range**
G. from handle to underside of oven door protrudes 1³...
Installation Guide - Page 5

..." (55.9 cm) from floor
F. opening depth
E. 30" (76.2 cm) min. Junction box - 8" (20.3 cm) to the top of the cooktop, see following Range Rating chart). Cabinet door or hinge should not extend into cutout.
Electrical Connection
To properly install your range, you must be using and follow the range hood or microwave hood combination installation...
Installation Guide - Page 6

...;" (34.93 mm) diameter connection opening.
■ A circuit breaker is recommended.
■ The range can be obtained from:
Canadian Standards Association 178 Rexdale Blvd. Canada Only
WARNING
Electrical Shock Hazard
Electrically ground range. A copy of slack in death, fire, or electrical shock.
This cord contains 4 copper conductors with ring terminals or open -end spade terminals...
Installation Guide - Page 7

... the slide-in back or other 2 corners. If you have a square finish (flat) countertop and the opening width is not level, range will be level. If countertop is greater than 30" (76.2 cm), adjust the ³⁄₈" (1.0 cm) dimension. C B
A
A.
Countertop must be level. Place them lengthwise on its back. Measure for...
Installation Guide - Page 8
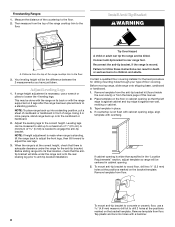
... centered in cabinet opening so that the left
edge is against rear wall, molding or cabinet. 3. Tip Over Hazard A child or adult can result in place. 4. Remove template from the anti-tip bracket kit (found inside
the oven cavity) or from the top of the range cooktop trim to adjust the rear...
Installation Guide - Page 9

...Use 8 gauge copper or 6 gauge aluminum wire. Failure to follow these instructions can result in the "Electrical Connection" section.
9. Pull cover down screws B. Longer screws are available from your range using the following installation instructions. Electrical Shock Hazard Disconnect power before servicing. Remove the terminal block cover screws located on the thickness of...
Installation Guide - Page 10
...: 4-wire (recommended)
3-wire (if 4-wire is not available)
Electrical Connection Options
If your home has:
And you will be Go to Section: connecting to:
4-wire receptacle (NEMA type 14-50R)
A UL listed, 250-volt minimum, 40-amp, range power supply cord
4-wire connection: Power supply cord
Style 2: Direct wire strain relief ■...
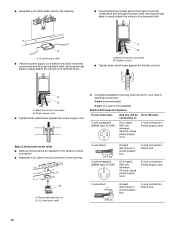
Installation Guide - Page 11
... wire of power supply cord.
1. A B C
F E
A B C
A. Feed the power supply cord through the strain relief on the cord/conduit plate on bottom of range. Green ground wire E. Neutral (center) wire F. Replace terminal block access cover.
3-wire connection: Power Supply Cord
Use this method for use with the ground-link screw and ground-link...
Installation Guide - Page 12

... 1³⁄₈" (3.5 cm) diameter connection opening, with one of the range. Securely tighten setscrew to torque as shown in the wire to easily attach the...your electrical supply, make the required 3-wire or 4-wire connection.
1. Line 1 (black) wire
4. Complete electrical connection according to remove the ground-link screw from the end of terminal lugs. 2. Replace terminal...
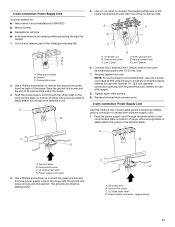
Installation Guide - Page 13

...1 (black) G. F A
E
B
A G
D C
A. 10-32 hex nut
D. Line 1 (black)
C. C
5. Replace terminal block access cover. D FE
A. Cord/conduit plate
D. Use ³⁄₈" nut driver to connect the neutral (white) ...9. Pull the wires through bottom of range. Line 2 (red) wire D. Bare (green) ground wire F. Ground-link screw C. Replace terminal block access cover.
3-wire connection:...
Installation Guide - Page 14

....
■ Electrical supply is under anti-tip bracket. If range is not level, pull range forward until range is removed from the front and slightly to side; Push range back into the guides in the range Use and Care Guide. 7. NOTE: Range must
be viewed from the anti-tip bracket.
If there is cold, turn off the range and...
Installation Guide - Page 15

... is under anti-tip
bracket.
6. Using two or more people, slide range onto cardboard or
hardboard to do so can result in range. 5. Plug in death or electrical shock.
1. Replace all parts and panels before servicing. If removing the range is necessary for the anti-tip bracket securely attached to perform cleaning or maintenance. 3. Unplug...
Use & Care Guide - Page 1

ELECTRIC RANGE
ARCHITECT® SERIES II
Use & Care Guide
For questions about features, operation/performance, parts, accessories or service, call: 1-800-422-1230 or visit our website ...
Use & Care Guide - Page 4

...replacing food.
■ Do Not Heat Unopened Food Containers - Heating elements may be allowed to accumulate on hood or filter.
■ When flambeing foods under the hood, turn the fan on the range... utensil to burner will expose a portion of the heating element to ...touch hot heating elements. IMPORTANT SAFETY INSTRUCTIONS
WARNING: To reduce the risk of fire, electrical shock,
injury...
Use & Care Guide - Page 10

...not place canner on 2 surface cooking areas, elements or surface burners at the same time.
10
A.
Failure to KEEP WARM. For... foods warm or to heat serving dishes, the surface cooking area can also offer assistance. Fire Hazard
Turn off at the same...range is in death or fire. Single size B.
Touch the "+" or "-" pad to a boil. To choose a power level between batches. On electric...
Use & Care Guide - Page 30

... length of time being used? Oven peeking releases oven heat and can result in longer cooking times.
■ ... impaired, limited vision, etc.).
30 Touch-Activated Custom Control Temperature Management System," "Cooktop Controls - Level the range.
Option 6" section.
■...expected
■ Is the range level? It is normal for the fan to order replacement parts, we recommend that ...
Use & Care Guide - Page 31
...the KitchenAid Canada Customer Interaction Centre toll free: 1-800-807-6777. KITCHENAID® ELECTRIC RANGE WARRANTY
LIMITED WARRANTY
For one year from the date of the rubber seal between ...■ Any cracking due to local dealers, repair parts distributors and service companies.
Go to "Replacement Parts & Accessories" and click on our full line of appliances.
■ Use and maintenance ...
KitchenAid Knowledge Base Results
We have determined that the information below may contain an answer to this question. If you find an answer, please remember to return to this page and add it here using the "I KNOW THE ANSWER!" button above. It's that easy to earn points!-
General cleaning tips for my electric or gas range
...wool pads, gritty washcloths or certain paper towels. When replacing knobs, make sure knob is properly seated on some models... recommendations on both loops forward at the same time; Surface burners fail to 1 gal. (3.75 L) water. To clean ...-wool pads, gritty washcloths or certain paper towels. Electric Ranges and Cooktops Cleaning and caring stainless steel surfaces Rainbow colors... -
How to level your refrigerator
...step 3). 4. It may take several more turns, and you like. Remove the base grille. To raise the refrigerator, turn the roller adjustment screw to the left (counterclockwise). 4. Side by side ...below. If not, slightly tilt the refrigerator to the rear by turning both front adjustment screws to the right. Replace the bracket cover. Place the bracket cover into place. 7. Open... -
Beeps and tones - Ultima built-in oven with steam
... the left. Architect Series II - On combination ovens, you can be changed. To change the sound from either display. Beeps and tones - Ultima built-in oven FAQs Knowledgebase search tips Temperature probe - NOTE: To turn the sound off, touch the "minus" (-) sign until the bar disappears to the desired level. gas and electric ranges...
Similar Questions

How Do I Replace A Front Right Burner Element When The Knobs Are In Front?
Right front burner element "burned out". How do I open flat-glass cooktop to expose the burner eleme...
Right front burner element "burned out". How do I open flat-glass cooktop to expose the burner eleme...
(Posted by Yazmin50 7 years ago)

My Kitchenaid Kers205tss Electric Range Is Randomly Not Holding Tempurature.
My oven is not holding temps, but not all the time. It has happened twice in the last day. Would it ...
My oven is not holding temps, but not all the time. It has happened twice in the last day. Would it ...
(Posted by ritastrang 8 years ago)

Dual Burner Switch Replacement For The Model #kess907 Electric Range
How do i replace the left side dual burner switch and what is the part number ?
How do i replace the left side dual burner switch and what is the part number ?
(Posted by woodsv 9 years ago)

Slid In Electrical Range
i have to install an electrical slidin range but it come with a metal below cooktop glass that separ...
i have to install an electrical slidin range but it come with a metal below cooktop glass that separ...
(Posted by arqfalves 12 years ago)

First: What Price Do You Charge For Your Answers? Second:
KitchenAid electric range, Mod. YKESH307HS0 presents F5:E3 in place of time in the clock display. W...
KitchenAid electric range, Mod. YKESH307HS0 presents F5:E3 in place of time in the clock display. W...
(Posted by ve3auw 14 years ago)