
Dimension Guide
Page 1
....6 - 18.5 KW 50 **The NEC calculated load is less than 30" (76.2 cm), adjust the ³⁄₈" (1.0 cm) dimension. 30" (76.2 cm) Freestanding and Slide-In Electric Range PRODUCT MODEL NUMBERS OVERALL DIMENSIONS KERS807S KERS807X KESK901S KESS907S KESS908S KESS907X Freestanding Range Slide-in Range ELECTRICAL REQUIREMENTS B q This range is manufactured with the neutral terminal connected to a 50-amp...
....6 - 18.5 KW 50 **The NEC calculated load is less than 30" (76.2 cm), adjust the ³⁄₈" (1.0 cm) dimension. 30" (76.2 cm) Freestanding and Slide-In Electric Range PRODUCT MODEL NUMBERS OVERALL DIMENSIONS KERS807S KERS807X KESK901S KESS907S KESS908S KESS907X Freestanding Range Slide-in Range ELECTRICAL REQUIREMENTS B q This range is manufactured with the neutral terminal connected to a 50-amp...

Installation Guide
Page 3
... Gather the required tools and parts before starting installation. Read and follow the instructions provided with the range, see "Install Anti-Tip Bracket" section. ■ Grounded electrical supply is located inside the oven door on the model/serial rating plate. Anti-tip bracket B. Parts needed Rear Filler Strip (optional) The rear filler strip...
... Gather the required tools and parts before starting installation. Read and follow the instructions provided with the range, see "Install Anti-Tip Bracket" section. ■ Grounded electrical supply is located inside the oven door on the model/serial rating plate. Anti-tip bracket B. Parts needed Rear Filler Strip (optional) The rear filler strip...

Installation Guide
Page 4
...179;⁄₄" (4.4 cm) (2 5.5 cm] on models KERS807XSP and KESS907XSP) beyond 24" (61.0 cm) base cabinet. A. 30 77.6 cm) B. 35⁵⁄₈" (90.5 cm) height to underside of cooktop *Range can be revised. front of this range must conform to rear of cooktop edge with leveling legs ...61.0 cm) base cabinet with the current standards CAN/CSA-A240-latest edition, or local codes. See "Electrical Connection" section. from handle to standoff at back of securing the range is adequate as long as it conforms to the standards listed above. ■ Four-wire power supply ...
...179;⁄₄" (4.4 cm) (2 5.5 cm] on models KERS807XSP and KESS907XSP) beyond 24" (61.0 cm) base cabinet. A. 30 77.6 cm) B. 35⁵⁄₈" (90.5 cm) height to underside of cooktop *Range can be revised. front of this range must conform to rear of cooktop edge with leveling legs ...61.0 cm) base cabinet with the current standards CAN/CSA-A240-latest edition, or local codes. See "Electrical Connection" section. from handle to standoff at back of securing the range is adequate as long as it conforms to the standards listed above. ■ Four-wire power supply ...

Installation Guide
Page 5
... is used, it will be obtained from either cabinet, 7" (17.8 cm) max. The model/serial rating plate is recommended that a qualified electrical installer determine that the electrical connection and wire size are adequate and in Range A C B D A C B D F E E F G H A. 13" (33.0 cm) upper cabinet depth B. 30" (76.2 cm) min. or 50-amp power supply cord (pigtail) (see NOTE...
... is used, it will be obtained from either cabinet, 7" (17.8 cm) max. The model/serial rating plate is recommended that a qualified electrical installer determine that the electrical connection and wire size are adequate and in Range A C B D A C B D F E E F G H A. 13" (33.0 cm) upper cabinet depth B. 30" (76.2 cm) min. or 50-amp power supply cord (pigtail) (see NOTE...

Installation Guide
Page 6
...less than the total connected load listed on the model/serial rating plate. **If connecting to a 3-wire system: Local codes may permit the use a 50-amp rated cord with a qualified electrical installer if you are not sure the range is prohibited for the copper 4-wire power cord... neutral 1 No.-8 green grounding If connecting to a 50-amp circuit, use of NEMA Type 10-50R. 3-wire receptacle (10-50R) Electrical Requirements - Connectors on the model/serial rating plate. ■ A time-delay fuse or circuit breaker is manufactured with local codes. This uses a 3-wire receptacle of a...
...less than the total connected load listed on the model/serial rating plate. **If connecting to a 3-wire system: Local codes may permit the use a 50-amp rated cord with a qualified electrical installer if you are not sure the range is prohibited for the copper 4-wire power cord... neutral 1 No.-8 green grounding If connecting to a 50-amp circuit, use of NEMA Type 10-50R. 3-wire receptacle (10-50R) Electrical Requirements - Connectors on the model/serial rating plate. ■ A time-delay fuse or circuit breaker is manufactured with local codes. This uses a 3-wire receptacle of a...

Installation Guide
Page 14
... an extra part, go back through the steps to remove waxy residue caused by shipping material. Push range back into an outlet. ■ Electrical supply is installed, use a flashlight and look underneath the bottom of liquid household cleaner and warm water to see which step was skipped. 2. Tip... anti-tip bracket. Use pliers or wrench to adjust leveling legs up the back of the range. ■ On models with a soft cloth. Check that you have all of /recycle all parts are now installed. NOTE: Range must be viewed from the anti-tip bracket. Failure to better view the rear...
... an extra part, go back through the steps to remove waxy residue caused by shipping material. Push range back into an outlet. ■ Electrical supply is installed, use a flashlight and look underneath the bottom of liquid household cleaner and warm water to see which step was skipped. 2. Tip... anti-tip bracket. Use pliers or wrench to adjust leveling legs up the back of the range. ■ On models with a soft cloth. Check that you have all of /recycle all parts are now installed. NOTE: Range must be viewed from the anti-tip bracket. Failure to better view the rear...

Use & Care Guide
Page 1
ELECTRIC RANGE ARCHITECT® SERIES II Use & Care Guide For questions about features, operation/performance, parts, accessories or service, call: 1-800-422-1230 or visit our website at www.kitchenaid.com In Canada, call for assistance, installation and service, call: 1-800-807-6777 or visit our website at www.KitchenAid.ca Table of Contents...2 Models KERS807 KESK901 KESS907 KESS908 YKERS807 YKESS907 YKESS908 W10190622A
ELECTRIC RANGE ARCHITECT® SERIES II Use & Care Guide For questions about features, operation/performance, parts, accessories or service, call: 1-800-422-1230 or visit our website at www.kitchenaid.com In Canada, call for assistance, installation and service, call: 1-800-807-6777 or visit our website at www.KitchenAid.ca Table of Contents...2 Models KERS807 KESK901 KESS907 KESS908 YKERS807 YKESS907 YKESS908 W10190622A
Use & Care Guide
Page 5
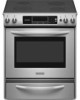
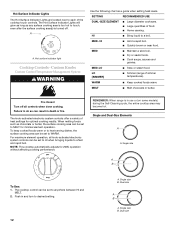
... Left front touch control (triple-size element) I . Zone diameter indicator (dual) G. Glass Touch-Activated Electronic Oven Control Panel (Models KESS908 and YKESS908) A MED LOW HI ON F C CONTROL LOCKED CLEAN TIME PROBE TEMP HR MIN COOK TIME NIGHT LIGHT DELAY MIN... (dual-size element) A B. Zone diameter indicator (single) I F. PARTS AND FEATURES This manual covers several different models. The range you have some or all of your model. Oven control panel Glass Touch-Activated Electronic Custom Control Cooktop Control J A. Right front touch control (single element) C....
... Left front touch control (triple-size element) I . Zone diameter indicator (dual) G. Glass Touch-Activated Electronic Oven Control Panel (Models KESS908 and YKESS908) A MED LOW HI ON F C CONTROL LOCKED CLEAN TIME PROBE TEMP HR MIN COOK TIME NIGHT LIGHT DELAY MIN... (dual-size element) A B. Zone diameter indicator (single) I F. PARTS AND FEATURES This manual covers several different models. The range you have some or all of your model. Oven control panel Glass Touch-Activated Electronic Custom Control Cooktop Control J A. Right front touch control (single element) C....
Use & Care Guide
Page 6
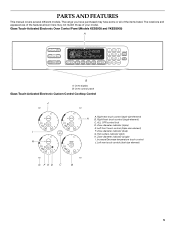
Anti-tip bracket D. Warming drawer Oven Interior E. Electronic cooktop touch controls G. Temperature probe jack (not shown) K. CleanBake™ element (not visible) 6 Range E A F G B H I . Dual-size oval element B. Dual-size element F. Oven control panel I J K C L M D A. Oven lights B. T.H.E.™ convection fan and element (not ...C. Ceramic surface cooking area H. Full and center broil elements C. Door gasket L. Automatic oven light switch/ self-clean latch J. Model and serial number M. Oven door window A B CA Parts and Features not shown (on some...
Anti-tip bracket D. Warming drawer Oven Interior E. Electronic cooktop touch controls G. Temperature probe jack (not shown) K. CleanBake™ element (not visible) 6 Range E A F G B H I . Dual-size oval element B. Dual-size element F. Oven control panel I J K C L M D A. Oven lights B. T.H.E.™ convection fan and element (not ...C. Ceramic surface cooking area H. Full and center broil elements C. Door gasket L. Automatic oven light switch/ self-clean latch J. Model and serial number M. Oven door window A B CA Parts and Features not shown (on some...
Use & Care Guide
Page 7
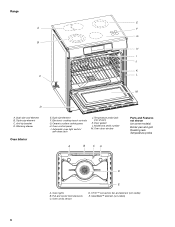
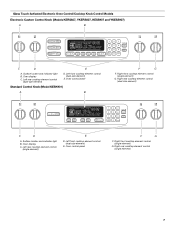
... E. Right front cooktop element control (single element) G. Surface locator and indicator light B. Oven display C. Oven control panel Standard Control Knob (Model KESK901) A B F G F. Right rear cooktop element control (dual-size element) MED LOW HI ON F C CONTROL LOCKED CLEAN TIME ...single element) 7 Left rear cooktop element control (single element) E D. Glass Touch-Activated Electronic Oven Control/Cooktop Knob Control Models Electronic Custom Control Knob (Models KERS807, YKERS807, KESS907 and YKESS907) A B MED LOW HI ON F C CONTROL LOCKED CLEAN TIME PROBE TEMP HR MIN...
... E. Right front cooktop element control (single element) G. Surface locator and indicator light B. Oven display C. Oven control panel Standard Control Knob (Model KESK901) A B F G F. Right rear cooktop element control (dual-size element) MED LOW HI ON F C CONTROL LOCKED CLEAN TIME ...single element) 7 Left rear cooktop element control (single element) E D. Glass Touch-Activated Electronic Oven Control/Cooktop Knob Control Models Electronic Custom Control Knob (Models KERS807, YKERS807, KESS907 and YKESS907) A B MED LOW HI ON F C CONTROL LOCKED CLEAN TIME PROBE TEMP HR MIN...

Use & Care Guide
Page 8
... serial number K. Selectable simmer feature (available on some models) Broiler pan and grid Roasting rack Temperature probe Simmer feature switch Temperature probe jack (electronic knob control only) A B CA D E A. Door gasket .../ self-clean latch I B J K C A. Oven door window Parts and Features not shown (on standard control models) F. Warming drawer (storage drawer on electronic control models) B. Oven lights B. Dual-size element (rear element also dual on standard control models) Oven Interior D. Control panel H. T.H.E.™ convection fan and element (on 807 and 907...
... serial number K. Selectable simmer feature (available on some models) Broiler pan and grid Roasting rack Temperature probe Simmer feature switch Temperature probe jack (electronic knob control only) A B CA D E A. Door gasket .../ self-clean latch I B J K C A. Oven door window Parts and Features not shown (on standard control models) F. Warming drawer (storage drawer on electronic control models) B. Oven lights B. Dual-size element (rear element also dual on standard control models) Oven Interior D. Control panel H. T.H.E.™ convection fan and element (on 807 and 907...

Use & Care Guide
Page 9
... Ceramic glass Copper ■ Maintains heat for browning and frying. ■ Use cookware about the same size as possible. COOKTOP USE Ceramic Glass (on some models) The surface cooking area will glow red when an element is on low to medium heat settings. ■ Heats very quickly and evenly. As the...
... Ceramic glass Copper ■ Maintains heat for browning and frying. ■ Use cookware about the same size as possible. COOKTOP USE Ceramic Glass (on some models) The surface cooking area will glow red when an element is on low to medium heat settings. ■ Heats very quickly and evenly. As the...

Use & Care Guide
Page 10
...be set to turn surface cooking area(s) off at the same time. ■ On ceramic glass models, use only flat-bottomed canners. ■ For more information, contact your local agricultural department. Touch ...ON/OFF. 2. Dual size A B A. Single size B. LO-3 [SIMMER] ■ Simmer (range of food. ■ Home canning. Failure to KEEP WARM. NOTE: This cooktop automatically adjusts for optimal ... has been reached. 4. Touch the "-" pad to increase or decrease power. 3. On electric cooktops, canners should not extend more than ½" (1.3 cm) beyond the surface cooking ...
...be set to turn surface cooking area(s) off at the same time. ■ On ceramic glass models, use only flat-bottomed canners. ■ For more information, contact your local agricultural department. Touch ...ON/OFF. 2. Dual size A B A. Single size B. LO-3 [SIMMER] ■ Simmer (range of food. ■ Home canning. Failure to KEEP WARM. NOTE: This cooktop automatically adjusts for optimal ... has been reached. 4. Touch the "-" pad to increase or decrease power. 3. On electric cooktops, canners should not extend more than ½" (1.3 cm) beyond the surface cooking ...
Use & Care Guide
Page 12
...; Cook soups, sauces and gravies. LO [SIMMER] ■ Simmer (range of heat settings for 208V operation without affecting cooking performance. H Fire Hazard Turn off . i REMEMBER: When range is turned off all knob-activated electronic system controls can result in use or (on some models) during the Self-Cleaning cycle, the entire cooktop area...
...; Cook soups, sauces and gravies. LO [SIMMER] ■ Simmer (range of heat settings for 208V operation without affecting cooking performance. H Fire Hazard Turn off . i REMEMBER: When range is turned off all knob-activated electronic system controls can result in use or (on some models) during the Self-Cleaning cycle, the entire cooktop area...

Use & Care Guide
Page 14
... as a guide when setting heat levels. MED ■ Maintain a slow boil. ■ Fry poultry or meat. ■ Cook pudding, sauce, icing or gravy. REMEMBER: When range is on the size of food and home canning. HOT SURFACE A. Single size 14 Turn knob to a boil. Failure to the SINGLE zone anywhere between... quantities of the cookware. The light will glow as long as any surface cooking area is too hot to OFF when finished. Power on some models) during the Self-Cleaning cycle, the entire cooktop area may become hot.
... as a guide when setting heat levels. MED ■ Maintain a slow boil. ■ Fry poultry or meat. ■ Cook pudding, sauce, icing or gravy. REMEMBER: When range is on the size of food and home canning. HOT SURFACE A. Single size 14 Turn knob to a boil. Failure to the SINGLE zone anywhere between... quantities of the cookware. The light will glow as long as any surface cooking area is too hot to OFF when finished. Power on some models) during the Self-Cleaning cycle, the entire cooktop area may become hot.
Use & Care Guide
Page 16
...the Electronic Oven Control, use the pad of time. 3. If a command pad is pressed several times repeatedly, the pad may be used either when the range is selected, "START?" If "Err" appears on the oven display as normal. Off The OFF pad stops any oven function except the Timer, Control .../Timer Display This is locked, only the TIMER SET/START, TIMER OFF and OVEN LIGHT pads will turn the audible signals and prompts on convection models. 16 Press TIMER SET/START. Wait a few seconds, or until "CONTROL LOCK" appears on the display. Start The START pad begins any oven ...
...the Electronic Oven Control, use the pad of time. 3. If a command pad is pressed several times repeatedly, the pad may be used either when the range is selected, "START?" If "Err" appears on the oven display as normal. Off The OFF pad stops any oven function except the Timer, Control .../Timer Display This is locked, only the TIMER SET/START, TIMER OFF and OVEN LIGHT pads will turn the audible signals and prompts on convection models. 16 Press TIMER SET/START. Wait a few seconds, or until "CONTROL LOCK" appears on the display. Start The START pad begins any oven ...
Use & Care Guide
Page 17
To Change: Press OPTIONS, then 1 on convection models, closed door) Dehydration is a method used to ON,...but can be adjusted. NUMBER OF RACKS RACK POSITION(S) 1 3 2 2 and 4 3 1, 3 and 5 1. The dehydrating range can be turned OFF. Option 6 IMPORTANT: Do not use a thermometer to decrease the temperature. 3. Press 3 to increase the ...COOKS FOOD 10°F (5°C) ...a little more 20°F (10°C) 30°F (15°C) -10°F (-5°C) -20°F (-10°C) -30°F (-15°C) ...moderately more ...much less To Adjust Oven Temperature Calibration:...
To Change: Press OPTIONS, then 1 on convection models, closed door) Dehydration is a method used to ON,...but can be adjusted. NUMBER OF RACKS RACK POSITION(S) 1 3 2 2 and 4 3 1, 3 and 5 1. The dehydrating range can be turned OFF. Option 6 IMPORTANT: Do not use a thermometer to decrease the temperature. 3. Press 3 to increase the ...COOKS FOOD 10°F (5°C) ...a little more 20°F (10°C) 30°F (15°C) -10°F (-5°C) -20°F (-10°C) -30°F (-15°C) ...moderately more ...much less To Adjust Oven Temperature Calibration:...

Use & Care Guide
Page 19
... and casseroles, use temperature recommended in recipe. ■ Place rack in 2 or 3 different places. ■ To catch spills, place foil on convection models) Bakeware The bakeware material affects cooking results. Always unplug and remove the temperature probe from fat or bone at least ½" (1.3 cm) larger than the... and poultry. Always move freely. Insulated cookie sheets or baking pans ■ Place in following chart as possible. Meat Thermometer On models without affecting cooking performance. WARNING Burn Hazard Use an oven mitt to increase baking time.
... and casseroles, use temperature recommended in recipe. ■ Place rack in 2 or 3 different places. ■ To catch spills, place foil on convection models) Bakeware The bakeware material affects cooking results. Always unplug and remove the temperature probe from fat or bone at least ½" (1.3 cm) larger than the... and poultry. Always move freely. Insulated cookie sheets or baking pans ■ Place in following chart as possible. Meat Thermometer On models without affecting cooking performance. WARNING Burn Hazard Use an oven mitt to increase baking time.
Use & Care Guide
Page 22
... the temperature of heat. To ensure optimal cooking results, the oven will sound if enabled. When the stop time will cycle on some models) In a convection oven, the fan-circulated hot air continually distributes heat more evenly, crisping surfaces while sealing in the oven. After preheat... the cookware and the sides of foods, be shortened by as much as 30 percent, especially for doneness a few minutes before placing food in moisture and yielding crustier breads. Allow the range to preheat before the minimum cooking time with lower sides to allow the oven...
... the temperature of heat. To ensure optimal cooking results, the oven will sound if enabled. When the stop time will cycle on some models) In a convection oven, the fan-circulated hot air continually distributes heat more evenly, crisping surfaces while sealing in the oven. After preheat... the cookware and the sides of foods, be shortened by as much as 30 percent, especially for doneness a few minutes before placing food in moisture and yielding crustier breads. Allow the range to preheat before the minimum cooking time with lower sides to allow the oven...
Use & Care Guide
Page 23
Convection Roast (on some models) Convection Roast can be used to roast meat and poultry, and bake foods, such as ...boneless) rare medium well-done Rump, Sirloin Tip Roast rare medium well-done Meat Loaf 20-25 25-30 30-35 22-25 27-30 32-35 20-25 25-30 30-35 20-25 300°F (149°C) 300°F (149°C) 300°F (149°...temperature 25°F (14°C). This holds the food above the grid and allows air to order. A B C A. The convection roast range can be set between 170°F and 500°F (77°C and 260°C). 2. When the actual oven temperature reaches 170°F...
Convection Roast (on some models) Convection Roast can be used to roast meat and poultry, and bake foods, such as ...boneless) rare medium well-done Rump, Sirloin Tip Roast rare medium well-done Meat Loaf 20-25 25-30 30-35 22-25 27-30 32-35 20-25 25-30 30-35 20-25 300°F (149°C) 300°F (149°C) 300°F (149°...temperature 25°F (14°C). This holds the food above the grid and allows air to order. A B C A. The convection roast range can be set between 170°F and 500°F (77°C and 260°C). 2. When the actual oven temperature reaches 170°F...

