Use and Care Guide
Page 1
www.kitchenaid.com or www.KitchenAid.ca Table of Contents...2 Models KERA807 KESI901 KESA907 KESV908 YKESA907 YKERA807 YKESV908 9757451 o ELECTRIC RANGE PRO LINE™ SERIES AND ARCHITECT® SERIES Use & Care Guide For questions about features, operation/performance, parts, accessories or service, call: 1-800-422-1230 In Canada, call for assistance 1-800-461-5681, for installation and service, call: 1-800-807-6777 or visit our website at...
www.kitchenaid.com or www.KitchenAid.ca Table of Contents...2 Models KERA807 KESI901 KESA907 KESV908 YKESA907 YKERA807 YKESV908 9757451 o ELECTRIC RANGE PRO LINE™ SERIES AND ARCHITECT® SERIES Use & Care Guide For questions about features, operation/performance, parts, accessories or service, call: 1-800-422-1230 In Canada, call for assistance 1-800-461-5681, for installation and service, call: 1-800-807-6777 or visit our website at...
Use and Care Guide
Page 2
TABLE OF CONTENTS RANGE SAFETY 3 The Anti-Tip Bracket 3 PARTS AND FEATURES 6 COOKTOP USE 8 Ceramic Glass 8 Cookware 9 Home Canning 9 Cooktop Controls for Electronic Touch Activated System .........9 Cooktop Controls for Electronic Knob Control System 11 Cooktop ... Convection Bake 21 Convection Roast 22 Convection Broil 23 Convect Full Meal 23 Sabbath Mode 24 Proofing Bread 24 Timed Cooking 25 Warming Drawer 25 RANGE CARE 26 Self-Cleaning Cycle 26 General Cleaning 27 Oven Light(s 28 Storage Drawer 29 Oven Door 29 Warming Drawer 29 TROUBLESHOOTING...
TABLE OF CONTENTS RANGE SAFETY 3 The Anti-Tip Bracket 3 PARTS AND FEATURES 6 COOKTOP USE 8 Ceramic Glass 8 Cookware 9 Home Canning 9 Cooktop Controls for Electronic Touch Activated System .........9 Cooktop Controls for Electronic Knob Control System 11 Cooktop ... Convection Bake 21 Convection Roast 22 Convection Broil 23 Convect Full Meal 23 Sabbath Mode 24 Proofing Bread 24 Timed Cooking 25 Warming Drawer 25 RANGE CARE 26 Self-Cleaning Cycle 26 General Cleaning 27 Oven Light(s 28 Storage Drawer 29 Oven Door 29 Warming Drawer 29 TROUBLESHOOTING...
Use and Care Guide
Page 4
...items of interest to children in cabinets above a range or on the range to persons, or damage when using the range. Do not repair or replace any part of electric shock, or fire. s Do Not Use Water on any part of fire, electrical shock, injury to reach items could be worn ... cause container to unintentional contact with one or more surface units of a range - TO CHECK IF THE DEVICES ARE INSTALLED PROPERLY, SLIDE RANGE FORWARD, LOOK FOR ANTI-TIP BRACKET SECURELY ATTACHED TO FLOOR, AND SLIDE RANGE BACK SO REAR RANGE FOOT IS UNDER ANTI-TIP BRACKET. s Do Not Leave Children Alone -...
...items of interest to children in cabinets above a range or on the range to persons, or damage when using the range. Do not repair or replace any part of electric shock, or fire. s Do Not Use Water on any part of fire, electrical shock, injury to reach items could be worn ... cause container to unintentional contact with one or more surface units of a range - TO CHECK IF THE DEVICES ARE INSTALLED PROPERLY, SLIDE RANGE FORWARD, LOOK FOR ANTI-TIP BRACKET SECURELY ATTACHED TO FLOOR, AND SLIDE RANGE BACK SO REAR RANGE FOOT IS UNDER ANTI-TIP BRACKET. s Do Not Leave Children Alone -...

Use and Care Guide
Page 5
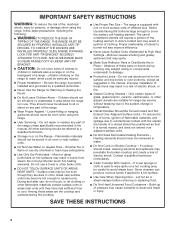
...INTERIOR SURFACES OF OVEN - among these openings, oven doors, and windows of oven doors. surfaces are dark in s Clean Only Parts Listed in or around any part of the appliance may be taken not to rub, damage, or move the gasket. This appliance can cause low-level exposure to...list of substances known to cause burns. Always place oven racks in oven. become hot enough to the State of Oven Racks - For self-cleaning ranges - The door gasket is cool. potholder contact hot heating element in desired location while oven is essential for a good seal. Care should be ...
...INTERIOR SURFACES OF OVEN - among these openings, oven doors, and windows of oven doors. surfaces are dark in s Clean Only Parts Listed in or around any part of the appliance may be taken not to rub, damage, or move the gasket. This appliance can cause low-level exposure to...list of substances known to cause burns. Always place oven racks in oven. become hot enough to the State of Oven Racks - For self-cleaning ranges - The door gasket is cool. potholder contact hot heating element in desired location while oven is essential for a good seal. Care should be ...

Use and Care Guide
Page 6
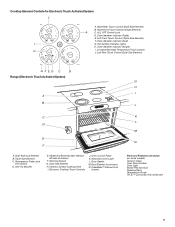
Architect® Series) A B C 325˚ 350˚ 400˚ 425˚ Bake CONVECT Bake ...Oven Control Panel D. Warm Zone Element On/Off Switch C. Oven Control Panel F. The range you have purchased may not match those of the items listed. Surface Locator Indicator Light B. Right Front Cooktop Element Control (Single... Element) G. PARTS AND FEATURES This manual covers several different models. Control Panel for Electronic Knob Control System (Models KERA807,...
Architect® Series) A B C 325˚ 350˚ 400˚ 425˚ Bake CONVECT Bake ...Oven Control Panel D. Warm Zone Element On/Off Switch C. Oven Control Panel F. The range you have purchased may not match those of the items listed. Surface Locator Indicator Light B. Right Front Cooktop Element Control (Single... Element) G. PARTS AND FEATURES This manual covers several different models. Control Panel for Electronic Knob Control System (Models KERA807,...
Use and Care Guide
Page 7
...) D. Ceramic Surface Cooking Area I . Door Gasket M. Triple-Size Element C. CleanBake™ Element (not shown) Parts and Features not shown (on some models) Ceramic Glass Oven Door Window Oven Light Broiler Pan and Grid Roasting Rack ... Control Lock D. Zone diameter indicator (Triple) E. Zone diameter indicator (Dual) I J K L M N A. Left Rear Touch Control (Dual-Size Element) GFED C B Range (Electronic Touch Activated System) A B C D E F M L M MED ON O F 1 O HR MIN PROBE MTIINMSEDECDCELLSEATAYONP COOK CLEAN CSELTO•CSKTART TIMER SET•START...
...) D. Ceramic Surface Cooking Area I . Door Gasket M. Triple-Size Element C. CleanBake™ Element (not shown) Parts and Features not shown (on some models) Ceramic Glass Oven Door Window Oven Light Broiler Pan and Grid Roasting Rack ... Control Lock D. Zone diameter indicator (Triple) E. Zone diameter indicator (Dual) I J K L M N A. Left Rear Touch Control (Dual-Size Element) GFED C B Range (Electronic Touch Activated System) A B C D E F M L M MED ON O F 1 O HR MIN PROBE MTIINMSEDECDCELLSEATAYONP COOK CLEAN CSELTO•CSKTART TIMER SET•START...
Use and Care Guide
Page 8
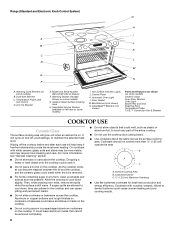
Range (Standard and Electronic Knob Control System) G A B C D E F DI DI H UAL M L M MED I ON O F 1 O HR MIN... oven mitts, remove the spills while the surface is on left side of the entire cooktop. s Do not slide cookware or bakeware across the cooktop. s Do not use will help keep it . Cookware with white ceramic glass...s Do not allow objects that cannot be more visible, and may be removed completely. 8 s Do not cook popcorn in any part of drawer) F. B A C A. As the cooktop cools, air can cause pitting and permanent marks. Cookware should not extend more...
Range (Standard and Electronic Knob Control System) G A B C D E F DI DI H UAL M L M MED I ON O F 1 O HR MIN... oven mitts, remove the spills while the surface is on left side of the entire cooktop. s Do not slide cookware or bakeware across the cooktop. s Do not use will help keep it . Cookware with white ceramic glass...s Do not allow objects that cannot be more visible, and may be removed completely. 8 s Do not cook popcorn in any part of drawer) F. B A C A. As the cooktop cools, air can cause pitting and permanent marks. Cookware should not extend more...

Use and Care Guide
Page 24
...the oven display throughout the Sabbath Mode. To Regularly Set, Untimed: 1. "SABBATH MODE" will no longer be enabled with shortening. The bake range can be regularly set, the oven must first be actively cooking. Number pads 1 through 0 represent temperatures. Press START. Follow the recipe directions ...as a guide. Put 2 cups (500 mL) of Sabbath Mode time, up to ½ hour for only part of the ability to 24 seconds. The display will begin a timed bake cycle. The heat sources icons will not show 100°F (38°...
...the oven display throughout the Sabbath Mode. To Regularly Set, Untimed: 1. "SABBATH MODE" will no longer be enabled with shortening. The bake range can be regularly set, the oven must first be actively cooking. Number pads 1 through 0 represent temperatures. Press START. Follow the recipe directions ...as a guide. Put 2 cups (500 mL) of Sabbath Mode time, up to ½ hour for only part of the ability to 24 seconds. The display will begin a timed bake cycle. The heat sources icons will not show 100°F (38°...
Use and Care Guide
Page 31
... : s Features and specifications on our full line of appliances. s Installation information. s Accessory and repair parts sales. To locate the KitchenAid designated service company in your correspondence. For further assistance If you need further assistance, you can write to Friday... Part #4396095 Gourmet Griddle Order Part #4396096 Warming Drawer Pan (1/2 Size) (ceramic glass models) Order Part #8171421 Warming Drawer Pan (1/3 Size) (ceramic glass models) Order Part #8171422 In Canada For product related questions, please call . Saturday 8:30 a.m. - 4:30 p.m. (EST). KitchenAid ...
... : s Features and specifications on our full line of appliances. s Installation information. s Accessory and repair parts sales. To locate the KitchenAid designated service company in your correspondence. For further assistance If you need further assistance, you can write to Friday... Part #4396095 Gourmet Griddle Order Part #4396096 Warming Drawer Pan (1/2 Size) (ceramic glass models) Order Part #8171421 Warming Drawer Pan (1/3 Size) (ceramic glass models) Order Part #8171422 In Canada For product related questions, please call . Saturday 8:30 a.m. - 4:30 p.m. (EST). KitchenAid ...
Use and Care Guide
Page 32
...cooktop will not crack due to correct defects in materials or workmanship. Pickup and delivery. Repairs to parts or systems resulting from the date of KitchenAid, U.S.A., KitchenAid Canada licensee in Canada 4/04 Printed in materials or workmanship. Some states or provinces do not allow ... GAS BURNERS, SOLID STATE TOUCH CONTROL SYSTEM, AND MAGNETRON TUBE On electric ranges and electric cooktops, in the second through due to or furnished with the product, KitchenAid will need it. On ceramic glass ranges and ceramic glass cooktops, in the second through fifth years from the...
...cooktop will not crack due to correct defects in materials or workmanship. Pickup and delivery. Repairs to parts or systems resulting from the date of KitchenAid, U.S.A., KitchenAid Canada licensee in Canada 4/04 Printed in materials or workmanship. Some states or provinces do not allow ... GAS BURNERS, SOLID STATE TOUCH CONTROL SYSTEM, AND MAGNETRON TUBE On electric ranges and electric cooktops, in the second through due to or furnished with the product, KitchenAid will need it. On ceramic glass ranges and ceramic glass cooktops, in the second through fifth years from the...

Installation Instructions
Page 2
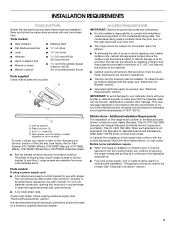
... Canada Only 7 Countertop Preparation (for Slide-in Ranges Only 7 INSTALLATION INSTRUCTIONS 8 Unpack Range 8 Adjust Leveling Legs 8 Install Anti-Tip Bracket 8 Optional Rear Spacer Cover (for Slide-in death or serious burns to rear range foot. We have provided many important...WARNING Tip Over Hazard A child or adult can tip the range and be killed or seriously injured if you what can result in Ranges Only 9 Electrical Connection - TABLE OF CONTENTS RANGE SAFETY 2 INSTALLATION REQUIREMENTS 3 Tools and Parts 3 Location Requirements 3 Electrical Requirements - U.S.A.
... Canada Only 7 Countertop Preparation (for Slide-in Ranges Only 7 INSTALLATION INSTRUCTIONS 8 Unpack Range 8 Adjust Leveling Legs 8 Install Anti-Tip Bracket 8 Optional Rear Spacer Cover (for Slide-in death or serious burns to rear range foot. We have provided many important...WARNING Tip Over Hazard A child or adult can tip the range and be killed or seriously injured if you what can result in Ranges Only 9 Electrical Connection - TABLE OF CONTENTS RANGE SAFETY 2 INSTALLATION REQUIREMENTS 3 Tools and Parts 3 Location Requirements 3 Electrical Requirements - U.S.A.
Installation Instructions
Page 3
.... ■ The floor anti-tip bracket must be revised. Check existing electrical supply. See "Electrical Requirements" section. Plastic anchors (2) C. #10 x ¹⁄₂" screws (2) D. Rear spacer cover for slide-in models (supplied on some models)* *To order, contact your cabinets,....7 cm) beyond the bottom of this range must be located for Mobile Home Construction and Safety, Title 24, HUD Part 280). See "Electrical Requirements" section. Additional Installation Requirements The installation of burns or fire by installing a range hood that the materials used in the ...
.... ■ The floor anti-tip bracket must be revised. Check existing electrical supply. See "Electrical Requirements" section. Plastic anchors (2) C. #10 x ¹⁄₂" screws (2) D. Rear spacer cover for slide-in models (supplied on some models)* *To order, contact your cabinets,....7 cm) beyond the bottom of this range must be located for Mobile Home Construction and Safety, Title 24, HUD Part 280). See "Electrical Requirements" section. Additional Installation Requirements The installation of burns or fire by installing a range hood that the materials used in the ...
Installation Instructions
Page 7
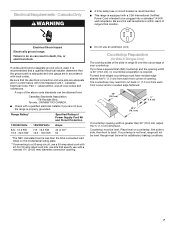
..., ON M9W 1R3 CANADA. ■ Check with CSA Standard C22.1, Canadian Electrical Code, Part 1 - For 50-amp rated cord kits, use kits that the electrical connection and wire size are adequate and in death, fire, or electrical shock. Tile countertops may need trim cut back ³⁄₈" (1.0...30" (76.2 cm), no countertop preparation is not level, range will not be level. Place level on the model/serial rating plate. **If connecting to do so can be level for Slide-in Ranges Only) The cooktop sides of the above code standards can result in conformance with a qualified electrical...
..., ON M9W 1R3 CANADA. ■ Check with CSA Standard C22.1, Canadian Electrical Code, Part 1 - For 50-amp rated cord kits, use kits that the electrical connection and wire size are adequate and in death, fire, or electrical shock. Tile countertops may need trim cut back ³⁄₈" (1.0...30" (76.2 cm), no countertop preparation is not level, range will not be level. Place level on the model/serial rating plate. **If connecting to do so can be level for Slide-in Ranges Only) The cooktop sides of the above code standards can result in conformance with a qualified electrical...
Installation Instructions
Page 8
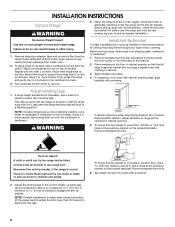
... Place template on the bracket template. Tip Over Hazard A child or adult can be killed. Remove oven racks and parts package from the range. To mount anti-tip bracket to concrete or ceramic floor, use a wrench or pliers to anti-tip bracket installation. When... the range is standing, tilt the range back to adjust the front legs, then tilt forward to rear range foot. Before sliding range into a standing position, put a sheet of cardboard or hardboard in the "Location Requirements...
... Place template on the bracket template. Tip Over Hazard A child or adult can be killed. Remove oven racks and parts package from the range. To mount anti-tip bracket to concrete or ceramic floor, use a wrench or pliers to anti-tip bracket installation. When... the range is standing, tilt the range back to adjust the front legs, then tilt forward to rear range foot. Before sliding range into a standing position, put a sheet of cardboard or hardboard in the "Location Requirements...
Installation Instructions
Page 14
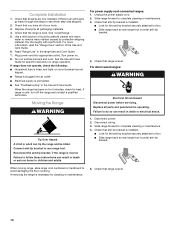
... moved. Reconnect the anti-tip bracket, if the range is intact and tight; Slide range forward to rear range foot. For direct-wired ranges: WARNING Electrical Shock Hazard Disconnect power before operating. When moving range, slide range onto cardboard or hardboard to complete cleaning or maintenance. 4. Check that range is an extra part, go back through the steps to see which...
... moved. Reconnect the anti-tip bracket, if the range is intact and tight; Slide range forward to rear range foot. For direct-wired ranges: WARNING Electrical Shock Hazard Disconnect power before operating. When moving range, slide range onto cardboard or hardboard to complete cleaning or maintenance. 4. Check that range is an extra part, go back through the steps to see which...
Parts List
Page 1
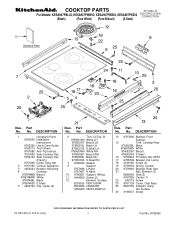
...11 4449809 Screw (2) 12 Element, Surface 8203525 1800/1000W 8523696 1800W RR 4453909 2500/1200W (2) Illus. DESCRIPTION 1 Literaturre Parts 9762035 Installation Instructiions 9762265 Use & Care Guide 9760713 Tech Sheet 9757680 Anti−Tip Instruct. 3191638 Safe Cooking Tips 9759133 ... Indicator Lamp, Hot Surface 25 3196537 Screw 10−05 Litho in U.S.A. (cre) 1 Part No. 8186392 COOKTOP PARTS 30" Slide−In For Models: KESA907PBL02, KESA907PWW02, KESA907PBB02, KESA907PSS02 ELECTRIC OVEN CONVECTION (Black) (Pure White) (Pure Biscuit) (S.Steel) Illus.
...11 4449809 Screw (2) 12 Element, Surface 8203525 1800/1000W 8523696 1800W RR 4453909 2500/1200W (2) Illus. DESCRIPTION 1 Literaturre Parts 9762035 Installation Instructiions 9762265 Use & Care Guide 9760713 Tech Sheet 9757680 Anti−Tip Instruct. 3191638 Safe Cooking Tips 9759133 ... Indicator Lamp, Hot Surface 25 3196537 Screw 10−05 Litho in U.S.A. (cre) 1 Part No. 8186392 COOKTOP PARTS 30" Slide−In For Models: KESA907PBL02, KESA907PWW02, KESA907PBB02, KESA907PSS02 ELECTRIC OVEN CONVECTION (Black) (Pure White) (Pure Biscuit) (S.Steel) Illus.
Parts List
Page 2
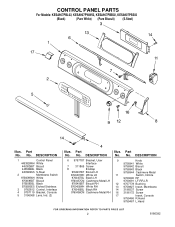
... Insert, Membrane 9760456BL Black RH 14 3196537 Screw 9760456CM Cashmere Metal RH 16 3196172 Screw 17 Insert, Console 9759466 R.Hand 9759467 L.Hand 2 8186392 CONTROL PANEL PARTS For Models: KESA907PBL02, KESA907PWW02, KESA907PBB02, KESA907PSS02 (Black) (Pure White) (Pure Biscuit) (S.Steel) Illus...
... Insert, Membrane 9760456BL Black RH 14 3196537 Screw 9760456CM Cashmere Metal RH 16 3196172 Screw 17 Insert, Console 9759466 R.Hand 9759467 L.Hand 2 8186392 CONTROL PANEL PARTS For Models: KESA907PBL02, KESA907PWW02, KESA907PBB02, KESA907PSS02 (Black) (Pure White) (Pure Biscuit) (S.Steel) Illus...
Parts List
Page 3
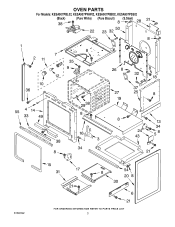
OVEN PARTS For Models: KESA907PBL02, KESA907PWW02, KESA907PBB02, KESA907PSS02 (Black) (Pure White) (Pure Biscuit) (S.Steel) 8186392 3
OVEN PARTS For Models: KESA907PBL02, KESA907PWW02, KESA907PBB02, KESA907PSS02 (Black) (Pure White) (Pure Biscuit) (S.Steel) 8186392 3
Parts List
Page 4
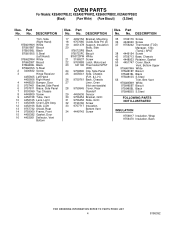
... 9756481BT Biscuit 9756481BL Black 9756481SS S.Steel 55 Trim, Btm Vent 9756485WH White 9756485BT Biscuit 9756485BL Black 9756485SS S.Steel FOLLOWING PARTS NOT ILLUSTRATED INSULATION 9756817 Insulation, Wrap 9756470 Insulation, Back 4 8186392 DESCRIPTION 1 Trim, Side (Right Hand) 9756619WH ... Chassis 27 Liner, Oven (Not serviceable) 28 9759945 Cover, Rear Standoff 29 4455636 Sensor 30 9756454 Bracket, GOC 31 9756452 Slide. No. Part No. OVEN PARTS For Models: KESA907PBL02, KESA907PWW02, KESA907PBB02, KESA907PSS02 (Black) (Pure White) (Pure Biscuit) (S.Steel) Illus...
... 9756481BT Biscuit 9756481BL Black 9756481SS S.Steel 55 Trim, Btm Vent 9756485WH White 9756485BT Biscuit 9756485BL Black 9756485SS S.Steel FOLLOWING PARTS NOT ILLUSTRATED INSULATION 9756817 Insulation, Wrap 9756470 Insulation, Back 4 8186392 DESCRIPTION 1 Trim, Side (Right Hand) 9756619WH ... Chassis 27 Liner, Oven (Not serviceable) 28 9759945 Cover, Rear Standoff 29 4455636 Sensor 30 9756454 Bracket, GOC 31 9756452 Slide. No. Part No. OVEN PARTS For Models: KESA907PBL02, KESA907PWW02, KESA907PBB02, KESA907PSS02 (Black) (Pure White) (Pure Biscuit) (S.Steel) Illus...
Parts List
Page 5
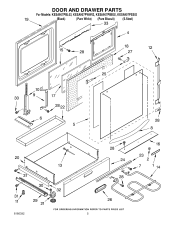
DOOR AND DRAWER PARTS For Models: KESA907PBL02, KESA907PWW02, KESA907PBB02, KESA907PSS02 (Black) (Pure White) (Pure Biscuit) (S.Steel) 8186392 5
DOOR AND DRAWER PARTS For Models: KESA907PBL02, KESA907PWW02, KESA907PBB02, KESA907PSS02 (Black) (Pure White) (Pure Biscuit) (S.Steel) 8186392 5


