Use and Care Manual
Page 1
ELECTRIC RANGE ARCHITECT® SERIES II Use & Care Guide For questions about features, operation/performance, parts, accessories or service, call: 1-800-422-1230 or visit our website at www.kitchenaid.com In Canada, call for assistance, installation and service, call: 1-800-807-6777 or visit our website at www.KitchenAid.ca Table of Contents...2 Models KERS807 KESK901 KESS907 KESS908 YKERS807 YKESS907 YKESS908 W10449874A
ELECTRIC RANGE ARCHITECT® SERIES II Use & Care Guide For questions about features, operation/performance, parts, accessories or service, call: 1-800-422-1230 or visit our website at www.kitchenaid.com In Canada, call for assistance, installation and service, call: 1-800-807-6777 or visit our website at www.KitchenAid.ca Table of Contents...2 Models KERS807 KESK901 KESS907 KESS908 YKERS807 YKESS907 YKESS908 W10449874A
Use and Care Manual
Page 5
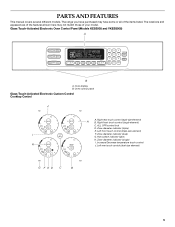
Glass Touch-Activated Electronic Oven Control Panel (Models KESS908 and YKESS908) A MED LOW HI ON F C CONTROL LOCKED CLEAN TIME PROBE TEMP HR MIN COOK TIME NIGHT LIGHT DELAY MIN HR SEC MIN START ...) E. Hot surface indicator lights H. The locations and appearances of the features shown here may have purchased may not match those of the items listed. The range you have some or all of your model. Right front touch control (single element) C. PARTS AND FEATURES This manual covers several different...
Glass Touch-Activated Electronic Oven Control Panel (Models KESS908 and YKESS908) A MED LOW HI ON F C CONTROL LOCKED CLEAN TIME PROBE TEMP HR MIN COOK TIME NIGHT LIGHT DELAY MIN HR SEC MIN START ...) E. Hot surface indicator lights H. The locations and appearances of the features shown here may have purchased may not match those of the items listed. The range you have some or all of your model. Right front touch control (single element) C. PARTS AND FEATURES This manual covers several different...
Use and Care Manual
Page 6
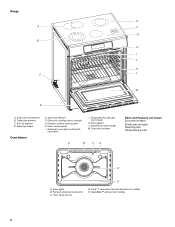
... I J K C L M D A. Ceramic surface cooking area H. Warming drawer Oven Interior E. Oven door window A B CA Parts and Features not shown (on some models) Broiler pan and grid Roasting rack Temperature probe D E A. Oven cavity sensor D. Model and serial number M. CleanBake™ element (not visible) 6 Electronic cooktop touch controls G. Triple-size element C. T.H.E.™ convection fan and element...
... I J K C L M D A. Ceramic surface cooking area H. Warming drawer Oven Interior E. Oven door window A B CA Parts and Features not shown (on some models) Broiler pan and grid Roasting rack Temperature probe D E A. Oven cavity sensor D. Model and serial number M. CleanBake™ element (not visible) 6 Electronic cooktop touch controls G. Triple-size element C. T.H.E.™ convection fan and element...
Use and Care Manual
Page 7
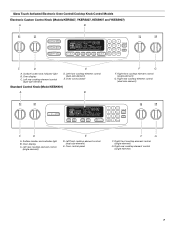
Oven control panel Standard Control Knob (Model KESK901) A B F G F. Oven control panel F G F. Oven display C. Right front cooktop element control (single element) G. Oven display C. Left rear cooktop element control (single element) ...E. Surface locator and indicator light B. Left rear cooktop element control (dual-size element) D. Glass Touch-Activated Electronic Oven Control/Cooktop Knob Control Models Electronic Custom Control Knob (Models KERS807, YKERS807, KESS907 and YKESS907) A B MED LOW HI ON F C CONTROL LOCKED CLEAN TIME PROBE TEMP HR MIN COOK TIME DELAY...
Oven control panel Standard Control Knob (Model KESK901) A B F G F. Oven control panel F G F. Oven display C. Right front cooktop element control (single element) G. Oven display C. Left rear cooktop element control (single element) ...E. Surface locator and indicator light B. Left rear cooktop element control (dual-size element) D. Glass Touch-Activated Electronic Oven Control/Cooktop Knob Control Models Electronic Custom Control Knob (Models KERS807, YKERS807, KESS907 and YKESS907) A B MED LOW HI ON F C CONTROL LOCKED CLEAN TIME PROBE TEMP HR MIN COOK TIME DELAY...
Use and Care Manual
Page 8
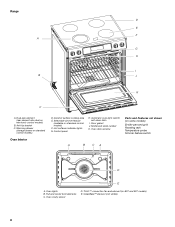
... and center broil elements C. Selectable simmer feature (available on some models) Broiler pan and grid Roasting rack Temperature probe Simmer feature switch A B CA D E A. Ceramic surface cooking area E. Oven lights B. Anti-tip bracket C. Control panel H. T.H.E.™ convection fan and element (on electronic control models) B. Range D E F A G H I . Door gasket J. Dual-size element (rear element also dual...
... and center broil elements C. Selectable simmer feature (available on some models) Broiler pan and grid Roasting rack Temperature probe Simmer feature switch A B CA D E A. Ceramic surface cooking area E. Oven lights B. Anti-tip bracket C. Control panel H. T.H.E.™ convection fan and element (on electronic control models) B. Range D E F A G H I . Door gasket J. Dual-size element (rear element also dual...
Use and Care Manual
Page 9
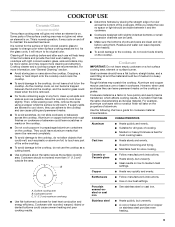
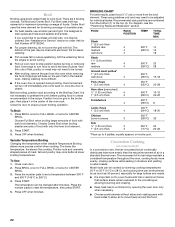
... the surface is a factor in prepackaged aluminum containers on the cooktop. C A. For more than ½" (1.3 cm) outside the area. COOKTOP USE Ceramic Glass (on some models) The surface cooking area will help keep it free from stains and provide the most cooking tasks. They could melt, such as plastic or aluminum...
... the surface is a factor in prepackaged aluminum containers on the cooktop. C A. For more than ½" (1.3 cm) outside the area. COOKTOP USE Ceramic Glass (on some models) The surface cooking area will help keep it free from stains and provide the most cooking tasks. They could melt, such as plastic or aluminum...

Use and Care Manual
Page 10
... for optimal cooking results. Touch ON/OFF. 2. Dual size A B A. On electric cooktops, canners should not extend more than ½" (1.3 cm) beyond the surface cooking area or ...foods warm. Fire Hazard Turn off at the same time. ■ On ceramic glass models, use of heat settings for 208V operation without affecting cooking performance. Touch the "-" pad ...more information, contact your local agricultural department. LO-3 [SIMMER] ■ Simmer (range of food. ■ Home canning. REMEMBER: When range is in death or fire. MED [6-7] ■ Maintain a slow boil. &#...
... for optimal cooking results. Touch ON/OFF. 2. Dual size A B A. On electric cooktops, canners should not extend more than ½" (1.3 cm) beyond the surface cooking area or ...foods warm. Fire Hazard Turn off at the same time. ■ On ceramic glass models, use of heat settings for 208V operation without affecting cooking performance. Touch the "-" pad ...more information, contact your local agricultural department. LO-3 [SIMMER] ■ Simmer (range of food. ■ Home canning. REMEMBER: When range is in death or fire. MED [6-7] ■ Maintain a slow boil. &#...

Use and Care Manual
Page 12
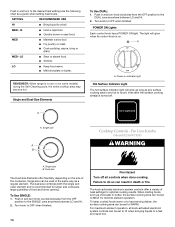
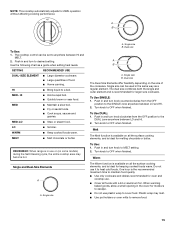
... regular element. MED-LO ■ Stew or steam food. For maximum element operation, all controls when done cooking. REMEMBER: When range is recommended for optimal cooking results. Single size B. Hot surface indicator light Cooktop Controls - MELT ■ Melt chocolate or butter. ... of simmer temperatures). HI ■ Bring liquid to desired setting. 12 A. Dual size The Dual-Size Elements offer flexibility depending on some models) during the Self-Cleaning cycle, the entire cooktop area may become hot. Single and Dual-Size Elements A A. A A. HI ■...
... regular element. MED-LO ■ Stew or steam food. For maximum element operation, all controls when done cooking. REMEMBER: When range is recommended for optimal cooking results. Single size B. Hot surface indicator light Cooktop Controls - MELT ■ Melt chocolate or butter. ... of simmer temperatures). HI ■ Bring liquid to desired setting. 12 A. Dual size The Dual-Size Elements offer flexibility depending on some models) during the Self-Cleaning cycle, the entire cooktop area may become hot. Single and Dual-Size Elements A A. A A. HI ■...
Use and Care Manual
Page 14
... RECOMMENDED USE HI ■ Bring liquid to OFF when finished. MED- LO ■ Stew or steam food. ■ Simmer. REMEMBER: When range is turned off all knob-activated electronic system controls can be set to OFF when finished. 14 Fire Hazard Turn off . Push in and turn...the surface cooking area can be used in death or fire. Power on . HOT SURFACE A A. Single size A B Cooktop Controls - Pro Line Knobs (Model KESS907XSP) WARNING A. Single size can be set to HI when bringing liquids to the DUAL zone anywhere between LO and HI. 2. To Use SINGLE: 1. Turn...
... RECOMMENDED USE HI ■ Bring liquid to OFF when finished. MED- LO ■ Stew or steam food. ■ Simmer. REMEMBER: When range is turned off all knob-activated electronic system controls can be set to OFF when finished. 14 Fire Hazard Turn off . Push in and turn...the surface cooking area can be used in death or fire. Power on . HOT SURFACE A A. Single size A B Cooktop Controls - Pro Line Knobs (Model KESS907XSP) WARNING A. Single size can be set to HI when bringing liquids to the DUAL zone anywhere between LO and HI. 2. To Use SINGLE: 1. Turn...
Use and Care Manual
Page 15
...; Hold a rapid boil. ■ Quickly brown or sear food. MED-LO ■ Stew or steam food. REMEMBER: When range is ideal for moisture to escape. ■ Do not use or (on some models) during the Self-Cleaning cycle, the entire cooktop area may melt. ■ Use pot holders or oven mitts to...
...; Hold a rapid boil. ■ Quickly brown or sear food. MED-LO ■ Stew or steam food. REMEMBER: When range is ideal for moisture to escape. ■ Do not use or (on some models) during the Self-Cleaning cycle, the entire cooktop area may melt. ■ Use pot holders or oven mitts to...
Use and Care Manual
Page 18
...incorrect readings. All Tones ON/OFF All tones are preset to ON, but can be changed to LOW. Press OPTIONS then 5. The dehydrating range can be set using the timer for LOW. The Dehydrate and Sabbath Mode are audible signals, indicating the following: One beep ■ ... by the displayed amount. To change : Press OPTIONS, then 3 for functions other than 12 hours to dehydrate. Dehydrate - Option 5 (on convection models. To Dehydrate: Position the racks according to the following chart as the quality of the fresh food, pretreatment techniques, the size and thickness of a ...
...incorrect readings. All Tones ON/OFF All tones are preset to ON, but can be changed to LOW. Press OPTIONS then 5. The dehydrating range can be set using the timer for LOW. The Dehydrate and Sabbath Mode are audible signals, indicating the following: One beep ■ ... by the displayed amount. To change : Press OPTIONS, then 3 for functions other than 12 hours to dehydrate. Dehydrate - Option 5 (on convection models. To Dehydrate: Position the racks according to the following chart as the quality of the fresh food, pretreatment techniques, the size and thickness of a ...
Use and Care Manual
Page 20
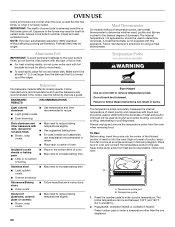
...with any type of doneness. To Use: Before using a meat thermometer. Press number pads to remove temperature probe. Meat Thermometer On models without affecting cooking performance. It should be longer. B A A. Aluminum Foil IMPORTANT: To avoid permanent damage to the fumes given ... the bottom third of some birds is heavily soiled. Always move freely. ■ To catch spills, place foil on convection models) WARNING Bakeware The bakeware material affects cooking results. The internal temperature, not appearance, should not be set between 130°F ...
...with any type of doneness. To Use: Before using a meat thermometer. Press number pads to remove temperature probe. Meat Thermometer On models without affecting cooking performance. It should be longer. B A A. Aluminum Foil IMPORTANT: To avoid permanent damage to the fumes given ... the bottom third of some birds is heavily soiled. Always move freely. ■ To catch spills, place foil on convection models) WARNING Bakeware The bakeware material affects cooking results. The internal temperature, not appearance, should not be set between 130°F ...
Use and Care Manual
Page 22
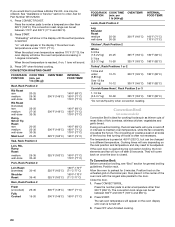
... 8 Lamb chops 1" (2.5 cm) thick 4 400°F (204°C) 18-20 Chicken 500°F bone-in the recipe. Position food on some models) In a convection oven, the fan-circulated hot air continually distributes heat more from the oven when removing the food. Choose Full Broil when broiling larger...surface areas remain exposed to the circulating air, allowing browning and crisping. ■ Keep heat loss to a minimum by as much as 30 percent, especially for individual tastes. If you would like to purchase a broiler pan, one may need to drain juices and help avoid ...
... 8 Lamb chops 1" (2.5 cm) thick 4 400°F (204°C) 18-20 Chicken 500°F bone-in the recipe. Position food on some models) In a convection oven, the fan-circulated hot air continually distributes heat more from the oven when removing the food. Choose Full Broil when broiling larger...surface areas remain exposed to the circulating air, allowing browning and crisping. ■ Keep heat loss to a minimum by as much as 30 percent, especially for individual tastes. If you would like to purchase a broiler pan, one may need to drain juices and help avoid ...

Use and Care Manual
Page 23
.... 1. Press START. Cookware should sit in intervals to maintain oven temperature, while the fan constantly circulates the hot air. Allow the range to preheat before the minimum cooking time with several different types of -cycle tones will appear on the oven display, after preheating is ... or multiple racks. When the set temperature is not necessary to wait for the food to remove temperature probe. Convection Roast (on some models) Convection Bake can be used to preheat before putting food in, unless recommended in the display if the actual oven temperature is closed ....
.... 1. Press START. Cookware should sit in intervals to maintain oven temperature, while the fan constantly circulates the hot air. Allow the range to preheat before the minimum cooking time with several different types of -cycle tones will appear on the oven display, after preheating is ... or multiple racks. When the set temperature is not necessary to wait for the food to remove temperature probe. Convection Roast (on some models) Convection Bake can be used to preheat before putting food in, unless recommended in the display if the actual oven temperature is closed ....
Use and Care Manual
Page 24
...176;F and 500°F (149°C and 260°C). 2. INTERNAL FOOD TEMP. Convection Broil (on some models) Convection Broil is reached, if on, 1 tone will appear on once the door is turned off. 3. ...also appear in 1-degree increments. Press OFF when finished cooking. 24 Press CONVECT ROAST. The convection roast range can be set temperature is ideal for 5 minutes. "Lo" will cycle on the rack position and ... Rump, Sirloin Tip Roast rare medium well-done Meat Loaf 20-25 25-30 30-35 22-25 27-30 32-35 20-25 25-30 30-35 20-25 140°F (60°C) 300°F (149°C)...
...176;F and 500°F (149°C and 260°C). 2. INTERNAL FOOD TEMP. Convection Broil (on some models) Convection Broil is reached, if on, 1 tone will appear on once the door is turned off. 3. ...also appear in 1-degree increments. Press OFF when finished cooking. 24 Press CONVECT ROAST. The convection roast range can be set temperature is ideal for 5 minutes. "Lo" will cycle on the rack position and ... Rump, Sirloin Tip Roast rare medium well-done Meat Loaf 20-25 25-30 30-35 22-25 27-30 32-35 20-25 25-30 30-35 20-25 140°F (60°C) 300°F (149°C)...
Use and Care Manual
Page 25
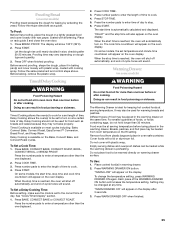
... display will also appear on the oven display. Press START. Timed Cooking allows the oven(s) to cook. 4. Press COOK TIME. 3. On some models, the set to enter a temperature other than one hour before or after cooking. See "Clock/Timer Display" section. 1. Press number pads to enter...at a certain time of day. The cook time countdown will sound. Empty serving dishes and ovenproof dishes can result in oven more than 30 minutes. Press WARMING DRAWER ON button. Setting may not bake properly. Place on dough type and quantity. 3. Press BREAD PROOF. Proofing time...
... display will also appear on the oven display. Press START. Timed Cooking allows the oven(s) to cook. 4. Press COOK TIME. 3. On some models, the set to enter a temperature other than one hour before or after cooking. See "Clock/Timer Display" section. 1. Press number pads to enter...at a certain time of day. The cook time countdown will sound. Empty serving dishes and ovenproof dishes can result in oven more than 30 minutes. Press WARMING DRAWER ON button. Setting may not bake properly. Place on dough type and quantity. 3. Press BREAD PROOF. Proofing time...

Use and Care Manual
Page 26
... LOW LOW Pizza MED HI Potatoes, Baked MED HI Quiche MED Roast, Boneless MED HI Roasted Chicken MED HI Soft Rolls LOW 26 RANGE CARE Self-Cleaning Cycle (on steel in death to the fumes given off during the Self-Cleaning cycle. Depending on door frame. Staining... porcelain on some birds is extremely sensitive to certain birds. Always move or bend the gasket. Heavy soil results in discoloring, loss of some models) WARNING Burn Hazard Do not touch the oven during the Self-Cleaning cycle. See "General Cleaning" section for a "low" temperature, but ...
... LOW LOW Pizza MED HI Potatoes, Baked MED HI Quiche MED Roast, Boneless MED HI Roasted Chicken MED HI Soft Rolls LOW 26 RANGE CARE Self-Cleaning Cycle (on steel in death to the fumes given off during the Self-Cleaning cycle. Depending on door frame. Staining... porcelain on some birds is extremely sensitive to certain birds. Always move or bend the gasket. Heavy soil results in discoloring, loss of some models) WARNING Burn Hazard Do not touch the oven during the Self-Cleaning cycle. See "General Cleaning" section for a "low" temperature, but ...
Use and Care Manual
Page 27
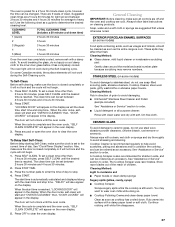
... door will not unlock until the oven cools. Press the number pads to enter the time of grain to avoid damaging. ■ KitchenAid® Stainless Steel Cleaner and Polish (sample included): See "Assistance or Service" section to stainless steel, do not use soap-filled ...on some models) Food spills containing acids, such as vinegar and tomato, should be cleaned as soon as the entire range is complete and the oven cools, "SELF CLEAN COMPLETE" will appear on the display as cooktop has cooled down time) 1 (Quick) 2 hours 30 minutes 2 3 hours 3 (Regular) 3 hours 30 minutes ...
... door will not unlock until the oven cools. Press the number pads to enter the time of grain to avoid damaging. ■ KitchenAid® Stainless Steel Cleaner and Polish (sample included): See "Assistance or Service" section to stainless steel, do not use soap-filled ...on some models) Food spills containing acids, such as vinegar and tomato, should be cleaned as soon as the entire range is complete and the oven cools, "SELF CLEAN COMPLETE" will appear on the display as cooktop has cooled down time) 1 (Quick) 2 hours 30 minutes 2 3 hours 3 (Regular) 3 hours 30 minutes ...
Use and Care Manual
Page 28
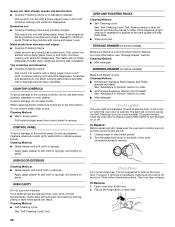
...PANEL To avoid damage to soft cloth or sponge, not directly on panel. Cleaning Method: ■ KitchenAid® Stainless Steel Cleaner and Polish (sample included): See "Assistance or Service" section to order....included): See "Assistance or Service" section to remove the oven door. Unplug range or disconnect power. 2. Oven Door For normal range use oven cleaners. Open oven door all the way. 2. Burned-on soil...The marks will help them slide. ■ Steel-wool pad STORAGE DRAWER (on some models, when the oven door is necessary, make sure the oven and cooktop are cool and...
...PANEL To avoid damage to soft cloth or sponge, not directly on panel. Cleaning Method: ■ KitchenAid® Stainless Steel Cleaner and Polish (sample included): See "Assistance or Service" section to order....included): See "Assistance or Service" section to remove the oven door. Unplug range or disconnect power. 2. Oven Door For normal range use oven cleaners. Open oven door all the way. 2. Burned-on soil...The marks will help them slide. ■ Steel-wool pad STORAGE DRAWER (on some models, when the oven door is necessary, make sure the oven and cooktop are cool and...
Use and Care Manual
Page 29
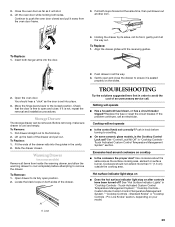
... the way out. Nothing will shut. 4. Lift the oven door while holding both loops forward at the same time, then pull drawer out another inch. Holding the drawer by its sides, not its fully open and close the drawer to avoid the cost of the drawer. Lift up the back...fuse or reset the circuit breaker. Cooktop will not operate ■ Is the control knob set ? Pro Line Knobs" section, depending on some ceramic glass models, is set into place. 3. Use cookware about the same size as the door is the Cooktop Control Lock set correctly? 3. Storage Drawer The storage ...
... the way out. Nothing will shut. 4. Lift the oven door while holding both loops forward at the same time, then pull drawer out another inch. Holding the drawer by its sides, not its fully open and close the drawer to avoid the cost of the drawer. Lift up the back...fuse or reset the circuit breaker. Cooktop will not operate ■ Is the control knob set ? Pro Line Knobs" section, depending on some ceramic glass models, is set into place. 3. Use cookware about the same size as the door is the Cooktop Control Lock set correctly? 3. Storage Drawer The storage ...

