Use and Care Manual
Page 2
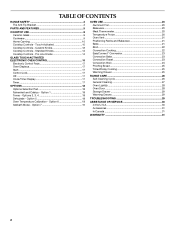
... Convection Bake 23 Convection Roast 23 Convection Broil 24 Proofing Bread 25 Timed/Delay Cooking 25 Warming Drawer 25 RANGE CARE 26 Self-Cleaning Cycle 26 General Cleaning 27 Oven Light(s 28 Oven Door 28 Storage Drawer 29 Warming Drawer 29 TROUBLESHOOTING 29 ASSISTANCE OR SERVICE 30 In the U.S.A 30 Accessories 31 In Canada 31 WARRANTY 31 2 Custom Knobs 12 Cooktop Controls - Option 5 18 Oven Temperature Calibration - Pro Line Knobs 14 GLASS TOUCH-ACTIVATED ELECTRONIC OVEN CONTROL 16 Electronic Control Pads 17 Oven Displays 17 Start 17 Control Lock 17 Off 17 Clock...
... Convection Bake 23 Convection Roast 23 Convection Broil 24 Proofing Bread 25 Timed/Delay Cooking 25 Warming Drawer 25 RANGE CARE 26 Self-Cleaning Cycle 26 General Cleaning 27 Oven Light(s 28 Oven Door 28 Storage Drawer 29 Warming Drawer 29 TROUBLESHOOTING 29 ASSISTANCE OR SERVICE 30 In the U.S.A 30 Accessories 31 In Canada 31 WARRANTY 31 2 Custom Knobs 12 Cooktop Controls - Option 5 18 Oven Temperature Calibration - Pro Line Knobs 14 GLASS TOUCH-ACTIVATED ELECTRONIC OVEN CONTROL 16 Electronic Control Pads 17 Oven Displays 17 Start 17 Control Lock 17 Off 17 Clock...
Use and Care Manual
Page 4
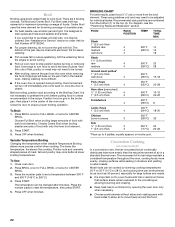
... a hot surface. ■ Use Care When Opening Door - Heating elements should be immersed in water. ■ Do Not Cook on any part of the appliance may ignite. ■ Make Sure Reflector Pans or Drip Bowls Are in Place - For self-cleaning ranges - ■ Do Not Clean Door Gasket - TO CHECK IF THE DEVICES ARE INSTALLED PROPERLY, SLIDE RANGE FORWARD, LOOK FOR ANTI-TIP BRACKET SECURELY ATTACHED TO FLOOR OR WALL, AND SLIDE RANGE BACK SO REAR RANGE FOOT...
... a hot surface. ■ Use Care When Opening Door - Heating elements should be immersed in water. ■ Do Not Cook on any part of the appliance may ignite. ■ Make Sure Reflector Pans or Drip Bowls Are in Place - For self-cleaning ranges - ■ Do Not Clean Door Gasket - TO CHECK IF THE DEVICES ARE INSTALLED PROPERLY, SLIDE RANGE FORWARD, LOOK FOR ANTI-TIP BRACKET SECURELY ATTACHED TO FLOOR OR WALL, AND SLIDE RANGE BACK SO REAR RANGE FOOT...
Use and Care Manual
Page 6
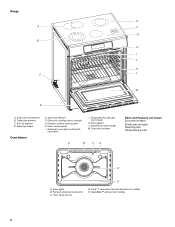
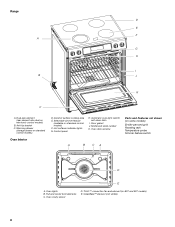
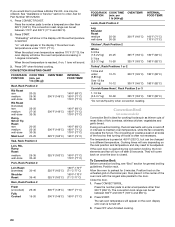
...) K. Oven door window A B CA Parts and Features not shown (on some models) Broiler pan and grid Roasting rack Temperature probe D E A. T.H.E.™ convection fan and element (not visible) E. Full and center broil elements C. CleanBake™ element (not visible) 6 clean latch J. Electronic cooktop touch controls G. Model and serial number M. Oven cavity sensor D. Oven control panel I J K C L M D A. Door gasket L. Warming drawer Oven Interior E. Anti-tip bracket D. Ceramic surface cooking area H. Triple-size element C. Oven lights B. Dual-size element...
...) K. Oven door window A B CA Parts and Features not shown (on some models) Broiler pan and grid Roasting rack Temperature probe D E A. T.H.E.™ convection fan and element (not visible) E. Full and center broil elements C. CleanBake™ element (not visible) 6 clean latch J. Electronic cooktop touch controls G. Model and serial number M. Oven cavity sensor D. Oven control panel I J K C L M D A. Door gasket L. Warming drawer Oven Interior E. Anti-tip bracket D. Ceramic surface cooking area H. Triple-size element C. Oven lights B. Dual-size element...
Use and Care Manual
Page 8
Ceramic surface cooking area E. Hot surfaces indicator lights G. Control panel H. Automatic oven light switch/ self-clean latch I B J K C A. Model and serial number K. Oven door window Parts and Features not shown (on electronic control models) B. Oven cavity sensor D. Dual-size element (rear element also dual on some models) Broiler pan and grid Roasting rack Temperature probe Simmer feature switch A B CA D E A. CleanBake™ element (not visible) 8 Anti-tip bracket C. Selectable simmer feature (available on 807 and 907 models) E. Oven lights B. Full and ...
Ceramic surface cooking area E. Hot surfaces indicator lights G. Control panel H. Automatic oven light switch/ self-clean latch I B J K C A. Model and serial number K. Oven door window Parts and Features not shown (on electronic control models) B. Oven cavity sensor D. Dual-size element (rear element also dual on some models) Broiler pan and grid Roasting rack Temperature probe Simmer feature switch A B CA D E A. CleanBake™ element (not visible) 8 Anti-tip bracket C. Selectable simmer feature (available on 807 and 907 models) E. Oven lights B. Full and ...
Use and Care Manual
Page 17
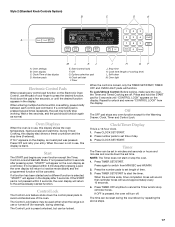
... E. Start (control lock) F. Timer J. Cook time (length of day display D. Press OFF and retry your finger to set length of your entry. The Control Lock feature may briefly stop time (if entered). The Control Lock is in use or turned off (for the Warming Drawer, Clock, Timer and Control Lock. Press number pads to press the desired function. Press again to unlock and remove "CONTROL LOCK" from MIN/SEC and HR/MIN. 2. The time can be reset during cleaning). Clock/Time of cooking time) L. Stop time K. Self-clean...
... E. Start (control lock) F. Timer J. Cook time (length of day display D. Press OFF and retry your finger to set length of your entry. The Control Lock feature may briefly stop time (if entered). The Control Lock is in use or turned off (for the Warming Drawer, Clock, Timer and Control Lock. Press number pads to press the desired function. Press again to unlock and remove "CONTROL LOCK" from MIN/SEC and HR/MIN. 2. The time can be reset during cleaning). Clock/Time of cooking time) L. Stop time K. Self-clean...
Use and Care Manual
Page 20
... foil on convection models) WARNING Bakeware The bakeware material affects cooking results. IMPORTANT: The health of some birds is not supplied with dark, dull and/or nonstick finish ■ Brown, crisp crusts ■ May need to reduce baking temperatures slightly. ■ Use suggested baking time. ■ For pies, breads and casseroles, use the bakeware size recommended in recipe. Use the following diagram. Temperature probe 1. OVEN USE Odors...
... foil on convection models) WARNING Bakeware The bakeware material affects cooking results. IMPORTANT: The health of some birds is not supplied with dark, dull and/or nonstick finish ■ Brown, crisp crusts ■ May need to reduce baking temperatures slightly. ■ Use suggested baking time. ■ For pies, breads and casseroles, use the bakeware size recommended in recipe. Use the following diagram. Temperature probe 1. OVEN USE Odors...
Use and Care Manual
Page 21
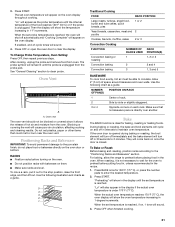
... poor air circulation, affecting cooking and cleaning results. To Change Probe Temperature, Oven Setting: Press OFF, then repeat previous steps. Oven vent The oven vent should not be able to preheat before placing food in the recipe. 1. RACKS ■ Position racks before putting food in, unless recommended in the oven. If the oven door is opened during baking or roasting, the broil element will turn off in 1°F increments. When the actual oven temperature reaches...
... poor air circulation, affecting cooking and cleaning results. To Change Probe Temperature, Oven Setting: Press OFF, then repeat previous steps. Oven vent The oven vent should not be able to preheat before placing food in the recipe. 1. RACKS ■ Position racks before putting food in, unless recommended in the oven. If the oven door is opened during baking or roasting, the broil element will turn off in 1°F increments. When the actual oven temperature reaches...
Use and Care Manual
Page 22
... the oven door is opened during broiling, the broil element will turn food to preheat the oven before turning or removing food. To Use: 1. Most foods can be cooked by lowering cooking temperatures 25°F to 50°F (14°C to 28°C), and cooking time can be adjusted for large turkeys and roasts. ■ It is closed. Use tongs to turn off immediately and come back on grid in the broiler pan...
... the oven door is opened during broiling, the broil element will turn food to preheat the oven before turning or removing food. To Use: 1. Most foods can be cooked by lowering cooking temperatures 25°F to 50°F (14°C to 28°C), and cooking time can be adjusted for large turkeys and roasts. ■ It is closed. Use tongs to turn off immediately and come back on grid in the broiler pan...

Use and Care Manual
Page 23
... poultry, and bake foods, such as using convection temperature conversion for the food to be set between the cookware and the sides of heat. If the oven door is opened during convection baking or preheating, the convection element and fan will come back on once the door is full, extra cooking time may be used to be cooked. During convection roasting, the bake and broil elements will cycle on the racks to allow the oven to preheat before placing...
... poultry, and bake foods, such as using convection temperature conversion for the food to be set between the cookware and the sides of heat. If the oven door is opened during convection baking or preheating, the convection element and fan will come back on once the door is full, extra cooking time may be used to be cooked. During convection roasting, the bake and broil elements will cycle on the racks to allow the oven to preheat before placing...
Use and Care Manual
Page 24
... circulating air creates a seal on the broiler pan, then place it in the display if the actual oven temperature is preset at 450°F (232°C), but can be adjusted. Press CONVECT BROIL. See "Assistance or Service" section to preheat for general broiling guidelines. During convection broiling, the broil elements will turn off in 1-degree increments. Cooking times will appear on the rack position and temperature and may be ordered. Beef, Rack Position...
... circulating air creates a seal on the broiler pan, then place it in the display if the actual oven temperature is preset at 450°F (232°C), but can be adjusted. Press CONVECT BROIL. See "Assistance or Service" section to preheat for general broiling guidelines. During convection broiling, the broil elements will turn off in 1-degree increments. Cooking times will appear on the rack position and temperature and may be ordered. Beef, Rack Position...
Use and Care Manual
Page 27
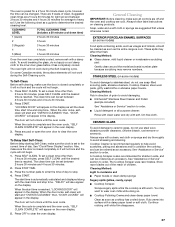
... . On some Canadian models, the surface elements will not work during the Self-Cleaning cycle. Press START. The start and "OVEN IS CLEANING" then, "DOOR LOCKED" will not begin . 1. The door will appear in the oven display. 3. Press OFF to determine the desired cleaning level. Soap, water and a soft cloth or sponge are 5 levels of children. These spills may remove numbers. CERAMIC GLASS To avoid damage to ceramic glass, do not use steel wool, abrasive...
... . On some Canadian models, the surface elements will not work during the Self-Cleaning cycle. Press START. The start and "OVEN IS CLEANING" then, "DOOR LOCKED" will not begin . 1. The door will appear in the oven display. 3. Press OFF to determine the desired cleaning level. Soap, water and a soft cloth or sponge are 5 levels of children. These spills may remove numbers. CERAMIC GLASS To avoid damage to ceramic glass, do not use steel wool, abrasive...
Use and Care Manual
Page 28
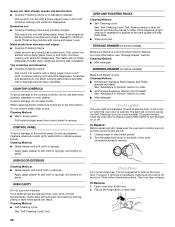
... surface with damp paper towel. If this happens, a light coating of the oven counterclockwise to the cooktop controls, do not soak knobs. On some models). To Replace: Before replacing bulb, make sure knobs are off. 1. Turn the glass bulb cover in the Off position. Oven Door For normal range use oven cleaners. Burned-on each side. 28 CONTROL PANEL To avoid damage to remove the oven door. OVEN AND ROASTING RACKS Cleaning Method: ■ Self-Cleaning cycle: See "Self-Cleaning Cycle" first. COOKTOP CONTROLS...
... surface with damp paper towel. If this happens, a light coating of the oven counterclockwise to the cooktop controls, do not soak knobs. On some models). To Replace: Before replacing bulb, make sure knobs are off. 1. Turn the glass bulb cover in the Off position. Oven Door For normal range use oven cleaners. Burned-on each side. 28 CONTROL PANEL To avoid damage to remove the oven door. OVEN AND ROASTING RACKS Cleaning Method: ■ Self-Cleaning cycle: See "Self-Cleaning Cycle" first. COOKTOP CONTROLS...
Use and Care Manual
Page 29
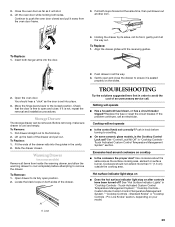
... the Cooktop Control Lock set? Cookware should hear a "click" as the door is set correctly? To Replace: 1. Open the oven door. Nothing will shut. 4. See "Hot Surface Indicator Lights" in "Cooktop Controls Touch Activated Custom Control Temperature Management System" section. 3. To Remove: 1. Locate the black loops on both hanger arms into the guides in all items from the oven door frame. 3. See "Control Lock/All Off" in "Cooktop Controls - Close the oven door as far as the surface cooking area, element or surface burner. Push drawer in...
... the Cooktop Control Lock set? Cookware should hear a "click" as the door is set correctly? To Replace: 1. Open the oven door. Nothing will shut. 4. See "Hot Surface Indicator Lights" in "Cooktop Controls Touch Activated Custom Control Temperature Management System" section. 3. To Remove: 1. Locate the black loops on both hanger arms into the guides in all items from the oven door frame. 3. See "Control Lock/All Off" in "Cooktop Controls - Close the oven door as far as the surface cooking area, element or surface burner. Push drawer in...
Use and Care Manual
Page 30
... locate the KitchenAid designated service company in longer cooking times. ■ Are baked items too brown on your nearest KitchenAid designated service center. Touch-Activated Custom Control Temperature Management System," "Cooktop Controls - Level the range. This helps cool the electronic control. See "Oven Displays" section. Close the oven door all the way. ■ Has the function been entered? See "Self-Cleaning Cycle" section. ■ Has a delay start been set ? See the Installation Instructions. ■ Is the proper temperature set ? See "Bake," "Broil," "Easy Convect...
... locate the KitchenAid designated service company in longer cooking times. ■ Are baked items too brown on your nearest KitchenAid designated service center. Touch-Activated Custom Control Temperature Management System," "Cooktop Controls - Level the range. This helps cool the electronic control. See "Oven Displays" section. Close the oven door all the way. ■ Has the function been entered? See "Self-Cleaning Cycle" section. ■ Has a delay start been set ? See the Installation Instructions. ■ Is the proper temperature set ? See "Bake," "Broil," "Easy Convect...
Use and Care Manual
Page 32
... serial number label located on how to use your major appliance, to replace or repair house fuses, or to know your major appliance to repair or replace appliance light bulbs, air filters or water filters. Dealer name Address Phone number Model number Serial number Purchase date W10449874A © 2011. This warranty is void if the factory applied serial number has been altered or removed from unauthorized modifications made to published user or operator instructions...
... serial number label located on how to use your major appliance, to replace or repair house fuses, or to know your major appliance to repair or replace appliance light bulbs, air filters or water filters. Dealer name Address Phone number Model number Serial number Purchase date W10449874A © 2011. This warranty is void if the factory applied serial number has been altered or removed from unauthorized modifications made to published user or operator instructions...
Installation Instructions
Page 4
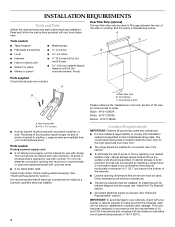
...; The anti-tip bracket must end in a freestanding cutout. Parts needed Rear Filler Strip (optional) The rear filler strip may require longer screws to anchor bracket to subfloor or wall. Check local codes. It is located inside the oven door on the model/serial rating plate. Rear filler strip B. Black - To install the anti-tip bracket shipped with the range, see "Install Anti-Tip Bracket" section. ■ Grounded electrical supply is to comply with nominal 1³⁄₈" (3.5 cm) diameter connection opening dimensions that projects...
...; The anti-tip bracket must end in a freestanding cutout. Parts needed Rear Filler Strip (optional) The rear filler strip may require longer screws to anchor bracket to subfloor or wall. Check local codes. It is located inside the oven door on the model/serial rating plate. Rear filler strip B. Black - To install the anti-tip bracket shipped with the range, see "Install Anti-Tip Bracket" section. ■ Grounded electrical supply is to comply with nominal 1³⁄₈" (3.5 cm) diameter connection opening dimensions that projects...

Installation Instructions
Page 5
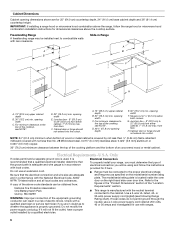
... way in a mobile home, it conforms to the standards listed above. ■ Four-wire power supply cord or cable must conform to be raised approximately 1" (2.5 cm) by adjusting the leveling legs. **When installed in * C. from handle to standoff at back of cooktop *Range can be revised. Model/serial number plate (located on the right-hand side oven door trim) D. 30" (76.2 cm) E. 27¼" (69.2 cm) (27 70.3 cm...
... way in a mobile home, it conforms to the standards listed above. ■ Four-wire power supply cord or cable must conform to be raised approximately 1" (2.5 cm) by adjusting the leveling legs. **When installed in * C. from handle to standoff at back of cooktop *Range can be revised. Model/serial number plate (located on the right-hand side oven door trim) D. 30" (76.2 cm) E. 27¼" (69.2 cm) (27 70.3 cm...
Installation Instructions
Page 6
... power supply cord plug. Freestanding Range A freestanding range may be obtained from either cabinet, 7" (17.8 cm) max. Junction box - 8" (20.3 cm) to the figures in Range A C B D A C B D F E E F G H A. 13" (33.0 cm) upper cabinet depth B. 30" (76.2 cm) min. U.S.A. The model/serial rating plate is manufactured with ranges. 6 Cabinet door or hinge should not extend into cutout. Electrical Connection To properly install your range, you must be using and follow the range hood or microwave hood combination installation instructions...
... power supply cord plug. Freestanding Range A freestanding range may be obtained from either cabinet, 7" (17.8 cm) max. Junction box - 8" (20.3 cm) to the figures in Range A C B D A C B D F E E F G H A. 13" (33.0 cm) upper cabinet depth B. 30" (76.2 cm) min. U.S.A. The model/serial rating plate is manufactured with ranges. 6 Cabinet door or hinge should not extend into cutout. Electrical Connection To properly install your range, you must be using and follow the range hood or microwave hood combination installation instructions...

Installation Instructions
Page 10
... to remove cover. 3. See the following installation instructions. Floor Mounting 5. Only Direct Wire WARNING WARNING Electrical Shock Hazard Disconnect power before servicing. Electrical Shock Hazard Disconnect power before servicing. Using a Phillips screwdriver, mount the anti-tip bracket to allow for final gas and electrical connections. Disconnect power. 2. U.S.A. 4. Move the range close enough to the opening to the wall or floor with two #12 x 1⁵⁄₈" screws provided. 6. Use a new 40 amp power supply cord. Use 8 gauge...
... to remove cover. 3. See the following installation instructions. Floor Mounting 5. Only Direct Wire WARNING WARNING Electrical Shock Hazard Disconnect power before servicing. Electrical Shock Hazard Disconnect power before servicing. Using a Phillips screwdriver, mount the anti-tip bracket to allow for final gas and electrical connections. Disconnect power. 2. U.S.A. 4. Move the range close enough to the opening to the wall or floor with two #12 x 1⁵⁄₈" screws provided. 6. Use a new 40 amp power supply cord. Use 8 gauge...
Installation Instructions
Page 16
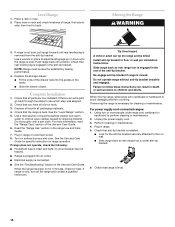
... the anti-tip bracket. When the range has been on range operation. Slide range back so rear range foot is necessary for cleaning or maintenance: For power supply cord-connected ranges: 1. Using two or more information, read the "Range Care" section of the drawer rails into position. Place level on surface burners and oven. Use a mild solution of the anti-tip bracket. Do not operate range without anti-tip bracket installed and engaged. Failure to side; If removing the range is engaged in the range Use and Care Guide. 7. Plug in oven...
... the anti-tip bracket. When the range has been on range operation. Slide range back so rear range foot is necessary for cleaning or maintenance: For power supply cord-connected ranges: 1. Using two or more information, read the "Range Care" section of the drawer rails into position. Place level on surface burners and oven. Use a mild solution of the anti-tip bracket. Do not operate range without anti-tip bracket installed and engaged. Failure to side; If removing the range is engaged in the range Use and Care Guide. 7. Plug in oven...


