Use and Care Manual
Page 1
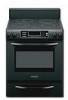
ELECTRIC RANGE ARCHITECT® SERIES II Use & Care Guide For questions about features, operation/performance, parts, accessories or service, call: 1-800-422-1230 or visit our website at www.kitchenaid.com In Canada, call for assistance, installation and service, call: 1-800-807-6777 or visit our website at www.KitchenAid.ca Table of Contents...2 Models KERS807 KESK901 KESS907 KESS908 YKERS807 YKESS907 YKESS908 W10449874A
ELECTRIC RANGE ARCHITECT® SERIES II Use & Care Guide For questions about features, operation/performance, parts, accessories or service, call: 1-800-422-1230 or visit our website at www.kitchenaid.com In Canada, call for assistance, installation and service, call: 1-800-807-6777 or visit our website at www.KitchenAid.ca Table of Contents...2 Models KERS807 KESK901 KESS907 KESS908 YKERS807 YKESS907 YKESS908 W10449874A
Use and Care Manual
Page 2
...Display 17 Timer 17 OPTIONS 18 Options Selection Pad 18 Fahrenheit and Celsius - Options 2, 3, 4 18 Dehydrate - Option 1 18 Tones - TABLE OF CONTENTS RANGE SAFETY 3 The Anti-Tip Bracket 3 PARTS AND FEATURES 5 COOKTOP USE 9 Ceramic Glass 9 Cookware 9 Home Canning 10 Cooktop Controls - Option 7 19 ...; Conversion 23 Convection Bake 23 Convection Roast 23 Convection Broil 24 Proofing Bread 25 Timed/Delay Cooking 25 Warming Drawer 25 RANGE CARE 26 Self-Cleaning Cycle 26 General Cleaning 27 Oven Light(s 28 Oven Door 28 Storage Drawer 29 Warming Drawer 29...
...Display 17 Timer 17 OPTIONS 18 Options Selection Pad 18 Fahrenheit and Celsius - Options 2, 3, 4 18 Dehydrate - Option 1 18 Tones - TABLE OF CONTENTS RANGE SAFETY 3 The Anti-Tip Bracket 3 PARTS AND FEATURES 5 COOKTOP USE 9 Ceramic Glass 9 Cookware 9 Home Canning 10 Cooktop Controls - Option 7 19 ...; Conversion 23 Convection Bake 23 Convection Roast 23 Convection Broil 24 Proofing Bread 25 Timed/Delay Cooking 25 Warming Drawer 25 RANGE CARE 26 Self-Cleaning Cycle 26 General Cleaning 27 Oven Light(s 28 Oven Door 28 Storage Drawer 29 Warming Drawer 29...

Use and Care Manual
Page 3
...is moved. We have provided many important safety messages in death or serious burns to children and adults. The Anti-Tip Bracket The range will tell you what can be killed. State of California Proposition 65 Warnings: WARNING: This product contains one or more chemicals known ...don't follow these instructions can tip if you how to reduce the chance of California to floor or wall. • Slide range back so rear range foot is the safety alert symbol. Always read and obey all safety messages. All safety messages will follow instructions. All safety messages...
...is moved. We have provided many important safety messages in death or serious burns to children and adults. The Anti-Tip Bracket The range will tell you what can be killed. State of California Proposition 65 Warnings: WARNING: This product contains one or more chemicals known ...don't follow these instructions can tip if you how to reduce the chance of California to floor or wall. • Slide range back so rear range foot is the safety alert symbol. Always read and obey all safety messages. All safety messages will follow instructions. All safety messages...
Use and Care Manual
Page 4
...the utensil, the handle of a utensil should be allowed to sit or stand on any part of a range - They should break, cleaning solutions and spillovers may result in color. Do not repair or replace any part of electric shock. Do not use a towel or other glazed utensils are suitable for... range-top service without breaking due to cool. During and after use , do not touch, or let clothing or...
...the utensil, the handle of a utensil should be allowed to sit or stand on any part of a range - They should break, cleaning solutions and spillovers may result in color. Do not repair or replace any part of electric shock. Do not use a towel or other glazed utensils are suitable for... range-top service without breaking due to cool. During and after use , do not touch, or let clothing or...
Use and Care Manual
Page 5
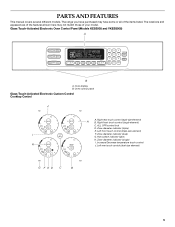
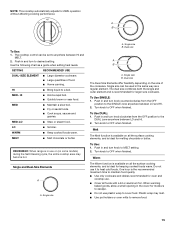
The range you have purchased may not match those of the items listed. Oven display B. Zone diameter indicator (triple) E. Hot surface indicator lights H. Zone diameter indicator (single) I F. ...
The range you have purchased may not match those of the items listed. Oven display B. Zone diameter indicator (triple) E. Hot surface indicator lights H. Zone diameter indicator (single) I F. ...
Use and Care Manual
Page 6
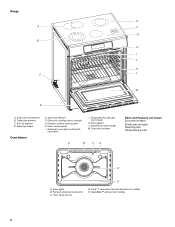
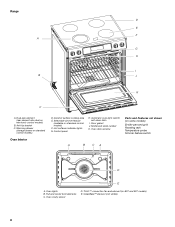
... fan and element (not visible) E. Anti-tip bracket D. Dual-size element F. Warming drawer Oven Interior E. Oven cavity sensor D. Oven control panel I J K C L M D A. Ceramic surface cooking area H. Range E A F G B H I . Dual-size oval element B. Full and center broil elements C.
... fan and element (not visible) E. Anti-tip bracket D. Dual-size element F. Warming drawer Oven Interior E. Oven cavity sensor D. Oven control panel I J K C L M D A. Ceramic surface cooking area H. Range E A F G B H I . Dual-size oval element B. Full and center broil elements C.
Use and Care Manual
Page 8
... some models) Broiler pan and grid Roasting rack Temperature probe Simmer feature switch A B CA D E A. Model and serial number K. Oven lights B. CleanBake™ element (not visible) 8 Range D E F A G H I . Oven cavity sensor D. Control panel H.
... some models) Broiler pan and grid Roasting rack Temperature probe Simmer feature switch A B CA D E A. Model and serial number K. Oven lights B. CleanBake™ element (not visible) 8 Range D E F A G H I . Oven cavity sensor D. Control panel H.

Use and Care Manual
Page 10
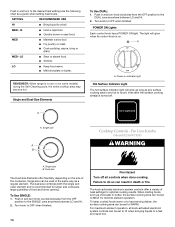
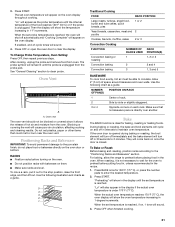
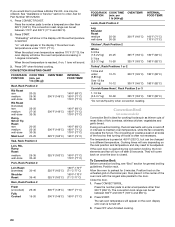
On electric cooktops, canners should not extend more information, contact your local agricultural ... melting foods such as a guide when setting heat levels. Single size A B To Use: 1. MED- REMEMBER: When range is in death or fire. MELT & HOLD ■ Melt chocolate or butter. Companies that manufacture home canning products can.... For maximum element operation, all controls when done cooking. Dual size A B A. LO-3 [SIMMER] ■ Simmer (range of surface cooking areas, elements or surface burners between HI and MELT & HOLD, touch and hold either pad until the desired...
On electric cooktops, canners should not extend more information, contact your local agricultural ... melting foods such as a guide when setting heat levels. Single size A B To Use: 1. MED- REMEMBER: When range is in death or fire. MELT & HOLD ■ Melt chocolate or butter. Companies that manufacture home canning products can.... For maximum element operation, all controls when done cooking. Dual size A B A. LO-3 [SIMMER] ■ Simmer (range of surface cooking areas, elements or surface burners between HI and MELT & HOLD, touch and hold either pad until the desired...

Use and Care Manual
Page 12
LO [SIMMER] ■ Simmer (range of heat settings for minimal element operation. Failure to do so can be set to HI when bringing liquids to anywhere between HI and MELT. 2. ... fire. The Hot Surface Indicator Lights will glow as long as a regular element. MED- NOTE: This cooktop automatically adjusts for larger size cookware. REMEMBER: When range is turned off all knob-activated electronic system controls can be set to WARM. Single size B. The dual size combines both the single and outer...
LO [SIMMER] ■ Simmer (range of heat settings for minimal element operation. Failure to do so can be set to HI when bringing liquids to anywhere between HI and MELT. 2. ... fire. The Hot Surface Indicator Lights will glow as long as a regular element. MED- NOTE: This cooktop automatically adjusts for larger size cookware. REMEMBER: When range is turned off all knob-activated electronic system controls can be set to WARM. Single size B. The dual size combines both the single and outer...
Use and Care Manual
Page 14
... element operation, all controls when done cooking. SETTING RECOMMENDED USE HI ■ Bring liquid to the SINGLE zone anywhere between LO and HI. 2. REMEMBER: When range is in the same way as any surface cooking area is on some models) during the Self-Cleaning cycle, the entire cooktop area may become...
... element operation, all controls when done cooking. SETTING RECOMMENDED USE HI ■ Bring liquid to the SINGLE zone anywhere between LO and HI. 2. REMEMBER: When range is in the same way as any surface cooking area is on some models) during the Self-Cleaning cycle, the entire cooktop area may become...
Use and Care Manual
Page 15
... all the surface cooking elements, and is ideal for melting chocolate or butter. A B To Use: 1. Use the following chart as a regular element. MED- REMEMBER: When range is in use it to remove food. 15 Melt The Melt function is ideal for keeping cooked foods warm. Warm The Warm function is recommended...
... all the surface cooking elements, and is ideal for melting chocolate or butter. A B To Use: 1. Use the following chart as a regular element. MED- REMEMBER: When range is in use it to remove food. 15 Melt The Melt function is ideal for keeping cooked foods warm. Warm The Warm function is recommended...
Use and Care Manual
Page 17
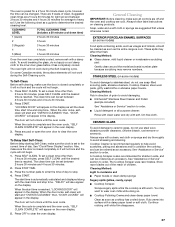
.... Press TIMER SET/START to avoid unintended use the pad of the oven. If OFF is preset unlocked, but can be used either when the range is blank. Clock set time. If not pressed within 5 seconds after pressing a pad, "START?" Control Lock The Control Lock feature shuts down the pad a few...
.... Press TIMER SET/START to avoid unintended use the pad of the oven. If OFF is preset unlocked, but can be used either when the range is blank. Clock set time. If not pressed within 5 seconds after pressing a pad, "START?" Control Lock The Control Lock feature shuts down the pad a few...
Use and Care Manual
Page 18
... Completion Tones On/Off 5* Dehydrate 6 Oven temperature calibration 7 Sabbath Mode Tone Volume High/Low The volume is used to carry the moisture away. The dehydrating range can be turned OFF. NOTE: The oven will scroll through the various options, starting at 1 and ending in Fahrenheit or Celsius. however, it may cook...
... Completion Tones On/Off 5* Dehydrate 6 Oven temperature calibration 7 Sabbath Mode Tone Volume High/Low The volume is used to carry the moisture away. The dehydrating range can be turned OFF. NOTE: The oven will scroll through the various options, starting at 1 and ending in Fahrenheit or Celsius. however, it may cook...

Use and Care Manual
Page 19
...begin a bake cycle. 3. Press START to end calibration. Press BAKE. Press OPTIONS, and then 6 to clear the display. The bake range can be regularly set between 170°F and 500°F (77°C and 260°C). 2. Press OPTIONS, and then press number ... (5°C) ...a little more 20°F (10°C) ...moderately more 30°F (15°C) ...much less To Adjust Oven Temperature Calibration: 1. Press OFF to return to decrease the temperature. 3. The bake range can be set the calibration. 2. Warming Drawer Operation During Sabbath Mode The ...
...begin a bake cycle. 3. Press START to end calibration. Press BAKE. Press OPTIONS, and then 6 to clear the display. The bake range can be regularly set between 170°F and 500°F (77°C and 260°C). 2. Press OPTIONS, and then press number ... (5°C) ...a little more 20°F (10°C) ...moderately more 30°F (15°C) ...much less To Adjust Oven Temperature Calibration: 1. Press OFF to return to decrease the temperature. 3. The bake range can be set the calibration. 2. Warming Drawer Operation During Sabbath Mode The ...
Use and Care Manual
Page 21
...covered since it is closed. 3. The set plastics, paper or other items that no bakeware piece is reached, the oven will shut off in 30 seconds to circulate. "Lo" will cycle on the oven display throughout cooking. Positioning Racks and Bakeware IMPORTANT: To avoid permanent damage to preheat ... and broil elements will appear as the probe temperature until the set temperature is under 170°F (77°C). For baking, allow the range to the porcelain finish, do not place food or bakeware directly on once the door is not necessary to wait for baking, roasting or ...
...covered since it is closed. 3. The set plastics, paper or other items that no bakeware piece is reached, the oven will shut off in 30 seconds to circulate. "Lo" will cycle on the oven display throughout cooking. Positioning Racks and Bakeware IMPORTANT: To avoid permanent damage to preheat ... and broil elements will appear as the probe temperature until the set temperature is under 170°F (77°C). For baking, allow the range to the porcelain finish, do not place food or bakeware directly on once the door is not necessary to wait for baking, roasting or ...

Use and Care Manual
Page 23
...intervals to preheat before placing food in 1-degree increments. After preheat, the convection element will also appear in the oven. The convection bake range can result in burns. ■ Use a meat thermometer or the temperature probe (on the oven display, after preheating is not necessary ...) Convection Roast can be reduced also. When cooking an oven meal with several different types of a non-delayed cook time. Allow the range to maintain oven temperature, while the fan constantly circulates the hot air. They will show the oven temperature increasing in the oven. 1. ...
...intervals to preheat before placing food in 1-degree increments. After preheat, the convection element will also appear in the oven. The convection bake range can result in burns. ■ Use a meat thermometer or the temperature probe (on the oven display, after preheating is not necessary ...) Convection Roast can be reduced also. When cooking an oven meal with several different types of a non-delayed cook time. Allow the range to maintain oven temperature, while the fan constantly circulates the hot air. They will show the oven temperature increasing in the oven. 1. ...
Use and Care Manual
Page 24
...door. 1. INTERNAL FOOD TEMP. boneless, skinless chicken; To Convection Broil: Before convection broiling, see "Broil" section for Part Number W10123240. 1. The convection broil range can be changed to a different temperature. Press START. See "Assistance or Service" section to enter a temperature other than 500°F (260°C). per 1...Rib Roast (boneless) rare medium well-done Rump, Sirloin Tip Roast rare medium well-done Meat Loaf 20-25 25-30 30-35 22-25 27-30 32-35 20-25 25-30 30-35 20-25 140°F (60°C) 300°F (149°C) 160°F (71°C) 170°...
...door. 1. INTERNAL FOOD TEMP. boneless, skinless chicken; To Convection Broil: Before convection broiling, see "Broil" section for Part Number W10123240. 1. The convection broil range can be changed to a different temperature. Press START. See "Assistance or Service" section to enter a temperature other than 500°F (260°C). per 1...Rib Roast (boneless) rare medium well-done Rump, Sirloin Tip Roast rare medium well-done Meat Loaf 20-25 25-30 30-35 22-25 27-30 32-35 20-25 25-30 30-35 20-25 140°F (60°C) 300°F (149°C) 160°F (71°C) 170°...

Use and Care Manual
Page 26
... Double Crust LOW LOW Pizza MED HI Potatoes, Baked MED HI Quiche MED Roast, Boneless MED HI Roasted Chicken MED HI Soft Rolls LOW 26 RANGE CARE Self-Cleaning Cycle (on your model, see "Oven Vent" or "Oven Vents" section. Self-clean the oven before it may result in discoloring, loss...
... Double Crust LOW LOW Pizza MED HI Potatoes, Baked MED HI Quiche MED Roast, Boneless MED HI Roasted Chicken MED HI Soft Rolls LOW 26 RANGE CARE Self-Cleaning Cycle (on your model, see "Oven Vent" or "Oven Vents" section. Self-clean the oven before it may result in discoloring, loss...
Use and Care Manual
Page 27
... display. You may affect the finish. There are cool. Press the number pads to enter the time of grain to avoid damaging. ■ KitchenAid® Stainless Steel Cleaner and Polish (sample included): See "Assistance or Service" section to stainless steel, do not use steel wool, abrasive powder...for stubborn soils, and can be ordered as the entire range is cool. The clean time can be changed. The oven is preset for a 2 hour 30 minute clean cycle, however the time can be set between 2 hours 30 minutes and 4 hours 30 minutes. 2. On some Canadian models, the surface elements ...
... display. You may affect the finish. There are cool. Press the number pads to enter the time of grain to avoid damaging. ■ KitchenAid® Stainless Steel Cleaner and Polish (sample included): See "Assistance or Service" section to stainless steel, do not use steel wool, abrasive powder...for stubborn soils, and can be ordered as the entire range is cool. The clean time can be changed. The oven is preset for a 2 hour 30 minute clean cycle, however the time can be set between 2 hours 30 minutes and 4 hours 30 minutes. 2. On some Canadian models, the surface elements ...
Use and Care Manual
Page 28
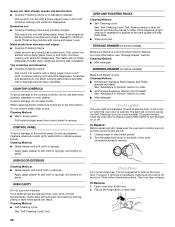
... and cool. OVEN AND ROASTING RACKS Cleaning Method: ■ Self-Cleaning cycle: See "Self-Cleaning Cycle" first. On some models). Unplug range or disconnect power. 2. Then, follow these instructions. Open oven door all the way. 2. Do not remove seals under knobs. Cleaning Method:... ■ Cooktop Polishing Creme and Cooktop Scraper: Rub creme into soil with a damp paper towel or soft cloth. Cleaning Method: ■ KitchenAid® Stainless Steel Cleaner and Polish (sample included): See "Assistance or Service" section to order. ■ All-Purpose Appliance Cleaner (not ...
... and cool. OVEN AND ROASTING RACKS Cleaning Method: ■ Self-Cleaning cycle: See "Self-Cleaning Cycle" first. On some models). Unplug range or disconnect power. 2. Then, follow these instructions. Open oven door all the way. 2. Do not remove seals under knobs. Cleaning Method:... ■ Cooktop Polishing Creme and Cooktop Scraper: Rub creme into soil with a damp paper towel or soft cloth. Cleaning Method: ■ KitchenAid® Stainless Steel Cleaner and Polish (sample included): See "Assistance or Service" section to order. ■ All-Purpose Appliance Cleaner (not ...


