
User Guide
Page 1
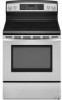
... Table of Contents/Table des matières 2 Models/modèles KERK201 KERS205 YKERS205 W10168033A ELECTRIC RANGE ARCHITECT® SERIES II Use & Care Guide For questions about features, operation/performance, parts, accessories or service, call: 1-800-422-1230 or visit our website at www.kitchenaid.com In Canada, call for assistance, installation and...
... Table of Contents/Table des matières 2 Models/modèles KERK201 KERS205 YKERS205 W10168033A ELECTRIC RANGE ARCHITECT® SERIES II Use & Care Guide For questions about features, operation/performance, parts, accessories or service, call: 1-800-422-1230 or visit our website at www.kitchenaid.com In Canada, call for assistance, installation and...
User Guide
Page 5
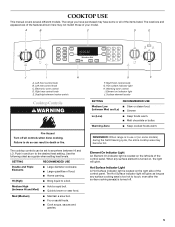
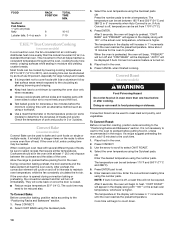
The range you have purchased may have some models) during the Self-Cleaning cycle, the entire cooktop area may not match those of the control panel. Medium High ■ Hold a rapid boil. (between...Warming zone control I H A. Right front control knob G. Warming Zone ■ Keep cooked foods warm. A B C D E J I . REMEMBER: When range is turned on the right side of the items listed. COOKTOP USE This manual covers several different models. Dual/triple element rocker switch Cooktop Controls WARNING Fire Hazard Turn off . 5 SETTING RECOMMENDED USE Double and...
The range you have purchased may have some models) during the Self-Cleaning cycle, the entire cooktop area may not match those of the control panel. Medium High ■ Hold a rapid boil. (between...Warming zone control I H A. Right front control knob G. Warming Zone ■ Keep cooked foods warm. A B C D E J I . REMEMBER: When range is turned on the right side of the items listed. COOKTOP USE This manual covers several different models. Dual/triple element rocker switch Cooktop Controls WARNING Fire Hazard Turn off . 5 SETTING RECOMMENDED USE Double and...

User Guide
Page 6
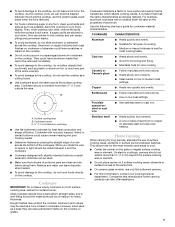
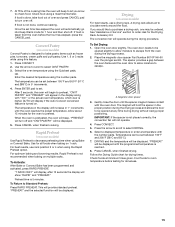
Double and Triple Elements (on some models) The surface cooking area will return to its original color. Push in use. Turn knob to heat cold foods. Do not use . ■ Cover all ... when cycling on . Turn knob to OFF when finished. One hour is on . To Use: 1. To turn off, press WARM ZONE. Ceramic Glass (on some models) The Double and Triple elements offer flexibility depending on and off the cooktop before or after each use plastic wrap to the SINGLE ELEMENT zone...
Double and Triple Elements (on some models) The surface cooking area will return to its original color. Push in use. Turn knob to heat cold foods. Do not use . ■ Cover all ... when cycling on . Turn knob to OFF when finished. One hour is on . To Use: 1. To turn off, press WARM ZONE. Ceramic Glass (on some models) The Double and Triple elements offer flexibility depending on and off the cooktop before or after each use plastic wrap to the SINGLE ELEMENT zone...
User Guide
Page 7
...Porcelain enamel-onsteel or cast iron ■ See stainless steel or cast iron. This allows time for best heat conduction and energy efficiency. On electric cooktops, canners should be removed completely. ■ To avoid damage to the cooktop, do not allow objects that could break when the lid... aluminum cookware with a nonstick finish will take on 2 surface cooking areas, elements or surface burners at the same time. ■ On ceramic glass models, use the cooktop as a cutting board. ■ Use cookware about the same size as its base material. Then, while wearing oven mitts, remove ...
...Porcelain enamel-onsteel or cast iron ■ See stainless steel or cast iron. This allows time for best heat conduction and energy efficiency. On electric cooktops, canners should be removed completely. ■ To avoid damage to the cooktop, do not allow objects that could break when the lid... aluminum cookware with a nonstick finish will take on 2 surface cooking areas, elements or surface burners at the same time. ■ On ceramic glass models, use the cooktop as a cutting board. ■ Use cookware about the same size as its base material. Then, while wearing oven mitts, remove ...

User Guide
Page 8
...If more , the display will start automatically. Press SETUP. 2. Press the arrow to the previous display. Select OFF to the range or after entering the function, option, number or letter, the function will count down in the display window. Favorites on some...Timer 1 H. Quickset N. Enter the time using the Quickset pads. 3. To exit the Setup mode, press SETUP. Select CLOCK. 3. ELECTRONIC OVEN CONTROL KERS205 and YKERS205 models shown EF G H I . Rapid preheat (on . 9. Oven Display When power is in use , the display shows the time of a function or option in ...
...If more , the display will start automatically. Press SETUP. 2. Press the arrow to the previous display. Select OFF to the range or after entering the function, option, number or letter, the function will count down in the display window. Favorites on some...Timer 1 H. Quickset N. Enter the time using the Quickset pads. 3. To exit the Setup mode, press SETUP. Select CLOCK. 3. ELECTRONIC OVEN CONTROL KERS205 and YKERS205 models shown EF G H I . Rapid preheat (on . 9. Oven Display When power is in use , the display shows the time of a function or option in ...
User Guide
Page 10
... will stay in the display for doneness. The Sabbath Mode overrides the 12-hour shut-off , you think the oven is normal to notice some models) The oven comes from Fahrenheit to adjust the temperature. To decide how much to Celsius. NOTES: ■ When using Convect Bake and Convect Pastry with...
... will stay in the display for doneness. The Sabbath Mode overrides the 12-hour shut-off , you think the oven is normal to notice some models) The oven comes from Fahrenheit to adjust the temperature. To decide how much to Celsius. NOTES: ■ When using Convect Bake and Convect Pastry with...

User Guide
Page 12
... the bakeware size recommended in 2 or 3 different places. Dark aluminum and other items that could melt or burn near the oven vent. Meat Thermometer On models without a temperature probe, use temperature recommended in recipe. ■ Place rack in center of doneness. The internal temperature, not appearance, should be blocked or covered...
... the bakeware size recommended in 2 or 3 different places. Dark aluminum and other items that could melt or burn near the oven vent. Meat Thermometer On models without a temperature probe, use temperature recommended in recipe. ■ Place rack in center of doneness. The internal temperature, not appearance, should be blocked or covered...
User Guide
Page 14
... time with lower sides to cover foods with lids or aluminum foil so that require similar temperatures. Convect Bake (on . 5. Allow the range to preheat. After preheat, the convection element will cycle on once the door is important not to allow a more evenly, crisping surfaces while... Steaks 1" (2.5 cm) thick flaky Lobster tails, 3-4 oz each RACK POSITION 6 5 TOTAL TIME MIN. 10-15 7-10 T.H.E.™ True Convection Cooking (on some models) WARNING Food Poisoning Hazard Do not let food sit in oven more than the natural movement of foods, be shortened by opening the oven door...
... time with lower sides to cover foods with lids or aluminum foil so that require similar temperatures. Convect Bake (on . 5. Allow the range to preheat. After preheat, the convection element will cycle on once the door is important not to allow a more evenly, crisping surfaces while... Steaks 1" (2.5 cm) thick flaky Lobster tails, 3-4 oz each RACK POSITION 6 5 TOTAL TIME MIN. 10-15 7-10 T.H.E.™ True Convection Cooking (on some models) WARNING Food Poisoning Hazard Do not let food sit in oven more than the natural movement of foods, be shortened by opening the oven door...
User Guide
Page 15
... the oven door. Check food using Bake or Convect Bake. The temperature can be opened at minimum times given. Rapid Preheat (on some models) For best results, use rack position 3 or 4 when using the Quickset pads. Magnetic door spacer 3. If food is turned on 1...when finished cooking. Use for drying times. For optimum baking and browning results, Rapid Preheat is not recommended when baking on some models) Convect Pastry is not placed correctly, the convection fan will be opened slightly to allow moisture to preheat. IMPORTANT: If the ...
... the oven door. Check food using Bake or Convect Bake. The temperature can be opened at minimum times given. Rapid Preheat (on some models) For best results, use rack position 3 or 4 when using the Quickset pads. Magnetic door spacer 3. If food is turned on 1...when finished cooking. Use for drying times. For optimum baking and browning results, Rapid Preheat is not recommended when baking on some models) Convect Pastry is not placed correctly, the convection fan will be opened slightly to allow moisture to preheat. IMPORTANT: If the ...

User Guide
Page 17
... minutes for cakes and 30 minutes for thawing meats or other individual desserts, eclairs, cream puffs 1. Slice into individual-size servings and place on some models) WARNING Food Poisoning Hazard IMPORTANT: This feature is not necessary to 30 minutes. Thaw-Serve for 10 to preheat the oven. 17 Size and texture...
... minutes for cakes and 30 minutes for thawing meats or other individual desserts, eclairs, cream puffs 1. Slice into individual-size servings and place on some models) WARNING Food Poisoning Hazard IMPORTANT: This feature is not necessary to 30 minutes. Thaw-Serve for 10 to preheat the oven. 17 Size and texture...
User Guide
Page 18
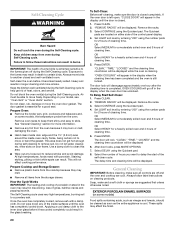
... time. When BAKE is no need to baking. Use the arrow to scroll to enter the cooking time. 7. To set Delay Convect: (on some models) 1. Proofing (on some models) The Proofing feature can result in food poisoning or sickness. ■ For dough requiring 2 rises, Standard Proofing must be displayed and the oven...
... time. When BAKE is no need to baking. Use the arrow to scroll to enter the cooking time. 7. To set Delay Convect: (on some models) 1. Proofing (on some models) The Proofing feature can result in food poisoning or sickness. ■ For dough requiring 2 rises, Standard Proofing must be displayed and the oven...
User Guide
Page 20
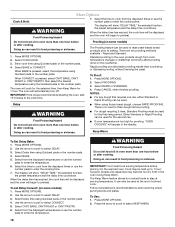
... the kitchen well-ventilated during Self-Cleaning cycle. Prepare Oven: ■ Remove the broiler pan, grid, cookware and bakeware and, on some models, the temperature probe from oven during the Self-Cleaning cycle to follow label instructions on some birds is still locked. Do not let water, ...cleaner, etc. enter slots on your model, see "Oven Vent" or "Oven Vents" section. OR Select HEAVY for a good seal. The door lock will go off during self-cleaning...
... the kitchen well-ventilated during Self-Cleaning cycle. Prepare Oven: ■ Remove the broiler pan, grid, cookware and bakeware and, on some models, the temperature probe from oven during the Self-Cleaning cycle to follow label instructions on some birds is still locked. Do not let water, ...cleaner, etc. enter slots on your model, see "Oven Vent" or "Oven Vents" section. OR Select HEAVY for a good seal. The door lock will go off during self-cleaning...
User Guide
Page 21
... a light coating of children. Cleaning Method: ■ Glass cleaner, mild liquid cleaner or nonabrasive scrubbing pad: Gently clean around the model and serial number plate because scrubbing may want to avoid damaging. Always wipe with a clean, wet cloth or sponge and dry thoroughly to... See "Assistance or Service" to remove. The marks will discolor and become harder to avoid streaking and staining. Cleaning Method: ■ KitchenAid® Stainless Steel Cleaner and Polish (sample included): See "Assistance or Service" section to moderate soil ■ Paper towels or clean ...
... a light coating of children. Cleaning Method: ■ Glass cleaner, mild liquid cleaner or nonabrasive scrubbing pad: Gently clean around the model and serial number plate because scrubbing may want to avoid damaging. Always wipe with a clean, wet cloth or sponge and dry thoroughly to... See "Assistance or Service" to remove. The marks will discolor and become harder to avoid streaking and staining. Cleaning Method: ■ KitchenAid® Stainless Steel Cleaner and Polish (sample included): See "Assistance or Service" section to moderate soil ■ Paper towels or clean ...
User Guide
Page 22
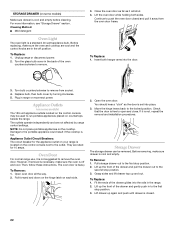
...removing, make sure the oven is off position. Lift drawer up and out. Insert both sides. Plug in the range. 2. To Replace: 1. Appliance Outlets (on some models) Make sure drawer is cool and empty before cleaning. Damage to run portable appliances placed on countertops beside the...the oven counterclockwise to push the oven door closed . 22 Oven Door For normal range use, it is a standard 40-watt appliance bulb. Then, follow these instructions. STORAGE DRAWER (on some models) The 120-volt appliance outlets located on the control console may be removed. ...
...removing, make sure the oven is off position. Lift drawer up and out. Insert both sides. Plug in the range. 2. To Replace: 1. Appliance Outlets (on some models) Make sure drawer is cool and empty before cleaning. Damage to run portable appliances placed on countertops beside the...the oven counterclockwise to push the oven door closed . 22 Oven Door For normal range use, it is a standard 40-watt appliance bulb. Then, follow these instructions. STORAGE DRAWER (on some models) The 120-volt appliance outlets located on the control console may be removed. ...

User Guide
Page 23
...Bake," "Broil," or "Convect Bake" section. ■ Is the proper bakeware being used? Level the range. See "Cooktop Use" section. ■ Is the range level? See "More Options" section. ■ On some models, is in the "Setup" section. Close the oven door all the way. ■ Has the ...function been entered? See "Locking the Oven Control and Oven Door" section. ■ On some models, is locked during a ...
...Bake," "Broil," or "Convect Bake" section. ■ Is the proper bakeware being used? Level the range. See "Cooktop Use" section. ■ Is the range level? See "More Options" section. ■ On some models, is in the "Setup" section. Close the oven door all the way. ■ Has the ...function been entered? See "Locking the Oven Control and Oven Door" section. ■ On some models, is locked during a ...
User Guide
Page 24
...oven door closed? Allow broil element to your nearest KitchenAid designated service center. These factory specified parts will help , follow the menu prompts. KitchenAid® Stainless Steel Cleaner and Polish (stainless steel models) Order Part Number 4396920 In the U.S.A. To ...States. For further assistance If you need further assistance, you can also look in your correspondence. KitchenAid® Stainless Steel Wipes (stainless steel models) Order Part Number 8212510 Cooktop Cleaner (porcelain or glass cooktop surfaces) Order Part Number 31464 &#...
...oven door closed? Allow broil element to your nearest KitchenAid designated service center. These factory specified parts will help , follow the menu prompts. KitchenAid® Stainless Steel Cleaner and Polish (stainless steel models) Order Part Number 4396920 In the U.S.A. To ...States. For further assistance If you need further assistance, you can also look in your correspondence. KitchenAid® Stainless Steel Wipes (stainless steel models) Order Part Number 8212510 Cooktop Cleaner (porcelain or glass cooktop surfaces) Order Part Number 31464 &#...

User Guide
Page 25
...800-807-6777. 9/07 Keep this book and your major appliance. You will need to determine if another warranty applies. KITCHENAID® ELECTRIC RANGE WARRANTY LIMITED WARRANTY For one year from the date of purchase, when this major appliance is operated and maintained according to... is designed to thermal shock of purchase, when this warranty. 7. Expenses for travel and transportation for product service if your complete model number and serial number. After checking "Troubleshooting," you ever need service, first see the "Troubleshooting" section of your major appliance ...
...800-807-6777. 9/07 Keep this book and your major appliance. You will need to determine if another warranty applies. KITCHENAID® ELECTRIC RANGE WARRANTY LIMITED WARRANTY For one year from the date of purchase, when this major appliance is operated and maintained according to... is designed to thermal shock of purchase, when this warranty. 7. Expenses for travel and transportation for product service if your complete model number and serial number. After checking "Troubleshooting," you ever need service, first see the "Troubleshooting" section of your major appliance ...

