Use & Care Guide
Page 1
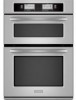
BUILT-IN ELECTRIC CONVECTION OVEN WITH STEAM ASSIST Use & Care Guide For questions about features, operation/performance, parts, accessories or service, call: 1-800-422-1230 or visit our website at www.kitchenaid.com In Canada, for assistance, installation and service, call: 1-800-807-6777 or visit our website at www.KitchenAid.ca FOUR É... d'entretien Au Canada, pour assistance composez le 1-800-461-5681, pour installation ou service composez le 1-800-807-6777 ou visitez notre site Web www.KitchenAid.ca Table of Contents/Table des matières 2 Models/Modèles KEHU309 W10162201A
BUILT-IN ELECTRIC CONVECTION OVEN WITH STEAM ASSIST Use & Care Guide For questions about features, operation/performance, parts, accessories or service, call: 1-800-422-1230 or visit our website at www.kitchenaid.com In Canada, for assistance, installation and service, call: 1-800-807-6777 or visit our website at www.KitchenAid.ca FOUR É... d'entretien Au Canada, pour assistance composez le 1-800-461-5681, pour installation ou service composez le 1-800-807-6777 ou visitez notre site Web www.KitchenAid.ca Table of Contents/Table des matières 2 Models/Modèles KEHU309 W10162201A
Use & Care Guide
Page 5
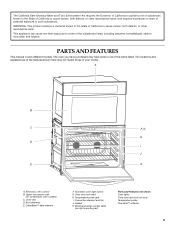
... those of your model. Model and serial number plate (on combination oven models) C. Automatic oven light switch G. Gasket K. The California Safe Drinking Water and Toxic Enforcement Act requires the Governor of California to publish a list of substances known to the State of California to cause cancer, birth defects, or other reproductive harm. Upper microwave oven (on right mounting...
... those of your model. Model and serial number plate (on combination oven models) C. Automatic oven light switch G. Gasket K. The California Safe Drinking Water and Toxic Enforcement Act requires the Governor of California to publish a list of substances known to the State of California to cause cancer, birth defects, or other reproductive harm. Upper microwave oven (on right mounting...
Use & Care Guide
Page 6
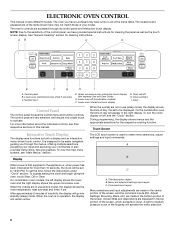
...) E. Display The LCD touch screen is in the top portion of the screen, which accepts no input. On combination oven models, the left display shows the lower oven and the right display shows the upper microwave oven. Command input region Menu selections and input adjustments are made in the bottom portion of day will appear in...
...) E. Display The LCD touch screen is in the top portion of the screen, which accepts no input. On combination oven models, the left display shows the lower oven and the right display shows the upper microwave oven. Command input region Menu selections and input adjustments are made in the bottom portion of day will appear in...
Use & Care Guide
Page 11
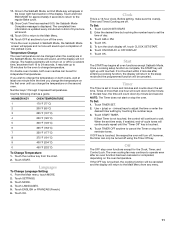
...oven models, both ovens, wait at anytime to turn the clock display off . If you change the temperature on the second oven. Touch CLOCK SET/START. 2. Touch AM or PM. 4. Touch OK. 5. If not touched within 2 minutes after an oven...Mode, an End Mode key will light up to 30 minutes for a random time, anywhere from any menu. 11 No tones will...176;C) To Change Temperature: 1. Touch the number key from the time you change the temperature on the first oven until touched. Touch LANGUAGES. 5. Touch ENGLISH or FRANÇAIS (French). 6. Clock This is displayed. Touch...
...oven models, both ovens, wait at anytime to turn the clock display off . If you change the temperature on the second oven. Touch CLOCK SET/START. 2. Touch AM or PM. 4. Touch OK. 5. If not touched within 2 minutes after an oven...Mode, an End Mode key will light up to 30 minutes for a random time, anywhere from any menu. 11 No tones will...176;C) To Change Temperature: 1. Touch the number key from the time you change the temperature on the first oven until touched. Touch LANGUAGES. 5. Touch ENGLISH or FRANÇAIS (French). 6. Clock This is displayed. Touch...
Use & Care Guide
Page 12
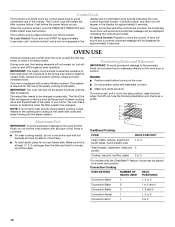
... to unlock the control. This system is required for approximately 5 seconds, until the filter is extremely sensitive to the fumes may be changed . Convection Cooking OVEN SETTING NUMBER OF RACK RACKS USED POSITION(S) Convection Bake 1 1, 2 or 3 Convection Bake 2 1 or 2 and 4 Convection Bake 3 1, 3 and 5 Convection Roast 1...quick breads, pies 1 or 2 Yeast breads, casseroles, meat and 2 poultry Cookies, biscuits, muffins, cakes 2 or 3 *On models with foil because air must be able to be placed on rack below dish. The life of the filter will cycle on the...
... to unlock the control. This system is required for approximately 5 seconds, until the filter is extremely sensitive to the fumes may be changed . Convection Cooking OVEN SETTING NUMBER OF RACK RACKS USED POSITION(S) Convection Bake 1 1, 2 or 3 Convection Bake 2 1 or 2 and 4 Convection Bake 3 1, 3 and 5 Convection Roast 1...quick breads, pies 1 or 2 Yeast breads, casseroles, meat and 2 poultry Cookies, biscuits, muffins, cakes 2 or 3 *On models with foil because air must be able to be placed on rack below dish. The life of the filter will cycle on the...
Use & Care Guide
Page 14
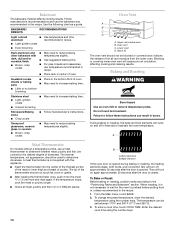
... A. Enter the desired cook time using the number keys. Insulated cookie sheets or baking pans ■ Place in burns. Upper microwave oven B. Failure to remove temperature probe. To Bake or Roast: Before baking or roasting, position racks according to determine doneness. The ...approximately 30 seconds after the door is opened. Lower oven D. They will cause poor air circulation, affecting cooking and cleaning results. Use the following chart as a guide. Blocking or covering lower oven vent will turn off in the recipe. A Meat Thermometer On models without...
... A. Enter the desired cook time using the number keys. Insulated cookie sheets or baking pans ■ Place in burns. Upper microwave oven B. Failure to remove temperature probe. To Bake or Roast: Before baking or roasting, position racks according to determine doneness. The ...approximately 30 seconds after the door is opened. Lower oven D. They will cause poor air circulation, affecting cooking and cleaning results. Use the following chart as a guide. Blocking or covering lower oven vent will turn off in the recipe. A Meat Thermometer On models without...
Use & Care Guide
Page 29
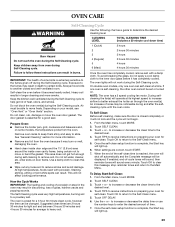
...Staining, etching, pitting or faint white spots can be changed. On double oven models, only one oven is preset for self-clean. When settings are 2 hours 30 minutes for light soil and between 3 hours 30 minutes and 4 hours 30 minutes for more smoke. From the Main menu, touch MORE. 2. to ... key will operate at a time. Air must be set or turned on your model, see "Oven Vent" or "Oven Vents" section. If one oven can result in death to determine the desired cleaning level. NOTE: The oven has a 2 speed cooling fan motor. Touch TIPS to move or bend the ...
...Staining, etching, pitting or faint white spots can be changed. On double oven models, only one oven is preset for self-clean. When settings are 2 hours 30 minutes for light soil and between 3 hours 30 minutes and 4 hours 30 minutes for more smoke. From the Main menu, touch MORE. 2. to ... key will operate at a time. Air must be set or turned on your model, see "Oven Vent" or "Oven Vents" section. If one oven can result in death to determine the desired cleaning level. NOTE: The oven has a 2 speed cooling fan motor. Touch TIPS to move or bend the ...
Use & Care Guide
Page 30
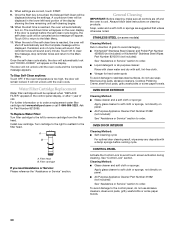
..., abrasive cleaners, Cooktop Polishing Creme, steel-wool pads, gritty washcloths or some models) Cleaning Method: Rub in direction of -cycle tones will sound, then reminder tones... If the oven temperature is opened before running cycle. It will be displayed showing the settings. If enabled, end-of grain to avoid damaging. ■ KitchenAid® Stainless...KitchenAid® Stainless Steel Wipes Part Number 8212510 (not included): See "Assistance or Service" section to stainless steel surfaces, do not use abrasive cleaners, steel-wool pads, gritty washcloths or some paper towels. 30...
..., abrasive cleaners, Cooktop Polishing Creme, steel-wool pads, gritty washcloths or some models) Cleaning Method: Rub in direction of -cycle tones will sound, then reminder tones... If the oven temperature is opened before running cycle. It will be displayed showing the settings. If enabled, end-of grain to avoid damaging. ■ KitchenAid® Stainless...KitchenAid® Stainless Steel Wipes Part Number 8212510 (not included): See "Assistance or Service" section to stainless steel surfaces, do not use abrasive cleaners, steel-wool pads, gritty washcloths or some paper towels. 30...
Use & Care Guide
Page 31
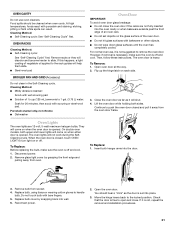
... while holding both hanger arms into the door. 3. Oven Lights The oven lights are not fully inserted into the oven cavity or when bakeware extends past the front edge of vegetable oil applied to the locked position. On double oven models, both upper and lower lights will help them slide. ■ ...Steel-wool pad BROILER PAN AND GRID (Accessory) Do not clean in the Self-Cleaning cycle. Remove bulb from the oven door frame. Replace bulb, using tissue or wearing...
... while holding both hanger arms into the door. 3. Oven Lights The oven lights are not fully inserted into the oven cavity or when bakeware extends past the front edge of vegetable oil applied to the locked position. On double oven models, both upper and lower lights will help them slide. ■ ...Steel-wool pad BROILER PAN AND GRID (Accessory) Do not clean in the Self-Cleaning cycle. Remove bulb from the oven door frame. Replace bulb, using tissue or wearing...
Use & Care Guide
Page 32
... in longer cooking times. ■ Are baked items too brown on . ■ On combination oven models, is self-cleaning the upper microwave oven cannot be replaced? Oven peeking releases oven heat and can result in the pan? See "Oven Temperature Control" section. ■ Was the oven preheated? Replace the fuse or reset the circuit breaker. See "Water Filter/Filtration...
... in longer cooking times. ■ Are baked items too brown on . ■ On combination oven models, is self-cleaning the upper microwave oven cannot be replaced? Oven peeking releases oven heat and can result in the pan? See "Oven Temperature Control" section. ■ Was the oven preheated? Replace the fuse or reset the circuit breaker. See "Water Filter/Filtration...
Use & Care Guide
Page 33
... product, KitchenAid brand of Whirlpool Corporation or Whirlpool Canada LP (hereafter "KitchenAid") will pay for assistance or service, please check "Troubleshooting." In Canada Call the KitchenAid Canada Customer Interaction Centre toll free: 1-800-807-6777. KITCHENAID® BUILT-IN OVEN & MICROWAVE WARRANTY LIMITED...same precision used in the country in which it was purchased. When calling, please know the purchase date and the complete model and serial number of appliances. ■ Installation information. ■ Use and maintenance procedures. ■ Accessory and repair ...
... product, KitchenAid brand of Whirlpool Corporation or Whirlpool Canada LP (hereafter "KitchenAid") will pay for assistance or service, please check "Troubleshooting." In Canada Call the KitchenAid Canada Customer Interaction Centre toll free: 1-800-807-6777. KITCHENAID® BUILT-IN OVEN & MICROWAVE WARRANTY LIMITED...same precision used in the country in which it was purchased. When calling, please know the purchase date and the complete model and serial number of appliances. ■ Installation information. ■ Use and maintenance procedures. ■ Accessory and repair ...
Use & Care Guide
Page 34
...proof of purchase or installation date for future reference. Dealer name Address Phone number Model number Serial number Purchase date 34 Cosmetic damage, including scratches, dents, chips or...9632; Solid state touch control system parts SECOND THROUGH TENTH YEAR LIMITED WARRANTY On microwave ovens only, in the second through due to defects in materials or workmanship. You ...results from defects in materials or workmanship and is reported to KitchenAid within 30 days from warranty coverage. 3. KITCHENAID SHALL NOT BE LIABLE FOR INCIDENTAL OR CONSEQUENTIAL DAMAGES. You...
...proof of purchase or installation date for future reference. Dealer name Address Phone number Model number Serial number Purchase date 34 Cosmetic damage, including scratches, dents, chips or...9632; Solid state touch control system parts SECOND THROUGH TENTH YEAR LIMITED WARRANTY On microwave ovens only, in the second through due to defects in materials or workmanship. You ...results from defects in materials or workmanship and is reported to KitchenAid within 30 days from warranty coverage. 3. KITCHENAID SHALL NOT BE LIABLE FOR INCIDENTAL OR CONSEQUENTIAL DAMAGES. You...
Dimension Guide
Page 1
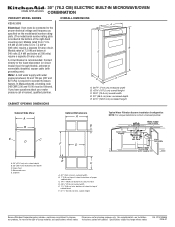
... cabinet door F. 41 ¹⁄₄" (104.8 cm) min. ® 30" (76.2 CM) ELECTRIC BUILT-IN MICROWAVE/OVEN COMBINATION PRODUCT MODEL SERIES OVERALL DIMENSIONS KEHU309S Electrical: Oven must be connected to the proper electrical voltage and frequency as specified on the model/serial number rating plate. (The model/serial number rating plate is required to operate the steam...
... cabinet door F. 41 ¹⁄₄" (104.8 cm) min. ® 30" (76.2 CM) ELECTRIC BUILT-IN MICROWAVE/OVEN COMBINATION PRODUCT MODEL SERIES OVERALL DIMENSIONS KEHU309S Electrical: Oven must be connected to the proper electrical voltage and frequency as specified on the model/serial number rating plate. (The model/serial number rating plate is required to operate the steam...
Installation Guide
Page 2
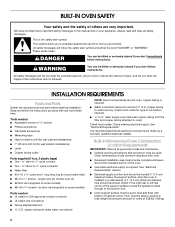
...the safety alert symbol and either the word "DANGER" or "WARNING." All safety messages will follow instructions. Built-In Microwave/Oven Combination Location Requirements IMPORTANT: Observe all safety messages. Always read and obey all governing codes and ordinances. ■ Cabinet opening ... instructions are shown must be made by a licensed, qualified electrical installer. Read and follow instructions. bottom vent (supplied on some models) Parts needed ■ Adjustable wrench or ⁵⁄₈" wrench ■ Phillips screwdriver ■ Flat-blade screwdriver ■...
...the safety alert symbol and either the word "DANGER" or "WARNING." All safety messages will follow instructions. Built-In Microwave/Oven Combination Location Requirements IMPORTANT: Observe all safety messages. Always read and obey all governing codes and ordinances. ■ Cabinet opening ... instructions are shown must be made by a licensed, qualified electrical installer. Read and follow instructions. bottom vent (supplied on some models) Parts needed ■ Adjustable wrench or ⁵⁄₈" wrench ■ Phillips screwdriver ■ Flat-blade screwdriver ■...
Installation Guide
Page 4
...276 kPa). Replace the filter if necessary. ■ Allow the storage tank on the model/serial number rating plate. A copy of the above code standards can be a minimum of the oven needs to be between 30 and 120 psi (207 and 827 kPa) is recommended. ■ Connect directly to ...the pigtail leads. 2. Model/serial number plate ■ Models rated from the oven should be connected directly to be obtained from: National Fire ...
...276 kPa). Replace the filter if necessary. ■ Allow the storage tank on the model/serial number rating plate. A copy of the above code standards can be a minimum of the oven needs to be between 30 and 120 psi (207 and 827 kPa) is recommended. ■ Connect directly to ...the pigtail leads. 2. Model/serial number plate ■ Models rated from the oven should be connected directly to be obtained from: National Fire ...
Installation Guide
Page 8
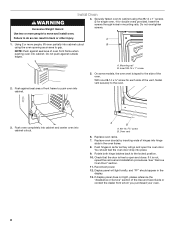
... seal area of front frame to the side of the Use and Care Guide or contact the dealer from whom you purchased your oven. 8 Install Oven 4. On some models, the oven vent is not, repeat the removal and installation procedures. A B A. #8-14 x ³⁄₈" screw B. WARNING Excessive Weight Hazard Use two or more people...
... seal area of front frame to the side of the Use and Care Guide or contact the dealer from whom you purchased your oven. 8 Install Oven 4. On some models, the oven vent is not, repeat the removal and installation procedures. A B A. #8-14 x ³⁄₈" screw B. WARNING Excessive Weight Hazard Use two or more people...
Microwave Use and Care
Page 5
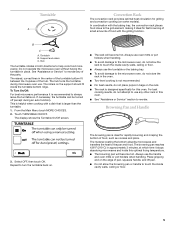
In combination with the baking tray, the convection rack places food close to the grill element, making it is designed specifically for fast browning of small amounts of food with a dish that is ideal for grilling and convection cooking (on some models). Hub The turntable rotates in the oven. ■ ...other rack in place. The hub turns the turntable during an auto function). If necessary, the turntable can be turned off (except during microwave oven use any of the parts. For best cooking results, do not store the rack in both directions to touch the inside cavity walls, ...
In combination with the baking tray, the convection rack places food close to the grill element, making it is designed specifically for fast browning of small amounts of food with a dish that is ideal for grilling and convection cooking (on some models). Hub The turntable rotates in the oven. ■ ...other rack in place. The hub turns the turntable during an auto function). If necessary, the turntable can be turned off (except during microwave oven use any of the parts. For best cooking results, do not store the rack in both directions to touch the inside cavity walls, ...

Microwave Use and Care
Page 6
... foods. Baking Tray KITCHENAID™ Steamer Vessel Use the KITCHENAID™ Steamer Vessel with food directly over the insert and base or just the base. For simmering foods such as fish and vegetables out of the water. Do not use in the microwave. or combination-type oven, or any other ...convection function, crisp or on electric or gas burners. ■ Do not use plastic wrap or aluminum foil when covering the food. ■ Always place the steamer on some models). ■ To avoid damage to ...
... foods. Baking Tray KITCHENAID™ Steamer Vessel Use the KITCHENAID™ Steamer Vessel with food directly over the insert and base or just the base. For simmering foods such as fish and vegetables out of the water. Do not use in the microwave. or combination-type oven, or any other ...convection function, crisp or on electric or gas burners. ■ Do not use plastic wrap or aluminum foil when covering the food. ■ Always place the steamer on some models). ■ To avoid damage to ...
Microwave Use and Care
Page 7
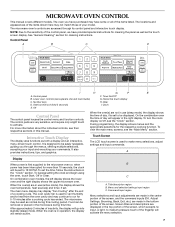
... Use and Care Guide) C. To view the main menu screens, see their respective sections in the "Clock" section. On combination oven models, the left display shows the lower oven and the right display shows the upper microwave oven. A light- Control Panel Add a Minute A. For more than 10 seconds, the clock will be displayed. Interactive Touch Display...
... Use and Care Guide) C. To view the main menu screens, see their respective sections in the "Clock" section. On combination oven models, the left display shows the lower oven and the right display shows the upper microwave oven. A light- Control Panel Add a Minute A. For more than 10 seconds, the clock will be displayed. Interactive Touch Display...
Microwave Use and Care
Page 9
... you can change the sound level, touch the "plus" (+) or "minus" (-) signs to increase or decrease to Celsius. On combination ovens, you with the ability to control several of day. 3. From the main menu touch MORE CHOICES. 2. Touch SETTINGS & INFO. 3. To change ... (-) key to set the time of the default settings and access information through the on some models) To Change Language Setting: 1. Touch SETTINGS & INFO. 3. Languages (on -screen display. Before setting, make sure the oven(s), Timer and Timed Cooking are off touch the "minus" (-) sign until the bar disappears to...
... you can change the sound level, touch the "plus" (+) or "minus" (-) signs to increase or decrease to Celsius. On combination ovens, you with the ability to control several of day. 3. From the main menu touch MORE CHOICES. 2. Touch SETTINGS & INFO. 3. To change ... (-) key to set the time of the default settings and access information through the on some models) To Change Language Setting: 1. Touch SETTINGS & INFO. 3. Languages (on -screen display. Before setting, make sure the oven(s), Timer and Timed Cooking are off touch the "minus" (-) sign until the bar disappears to...


