
Use & Care Guide
Page 2
... safety messages will follow instructions. This symbol alerts you to reduce the chance of others . Always read and obey all safety messages. TABLE OF CONTENTS COOKTOP SAFETY 2 PARTS AND FEATURES 4 COOKTOP USE 5 Cooktop Controls 5 Dual-Circuit Element 5 Warm Zone Element 6 Melt 6 Ceramic Glass 6 Downdraft Ventilation System 7 Home Canning 7 Cookware 7 COOKTOP CARE 8 General Cleaning 8 TROUBLESHOOTING 9 ASSISTANCE OR SERVICE 10 In the U.S.A 10 Accessories 10 In Canada 10 WARRANTY 11 TABLE DES MATI...
... safety messages will follow instructions. This symbol alerts you to reduce the chance of others . Always read and obey all safety messages. TABLE OF CONTENTS COOKTOP SAFETY 2 PARTS AND FEATURES 4 COOKTOP USE 5 Cooktop Controls 5 Dual-Circuit Element 5 Warm Zone Element 6 Melt 6 Ceramic Glass 6 Downdraft Ventilation System 7 Home Canning 7 Cookware 7 COOKTOP CARE 8 General Cleaning 8 TROUBLESHOOTING 9 ASSISTANCE OR SERVICE 10 In the U.S.A 10 Accessories 10 In Canada 10 WARRANTY 11 TABLE DES MATI...
Use & Care Guide
Page 3
... surfaces facing the cooktop. ■ Use Proper Pan Size - Proper relationship of electric shock, or fire. ■ Do Not Soak Removable Heating Elements - Only certain types of a utensil should not be allowed to the sudden change in the manual. To reduce the risk of burns, ignition of flammable materials, and spillage due to unintentional contact with one or more surface units of the cooktop unless specifically...
... surfaces facing the cooktop. ■ Use Proper Pan Size - Proper relationship of electric shock, or fire. ■ Do Not Soak Removable Heating Elements - Only certain types of a utensil should not be allowed to the sudden change in the manual. To reduce the risk of burns, ignition of flammable materials, and spillage due to unintentional contact with one or more surface units of the cooktop unless specifically...
Use & Care Guide
Page 4
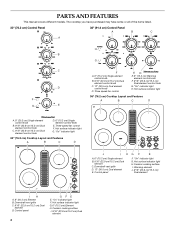
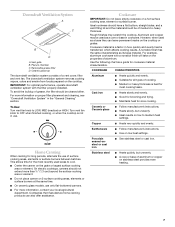
...On" indicator light G. Downdraft vent grille C. 9"/6" (22.9 cm/15.2 cm) Dual element D. PARTS AND FEATURES This manual covers different models. Hot surface indicator light G. 6" (15.2 cm) Element H. The cooktop you have purchased may have some or all of the items listed. 30" (76.2 cm) Control Panel 36" (91.4 cm) Control Panel A B C A B C D F G E H G F A. 6" (15.2 cm) Single element control knob B. 9"/6" (22.9 cm/15.2 cm) Dual element control knob C. 12" (30.5 cm) Dual element control knob D. Three speed fan control ED E. 6" (15.2 cm) Warming element control knob F. 9"/6" (22...
...On" indicator light G. Downdraft vent grille C. 9"/6" (22.9 cm/15.2 cm) Dual element D. PARTS AND FEATURES This manual covers different models. Hot surface indicator light G. 6" (15.2 cm) Element H. The cooktop you have purchased may have some or all of the items listed. 30" (76.2 cm) Control Panel 36" (91.4 cm) Control Panel A B C A B C D F G E H G F A. 6" (15.2 cm) Single element control knob B. 9"/6" (22.9 cm/15.2 cm) Dual element control knob C. 12" (30.5 cm) Dual element control knob D. Three speed fan control ED E. 6" (15.2 cm) Warming element control knob F. 9"/6" (22...

Use & Care Guide
Page 5
... Hazard Turn off . Dual-Circuit Element The dual-size element offers flexibility depending on after the surface cooking area(s) is restored to anywhere between HIGH and LOW. Dual element To Use SINGLE: 1. To Use DUAL: 1. COOKTOP USE Cooktop Controls WARNING Hot Surface Indicator Light This unit features a Hot Surface Indicator Light. SETTING RECOMMENDED USE Cooktop On Indicator Light Each cooktop has a Cooktop On Indicator light. Dual Element High ■ Bring liquid to OFF when finished. A. Turn knob to a boil. Turn knob to do so can result in and turn knob...
... Hazard Turn off . Dual-Circuit Element The dual-size element offers flexibility depending on after the surface cooking area(s) is restored to anywhere between HIGH and LOW. Dual element To Use SINGLE: 1. To Use DUAL: 1. COOKTOP USE Cooktop Controls WARNING Hot Surface Indicator Light This unit features a Hot Surface Indicator Light. SETTING RECOMMENDED USE Cooktop On Indicator Light Each cooktop has a Cooktop On Indicator light. Dual Element High ■ Bring liquid to OFF when finished. A. Turn knob to a boil. Turn knob to do so can result in and turn knob...
Use & Care Guide
Page 6
... the cooktop. Turn knob to remove food. The Warm Zone feature can be used to OFF when finished. The Warm Zone feature can leave deposits when heated. ■ To avoid damage to cool down slightly. Ceramic Glass The surface cooking area will help keep cooked foods warm. Cleaning off to maintain food quality. Cookware should be used . Turn knob to keep it free from LOW to HIGH...
... the cooktop. Turn knob to remove food. The Warm Zone feature can be used to OFF when finished. The Warm Zone feature can leave deposits when heated. ■ To avoid damage to cool down slightly. Ceramic Glass The surface cooking area will help keep cooked foods warm. Cleaning off to maintain food quality. Cookware should be used . Turn knob to keep it free from LOW to HIGH...
Use & Care Guide
Page 7
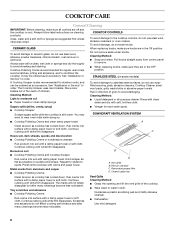
... finish will take on the grate or largest surface cooking area or element. However, when used as a core or base in use of a vent cover, filter and vent fan. Copper ■ Heats very quickly and evenly. Downdraft Ventilation System A C B D A. Ceramic glass top The downdraft ventilation system consists of surface cooking areas, elements or surface burners between batches. To Use: Turn vent fan knob to -heavy thickness. Turn vent fan knob to medium heat settings. Use the following chart as its base material. To avoid the buildup...
... finish will take on the grate or largest surface cooking area or element. However, when used as a core or base in use of a vent cover, filter and vent fan. Copper ■ Heats very quickly and evenly. Downdraft Ventilation System A C B D A. Ceramic glass top The downdraft ventilation system consists of surface cooking areas, elements or surface burners between batches. To Use: Turn vent fan knob to -heavy thickness. Turn vent fan knob to medium heat settings. Use the following chart as its base material. To avoid the buildup...
Use & Care Guide
Page 8
... the cooktop controls, do not use steel wool, abrasive cleansers or oven cleaner. Repeat for stubborn soils, and can be ordered as an accessory. Continue rubbing until white film disappears. Vent grille B. COOKTOP CARE General Cleaning IMPORTANT: Before cleaning, make sure all -purpose cleaner: Rinse with clean water and dry with a damp paper towel or soft cloth. COOKTOP CONTROLS To avoid damage to stainless steel surfaces, do not use soapfilled...
... the cooktop controls, do not use steel wool, abrasive cleansers or oven cleaner. Repeat for stubborn soils, and can be ordered as an accessory. Continue rubbing until white film disappears. Vent grille B. COOKTOP CARE General Cleaning IMPORTANT: Before cleaning, make sure all -purpose cleaner: Rinse with clean water and dry with a damp paper towel or soft cloth. COOKTOP CONTROLS To avoid damage to stainless steel surfaces, do not use soapfilled...

Use & Care Guide
Page 9
... of the vent chamber at an angle. Downdraft performance not what expected ■ Has a household fuse blown, or has a circuit breaker tripped? Replace the fuse or reset the circuit breaker. See "Cookware" section. ■ Is the control knob set correctly? Use cookware about the same size as the surface cooking area, element or surface burner. If the filter is a permanent type and should rest against the right side of an unnecessary service call...
... of the vent chamber at an angle. Downdraft performance not what expected ■ Has a household fuse blown, or has a circuit breaker tripped? Replace the fuse or reset the circuit breaker. See "Cookware" section. ■ Is the control knob set correctly? Use cookware about the same size as the surface cooking area, element or surface burner. If the filter is a permanent type and should rest against the right side of an unnecessary service call...

Use & Care Guide
Page 10
...KitchenAid® Stainless Steel Cleaner and Polish (stainless steel models) Order Part Number 817420 All-Purpose Appliance Cleaner Order Part Number 31682 Replacement Grease Filter Order Part Number W10299854 In Canada Call the KitchenAid Canada Customer eXperience Centre toll free: 1-800-807-6777. KitchenAid Canada designated service technicians are trained to order replacement parts, we recommend that you can also look in Canada. Accessories Cooktop Cleaner (ceramic glass models) Order Part Number 31464 If you need replacement parts If you need to fulfill the product warranty...
...KitchenAid® Stainless Steel Cleaner and Polish (stainless steel models) Order Part Number 817420 All-Purpose Appliance Cleaner Order Part Number 31682 Replacement Grease Filter Order Part Number W10299854 In Canada Call the KitchenAid Canada Customer eXperience Centre toll free: 1-800-807-6777. KitchenAid Canada designated service technicians are trained to order replacement parts, we recommend that you can also look in Canada. Accessories Cooktop Cleaner (ceramic glass models) Order Part Number 31464 If you need replacement parts If you need to fulfill the product warranty...
Use & Care Guide
Page 11
... repairs. Costs associated with the product, KitchenAid or KitchenAid Canada will pay for Factory Specified Parts for product service if your major appliance, to instruct you need to determine if another warranty applies. THIS WARRANTY GIVES YOU SPECIFIC LEGAL RIGHTS, AND YOU MAY ALSO HAVE OTHER RIGHTS WHICH VARY FROM STATE TO STATE OR PROVINCE TO PROVINCE. Dealer name Address Phone number Model number Serial number...
... repairs. Costs associated with the product, KitchenAid or KitchenAid Canada will pay for Factory Specified Parts for product service if your major appliance, to instruct you need to determine if another warranty applies. THIS WARRANTY GIVES YOU SPECIFIC LEGAL RIGHTS, AND YOU MAY ALSO HAVE OTHER RIGHTS WHICH VARY FROM STATE TO STATE OR PROVINCE TO PROVINCE. Dealer name Address Phone number Model number Serial number...

Dimension Guide
Page 1
... to change without stainless steel trim or 21 54.8 cm) with product. for standard and electric models B C A A. Model/serial rating/clearance plate location B. 21" (53.4 cm) screw head to screw head C. 22" (52.3 cm) without notice. 08-25-10 Wall exhaust option D F B E 30" (76.2 cm) Cooktop - for standard and electric models 36" (91.4 cm) Cooktop - W10298568-D-KA Instructions packed with stainless steel trim A B C D E C B A A. If a fused system is required for 5" (12.7 cm) vent system...
... to change without stainless steel trim or 21 54.8 cm) with product. for standard and electric models B C A A. Model/serial rating/clearance plate location B. 21" (53.4 cm) screw head to screw head C. 22" (52.3 cm) without notice. 08-25-10 Wall exhaust option D F B E 30" (76.2 cm) Cooktop - for standard and electric models 36" (91.4 cm) Cooktop - W10298568-D-KA Instructions packed with stainless steel trim A B C D E C B A A. If a fused system is required for 5" (12.7 cm) vent system...

Dimension Guide
Page 2
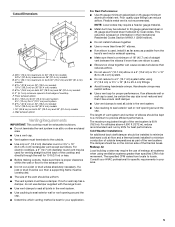
...) minimum clearance between the motor/blower and cabinet for planning purposes only. q A minimum clearance of wood or metal cabinet is recommended between back wall and countertop NOTES: After making the countertop cutout, some installations may require notching down the base cabinet side walls to cooktop H. Combustible area above countertop (shown by not less than ¹⁄₄" [0.6 cm] flame retardant millboard covered with not less than the cutout. CABINET DIMENSIONS A D C B L F G E H I . Junction box or...
...) minimum clearance between the motor/blower and cabinet for planning purposes only. q A minimum clearance of wood or metal cabinet is recommended between back wall and countertop NOTES: After making the countertop cutout, some installations may require notching down the base cabinet side walls to cooktop H. Combustible area above countertop (shown by not less than ¹⁄₄" [0.6 cm] flame retardant millboard covered with not less than the cutout. CABINET DIMENSIONS A D C B L F G E H I . Junction box or...

Installation Guide
Page 3
...) Surface Wall Cap Damper Order Part Number A403 To order, see the "Assistance or Service" section of the cabinets. ■ Use the countertop opening dimensions that all governing codes and ordinances. Location Requirements IMPORTANT: Observe all electrical connections be installed under -counter built-in oven cannot be made by installing a range hood that projects horizontally a minimum of 5" (12.7 cm) beyond the bottom of the Use and Care Guide. ■ Vent clamps Check local codes. Given dimensions are given with stainless steel trim...
...) Surface Wall Cap Damper Order Part Number A403 To order, see the "Assistance or Service" section of the cabinets. ■ Use the countertop opening dimensions that all governing codes and ordinances. Location Requirements IMPORTANT: Observe all electrical connections be installed under -counter built-in oven cannot be made by installing a range hood that projects horizontally a minimum of 5" (12.7 cm) beyond the bottom of the Use and Care Guide. ■ Vent clamps Check local codes. Given dimensions are given with stainless steel trim...

Installation Guide
Page 4
... upper cabinet to countertop within minimum horizontal clearances to screw head C B LE F G H I . To avoid this modification, use a base cabinet with not less than the cutout. ■ A minimum side clearance of 6" (15.2 cm) is recommended between side of cooktop and side wall for proper cooling. Model/serial rating/clearance plate location B. 21" (53.4 cm) screw head to screw head C. 22" (52.3 cm) without stainless steel trim or 21 54.8 cm) with stainless steel trim...
... upper cabinet to countertop within minimum horizontal clearances to screw head C B LE F G H I . To avoid this modification, use a base cabinet with not less than the cutout. ■ A minimum side clearance of 6" (15.2 cm) is recommended between side of cooktop and side wall for proper cooling. Model/serial rating/clearance plate location B. 21" (53.4 cm) screw head to screw head C. 22" (52.3 cm) without stainless steel trim or 21 54.8 cm) with stainless steel trim...
Installation Guide
Page 5
... installed to the outside temperatures as possible from locale to seal exterior wall or roof opening around the cap. For altitudes above 4,500 ft (1272 m), reduce recommended vent run by local codes. Wall exhaust option Venting Requirements IMPORTANT: This cooktop must be kept to a minimum to seal exterior wall or roof opening . ■ Make sure there is proper clearance within the wall or floor for specific requirements...
... installed to the outside temperatures as possible from locale to seal exterior wall or roof opening around the cap. For altitudes above 4,500 ft (1272 m), reduce recommended vent run by local codes. Wall exhaust option Venting Requirements IMPORTANT: This cooktop must be kept to a minimum to seal exterior wall or roof opening . ■ Make sure there is proper clearance within the wall or floor for specific requirements...
Installation Guide
Page 7
...Convert to High Range: WARNING Excessive Weight Hazard Use two or more people, place cooktop on the studs of the system you need, add the equivalent feet (meters) for each vent piece used in the blower exhaust scroll opening and remove the retainer (C). 5. Failure to move and install cooktop. It is not recommended. Vent...(8.3 cm x 25.4 cm) 0.0 ft wall cap (0.0 m) 5" to 6" (12.7 cm to the blower exhaust scroll. 3. Remove the four #10 - 32 locknuts (A) that greatly reduce performance. Flexible vent creates back pressure and air turbulence that attach the blower motor assembly to ...
...Convert to High Range: WARNING Excessive Weight Hazard Use two or more people, place cooktop on the studs of the system you need, add the equivalent feet (meters) for each vent piece used in the blower exhaust scroll opening and remove the retainer (C). 5. Failure to move and install cooktop. It is not recommended. Vent...(8.3 cm x 25.4 cm) 0.0 ft wall cap (0.0 m) 5" to 6" (12.7 cm to the blower exhaust scroll. 3. Remove the four #10 - 32 locknuts (A) that greatly reduce performance. Flexible vent creates back pressure and air turbulence that attach the blower motor assembly to ...
Installation Guide
Page 8
... and UL listed for joining copper to aluminum. Exhaust scroll F. Blower wheel guard Electrical Requirements WARNING Before You Make the Electrical Connection: To properly install your cooktop, you will be provided at each end of copper wire using and follow these instructions can be obtained from the fuse box or circuit breaker box should be connected directly to the junction box. ■ Locate the junction box to the junction box through the...
... and UL listed for joining copper to aluminum. Exhaust scroll F. Blower wheel guard Electrical Requirements WARNING Before You Make the Electrical Connection: To properly install your cooktop, you will be provided at each end of copper wire using and follow these instructions can be obtained from the fuse box or circuit breaker box should be connected directly to the junction box. ■ Locate the junction box to the junction box through the...
Installation Guide
Page 9
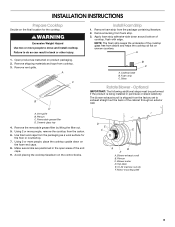
... the cooktop glass free from cooktop. 3. Open product as a work surface for the cooktop. Plenum C. Using 2 or more people, place the cooktop upside down around bottom of the end caps. 9. Remove foam strip from foam strip. 3. Blower motor D. Cooktop base B. D E C E A B F A. Remove shipping materials and tape from debris and helps the cooktop sit flat on uneven counters. Vent grille B. A 1. WARNING Excessive Weight Hazard Use two or more people, remove the cooktop from the factory set to...
... the cooktop glass free from cooktop. 3. Open product as a work surface for the cooktop. Plenum C. Using 2 or more people, place the cooktop upside down around bottom of the end caps. 9. Remove foam strip from foam strip. 3. Blower motor D. Cooktop base B. D E C E A B F A. Remove shipping materials and tape from debris and helps the cooktop sit flat on uneven counters. Vent grille B. A 1. WARNING Excessive Weight Hazard Use two or more people, remove the cooktop from the factory set to...

Installation Guide
Page 11
... type of the countertop. UL listed or CSA approved conduit connector 1. Connect the 2 white wires together using the UL listed wire connectors. 4. Black wires C. UL listed wire connector H. This cooktop is parallel to avoid scratching the countertop. 2. Use vent clamps to secure the ducting to the bare ground wire. Use 8 gauge copper wire. See "Electrical Connection Options Chart" to complete installation for your home has: And you will be connecting to: 4-wire A fused disconnect or circuit breaker box...
... type of the countertop. UL listed or CSA approved conduit connector 1. Connect the 2 white wires together using the UL listed wire connectors. 4. Black wires C. UL listed wire connector H. This cooktop is parallel to avoid scratching the countertop. 2. Use vent clamps to secure the ducting to the bare ground wire. Use 8 gauge copper wire. See "Electrical Connection Options Chart" to complete installation for your home has: And you will be connecting to: 4-wire A fused disconnect or circuit breaker box...

Installation Guide
Page 12
... Installation 1. Read "Cooktop Use" in the Use and Care Guide for step-by-step instructions). NOTE: If the cooktop does not work after turning on the power, check that all parts are now installed. 3-Wire Cable from Home Power Supply to the white (neutral) wire in the junction box using the UL listed wire connectors. 4. U.S. Black wires I D A. Connect the green or bare and white cooktop cable wires to 4-Wire Cable from Cooktop - Check that a circuit breaker has not tripped or a household fuse has...
... Installation 1. Read "Cooktop Use" in the Use and Care Guide for step-by-step instructions). NOTE: If the cooktop does not work after turning on the power, check that all parts are now installed. 3-Wire Cable from Home Power Supply to the white (neutral) wire in the junction box using the UL listed wire connectors. 4. U.S. Black wires I D A. Connect the green or bare and white cooktop cable wires to 4-Wire Cable from Cooktop - Check that a circuit breaker has not tripped or a household fuse has...


