Use & Care Guide
Page 2
... messages will tell you what can happen if the instructions are very important. KNOB CONTROLS 9 Cooktop Controls 9 Even-Heat™ ULTRA Element 9 Even-Heat™ Element 9 Dual Circuit Element 10 Keep Warm 10 COOKTOP USE 11 Ceramic Glass 11 Home Canning 11 Cookware 11 COOKTOP CARE 12 General Cleaning 12 TROUBLESHOOTING 13 ASSISTANCE OR SERVICE 14 In the U.S.A 14 Accessories 14 In Canada 14 WARRANTY 15 TABLE DES MATIÈRES SÉCURIT...
... messages will tell you what can happen if the instructions are very important. KNOB CONTROLS 9 Cooktop Controls 9 Even-Heat™ ULTRA Element 9 Even-Heat™ Element 9 Dual Circuit Element 10 Keep Warm 10 COOKTOP USE 11 Ceramic Glass 11 Home Canning 11 Cookware 11 COOKTOP CARE 12 General Cleaning 12 TROUBLESHOOTING 13 ASSISTANCE OR SERVICE 14 In the U.S.A 14 Accessories 14 In Canada 14 WARRANTY 15 TABLE DES MATIÈRES SÉCURIT...

Use & Care Guide
Page 3
... - Heating elements should be allowed to accumulate on hood or filter. ■ When flaming foods under the hood, turn the fan on Grease Fires - Children climbing on hot surfaces may penetrate the broken cooktop and create a risk of electric shock. Do not repair or replace any part of the cooktop. ■ Wear Proper Apparel - This cooktop is properly installed and grounded by a qualified technician. ■ Never Use Your Cooktop for cooktop service...
... - Heating elements should be allowed to accumulate on hood or filter. ■ When flaming foods under the hood, turn the fan on Grease Fires - Children climbing on hot surfaces may penetrate the broken cooktop and create a risk of electric shock. Do not repair or replace any part of the cooktop. ■ Wear Proper Apparel - This cooktop is properly installed and grounded by a qualified technician. ■ Never Use Your Cooktop for cooktop service...
Use & Care Guide
Page 4
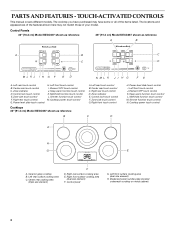
...Power level slide touch control H. Left front touch control I . Melt/hold function touch control M. Zone size touch control G. Power level slide touch control I . Melt/hold function touch control L. Left rear surface cooking area C. Right rear surface cooking area E. Model and serial number plate (located underneath cooktop on metal cabinet) 4 TOUCH-ACTIVATED CONTROLS This manual covers different models. Left rear touch control B. Right rear touch control G. Zone indicator E. Simmer function touch control N. Center rear cooking area (triple size element) F D. Control Panels...
...Power level slide touch control H. Left front touch control I . Melt/hold function touch control M. Zone size touch control G. Power level slide touch control I . Melt/hold function touch control L. Left rear surface cooking area C. Right rear surface cooking area E. Model and serial number plate (located underneath cooktop on metal cabinet) 4 TOUCH-ACTIVATED CONTROLS This manual covers different models. Left rear touch control B. Right rear touch control G. Zone indicator E. Simmer function touch control N. Center rear cooking area (triple size element) F D. Control Panels...

Use & Care Guide
Page 5
... reset the circuit breaker. S: Simmer NOTE: Elements will automatically turn off all cooktop touch controls can result in death or fire. TOUCH-ACTIVATED CONTROLS WARNING Cooktop Controls The current power level and indicator light will flash for each surface cooking area is in the surface cooking area display. Touch Power Level 9 to lock the cooktop using the Control Lock option (see the "Control Lock" section) when cleaning around the controls. To Turn On a Surface Cooking Area: 1. M: Melt F. The heat setting will automatically turn Off. Power level slide...
... reset the circuit breaker. S: Simmer NOTE: Elements will automatically turn off all cooktop touch controls can result in death or fire. TOUCH-ACTIVATED CONTROLS WARNING Cooktop Controls The current power level and indicator light will flash for each surface cooking area is in the surface cooking area display. Touch Power Level 9 to lock the cooktop using the Control Lock option (see the "Control Lock" section) when cleaning around the controls. To Turn On a Surface Cooking Area: 1. M: Melt F. The heat setting will automatically turn Off. Power level slide...
Use & Care Guide
Page 7
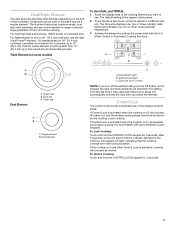
... quantities of the surface cooking areas. Single size can be turned on 36" (91.4 cm) cooktops, use the right Ultra Power™ element. Touch the Zone Size touch control to adjust to cookware size. Triple element light C. To Lock Cooktop: Touch and hold the CONTROL LOCK keypad for 3 seconds. To Unlock Cooktop: Touch and hold the CONTROL LOCK keypad for 3 seconds. 7 For best high heat performance, match burner to a different size pot. Use the center element on pots greater than...
... quantities of the surface cooking areas. Single size can be turned on 36" (91.4 cm) cooktops, use the right Ultra Power™ element. Touch the Zone Size touch control to adjust to cookware size. Triple element light C. To Lock Cooktop: Touch and hold the CONTROL LOCK keypad for 3 seconds. To Unlock Cooktop: Touch and hold the CONTROL LOCK keypad for 3 seconds. 7 For best high heat performance, match burner to a different size pot. Use the center element on pots greater than...
Use & Care Guide
Page 8
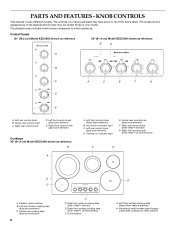
...Control Panels 30" (76.2 cm) Model KECC605 shown as reference 36" (91.4 cm) Model KECC664 shown as reference B A A. Right front control knob (dual-zone element) Cooktops 36" (91.4 cm) Model KECC664 shown as reference B D A B C A C E F G D E A. Left front control knob (Keep Warm element) B. Right rear control knob (Even-Heat™ element) G. Center rear cooking area (dual-zone element) 8 F D. KNOB CONTROLS This manual covers different models. Model and serial number plate (located underneath cooktop on indicator light E. Ceramic glass cooktop B. Right rear control...
...Control Panels 30" (76.2 cm) Model KECC605 shown as reference 36" (91.4 cm) Model KECC664 shown as reference B A A. Right front control knob (dual-zone element) Cooktops 36" (91.4 cm) Model KECC664 shown as reference B D A B C A C E F G D E A. Left front control knob (Keep Warm element) B. Right rear control knob (Even-Heat™ element) G. Center rear cooking area (dual-zone element) 8 F D. KNOB CONTROLS This manual covers different models. Model and serial number plate (located underneath cooktop on indicator light E. Ceramic glass cooktop B. Right rear control...
Use & Care Guide
Page 9
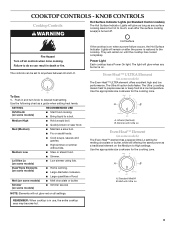
... a traditional element on all controls when done cooking. Simmer (on some models) ■ Simmer sauces NOTE: Elements will not glow red on the Medium to a boil. The light will glow as long as any burner is restored to anywhere between HI and LO. Use the appropriate size cookware for the cooking zone. Melt with Ultra Lo Even-Heat™ Element (on . KNOB CONTROLS Cooktop Controls WARNING Hot Surface Indicator Lights (on some models...
... a traditional element on all controls when done cooking. Simmer (on some models) ■ Simmer sauces NOTE: Elements will not glow red on the Medium to a boil. The light will glow as long as any burner is restored to anywhere between HI and LO. Use the appropriate size cookware for the cooking zone. Melt with Ultra Lo Even-Heat™ Element (on . KNOB CONTROLS Cooktop Controls WARNING Hot Surface Indicator Lights (on some models...
Use & Care Guide
Page 11
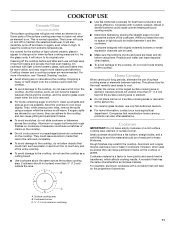
... time. ■ On ceramic glass models, use will cycle on . Aluminum and copper may require more than ½" (1.3 cm) beyond the surface cooking area or element. ■ Do not place canner on a hot surface cooking area, element or surface burner. Cookware material is a factor in cookware. A nonstick finish has the same characteristics as a core or base in how quickly and evenly heat is on the cooktop. Cookware/canner C. ½...
... time. ■ On ceramic glass models, use will cycle on . Aluminum and copper may require more than ½" (1.3 cm) beyond the surface cooking area or element. ■ Do not place canner on a hot surface cooking area, element or surface burner. Cookware material is a factor in cookware. A nonstick finish has the same characteristics as a core or base in how quickly and evenly heat is on the cooktop. Cookware/canner C. ½...
Use & Care Guide
Page 12
... heat for hard water spots. 12 COOKTOP CONTROLS To avoid damage to the cooktop controls, do not use steel wool, abrasive cleansers or oven cleaner. COOKTOP CARE General Cleaning IMPORTANT: Before cleaning, make sure knobs are in direction of aluminum or copper on cleaning products. See "Control Lock" section. It may want to remove. ■ Do not place knobs in dishwasher. Continue rubbing until white film disappears. Metal marks from control panel to wear oven...
... heat for hard water spots. 12 COOKTOP CONTROLS To avoid damage to the cooktop controls, do not use steel wool, abrasive cleansers or oven cleaner. COOKTOP CARE General Cleaning IMPORTANT: Before cleaning, make sure knobs are in direction of aluminum or copper on cleaning products. See "Control Lock" section. It may want to remove. ■ Do not place knobs in dishwasher. Continue rubbing until white film disappears. Metal marks from control panel to wear oven...
Use & Care Guide
Page 13
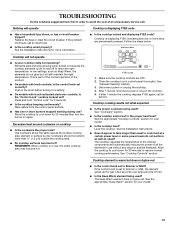
.... REMEMBER: When cooktop is the control knob set to reach the right temperature. See "General Cleaning" section. 3. After 1 minute, reconnect power or plug in use ? See the appropriate "Cooktop Controls" section for 30 minutes then turn the burner on again. Level the cooktop. See the Installation Instructions. ■ Does it appear to take longer than ½" (1.3 cm) outside the cooking area. ■ Do cooktop surfaces become hot. The cooktop regulates the temperature...
.... REMEMBER: When cooktop is the control knob set to reach the right temperature. See "General Cleaning" section. 3. After 1 minute, reconnect power or plug in use ? See the appropriate "Cooktop Controls" section for 30 minutes then turn the burner on again. Level the cooktop. See the Installation Instructions. ■ Does it appear to take longer than ½" (1.3 cm) outside the cooking area. ■ Do cooktop surfaces become hot. The cooktop regulates the temperature...
Use & Care Guide
Page 14
... models) Order Part Number 31463 Cooktop Scraper (ceramic glass models) Order Part Number WA906B affresh® Stainless Steel Cleaner and Polish (stainless steel models) Order Part Number W10355016B affresh® Stainless Steel Cleaning Wipes (stainless steel models) Order Part Number W10355049B ■ Accessory and repair parts sales. ■ Specialized customer assistance (Spanish speaking, hearing impaired, limited vision, etc.). ■ Referrals to order replacement parts, we recommend that you need replacement parts If you use only factory specified parts. affresh® Kitchen...
... models) Order Part Number 31463 Cooktop Scraper (ceramic glass models) Order Part Number WA906B affresh® Stainless Steel Cleaner and Polish (stainless steel models) Order Part Number W10355016B affresh® Stainless Steel Cleaning Wipes (stainless steel models) Order Part Number W10355049B ■ Accessory and repair parts sales. ■ Specialized customer assistance (Spanish speaking, hearing impaired, limited vision, etc.). ■ Referrals to order replacement parts, we recommend that you need replacement parts If you use only factory specified parts. affresh® Kitchen...
Use & Care Guide
Page 15
... is used in the country in materials or workmanship. Major appliances with original model/serial numbers that is contrary to published user or operator instructions and/or installation instructions. 4. This warranty is void if the factory applied serial number has been altered or removed from your major appliance, to replace or repair house fuses, or to correct house wiring or plumbing. 2. In Canada, call 1-800-422-1230. Service...
... is used in the country in materials or workmanship. Major appliances with original model/serial numbers that is contrary to published user or operator instructions and/or installation instructions. 4. This warranty is void if the factory applied serial number has been altered or removed from your major appliance, to replace or repair house fuses, or to correct house wiring or plumbing. 2. In Canada, call 1-800-422-1230. Service...
Dimension Guide
Page 1
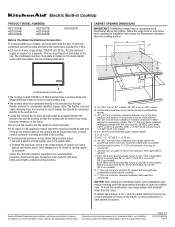
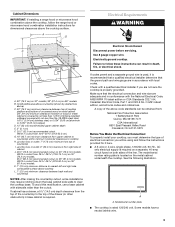
The model/serial number rating plate is already provided at the junction box). CABINET OPENING DIMENSIONS IMPORTANT: If installing a range hood or microwave hood combination above cooktop L. 1" (2.5 cm) minimum clearance between back wall and countertop NOTES: After making the countertop cutout, some installations may require notching down the base cabinet side walls to aluminum. Model W5CE3024 does not have a neutral (white) wire. q A UL listed or CSA approved conduit connector must be provided at each end of the power supply cable...
The model/serial number rating plate is already provided at the junction box). CABINET OPENING DIMENSIONS IMPORTANT: If installing a range hood or microwave hood combination above cooktop L. 1" (2.5 cm) minimum clearance between back wall and countertop NOTES: After making the countertop cutout, some installations may require notching down the base cabinet side walls to aluminum. Model W5CE3024 does not have a neutral (white) wire. q A UL listed or CSA approved conduit connector must be provided at each end of the power supply cable...

Installation Guide
Page 1
... in this manual and on your appliance. All safety messages will follow instructions. This is , tell you how to reduce the chance of others . ELECTRIC COOKTOP INSTALLATION INSTRUCTIONS INSTRUCTIONS D'INSTALLATION DE LA TABLE DE CUISSON ÉLECTRIQUE Table of Contents / Table des matières COOKTOP SAFETY 1 SÉCURITÉ DE LA TABLE DE CUISSON 9 INSTALLATION REQUIREMENTS 2 Tools and Parts 2 Location Requirements 2 Electrical Requirements 3 EXIGENCES D'INSTALLATION 9 Outils...
... in this manual and on your appliance. All safety messages will follow instructions. This is , tell you how to reduce the chance of others . ELECTRIC COOKTOP INSTALLATION INSTRUCTIONS INSTRUCTIONS D'INSTALLATION DE LA TABLE DE CUISSON ÉLECTRIQUE Table of Contents / Table des matières COOKTOP SAFETY 1 SÉCURITÉ DE LA TABLE DE CUISSON 9 INSTALLATION REQUIREMENTS 2 Tools and Parts 2 Location Requirements 2 Electrical Requirements 3 EXIGENCES D'INSTALLATION 9 Outils...

Installation Guide
Page 2
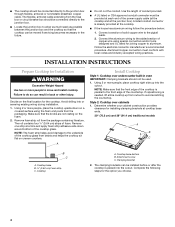
... all electrical connections be installed in oven. Check the cooktop base for ½" (1.3 cm) diameter conduit ■ UL listed wire connectors Check local codes. Glass depth - Read and follow the instructions provided with your cooktop is approved. When installing cooktop, use in undercounter use and proper cutout dimensions. ■ The cooktop should be a specified cooktop that is to be provided, the risk can be reduced by installing a range hood that projects horizontally a minimum of...
... all electrical connections be installed in oven. Check the cooktop base for ½" (1.3 cm) diameter conduit ■ UL listed wire connectors Check local codes. Glass depth - Read and follow the instructions provided with your cooktop is approved. When installing cooktop, use in undercounter use and proper cutout dimensions. ■ The cooktop should be a specified cooktop that is to be provided, the risk can be reduced by installing a range hood that projects horizontally a minimum of...
Installation Guide
Page 3
... countertop within minimum horizontal clearances to follow the range hood or microwave hood combination installation instructions for it is covered by dashed box above) C. 30" (76.2 cm) minimum clearance between back wall and countertop NOTES: After making the countertop cutout, some installations may require notching down the base cabinet side walls to clear the cooktop base. The model/serial number rating plate is rated 120/240 volt. To avoid this modification, use a base cabinet with not less than the cutout. Electrically ground cooktop. Junction box...
... countertop within minimum horizontal clearances to follow the range hood or microwave hood combination installation instructions for it is covered by dashed box above) C. 30" (76.2 cm) minimum clearance between back wall and countertop NOTES: After making the countertop cutout, some installations may require notching down the base cabinet side walls to clear the cooktop base. The model/serial number rating plate is rated 120/240 volt. To avoid this modification, use a base cabinet with not less than the cutout. Electrically ground cooktop. Junction box...
Installation Guide
Page 4
Connect a section of the cooktop glass from debris and helps the cooktop sit flat on the final location for the option you choose. 4 Decide on uneven counters. Remove foam strip roll from cutout to the pigtail leads. 2. Determine whether your cabinet construction provides clearance for installing clamping brackets at the cooktop. ■ If the house has aluminum wiring follow the procedure below: 1. Cooktop base bottom B. INSTALLATION INSTRUCTIONS Prepare Cooktop for joining copper...
Connect a section of the cooktop glass from debris and helps the cooktop sit flat on the final location for the option you choose. 4 Decide on uneven counters. Remove foam strip roll from cutout to the pigtail leads. 2. Determine whether your cabinet construction provides clearance for installing clamping brackets at the cooktop. ■ If the house has aluminum wiring follow the procedure below: 1. Cooktop base bottom B. INSTALLATION INSTRUCTIONS Prepare Cooktop for joining copper...

Installation Guide
Page 5
... selected bracket locations from cutout to hold brackets in place when cooktop is needed , lift entire cooktop up into the cutout. If repositioning is placed in Cutout 1. F A E C D C B A A. Bracket clamping hole E. Tighten attachment screws enough to avoid scratching the countertop. 2. Securely tighten screws. 5 Using 2 or more people, place the cooktop upside down on the foam. 2. Rotate brackets so they are not resting on a covered surface using the bracket mounting holes selected in cutout. Using...
... selected bracket locations from cutout to hold brackets in place when cooktop is needed , lift entire cooktop up into the cutout. If repositioning is placed in Cutout 1. F A E C D C B A A. Bracket clamping hole E. Tighten attachment screws enough to avoid scratching the countertop. 2. Securely tighten screws. 5 Using 2 or more people, place the cooktop upside down on the foam. 2. Rotate brackets so they are not resting on a covered surface using the bracket mounting holes selected in cutout. Using...

Installation Guide
Page 6
...black wires together using the UL listed wire connectors. 8. Black wires C. Connect the green or bare ground wire from the cooktop to 3-Wire Cable from power supply B. Install junction box cover. 10. Use 8 gauge copper wire. Electrically ground cooktop. Connect the cooktop cable to 4-Wire Cable from Cooktop Electrical Shock Hazard Disconnect power before servicing. UL listed wire connector H. Reconnect power. 3-wire direct 3¹⁄₂" (8.9 cm) A fused disconnect or circuit breaker box 3-Wire Cable from Power Supply to the junction box using a UL listed...
...black wires together using the UL listed wire connectors. 8. Black wires C. Connect the green or bare ground wire from the cooktop to 3-Wire Cable from power supply B. Install junction box cover. 10. Use 8 gauge copper wire. Electrically ground cooktop. Connect the cooktop cable to 4-Wire Cable from Cooktop Electrical Shock Hazard Disconnect power before servicing. UL listed wire connector H. Reconnect power. 3-wire direct 3¹⁄₂" (8.9 cm) A fused disconnect or circuit breaker box 3-Wire Cable from Power Supply to the junction box using a UL listed...

Installation Guide
Page 8
... Countertop NOTE: This section applies only if you are now installed. Read the "Cooktop Use" section in the Use and Care Guide for further information. 3-Wire Cable from Power Supply to 3-Wire Cable from Cooktop IMPORTANT: Use the 3-wire cable from power supply where local codes permit connecting the frame-ground conductor to the neutral (white) junction box wire: A E B F G Attach Cooktop to clean cooktop before use. Remove junction box cover, if present. 3. Foam seal 1. Use a screwdriver to see the "Cooktop Care...
... Countertop NOTE: This section applies only if you are now installed. Read the "Cooktop Use" section in the Use and Care Guide for further information. 3-Wire Cable from Power Supply to 3-Wire Cable from Cooktop IMPORTANT: Use the 3-wire cable from power supply where local codes permit connecting the frame-ground conductor to the neutral (white) junction box wire: A E B F G Attach Cooktop to clean cooktop before use. Remove junction box cover, if present. 3. Foam seal 1. Use a screwdriver to see the "Cooktop Care...


