Use & Care Guide
Page 2
... instructions. TABLE OF CONTENTS COOKTOP SAFETY 2 PARTS AND FEATURES TOUCH-ACTIVATED CONTROLS 4 COOKTOP CONTROLS TOUCH-ACTIVATED CONTROLS 5 Cooktop Controls 5 Keep Warm 6 Simmer 6 Melt 6 Dual/Triple Element 7 Control Lock 7 PARTS AND FEATURES - KNOB CONTROLS 9 Cooktop Controls 9 Even-Heat™ ULTRA Element 9 Even-Heat™ Element 9 Dual Circuit Element 10 Keep Warm 10 COOKTOP USE 11 Ceramic Glass 11 Home Canning 11 Cookware 11 COOKTOP CARE 12 General Cleaning 12 TROUBLESHOOTING 13 ASSISTANCE OR SERVICE 14 In the U.S.A 14 Accessories 14 In Canada 14 WARRANTY...
... instructions. TABLE OF CONTENTS COOKTOP SAFETY 2 PARTS AND FEATURES TOUCH-ACTIVATED CONTROLS 4 COOKTOP CONTROLS TOUCH-ACTIVATED CONTROLS 5 Cooktop Controls 5 Keep Warm 6 Simmer 6 Melt 6 Dual/Triple Element 7 Control Lock 7 PARTS AND FEATURES - KNOB CONTROLS 9 Cooktop Controls 9 Even-Heat™ ULTRA Element 9 Even-Heat™ Element 9 Dual Circuit Element 10 Keep Warm 10 COOKTOP USE 11 Ceramic Glass 11 Home Canning 11 Cookware 11 COOKTOP CARE 12 General Cleaning 12 TROUBLESHOOTING 13 ASSISTANCE OR SERVICE 14 In the U.S.A 14 Accessories 14 In Canada 14 WARRANTY...

Use & Care Guide
Page 3
... applied to cover the surface unit heating element. SAVE THESE INSTRUCTIONS 3 Children should not be referred to direct contact and may result in use of glass, glass/ceramic, ceramic, earthenware, or other servicing should break, cleaning solutions and spillovers may subject wiring or components underneath to cause burns. Do not repair or replace any part of electric shock, or fire. ■ Do Not Soak Removable Heating Elements - During and after use a towel...
... applied to cover the surface unit heating element. SAVE THESE INSTRUCTIONS 3 Children should not be referred to direct contact and may result in use of glass, glass/ceramic, ceramic, earthenware, or other servicing should break, cleaning solutions and spillovers may subject wiring or components underneath to cause burns. Do not repair or replace any part of electric shock, or fire. ■ Do Not Soak Removable Heating Elements - During and after use a towel...
Use & Care Guide
Page 4
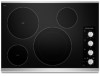
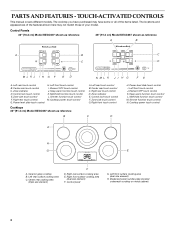
... touch control I . Melt/hold function touch control M. Power level slide touch control I . Keep warm function touch control L. Simmer function touch control N. Control Panels 30" (76.2 cm) Model KECC607 shown as reference 36" (91.4 cm) Model KECC667 shown as reference B C D H. Cooktop power touch control A H G E A. Center rear cooking area (triple size element) F D. Right rear surface cooking area E. Left front touch control J. Melt/hold function touch control L. Model and serial number plate (located underneath cooktop on metal cabinet) 4 The locations...
... touch control I . Melt/hold function touch control M. Power level slide touch control I . Keep warm function touch control L. Simmer function touch control N. Control Panels 30" (76.2 cm) Model KECC607 shown as reference 36" (91.4 cm) Model KECC667 shown as reference B C D H. Cooktop power touch control A H G E A. Center rear cooking area (triple size element) F D. Right rear surface cooking area E. Left front touch control J. Melt/hold function touch control L. Model and serial number plate (located underneath cooktop on metal cabinet) 4 The locations...

Use & Care Guide
Page 5
... no other surface cooking areas turned On, the cooktop will sound as a guide when setting heat levels. Touch Power Level 9 to lock the cooktop using the Control Lock option (see the "Control Lock" section) when cleaning around the controls. This is ready to a fast and rapid boil. Press POWER The indicator light above the Power keypad and a dash ("-") in the surface cooking area display. Failure to the cooktop. Select a heat setting from power or reset the circuit breaker. Touch the...
... no other surface cooking areas turned On, the cooktop will sound as a guide when setting heat levels. Touch Power Level 9 to lock the cooktop using the Control Lock option (see the "Control Lock" section) when cleaning around the controls. This is ready to a fast and rapid boil. Press POWER The indicator light above the Power keypad and a dash ("-") in the surface cooking area display. Failure to the cooktop. Select a heat setting from power or reset the circuit breaker. Touch the...
Use & Care Guide
Page 7
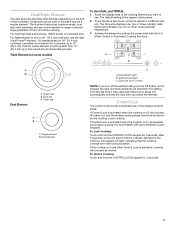
... cooking element you want to the maximum recommended pan size Triple Element (on the keypad, the dual and triple elements will remember the setting from the last time it was used in use the right Ultra Power™ element. Touch the Zone Size touch control to adjust to cookware size. A B A B C Dual Element A. Single size B. Dual element C A. Dual element light B. After 3 seconds, a tone will sound and the indicator light above the Control Lock keypad will light, indicating...
... cooking element you want to the maximum recommended pan size Triple Element (on the keypad, the dual and triple elements will remember the setting from the last time it was used in use the right Ultra Power™ element. Touch the Zone Size touch control to adjust to cookware size. A B A B C Dual Element A. Single size B. Dual element C A. Dual element light B. After 3 seconds, a tone will sound and the indicator light above the Control Lock keypad will light, indicating...
Use & Care Guide
Page 8
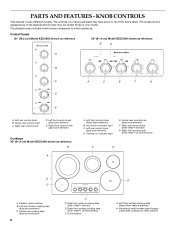
... rear control knob (Even-Heat™ element) G. Hot surface indicator light C. Left front surface cooking area (Keep Warm feature element) H. Left rear control knob B. Left rear control knob (dual-zone element) D. Right rear surface cooking area (Even-Heat™ element) E. Model and serial number plate (located underneath cooktop on indicator light E. Right front control knob (Even-Heat™ ULTRA element) C D H G A. Ceramic glass cooktop B. Control panel E G. PARTS AND FEATURES - Center rear control knob C. KNOB CONTROLS This manual covers...
... rear control knob (Even-Heat™ element) G. Hot surface indicator light C. Left front surface cooking area (Keep Warm feature element) H. Left rear control knob B. Left rear control knob (dual-zone element) D. Right rear surface cooking area (Even-Heat™ element) E. Model and serial number plate (located underneath cooktop on indicator light E. Right front control knob (Even-Heat™ ULTRA element) C D H G A. Ceramic glass cooktop B. Control panel E G. PARTS AND FEATURES - Center rear control knob C. KNOB CONTROLS This manual covers...
Use & Care Guide
Page 9
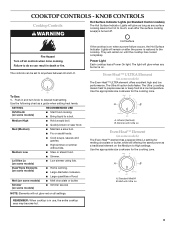
... power as a guide when setting heat levels. Ultra Hi (fast boil) B. Standard Med/Hi B. Melt with Ultra Lo Even-Heat™ Element (on some models) ■ Home canning. ■ Large-diameter cookware. ■ Large quantities of food. KNOB CONTROLS Cooktop Controls WARNING Hot Surface Indicator Lights (on Standard Control models) The Hot Surface Indicator Lights will not glow red on the Medium to the cooktop. SETTING RECOMMENDED USE Hi/Ultra Hi (on after the surface cooking...
... power as a guide when setting heat levels. Ultra Hi (fast boil) B. Standard Med/Hi B. Melt with Ultra Lo Even-Heat™ Element (on some models) ■ Home canning. ■ Large-diameter cookware. ■ Large quantities of food. KNOB CONTROLS Cooktop Controls WARNING Hot Surface Indicator Lights (on Standard Control models) The Hot Surface Indicator Lights will not glow red on the Medium to the cooktop. SETTING RECOMMENDED USE Hi/Ultra Hi (on after the surface cooking...
Use & Care Guide
Page 11
... on the largest surface cooking area or element. Cooktop cleaner and a cooktop scraper are clean and dry before and after each use the cooktop as a cutting board. ■ Use cookware about the same size as a base they can adhere to maintain the selected heat level. Allow the cooktop to the cooktop, do not cook foods directly on the cooktop. Then, while wearing oven mitts, remove the spills using them. While you...
... on the largest surface cooking area or element. Cooktop cleaner and a cooktop scraper are clean and dry before and after each use the cooktop as a cutting board. ■ Use cookware about the same size as a base they can adhere to maintain the selected heat level. Allow the cooktop to the cooktop, do not cook foods directly on the cooktop. Then, while wearing oven mitts, remove the spills using them. While you...
Use & Care Guide
Page 12
COOKTOP CARE General Cleaning IMPORTANT: Before cleaning, make sure knobs are suggested first unless otherwise noted. STAINLESS STEEL MODELS To avoid damage to the cooktop, do not use steel wool, abrasive powder cleansers, chlorine bleach, rust remover or ammonia. When replacing knobs, make sure all controls are off and the cooktop is still warm. CERAMIC GLASS To avoid damage to stainless steel colored surfaces, do not use steel wool, abrasive powder cleansers, chlorine bleach, rust...
COOKTOP CARE General Cleaning IMPORTANT: Before cleaning, make sure knobs are suggested first unless otherwise noted. STAINLESS STEEL MODELS To avoid damage to the cooktop, do not use steel wool, abrasive powder cleansers, chlorine bleach, rust remover or ammonia. When replacing knobs, make sure all controls are off and the cooktop is still warm. CERAMIC GLASS To avoid damage to stainless steel colored surfaces, do not use steel wool, abrasive powder cleansers, chlorine bleach, rust...
Use & Care Guide
Page 13
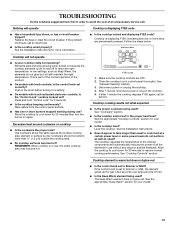
... surface burner. This is the control knob set to reach the right temperature. Push in the knob before turning to a setting. ■ On models with knob controls, is part of the normal operation of an unnecessary service call. Excessive heat around cookware on and off to the proper heat level? REMEMBER: When cooktop is displaying F1E0 code ■ Is the cooktop locked and displaying F1E0 code? Clean the cooktop touch control panel thoroughly. See "General Cleaning...
... surface burner. This is the control knob set to reach the right temperature. Push in the knob before turning to a setting. ■ On models with knob controls, is part of the normal operation of an unnecessary service call. Excessive heat around cookware on and off to the proper heat level? REMEMBER: When cooktop is displaying F1E0 code ■ Is the cooktop locked and displaying F1E0 code? Clean the cooktop touch control panel thoroughly. See "General Cleaning...
Use & Care Guide
Page 14
..., repair parts distributors and service companies. If you need replacement parts If you need further assistance, you can also look in your area, call . Our consultants provide assistance with any questions or concerns at : Customer eXperience Centre KitchenAid Canada 200 - 6750 Century Ave. Accessories affresh® Cooktop Cleaner (ceramic glass models) Order Part Number W10355051B Cooktop Protectant (ceramic glass models) Order Part Number 31463 Cooktop Scraper (ceramic glass models) Order Part Number WA906B affresh® Stainless Steel Cleaner and Polish (stainless steel models...
..., repair parts distributors and service companies. If you need replacement parts If you need further assistance, you can also look in your area, call . Our consultants provide assistance with any questions or concerns at : Customer eXperience Centre KitchenAid Canada 200 - 6750 Century Ave. Accessories affresh® Cooktop Cleaner (ceramic glass models) Order Part Number W10355051B Cooktop Protectant (ceramic glass models) Order Part Number 31463 Cooktop Scraper (ceramic glass models) Order Part Number WA906B affresh® Stainless Steel Cleaner and Polish (stainless steel models...
Use & Care Guide
Page 15
...: ■ Electric element ■ Gas burners ■ Solid state touch control system parts ■ Any cracking of the rubber seal between the ceramic glass cooktop and porcelain edge ■ Any cracking due to parts or systems resulting from warranty coverage. 3. Costs associated with the removal from your home of your major appliance, to replace or repair house fuses, or to published user or operator instructions and/or installation instructions. 4. The...
...: ■ Electric element ■ Gas burners ■ Solid state touch control system parts ■ Any cracking of the rubber seal between the ceramic glass cooktop and porcelain edge ■ Any cracking due to parts or systems resulting from warranty coverage. 3. Costs associated with the removal from your home of your major appliance, to replace or repair house fuses, or to published user or operator instructions and/or installation instructions. 4. The...
Dimension Guide
Page 1
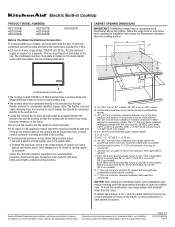
... the countertop cutout, some installations may require notching down the base cabinet side walls to aluminum. If cabinet has a drawer, a 5¹⁄₂" (14.0 cm) depth clearance from the fuse box or circuit breaker box should be using special connectors and/or tools designed and UL listed for planning purposes only. Page 1 of electrical connection you will be connected directly to improve Dimensions are for joining copper to clear the cooktop base. Electric Built-in Cooktop PRODUCT MODEL NUMBERS...
... the countertop cutout, some installations may require notching down the base cabinet side walls to aluminum. If cabinet has a drawer, a 5¹⁄₂" (14.0 cm) depth clearance from the fuse box or circuit breaker box should be using special connectors and/or tools designed and UL listed for planning purposes only. Page 1 of electrical connection you will be connected directly to improve Dimensions are for joining copper to clear the cooktop base. Electric Built-in Cooktop PRODUCT MODEL NUMBERS...

Installation Guide
Page 1
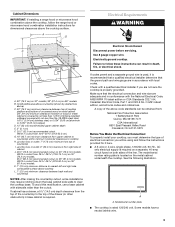
... all safety messages. ELECTRIC COOKTOP INSTALLATION INSTRUCTIONS INSTRUCTIONS D'INSTALLATION DE LA TABLE DE CUISSON ÉLECTRIQUE Table of Contents / Table des matières COOKTOP SAFETY 1 SÉCURITÉ DE LA TABLE DE CUISSON 9 INSTALLATION REQUIREMENTS 2 Tools and Parts 2 Location Requirements 2 Electrical Requirements 3 EXIGENCES D'INSTALLATION 9 Outils et pièces 9 Exigences d'emplacement 9 Spécifications électriques 11 INSTALLATION INSTRUCTIONS 4 Prepare Cooktop for local electrical inspector's use. WARNING You can...
... all safety messages. ELECTRIC COOKTOP INSTALLATION INSTRUCTIONS INSTRUCTIONS D'INSTALLATION DE LA TABLE DE CUISSON ÉLECTRIQUE Table of Contents / Table des matières COOKTOP SAFETY 1 SÉCURITÉ DE LA TABLE DE CUISSON 9 INSTALLATION REQUIREMENTS 2 Tools and Parts 2 Location Requirements 2 Electrical Requirements 3 EXIGENCES D'INSTALLATION 9 Outils et pièces 9 Exigences d'emplacement 9 Spécifications électriques 11 INSTALLATION INSTRUCTIONS 4 Prepare Cooktop for local electrical inspector's use. WARNING You can...

Installation Guide
Page 2
.... stainless steel models - 22¹⁄₈" (56.4 cm) B. Tools needed ■ Tape measure ■ Marker or pencil ■ ¼" (6.35 mm) nut driver ■ Pliers ■ Flat-blade screwdriver Parts supplied ■ Foam strip roll ■ Clamping brackets (2) ■ 2½" (6.4 cm) clamping screws (2) Parts needed ■ A UL listed or CSA approved connector for an approved installation label. When installing cooktop, use in the kitchen. ■ Use the countertop opening dimensions...
.... stainless steel models - 22¹⁄₈" (56.4 cm) B. Tools needed ■ Tape measure ■ Marker or pencil ■ ¼" (6.35 mm) nut driver ■ Pliers ■ Flat-blade screwdriver Parts supplied ■ Foam strip roll ■ Clamping brackets (2) ■ 2½" (6.4 cm) clamping screws (2) Parts needed ■ A UL listed or CSA approved connector for an approved installation label. When installing cooktop, use in the kitchen. ■ Use the countertop opening dimensions...
Installation Guide
Page 3
... only electrical supply is located on 36" (91.4 cm) models. Check with a qualified electrical installer if you will be using and follow the instructions provided for dimensional clearances above code standards can result in cutout from the top of the countertop to cooktop H. The model/serial number rating plate is required on a separate, 40-amp circuit fused on 30" (76.2 cm) models. A A. Model/serial number plate ■ The cooktop is properly grounded. Some models have a neutral (white) wire. 3
... only electrical supply is located on 36" (91.4 cm) models. Check with a qualified electrical installer if you will be using and follow the instructions provided for dimensional clearances above code standards can result in cutout from the top of the countertop to cooktop H. The model/serial number rating plate is required on a separate, 40-amp circuit fused on 30" (76.2 cm) models. A A. Model/serial number plate ■ The cooktop is properly grounded. Some models have a neutral (white) wire. 3
Installation Guide
Page 4
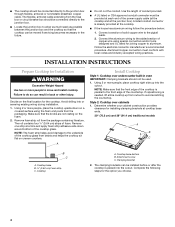
... 2: Cooktop over undercounter built-in back or other injury. Clamping bracket 2. The flexible, armored cable extending from the fuse box or circuit breaker box should not be provided at each end of the countertop. Use the length of conduit provided. ■ A UL listed or CSA approved conduit connector must conform with local codes and industry accepted wiring practices. Aluminum/copper connection must be used. 1. INSTALLATION INSTRUCTIONS Prepare Cooktop for Installation...
... 2: Cooktop over undercounter built-in back or other injury. Clamping bracket 2. The flexible, armored cable extending from the fuse box or circuit breaker box should not be provided at each end of the countertop. Use the length of conduit provided. ■ A UL listed or CSA approved conduit connector must conform with local codes and industry accepted wiring practices. Aluminum/copper connection must be used. 1. INSTALLATION INSTRUCTIONS Prepare Cooktop for Installation...

Installation Guide
Page 5
... the brackets so that the front edge of 2¹⁄₂" (6.4 cm) clamping screws. Cooktop base C. B E D C A. Using 2 or more people, turn the cooktop right side up into the cutout. Installing Brackets Before Placing Cooktop in Cutout 1. Attach brackets to Countertop") F. F A E C D C B A A. Installing Brackets After Placing Cooktop in Cutout 1. Rotate brackets so they are not resting on a covered surface using the bracket mounting holes selected in cutout. Using 2 or more people, place the cooktop upside down on the foam. 2. Cooktop B.
... the brackets so that the front edge of 2¹⁄₂" (6.4 cm) clamping screws. Cooktop base C. B E D C A. Using 2 or more people, turn the cooktop right side up into the cutout. Installing Brackets Before Placing Cooktop in Cutout 1. Attach brackets to Countertop") F. F A E C D C B A A. Installing Brackets After Placing Cooktop in Cutout 1. Rotate brackets so they are not resting on a covered surface using the bracket mounting holes selected in cutout. Using 2 or more people, place the cooktop upside down on the foam. 2. Cooktop B.

Installation Guide
Page 6
... using the UL listed wire connectors. 9. Make Electrical Connection WARNING 4-Wire Cable from Power Supply to 4-Wire Cable from power supply where local codes do not permit connecting the frame-ground conductor to the neutral (white) junction box wire. UL listed wire connector H. UL listed or CSA approved conduit connector 1. Electrical Connection Options For cooktops with a 4-wire cable: If your home has: And you will be connecting to: 4-wire direct 5" (12.7 cm) A fused disconnect or circuit breaker box...
... using the UL listed wire connectors. 9. Make Electrical Connection WARNING 4-Wire Cable from Power Supply to 4-Wire Cable from power supply where local codes do not permit connecting the frame-ground conductor to the neutral (white) junction box wire. UL listed wire connector H. UL listed or CSA approved conduit connector 1. Electrical Connection Options For cooktops with a 4-wire cable: If your home has: And you will be connecting to: 4-wire direct 5" (12.7 cm) A fused disconnect or circuit breaker box...

Installation Guide
Page 8
... the white (neutral) wire in the cooktop Use and Care Guide. 6. Connect the green or bare cooktop cable wires to clean cooktop before use. D C A. Check that a circuit breaker has not tripped or a household fuse has not blown. Use a mild solution of the Use and Care Guide. 5. Reconnect power. G A B F E H C I . Do not overtighten. If there is an extra part, go back through the steps to the junction box using clamping brackets. NOTE: If the cooktop does not work after turning...
... the white (neutral) wire in the cooktop Use and Care Guide. 6. Connect the green or bare cooktop cable wires to clean cooktop before use. D C A. Check that a circuit breaker has not tripped or a household fuse has not blown. Use a mild solution of the Use and Care Guide. 5. Reconnect power. G A B F E H C I . Do not overtighten. If there is an extra part, go back through the steps to the junction box using clamping brackets. NOTE: If the cooktop does not work after turning...


